Amazon Web Services is a beast. It offers so many different cloud services that my natural reaction was to be intimidated. But not for long! I intend to tame that beast one blog post at a time until I have a production-grade, continuously deployable system!
We’ll start this series by creating a small win to boost our motivation: we’ll deploy a Docker image using the AWS Management Console. In a real-world scenario with multiple images and a more complex setup, we’d want to automate deployments using scripts and the AWS command-line interface. But using the web-based Management Console is a good way to get our bearings.
Check Out the Book!
This article gives only a first impression of what you can do with Docker and AWS.
If you want to go deeper and learn how to deploy a Spring Boot application to the AWS cloud and how to connect it to cloud services like RDS, Cognito, and SQS, make sure to check out the book Stratospheric - From Zero to Production with Spring Boot and AWS!
Example Code
This article is accompanied by a working code example on GitHub.Prerequisites
Before we start, there are some things to set up to get this tutorial going smoothly.
Optionally, if you want to create your own Docker image, you need to have an account at hub.docker.com. Once logged in, you need to create a repository. You can give it any name you want, but aws-hello-world is a good candidate. We’ll later use this repository to publish our Docker image so that AWS can load it from there.
You can also use a different Docker registry (Amazon ECR, Artifactory, Docker’s own Registry, or any of a list of other products), but we’ll use the public Docker Hub in this tutorial.
Second, you’ll need an AWS account. Go to aws.amazon.com/console/ and sign up.
Note that, as of yet, I find Amazon’s pricing for its cloud services very intransparent. I can’t guarantee that this tutorial won’t incur costs for your AWS account, but it hasn’t for me (Update: after the month ended, I actually got a bill over $0.36 for playing around with AWS to write this article).
Finally, if you want to create and publish your own Docker image, you need to have Docker installed.
Preparing a Docker Image
Let’s start with creating and publishing a Docker image that we can then deploy to AWS. If you want to skip this part, you can just use the Docker image reflectoring/aws-hello-world:latest, which is available here, and move on to the next chapter.
Creating the Docker Image
For this tutorial, we’ll create a simple Docker image from a Hello World application I created. You can pull it from GitHub to build the Docker image yourself.
The example application is a simple Hello World application that prints “Hello World” when you open the “/hello” endpoint in a browser.
To build a Docker image, the application has a Dockerfile:
FROM openjdk:8-jdk-alpine
ARG JAR_FILE=build/libs/*.jar
COPY ${JAR_FILE} app.jar
ENTRYPOINT ["java","-jar","/app.jar"]
EXPOSE 8080
This is a Docker file wrapping our Spring Boot application. It starts with an OpenJDK on top of a Linux alpine distribution and takes the path to a JAR file as an argument. It then copies this JAR file into app.jar within its own filesystem and runs java -jar app.jar to start the application. Finally, we’re telling Docker that the application exposes port 8080, which is for documentation purposes more than for real effect.
Next, we have to build the Java application with ./gradlew clean build. This will create the file build/libs/aws-hello-world-0.0.1-SNAPSHOT.jar, which Docker picks up by default because we specified build/libs/*.jar as the default value for the JAR_FILE argument in our Docker file.
Now, we can build the Docker image. From the folder containing the Dockerfile, we run:
docker build -t reflectoring/aws-hello-world:latest .
To check if everything worked out, we can run
docker images | grep aws-hello-world
which will display all Docker images available locally that contain aws-hello-world in their name.
Testing the Docker Image
Let’s check if the Docker image we just built actually works. We start the image up with docker run:
docker run -p 8081:8080 reflectoring/aws-hello-world:latest
With -p we define that whatever is available on port 8080 within the container, Docker will make available via the port 8081 on the host computer. In other words, requests to port 8081 on the host computer (the host port) will be forwarded to port 8080 within the container (the container port).
Without specifying these ports, Docker won’t expose a port on which we can access the application.
When the Docker container has successfully started up, we should see log output similar to this:
... Tomcat started on port(s) 8080 (http) with context path ''
... Started AwsHelloWorldApplication in 3.222 seconds ...
Once we see this output, we can type http://localhost:8081/hello into a browser and should be rewarded with a “Hello World” message.
Publishing the Docker Image
To deploy a Docker image to AWS, it needs to be available in a Docker registry so that AWS can download it from there. So, let’s publish our image.
We can choose to publish our Docker image in any Docker registry we want, even our own, as long as AWS can reach it from the internet. We’ll publish it to Docker Hub, which is Docker’s official registry.
For business-critical applications that we don’t want to share with the world, we should have our own private Docker registry, but for this tutorial, we’ll just share the Docker image publicly.
First, we need to log in with Docker:
docker login registry-1.docker.io
We’re prompted to enter the credentials to our Docker Hub account.
We can leave out the registry-1.docker.io part because Docker will use this as a default. If we want to publish to a different registry, we need to replace this address.
Next, we push the Docker image to the registry:
docker push reflectoring/aws-hello-world:latest
Requested Access to the Resource is Denied?
If you get errors like denied: requested access to the resource is denied when pushing to Docker Hub this means that you don't have permission to the account you want to publish the image under. Make sure that the account name (the name before the "/") is correct and that it's either your account name or the name of an organization that you have access to.
AWS Concepts
So, we’ve got a Docker image ready to be deployed to AWS. Before we start working with AWS, let’s learn some high-level AWS vocabulary that we’ll need.
ECS - Elastic Container Service
ECS is the “entry point” service that allows us to run Docker containers on AWS infrastructure. Under the hood, it uses a bunch of other AWS services to get things done.
Task
A task is AWS domain language for a wrapper around one or more Docker containers. A task instance is what AWS considers an instance of our application.
Service
A service wraps a task and provides security rules to control access and potentially load balancing rules to balance traffic across multiple task instances.
Cluster
A cluster provides a network and scaling rules for the tasks of a service.
Deploying a Docker Image Using the Management Console
We’ll configure a task, service, and cluster using the “Get Started” wizard provided in the web-based management console. This wizard is very convenient to use, but it’s very limited in its feature set. We don’t have all the configuration options available.
Also, by definition, deploying containers via the web-based wizard is a manual process and cannot be automated. In real-world scenarios, we want to automate deployments and will need to use the AWS CLI.
If you want to follow along, open the ECS start page in your browser and click on the “Get started” button. It should take no more than a couple minutes to get a container up and running!
Configuring the Container
First, we configure the Docker container:
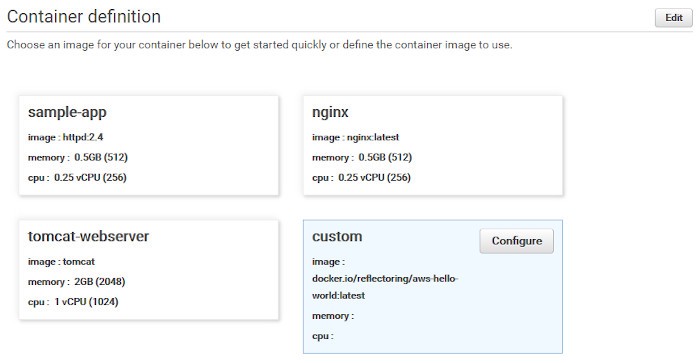
We can select a pre-defined Docker image or choose our own. We want to use the Docker image we published previously, so we’ll click on the “Configure” button in the “custom” box to open the “Edit container” form and will be prompted to enter a bunch of information:
- Container name: An arbitrary name for the container.
- image: images/stock/ The URL to the Docker image. If you have published your image in a Docker registry different from Docker Hub, check with that registry what the URL to your image looks like. We’ll use the URL
docker.io/reflectoring/aws-hello-world:latest, pointing to the Docker image we prepared above.-1200x628-branded.jpg - Private repository authentication: if the Docker image is private, we need to provide authentication credentials here. We’ll skip this, as our image is public.
- Memory Limits: We’ll leave the default (i.e. no memory limits). This should definitely be thought out and set in a production deployment, though!
- Port mappings: Here we can define the container port, i.e. the port that our application exposes. The Spring Boot application in the
aws-hello-worldDocker image exposes port 8080, so we have to put this port here. The container port doubles as the host port and I have found no way of changing that using the web wizard. This means that we’ll have to add:8080to the URL when we want to access our application later.
In the “Advanced container configuration”`" section, we could configure more, but we’ll leave everything else in the default configuration for now.
Configuring the Task
Next, we configure the task, which wraps our Docker image: images/stock/-1200x628-branded.jpg

We leave everything in the default setting except the name, so we can find the task later.
Configuring the Service
Next, the wizard takes us to a screen configuring the service that’s going to wraps the task we just configured:
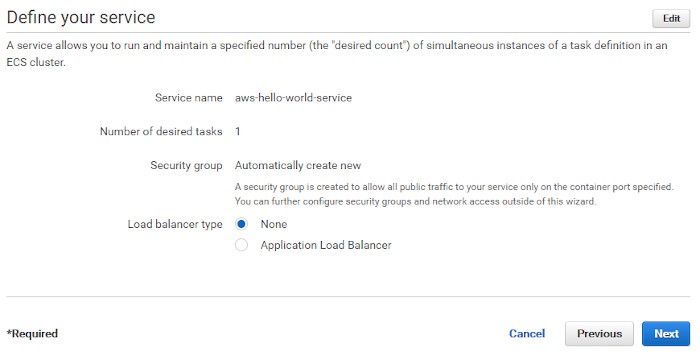
Again, we just change the name and leave everything in the default setting.
Configuring the Cluster
We do the same with the cluster configuration:
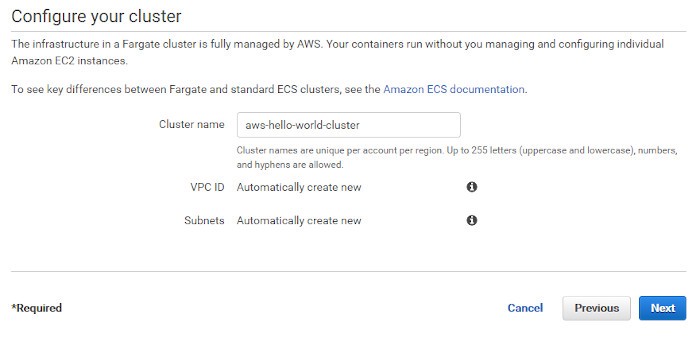
Change the name, leave the rest on default, hit “Next”.
Testing the Service
After checking everything again and hitting the “Create” button, we’ll be redirected to a screen showing the steps AWS performs to set everything up:
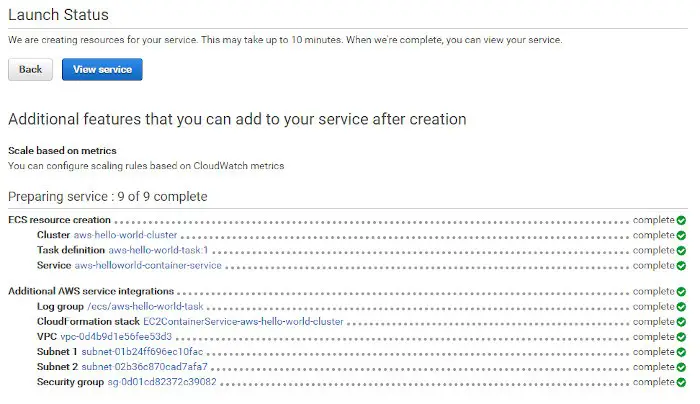
When all steps are completed, hit the “View service” button, and we’ll a screen like this:

This screen shows a whole bunch of information about the status of the service we have just started. But where do we find the URL it’s available at so that I can test it out?
To find the URL of our application in the web console, do the following:
- Click on the cluster name to see the status of the cluster.
- In the “Tasks” tab, click the name of the task to see the status of the task.
- Click the “ENI Id” of the task to see the status of the network interface of that task (ENI = Elastic Network Interface).
- On the status page of the network interface, we finally find the public IPv4 address we can use to access our freshly deployed service.
If you have deployed the aws-hello-world container from above, add :8080/hello to that URL, put it in your browser, and you should see the message “Hello AWS!”.
Done. We’ve just deployed our first Docker container to AWS!
But How Do The Pros Do It?
Deploying a Docker container via a web UI is nice and all, but it doesn’t scale. We need a human each time we want to deploy a new version of the application, doing a bunch of manual stuff.
And the web UI doesn’t even provide all the knobs and dials we might need. We’ve seen already that we can’t even provide a host port to do proper port forwarding.
So, there’s a bunch of things we’re missing out on when using the web UI.
All the stuff we’re missing (and more) is available in the AWS CLI, a command-line interface that we can use in scripts to remote control pretty much everything that’s going on in our AWS account.
Keep your eyes peeled for a follow-up article doing the same as we did here with the AWS CLI.
The AWS Journey
So, we’ve successfully deployed a Docker container. That’s only the beginning of the story. Having an application running in the cloud opens a huge range of follow-up questions.
Here’s a list of the questions I want to answer on this journey. If there’s a link, it has already been answered with a blog post! If not, stay tuned!
- How can I deploy an application from the web console? (this article)
- How can I deploy an application from the command line?
- How can I implement high availability for my deployed application?
- How do I set up load balancing?
- How can I deploy a database in a private subnet and access it from my application?
- How can I deploy my application from a CI/CD pipeline?
- How can I deploy a new version of my application without downtime?
- How can I deploy my application into multiple environments (test, staging, production)?
- How can I auto-scale my application horizontally on high load?
- How can I implement sticky sessions in the load balancer (if I’m building a session-based webapp)?
- How can I monitor what’s happening on my application?
- How can I bind my application to a custom domain?
- How can I access other AWS resources (like SQS queues and DynamoDB tables) from my application?
- How can I implement HTTPS?
Conclusion
The AWS web interface is intimidating. If we know where to look, though, we can deploy a Docker container in a matter of minutes. But this is a manual process and the web interface only provides basic means of configuration.
In real-world scenarios, we need to use the AWS CLI to create production-grade configurations and to deploy those from within an automated CI/CD pipeline.
Check Out the Book!
This article gives only a first impression of what you can do with Docker and AWS.
If you want to go deeper and learn how to deploy a Spring Boot application to the AWS cloud and how to connect it to cloud services like RDS, Cognito, and SQS, make sure to check out the book Stratospheric - From Zero to Production with Spring Boot and AWS!


