The AWS journey started with deploying a Spring Boot application in a Docker container manually. In the previous episode, we then automated the deployment with CloudFormation.
On the road to a production-grade, continuously deployable system, we now want to extend our CloudFormation templates to automatically provision a PostgreSQL database and connect it to our Spring Boot application.
The result will be a reproducible, fully automated deployment of a virtual private network, a PostgreSQL RDS instance, and our Spring Boot application.
Check Out the Book!
This article gives only a first impression of what you can do with CloudFormation and RDS.
If you want to go deeper and learn how to deploy a Spring Boot application to the AWS cloud and how to connect it to cloud services like RDS, Cognito, and SQS, make sure to check out the book Stratospheric - From Zero to Production with Spring Boot and AWS!
Code Example
This article is accompanied by working code examples of a Spring Boot application and CloudFormation templates on Github.
What is RDS?
RDS is short for “Amazon Relational Database Service” and is AWS’s managed database service. With RDS, we can create and manage database instances of different types and sizes. In this article, we’ll be creating a PostgreSQL instance.
Creating a Spring Boot Application to Test RDS Connectivity
We start by creating a simple Spring Boot application that we can later use to check the connectivity to the database so that we know if our setup is working properly.
I’m not going into the details of this application too much since this is not a tutorial about building a Spring Boot application, but it has a single HTTP GET endpoint /hello:
@RestController
class HelloWorldController {

  private final UserRepository userRepository;

  HelloWorldController(UserRepository userRepository) {
    this.userRepository = userRepository;
  }

  @GetMapping("/hello")
  String helloWorld(){
    Iterable<User> users = userRepository.findAll();
    return "Hello AWS! Successfully connected to the database!";
  }

}
We’re going to call this endpoint once the application is deployed to AWS to check that it can connect to the database.
To configure which database to connect to, we use the Spring Boot default properties in application.yml:
spring:
  datasource:
    url: jdbc:postgresql://localhost:5432/hello
    username: hello
    password: hello
We’re later going to override these properties to tell the application to connect to an AWS PostgreSQL instance.
Finally, we’re packaging the Spring Boot application into a Docker image with this Dockerfile:
FROM openjdk:8-jdk-alpine
ARG JAR_FILE=build/libs/*.jar
COPY ${JAR_FILE} app.jar
ENTRYPOINT ["java","-jar","/app.jar"]
EXPOSE 8080
I have published this Docker image under the name reflectoring/aws-rds-hello-world to Docker Hub so we can download it from there during deployment.
There isn’t really much more to this Spring Boot application. If you want to see all the details, have a look at the GitHub repository.
Designing the CloudFormation Stacks
Now that we have a Spring Boot application wrapped in Docker, we can start looking at how to deploy it to AWS and connect it to a database. This picture shows what we’re building:
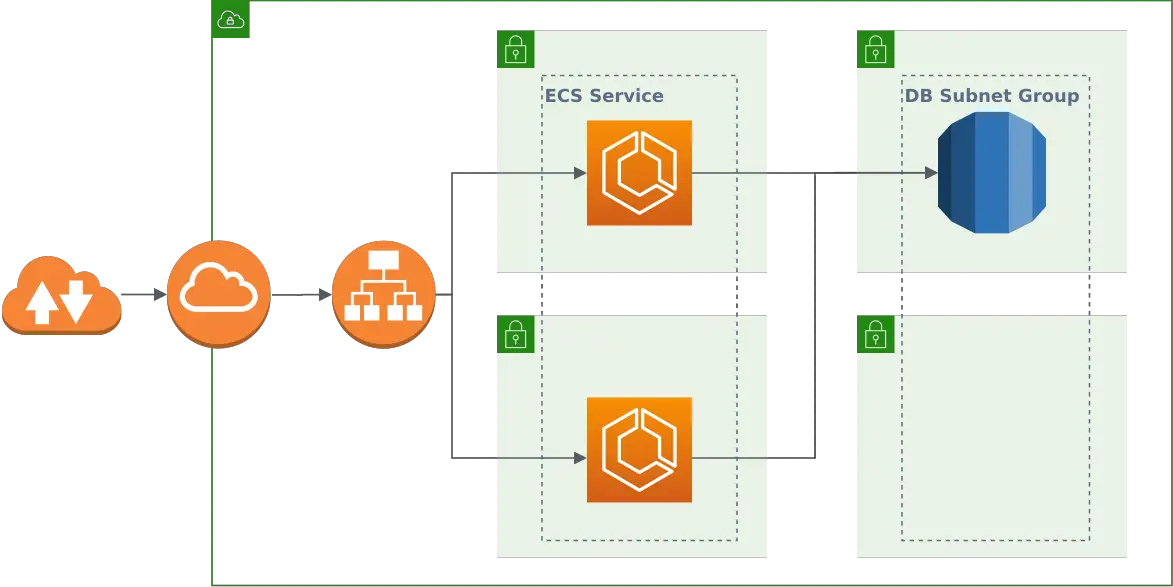
We’ll create three CloudFormation stacks:
- A network stack that creates a VPC (virtual private cloud) with two public and two private subnets (each pair across two different availability zones for high availability), an internet gateway, and a load balancer that balances traffic between those networks.
- A database stack that places a single PostgreSQL database instance into the private subnets.
- A service stack that places a Docker container with our Spring Boot application into each of the public subnets. The application connects to the database.
We have already created most of the network and service stacks in the previous article and will concentrate on additions to those stacks which concern the RDS database.
We’ll be discussing a single fragment of YAML at a time. You can find the complete CloudFormation templates for the network stack (network.yml), the database stack (database.yml), and the service stack (service.yml) on GitHub.
Skip to running the stacks if you’re not interested in the nitty-gritty details of the stack configuration.
Designing the Network Stack
The network stack creates all the basic resources we need to run our Spring Boot application and database. Compared to the original stack, we’re adding private subnets for the database and a security group to control access to those subnets.
Private Subnets
We add two private subnets to the network stack:
PrivateSubnetOne:
  Type: AWS::EC2::Subnet
  Properties:
    AvailabilityZone:
      Fn::Select:
        - 0
        - Fn::GetAZs: {Ref: 'AWS::Region'}
    VpcId: !Ref 'VPC'
    CidrBlock: '10.0.101.0/24'
    MapPublicIpOnLaunch: false

PrivateSubnetTwo:
  Type: AWS::EC2::Subnet
  Properties:
    AvailabilityZone:
      Fn::Select:
        - 1
        - Fn::GetAZs: {Ref: 'AWS::Region'}
    VpcId: !Ref 'VPC'
    CidrBlock: '10.0.102.0/24'
    MapPublicIpOnLaunch: false
We have to take care that the CidrBlocks don’t overlap with those of the public subnets.
Setting MapPublicIpOnLaunch to false makes the subnets private.
Database Security Group
Next, we create a security group into which we’ll later put the database:
DBSecurityGroup:
  Type: AWS::EC2::SecurityGroup
  Properties:
    GroupDescription: Access to the RDS instance
    VpcId: !Ref 'VPC'

DBSecurityGroupIngressFromECS:
  Type: AWS::EC2::SecurityGroupIngress
  Properties:
    Description: Ingress from the ECS containers to the RDS instance
    GroupId: !Ref 'DBSecurityGroup'
    IpProtocol: -1
    SourceSecurityGroupId: !Ref 'ECSSecurityGroup'
We allow incoming traffic to the DBSecurityGroup from the ECSSecurityGroup, which is the security group we have created earlier, and into which ECS will deploy our Spring Boot application instances. If we don’t allow this, the application cannot access the database.
Designing the Database Stack
The database stack sets up a PostgreSQL database and all resources it needs to work. We’ll discuss the whole stack since it’s new.
Parameters
The database stack needs some configuration parameters:
Parameters:
  NetworkStackName:
    Type: String
    Description: The name of the networking stack that this stack will build upon.
  DBInstanceClass:
    Type: String
    Description: The ID of the second subnet to place the RDS instance into.
    Default: 'db.t2.micro'
  DBName:
    Type: String
    Description: The name of the database that is created within the PostgreSQL instance.
  DBUsername:
    Type: String
    Description: The master user name for the PostgreSQL instance.
The database stack requires a running network stack and the NetworkStackName parameter takes the name of that network stack to refer to some of the network resources.
With the DBInstanceClass parameter, we can define what size of database we want to create. We give it the smallest (and cheapest) possible size as a default to save money.
The DBName and DBUsername parameters define the name of the database to be created within the PostgreSQL instance and the name of the user to be created.
Secret Password
Next, we create a Secret to be used as a password for the database:
Secret:
  Type: "AWS::SecretsManager::Secret"
  Properties:
    Name: !Ref 'DBUsername'
    GenerateSecretString:
      SecretStringTemplate: !Join ['', ['{"username": "', !Ref 'DBUsername' ,'"}']]
      GenerateStringKey: "password"
      PasswordLength: 32
      ExcludeCharacters: '"@/\'
The SecretStringTemplate property specifies a JSON structure with the user name. The GenerateStringKey property defines that the generated password should be added to this JSON structure in the password field. The resulting JSON string will look like this:
{
  "username": "<value of DBUserName parameter>",
  "password": "<generated password>"
}
We’re excluding some characters from the password creation because they are not allowed in Postgres RDS instances. We’d get an error message Only printable ASCII characters besides '/', '@', '"', ' ' may be used if the password contains one of these characters.
We’ll later use the generated password when we’re setting up the database.
Database Instance
The core of the database stack is, of course, the database instance. A database instance must be associated with a DBSubnetGroup:
DBSubnetGroup:
  Type: AWS::RDS::DBSubnetGroup
  Properties:
    DBSubnetGroupDescription: Subnet group for the RDS instance
    DBSubnetGroupName: DBSubnetGroup
    SubnetIds:
      - Fn::ImportValue:
          !Join [':', [!Ref 'NetworkStackName', 'PrivateSubnetOne']]
      - Fn::ImportValue:
          !Join [':', [!Ref 'NetworkStackName', 'PrivateSubnetTwo']]
The DBSubnetGroup spans across the two private subnets we created in the network stack. A DBSubnetGroup must span across at least two subnets in at least two availability zones.
Next, we can put a PostgreSQL instance into this subnet group:
{% raw %}
PostgresInstance:
  Type: AWS::RDS::DBInstance
  Properties:
    Engine: postgres
    EngineVersion: 11.5
    AllocatedStorage: 20
    AvailabilityZone:
      Fn::Select:
        - 0
        - Fn::GetAZs: {Ref: 'AWS::Region'}
    DBSubnetGroupName: !Ref 'DBSubnetGroup'
    DBInstanceClass: !Ref 'DBInstanceClass'
    DBName: !Ref 'DBName'
    MasterUsername: !Ref 'DBUsername'
    MasterUserPassword: !Join ['', ['{{resolve:secretsmanager:', !Ref Secret, ':SecretString:password}}' ]]
    PubliclyAccessible: false
    VPCSecurityGroups:
      - Fn::ImportValue:
          !Join [':', [!Ref 'NetworkStackName', 'DBSecurityGroupId']]
{% endraw %}
We define the engine and version and an AllocatedStorage of 20 GB (this is the minimum allowed value).
We place the database instance into the previously created DBSubnetGroup.
Then, we refer to the DBInstanceClass, DBName, and DBUsername parameters we defined as inputs to this CloudFormation stack earlier to set some basic properties of the database.
The MasterUserPassword we set to the previously created password. For this, we resolve the secret from the Secrets Manager and extract the password field from the JSON object.
Finally, we restrict public access to the database and place the database into the DBSecurityGroup we have created in the network stack.
Secret Attachment
Next, we attach the secret to the database:
SecretRDSInstanceAttachment:
  Type: "AWS::SecretsManager::SecretTargetAttachment"
  Properties:
    SecretId: !Ref Secret
    TargetId: !Ref PostgresInstance
    TargetType: AWS::RDS::DBInstance
This merely associates the secret with the database so that we can take advantage of the secret rotation feature provided by the AWS Secrets Manager.
Outputs
Finally, we need to export some resources from the database stack so that we can use them in the service stack:
Outputs:
  EndpointAddress:
    Description: Address of the RDS endpoint.
    Value: !GetAtt 'PostgresInstance.Endpoint.Address'
    Export:
      Name: !Join [ ':', [ !Ref 'AWS::StackName', 'EndpointAddress' ] ]
  EndpointPort:
    Description: Port of the RDS endpoint.
    Value: !GetAtt 'PostgresInstance.Endpoint.Port'
    Export:
      Name: !Join [ ':', [ !Ref 'AWS::StackName', 'EndpointPort' ] ]
  DBName:
    Description: The name of the database that is created within the PostgreSQL instance.
    Value: !Ref DBName
    Export:
      Name: !Join [ ':', [ !Ref 'AWS::StackName', 'DBName' ] ]
  Secret:
    Description: Reference to the secret containing the password to the database.
    Value: !Ref 'Secret'
    Export:
      Name: !Join [ ':', [ !Ref 'AWS::StackName', 'Secret' ] ]
We’ll need the EndpointAddress, EndpointPort, DBName, and Secret parameters in the service stack to connect our Spring Boot application to the database.
Designing the Service Stack
In the service stack, we don’t really change much compared to the original stack. The only thing we do is to override some environment variables to pass the database connection to the Spring Boot application.
Parameters
We need a new input parameter to capture the name of the database stack:
Parameters:
  DatabaseStackName:
    Type: String
    Description: The name of the database stack with the database this service should connect to.
  # ... other parameters
We’ll need the database stack name to import some of its outputs.
Set the Database Connection
The main change is passing Environment variables to the Docker containers that contain our Spring Boot application:
{% raw %}
TaskDefinition:
  Type: AWS::ECS::TaskDefinition
  Properties:
    # ...
    ContainerDefinitions:
      - Name: !Ref 'ServiceName'
        Cpu: !Ref 'ContainerCpu'
        Memory: !Ref 'ContainerMemory'
        image: images/stock/!Ref 'ImageUrl'-1200x628-branded.jpg
        Environment:
          - Name: SPRING_DATASOURCE_URL
            Value: !Join
              - ''
              - - 'jdbc:postgresql://'
                - Fn::ImportValue: !Join [':', [!Ref 'DatabaseStackName', 'EndpointAddress']]
                - ':'
                - Fn::ImportValue: !Join [':', [!Ref 'DatabaseStackName', 'EndpointPort']]
                - '/'
                - Fn::ImportValue: !Join [':', [!Ref 'DatabaseStackName', 'DBName']]
          - Name: SPRING_DATASOURCE_USERNAME
            Value: !Join
              - ''
              - - '{{resolve:secretsmanager:'
                - Fn::ImportValue: !Join [':', [!Ref 'DatabaseStackName', 'Secret']]
                - ':SecretString:username}}'
          - Name: SPRING_DATASOURCE_PASSWORD
            Value: !Join
              - ''
              - - '{{resolve:secretsmanager:'
                - Fn::ImportValue: !Join [':', [!Ref 'DatabaseStackName', 'Secret']]
                - ':SecretString:password}}'
        # ...
{% endraw %}
We’re setting the environment properties SPRING_DATASOURCE_URL, SPRING_DATASOURCE_USERNAME, and SPRING_DATASOURCE_PASSWORD, which are the default properties used by Spring Boot to create a database connection.
The URL will have a value like jdbc:postgresql://<EndpointAddress>:<EndpointPort>/<DBName>, using the respective parameters exported by the database stack.
We load the username and password from the Secret we created in the database stack. The dynamic reference {% raw %}{{resolve:..}}{% endraw %} resolves the exported secret as JSON from the database stack and reads the username and password fields from it.
Running the Stacks
With those changes to the stacks, we can start them one after another.
Starting the Stacks Will Incur AWS Costs!
Starting a stack is fun because it creates a whole bunch of resources with the click of a button. But this also means that we have to pay for the resources it creates. Starting and stopping all stacks described in this article a couple of times will incur a cost in the ballpark of cents of up to a couple of dollars, depending on how often you do it.
It cost me around $20 to start, stop, debug, and re-start the stacks over a week's time to prepare this article.
The network stack has to be up first:
aws cloudformation create-stack \
  --stack-name reflectoring-hello-rds-network \
  --template-body file://network.yml \
  --capabilities CAPABILITY_IAM
Once the network stack has reached the status CREATE_COMPLETE, we can start the database stack:
aws cloudformation create-stack \
  --stack-name reflectoring-hello-rds-database \
  --template-body file://database.yml \
  --parameters \
      ParameterKey=DBName,ParameterValue=reflectoring \
      ParameterKey=NetworkStackName,ParameterValue=reflectoring-hello-rds-network \
      ParameterKey=DBUsername,ParameterValue=reflectoring
And finally the service stack:
aws cloudformation create-stack \
  --stack-name reflectoring-hello-rds-service \
  --template-body file://service.yml \
  --parameters \
      ParameterKey=NetworkStackName,ParameterValue=reflectoring-hello-rds-network \
      ParameterKey=ServiceName,ParameterValue=reflectoring-hello-rds \
      ParameterKey=ImageUrl,ParameterValue=docker.io/reflectoring/aws-rds-hello-world:latest \
      ParameterKey=ContainerPort,ParameterValue=8080 \
      ParameterKey=HealthCheckPath,ParameterValue=/hello \
      ParameterKey=HealthCheckIntervalSeconds,ParameterValue=90 \
      ParameterKey=DatabaseStackName,ParameterValue=reflectoring-hello-rds-database
Note that we’re starting the service stack with the Docker image reflectoring/aws-rds-hello-world:latest which we have created above.
Testing the Stacks
Once the service stack reaches the status CREATE_COMPLETE, we should test that everything works as expected. For this, we need to find out the public URL of the load balancer which is available in the EC2 console under “Load Balancers”. There, we find the DNS name of the load balancer, copy that into a browser and add the /hello endpoint. The browser should show the following text:
Hello AWS! Successfully connected to the database!
This means that the Spring Boot application could successfully connect to the database.
Troubleshooting
CannotStartContainerError: Error response from dae
I saw this error in the CloudFormation console when it tried to start a Docker container in the service stack. The error means that CloudFormation cannot start the Docker container for whatever reason (I couldn’t find out what a dae is, though).
If you go to the “Details” section of the ECS task in the ECS console you should see the same error message there. The error message is expandable (which is not obvious). If you expand it, you should see a more helpful error message.
In my case, the error was failed to create Cloudwatch log stream: ResourceNotFoundException: The specified log group does not exist. because I had forgotten to create a CloudWatch log stream. I added the log stream to the CloudFormation template and all was good.
The AWS Journey
By now, we have successfully deployed a highly available Spring Boot application and a (not so highly available) PostgreSQL instance all with running a few commands from the command line.
But there’s more to do on the road to a production-ready, continuously deployable system.
Here’s a list of the questions I want to answer on this journey. If there’s a link, it has already been answered with a blog post! If not, stay tuned!
- How can I deploy an application from the web console?
- How can I deploy an application from the command line?
- How can I implement high availability for my deployed application?
- How do I set up load balancing?
- How can I deploy a database in a private subnet and access it from my application? (this article)
- How can I deploy my application from a CI/CD pipeline?
- How can I deploy a new version of my application without downtime?
- How can I deploy my application into multiple environments (test, staging, production)?
- How can I auto-scale my application horizontally on high load?
- How can I implement sticky sessions in the load balancer (if I’m building a session-based web app)?
- How can I monitor what’s happening on my application?
- How can I bind my application to a custom domain?
- How can I access other AWS resources (like SQS queues and DynamoDB tables) from my application?
- How can I implement HTTPS?
Check Out the Book!
This article gives only a first impression of what you can do with CloudFormation and RDS.
If you want to go deeper and learn how to deploy a Spring Boot application to the AWS cloud and how to connect it to cloud services like RDS, Cognito, and SQS, make sure to check out the book Stratospheric - From Zero to Production with Spring Boot and AWS!


