In the first article of my AWS Journey, we deployed a Docker image via the AWS web console. While this works fine, it includes manual work and doesn’t provide fine-grained control over the network and other resources we might need.
The goal of this journey is to create a production-grade, continuously deployable system, so the next step in this journey is to automate the deployment of Docker images. In this article, we’ll use AWS’s CloudFormation service to deploy and undeploy a highly available virtual private cloud running multiple instances of our Docker image behind a load balancer - all with a single CLI command.
Check Out the Book!
This article gives only a first impression of what you can do with Docker and AWS.
If you want to go deeper and learn how to deploy a Spring Boot application to the AWS cloud and how to connect it to cloud services like RDS, Cognito, and SQS, make sure to check out the book Stratospheric - From Zero to Production with Spring Boot and AWS!
Example Code
This article is accompanied by a working code example on GitHub.What is CloudFormation?
CloudFormation is AWS’s service for automating the deployment of AWS resources. It allows us to describe the resources we want (networks, load balancers, EC2 instances, …) in a JSON or YAML template and provides commands within the AWS CLI to spin up those resources and remove them again (among other things).
The resources defined in such a template are called a “stack”. A stack is the unit in which CloudFormation allows us to interact with resources. Each stack can be created and deleted separately and stacks may depend on each other. We’ll make use of that later when we’re creating a stack containing all the networking resources we need and another one that contains our application.
To create a CloudFormation template, we need low-level knowledge of the resources we’re going to deploy. Once we have a running CloudFormation template, though, we can start and stop it at any time without having to think about the detailed resources too much.
Note that CloudFormation is not the only option to codify an AWS infrastructure. We could also use Terraform, a general infrastructure-as-code platform, or CDK, AWS’s Cloud Development Kit, which is a wrapper around CloudFormation and allows us to describe AWS resources in different programming languages than JSON and YAML (did I hear anyone say that JSON and YAML are programming languages?). There’s a bunch of other solutions out there, but these two seem to be the most common ones.
In this article, however, we’ll use CloudFormation to learn the basics.
Designing the CloudFormation Stacks
On a very high level, this is what we’re going to build in this article:
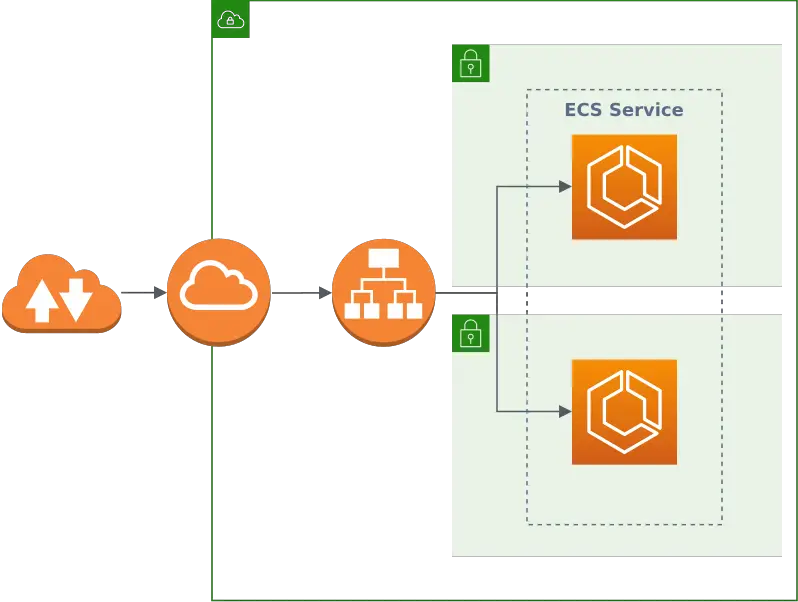
We’ll create two CloudFormation stacks:
- A network stack that creates a VPC (virtual private cloud) with two public subnets (each in a different availability zone for high availability), an internet gateway, and a load balancer that balances traffic between those networks.
- A service stack that places a Docker container with the application we want to run into each of the public networks. For this, we take advantage of ECS (Elastic Container Service) and Fargate, which together abstract away some of the gritty details and make it easier to run a Docker container.
The service stack depends on the network stack, so we start with designing the network stack.
I didn’t start from scratch (I’m not smart enough for that) but instead used these CloudFormation templates as a starting point and modified them for simplicity and understanding.
We’ll be discussing a single fragment of YAML at a time. You can find the complete CloudFormation templates for the network stack (network.yml) and the service stack (service.yml) on GitHub.
Skip to running the stacks if you’re not interested in the nitty-gritty details of the stack configuration.
Designing the Network Stack
The network stack creates a bunch of AWS resources required to create a network for our application. Let’s look at each of the resources in turn.
VPC
  VPC:
    Type: AWS::EC2::VPC
    Properties:
      CidrBlock: '10.0.0.0/16'
A VPC is rather easy to define. The main feature is the IP address space defined by a CIDR (classless inter-domain routing) address block.
10.0.0.0/16 means that the first 16 bits (10.0) of the CIDR block are used to designate the network and the rest of the bits can be used to create IP addresses. This gives us an IP address range from 10.0.0.0 through 10.0.255.255. More than enough to spin up a couple of Docker containers.
Public Subnets
Next, we create two public subnets. A subnet is a network in which we can place other resources. A public subnet is a network whose resources get a public IP address which is reachable from the internet:
  PublicSubnetOne:
    Type: AWS::EC2::Subnet
    Properties:
      AvailabilityZone:
        Fn::Select:
          - 0
          - Fn::GetAZs: {Ref: 'AWS::Region'}
      VpcId: !Ref 'VPC'
      CidrBlock: '10.0.1.0/24'
      MapPublicIpOnLaunch: true

  PublicSubnetTwo:
    Type: AWS::EC2::Subnet
    Properties:
      AvailabilityZone:
        Fn::Select:
          - 1
          - Fn::GetAZs: {Ref: 'AWS::Region'}
      VpcId: !Ref 'VPC'
      CidrBlock: '10.0.2.0/24'
      MapPublicIpOnLaunch: true
We place each subnet into a different AvailabilityZone so that when one zone goes down, the other can still serve traffic. For this, we select the first and second availability zone for the region we’re working in, respectively.
Using the CidrBlock property, we define the IP address range for each subnet. The first subnet gets the range from 10.0.1.0 to 10.0.1.255 and the second from 10.0.2.0 to 10.0.2.255.
Finally, we set the property MapPublicIpOnLaunch to true, making those subnets public.
Why Are We Using Public Subnets?
Because it's easier to set up. Putting our Docker containers into private subnets requires a more complicated setup with a NAT gateway and routes from the load balancer in the public subnet to the containers in the private subnet.
We will later define security groups to restrict the access to our Docker containers, but note that it's always more secure to put resources into a private subnet, because that puts another layer of abstraction between them and the evil internet.
Internet Gateway
Next, we set up an internet gateway, which will later allow internet traffic to reach our public subnets and which will also allow resources in our public subnets to reach out to the internet:
  InternetGateway:
    Type: AWS::EC2::InternetGateway

  GatewayAttachement:
    Type: AWS::EC2::VPCGatewayAttachment
    Properties:
      VpcId: !Ref 'VPC'
      InternetGatewayId: !Ref 'InternetGateway'
With the VpcId and InternetGatewayId properties, we connect the internet gateway with our VPC from above.
Routing
The internet gateway is connected to our VPC now, but it wouldn’t forward any internet traffic to our subnets, yet. We need to define a route table for that:
  PublicRouteTable:
    Type: AWS::EC2::RouteTable
    Properties:
      VpcId: !Ref 'VPC'

  PublicRoute:
    Type: AWS::EC2::Route
    DependsOn: GatewayAttachement
    Properties:
      RouteTableId: !Ref 'PublicRouteTable'
      DestinationCidrBlock: '0.0.0.0/0'
      GatewayId: !Ref 'InternetGateway'

  PublicSubnetOneRouteTableAssociation:
    Type: AWS::EC2::SubnetRouteTableAssociation
    Properties:
      SubnetId: !Ref PublicSubnetOne
      RouteTableId: !Ref PublicRouteTable

  PublicSubnetTwoRouteTableAssociation:
    Type: AWS::EC2::SubnetRouteTableAssociation
    Properties:
      SubnetId: !Ref PublicSubnetTwo
      RouteTableId: !Ref PublicRouteTable
The route table is connected to our VPC via the VpcId property.
We define a route from 0.0.0.0/0 (i.e. from any possible IP address, meaning the internet) to our internet gateway from above.
Finally, we associate the route table with both of our public subnets, opening up our subnets for internet traffic.
Do I Need a NAT Gateway to Access the Internet From Within My Subnet?
To access the internet from a custom network like our subnets, we need to translate an internal IP address (e.g. 10.0.1.123) into a global IP address. This is called network address translation (NAT) and is usually done by a router that has both an internal IP address and a global IP address.
The internet gateway we set up above will do this translation for us automatically, but only for resources in public subnets. To enable access to the internet from private subnets, we would need to set up a NAT gateway.
Load Balancer
Now that we have two subnets that can get traffic from the outside, we need a way to balance the traffic between them. For this, we create an application load balancer (ALB):
  PublicLoadBalancerSecurityGroup:
      Type: AWS::EC2::SecurityGroup
      Properties:
        GroupDescription: Access to the public facing load balancer
        VpcId: !Ref 'VPC'
        SecurityGroupIngress:
          - CidrIp: 0.0.0.0/0
            IpProtocol: -1

  PublicLoadBalancer:
    Type: AWS::ElasticLoadBalancingV2::LoadBalancer
    Properties:
      Scheme: internet-facing
      Subnets:
        - !Ref PublicSubnetOne
        - !Ref PublicSubnetTwo
      SecurityGroups: [!Ref 'PublicLoadBalancerSecurityGroup']
We start with a security group that allows inbound (or “ingress”) traffic from the internet (0.0.0.0/0) to the load balancer.
We have to do this even though we already created a public route from the internet to the internet gateway above because AWS will otherwise assign all resources in the public subnets to a default security group that doesn’t allow inbound traffic from the internet.
Next, we create the load balancer itself with the internet-facing scheme, meaning that it takes inbound traffic from the public, and attach it to both subnets and the security group.
Now, the load balancer needs to know where to forward incoming requests. This is where a target group comes into play:
  DummyTargetGroupPublic:
    Type: AWS::ElasticLoadBalancingV2::TargetGroup
    Properties:
      HealthCheckIntervalSeconds: 6
      HealthCheckPath: /
      HealthCheckProtocol: HTTP
      HealthCheckTimeoutSeconds: 5
      HealthyThresholdCount: 2
      Name: "no-op"
      Port: 80
      Protocol: HTTP
      UnhealthyThresholdCount: 2
      VpcId: !Ref 'VPC'
This is just a dummy “no-op” target group that takes the traffic and drops it. We will later create a real target group with our Docker containers in the service stack. We need this dummy target group for now so that we can spin up the network stack without the real services.
Finally, we define a listener that defines the load balancing rules:
  PublicLoadBalancerListener:
    Type: AWS::ElasticLoadBalancingV2::Listener
    DependsOn:
      - PublicLoadBalancer
    Properties:
      DefaultActions:
        - TargetGroupArn: !Ref 'DummyTargetGroupPublic'
          Type: 'forward'
      LoadBalancerArn: !Ref 'PublicLoadBalancer'
      Port: 80
      Protocol: HTTP
The listener forwards all HTTP traffic on port 80 to the target group we created previously. The service stack will later change the target group here as well.
ECS Cluster
Now, we create an ECS (Elastic Container Service) cluster that will be responsible for managing our Docker containers:
  ECSCluster:
    Type: AWS::ECS::Cluster

  ECSSecurityGroup:
    Type: AWS::EC2::SecurityGroup
    Properties:
      GroupDescription: Access to the ECS containers
      VpcId: !Ref 'VPC'

  ECSSecurityGroupIngressFromPublicALB:
    Type: AWS::EC2::SecurityGroupIngress
    Properties:
      Description: Ingress from the public ALB
      GroupId: !Ref 'ECSSecurityGroup'
      IpProtocol: -1
      SourceSecurityGroupId: !Ref 'PublicLoadBalancerSecurityGroup'

  ECSSecurityGroupIngressFromSelf:
    Type: AWS::EC2::SecurityGroupIngress
    Properties:
      Description: Ingress from other containers in the same security group
      GroupId: !Ref 'ECSSecurityGroup'
      IpProtocol: -1
      SourceSecurityGroupId: !Ref 'ECSSecurityGroup'
We define the cluster and a security group that we will later need in the service stack.
The security group allows inbound traffic from the load balancer (or, more specifically, from everything in the PublicLoadBalancerSecurityGroup) and inbound traffic from everything in the same security group so that our Docker containers can later talk to each other.
Roles
Finally (yes, we’re close to the end!), we set up some roles for everything to work properly.
First, we need to give some permissions to ECS so it can set everything up for us when we spin up the service stack later:
  ECSRole:
    Type: AWS::IAM::Role
    Properties:
      AssumeRolePolicyDocument:
        Statement:
          - Effect: Allow
            Principal:
              Service: [ecs.amazonaws.com]
            Action: ['sts:AssumeRole']
      Path: /
      Policies:
        - PolicyName: ecs-service
          PolicyDocument:
            Statement:
              - Effect: Allow
                Action:
                  - 'ec2:AttachNetworkInterface'
                  - 'ec2:CreateNetworkInterface'
                  - 'ec2:CreateNetworkInterfacePermission'
                  - 'ec2:DeleteNetworkInterface'
                  - 'ec2:DeleteNetworkInterfacePermission'
                  - 'ec2:Describe*'
                  - 'ec2:DetachNetworkInterface'
                  - 'elasticloadbalancing:DeregisterInstancesFromLoadBalancer'
                  - 'elasticloadbalancing:DeregisterTargets'
                  - 'elasticloadbalancing:Describe*'
                  - 'elasticloadbalancing:RegisterInstancesWithLoadBalancer'
                  - 'elasticloadbalancing:RegisterTargets'
                Resource: '*'
This role gives ECS the permission to do some networking stuff (prefix ec2) and some loadbalancing stuff (prefix elasticloadbalancing).
Since ECS will later do some heavy lifting for us in setting up a bunch of EC2 instances running our Docker images, it needs the permission to create network interfaces.
Also, since we created a dummy target group for the load balancer above, it will need the permission to change the load balancer’s target group to a new one pointing to our Docker containers.
We create another role for our Docker containers:
  ECSTaskExecutionRole:
    Type: AWS::IAM::Role
    Properties:
      AssumeRolePolicyDocument:
        Statement:
          - Effect: Allow
            Principal:
              Service: [ecs-tasks.amazonaws.com]
            Action: ['sts:AssumeRole']
      Path: /
      Policies:
        - PolicyName: AmazonECSTaskExecutionRolePolicy
          PolicyDocument:
            Statement:
              - Effect: Allow
                Action:
                  - 'logs:CreateLogStream'
                  - 'logs:PutLogEvents'
                Resource: '*'
Docker containers are abstracted by a “Task” in ECS, so this role is called ECSTaskExecutionRole. We’ll apply this role to the ECS tasks later in the service stack.
The role merely allows the Docker containers to create logs for now.
Outputs of the Network Stack
In the last step, we’re creating a bunch of Outputs that export some of the resources of this stack so we can refer to them in the service stack later:
Outputs:
  ClusterName:
    Description: The name of the ECS cluster
    Value: !Ref 'ECSCluster'
    Export:
      Name: !Join [ ':', [ !Ref 'AWS::StackName', 'ClusterName' ] ]
  ExternalUrl:
    Description: The url of the external load balancer
    Value: !Join ['', ['http://', !GetAtt 'PublicLoadBalancer.DNSName']]
    Export:
      Name: !Join [ ':', [ !Ref 'AWS::StackName', 'ExternalUrl' ] ]
  ECSRole:
    Description: The ARN of the ECS role
    Value: !GetAtt 'ECSRole.Arn'
    Export:
      Name: !Join [ ':', [ !Ref 'AWS::StackName', 'ECSRole' ] ]
  ECSTaskExecutionRole:
    Description: The ARN of the ECS role
    Value: !GetAtt 'ECSTaskExecutionRole.Arn'
    Export:
      Name: !Join [ ':', [ !Ref 'AWS::StackName', 'ECSTaskExecutionRole' ] ]
  PublicListener:
    Description: The ARN of the public load balancer's Listener
    Value: !Ref PublicLoadBalancerListener
    Export:
      Name: !Join [ ':', [ !Ref 'AWS::StackName', 'PublicListener' ] ]
  VPCId:
    Description: The ID of the VPC that this stack is deployed in
    Value: !Ref 'VPC'
    Export:
      Name: !Join [ ':', [ !Ref 'AWS::StackName', 'VPCId' ] ]
  PublicSubnetOne:
    Description: Public subnet one
    Value: !Ref 'PublicSubnetOne'
    Export:
      Name: !Join [ ':', [ !Ref 'AWS::StackName', 'PublicSubnetOne' ] ]
  PublicSubnetTwo:
    Description: Public subnet two
    Value: !Ref 'PublicSubnetTwo'
    Export:
      Name: !Join [ ':', [ !Ref 'AWS::StackName', 'PublicSubnetTwo' ] ]
  ECSSecurityGroup:
    Description: A security group used to allow ECS containers to receive traffic
    Value: !Ref 'ECSSecurityGroup'
    Export:
      Name: !Join [ ':', [ !Ref 'AWS::StackName', 'ECSSecurityGroup' ] ]
All resources are exported with the name pattern StackName:ResourceName. CloudFormation will resolve the stack name from the mandatory --stack-name command line parameter we have to provide when creating the stack from the template.
The resources can then be imported in another stack with the Fn::ImportValue function.
Designing the Service Stack
Phew, that was a lot of networking stuff. Now how do we get our service into that network?
Let’s build the service stack. Take comfort in the fact that it is much smaller than the network stack!
Parameters
We start the service with some input parameters:
Parameters:
  StackName:
    Type: String
    Description: The name of the networking stack that
      these resources are put into.
  ServiceName:
    Type: String
    Description: A human-readable name for the service.
  HealthCheckPath:
    Type: String
    Default: /health
    Description: Path to perform the healthcheck on each instance.
  HealthCheckIntervalSeconds:
    Type: Number
    Default: 5
    Description: Number of seconds to wait between each health check.
  ImageUrl:
    Type: String
    Description: The url of a docker image that will handle incoming traffic.
  ContainerPort:
    Type: Number
    Default: 80
    Description: The port number the application inside the docker container
      is binding to.
  ContainerCpu:
    Type: Number
    Default: 256
    Description: How much CPU to give the container. 1024 is 1 CPU.
  ContainerMemory:
    Type: Number
    Default: 512
    Description: How much memory in megabytes to give the container.
  Path:
    Type: String
    Default: "*"
    Description: A path on the public load balancer that this service
      should be connected to.
  DesiredCount:
    Type: Number
    Default: 2
    Description: How many copies of the service task to run.
Only the StackName, ServiceName, and ImageUrl parameters are mandatory. The rest has defaults that might require tweaking depending on our application.
The StackName parameter must be the name of the network stack, so we can import some of its outputs later.
Re-route the Load Balancer
Remember that we have set up a dummy target group for the load balancer in the network stack? We now create the real target group:
  TargetGroup:
    Type: AWS::ElasticLoadBalancingV2::TargetGroup
    Properties:
      HealthCheckIntervalSeconds: !Ref 'HealthCheckIntervalSeconds'
      HealthCheckPath: !Ref 'HealthCheckPath'
      HealthCheckProtocol: HTTP
      HealthCheckTimeoutSeconds: 5
      HealthyThresholdCount: 2
      TargetType: ip
      Name: !Ref 'ServiceName'
      Port: !Ref 'ContainerPort'
      Protocol: HTTP
      UnhealthyThresholdCount: 2
      VpcId:
        Fn::ImportValue:
          !Join [':', [!Ref 'StackName', 'VPCId']]

    LoadBalancerRule:
      Type: AWS::ElasticLoadBalancingV2::ListenerRule
      Properties:
        Actions:
          - TargetGroupArn: !Ref 'TargetGroup'
            Type: 'forward'
        Conditions:
          - Field: path-pattern
            Values: [!Ref 'Path']
        ListenerArn:
          Fn::ImportValue:
            !Join [':', [!Ref 'StackName', 'PublicListener']]
        Priority: 1
We use some of the input parameters from above here with the !Ref function to set up the health check and the port on which the machines within the TargetGroup should receive traffic.
We put the target group into our VPC using the Fn::ImportValue function to import the VPC ID from the network stack (which must be up and running before we create the service stack).
Also, we replace the LoadBalancerRule we created in the network stack with a new one that points to the new TargetGroup.
Task Definition
Now it’s time to set up our Docker containers. In ECS, this is done via a TaskDefinition.
With a TaskDefinition, we can define the resources our containers need. ECS will then take care of downloading our Docker image and passing it to Fargate to provision the required EC2 resources:
  TaskDefinition:
    Type: AWS::ECS::TaskDefinition
    Properties:
      Family: !Ref 'ServiceName'
      Cpu: !Ref 'ContainerCpu'
      Memory: !Ref 'ContainerMemory'
      NetworkMode: awsvpc
      RequiresCompatibilities:
        - FARGATE
      ExecutionRoleArn:
        Fn::ImportValue:
          !Join [':', [!Ref 'StackName', 'ECSTaskExecutionRole']]
      ContainerDefinitions:
        - Name: !Ref 'ServiceName'
          Cpu: !Ref 'ContainerCpu'
          Memory: !Ref 'ContainerMemory'
          image: images/stock/!Ref 'ImageUrl'-1200x628-branded.jpg
          PortMappings:
            - ContainerPort: !Ref 'ContainerPort'
          LogConfiguration:
            LogDriver: 'awslogs'
            Options:
              awslogs-group: !Ref 'ServiceName'
              awslogs-region: !Ref AWS::Region
              awslogs-stream-prefix: !Ref 'ServiceName'
There are a couple of important settings here.
With RequiresCompatibilities, we declare that we’re using FARGATE, which is the AWS infrastructure that takes care of running our Docker images without us having to provision EC2 instances ourselves. If we chose EC2 instead, we’d have to do that ourselves.
Using Fargate, we have to set the Docker NetworkMode to awsvpc.
In ExecutionRoleArn, we refer to the ECSTaskExecutionRole we have defined in the network stack earlier, to give the containers permission to send logs into CloudWatch.
Within the ContainerDefinitions comes an important part: we set the Image property to the URL of our Docker image so that ECS can download the image and put it into action.
We also define the ContainerPort (i.e. the port the container receives traffic on). Using Fargate, we cannot define a HostPort (i.e. the port the host receives traffic on and passes it to the container port). Instead, the host port is the same as the container port. But that doesn’t hurt us much, because the load balancer will translate from HTTP port 80 to the container port for us.
Finally, we define a LogConfiguration that sends whatever our Docker containers log to the console to CloudWatch logs.
ECS Service
The final piece of the puzzle is the ECS Service. It connects the load balancer to the task definition and puts docker containers into our public subnets:
  Service:
    Type: AWS::ECS::Service
    DependsOn: LoadBalancerRule
    Properties:
      ServiceName: !Ref 'ServiceName'
      Cluster:
        Fn::ImportValue:
          !Join [':', [!Ref 'StackName', 'ClusterName']]
      LaunchType: FARGATE
      DeploymentConfiguration:
        MaximumPercent: 200
        MinimumHealthyPercent: 50
      DesiredCount: !Ref 'DesiredCount'
      NetworkConfiguration:
        AwsvpcConfiguration:
          AssignPublicIp: ENABLED
          SecurityGroups:
            - Fn::ImportValue:
                !Join [':', [!Ref 'StackName', 'ECSSecurityGroup']]
          Subnets:
            - Fn::ImportValue:
                !Join [':', [!Ref 'StackName', 'PublicSubnetOne']]
            - Fn::ImportValue:
                !Join [':', [!Ref 'StackName', 'PublicSubnetTwo']]
      TaskDefinition: !Ref 'TaskDefinition'
      LoadBalancers:
        - ContainerName: !Ref 'ServiceName'
          ContainerPort: !Ref 'ContainerPort'
          TargetGroupArn: !Ref 'TargetGroup'
We define FARGATE as the LaunchType, because we don’t want to provision the computing resources ourselves.
In the DeploymentConfiguration block, we tell ECS to have a maximum of double the desired containers and a minimum of half the desired containers running at the same time. ECS needs this leeway during deployments of new versions of the Docker images.
In the NetworkConfiguration we pass in the ECSSecurityGroup we defined in the network stack. Remember that this security group has permissions to configure some networking and load balancing stuff which is required to bring new Docker containers into the cluster and decommission old ones.
Finally, we tell the ECS service to run our task definition from above and connect it to the load balancer.
Running the Stacks
Defining a CloudFormation stack is the hard part. Once a stack template is reliably defined, running stacks becomes a breeze.
It took me a lot of time to get here, even though I have started with existing templates from GitHub.
The dev loop looked something like this:
- tweak the stack template
- create a stack with the template
- find out why it’s not working
- delete the stack
- start from the beginning.
Especially the “find out why it’s not working” part takes a lot of research and time if you’re not intimately familiar with all the AWS resources you’re using. I put some of the errors that cost me time in the troubleshooting section.
Starting the Stacks Will Incur AWS Costs!
Starting a stack is fun because it creates a whole bunch of resources with the click of a button. But this also means that we have to pay for the resources it creates. Starting and stopping all stacks described in this article a couple of times will incur a cost in the ballpark of cents of up to a couple of dollars, depending on how often you do it.
It cost me around $20 to start, stop, debug, and re-start the stacks over a week's time to prepare this article.
Creating the Network Stack
Spinning up our stacks is now a matter of running a CLI command. Make sure you have the AWS CLI installed if you want to try it yourself.
Let’s start with spinning up our network stack:
aws cloudformation create-stack \
  --stack-name reflectoring-hello-world-network \
  --template-body file://network.yml \
  --capabilities CAPABILITY_IAM
We merely select a name for the stack, pass in the YAML template and give CloudFormation the CAPABILITY_IAM capability (i.e. we’re OK when CloudFormation creates or modifies identity and access management roles in our name).
We can check if the stack was successfully created by selecting the CloudFormation service in the AWS console and looking at the list of stacks available to us.
Alternatively, we can use the AWS CLI and run the command aws cloudformation describe-stacks, which lists the status of all the stacks that are currently running.
It should only take a couple of minutes until the stack has reached the status CREATE_COMPLETE.
Creating the Service Stack
One the network stack is up and running, we can create the service stack:
aws cloudformation create-stack \
  --stack-name reflectoring-hello-world-service \
  --template-body file://service.yml \
  --parameters \
      ParameterKey=StackName,ParameterValue=reflectoring-hello-world-network \
      ParameterKey=ServiceName,ParameterValue=reflectoring-hello-world \
      ParameterKey=ImageUrl,ParameterValue=docker.io/reflectoring/aws-hello-world:latest \
      ParameterKey=ContainerPort,ParameterValue=8080 \
      ParameterKey=HealthCheckPath,ParameterValue=/hello \
      ParameterKey=HealthCheckIntervalSeconds,ParameterValue=90
This looks a little more complicated, but only because we’re passing in a bunch of the parameters we defined in the service template.
The three mandatory parameters are
- the
StackName, which we set to the name we used when creating the network stack, - the
ServiceName, which is used to name some of the resources created by CloudFormation (look forServiceNamein the YAML snippets in the previous sections), and - the
ImageUrl, which I pointed to the Docker image of my “hello world” Spring Boot application.
The rest are optional parameters that have sensible defaults, but we need to tweak them to work with the hello world application.
The application runs on port 8080, so we have to set this as the value for the ContainerPort parameter.
Also, the application only has a single HTTP endpoint, /hello, so we have to configure the health check to use this endpoint, otherwise, the health check will fail.
By default, the health check would run every 5 seconds. With the default of 256 CPU units for the ContainerCpu parameter (which is 1/4 vCPU), even the simple hello world Spring Boot application doesn’t manage to start up in 5 seconds, so we set the HealthCheckIntervalSeconds to 90.
Testing the Stacks
Assuming that the stacks were created successfully and have both reached the status CREATE_COMPLETE (check this on the CloudFormation page in the AWS console), we can test if the application is working as expected. If something didn’t work out, check the troubleshooting section for some hints.
To send some test requests to our application, we first need to know the URL of the load balancer. For this, we go to the EC2 page in the AWS Console and click on “Load Balancers” in the menu on the left. Clicking on the load balancer in the list, we see the “DNS name” in the “Description” tab at the bottom:
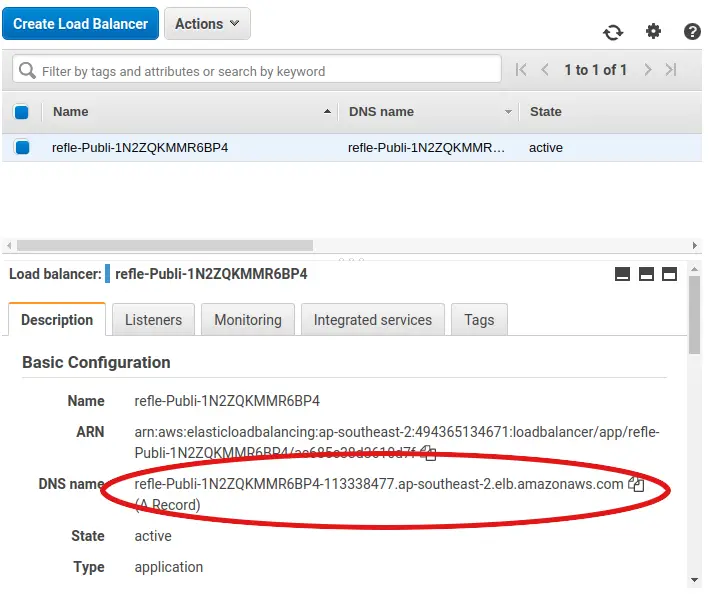
Paste this URL into the browser, and add /hello to the end, and you should see a “Hello World” greeting!
Deleting the Stacks
When we’re done, we can delete the stacks:
aws cloudformation delete-stack \
  --stack-name reflectoring-hello-world-service
Wait a bit until the service stack has reached the status DELETE_COMPLETE before deleting the network stack:
aws cloudformation delete-stack \
  --stack-name reflectoring-hello-world-network
Troubleshooting
Even though I started with existing CloudFormation templates, I stumbled over a couple of things. In case you have the same problems, here are some hints for troubleshooting.
ECS Service Stuck in Status CREATE_IN_PROGRESS
At some point when starting the service stack, it got stuck in the CREATE_IN_PROGRESS status. Looking at the “Resources” tab of the stack in the CloudFormation page of the AWS console, I saw that this was because the ECSService resource was stuck in this status.
To find the root cause of this, I went to the ECS page of the AWS console and clicked on the ECS Cluster. In the “Tasks” tab, expand the container under “Containers”. Under “Details” I found a reason why the containers weren’t starting:
CannotPullContainerError: Error response from daemon: Get https://registry-1.docker.io/v2/:
  net/http: request canceled while waiting for connection (Client.Timeout exceeded while awaiting headers)
The cause was that the ECS Service didn’t have access to the internet.
Make sure that the ECS Service has a security group that allows outbound traffic to your Docker registry. In my case, the Docker registry was in the internet, so my ECS Service must be in a public subnet, or in a private subnet with a NAT gateway that allows outbound traffic.
ECS Tasks Are Being Restarted Over and Over
Another problem I had was that ECS Tasks seemed to be restarting again and again after the service stack has been created successfully.
I observed this on the ECS page of the AWS console in the list of stopped tasks of my service, which grew longer and longer. Sometimes, a task would show an error message next to the STOPPED status:
Task failed ELB health checks in (target-group arn:aws:elasticloadbalancing:<your-target-group>))
On the EC2 page of the AWS console, under “Load Balancing -> Target Groups -> Select target group -> Registered Targets”, I saw this error message:
Health checks failed with these codes: [502]
To find the source of this, I added the LogConfiguration block to the task definition and restarted the service stack.
The logs showed that the Spring Boot app started without error, but that it took 45 seconds! Which is a lot for a dummy hello world application (but can be explained by only providing it with 256 CPU units)! And according to the logs, the application shut down shortly after that.
Since the health check was configured to only 5 seconds, it kept failing and restarted the tasks over and over.
I increased the health check interval to 90 seconds and it worked.
The AWS Journey
So, we’ve successfully deployed a network and a Docker container to the cloud.
CloudFormation is a mighty tool which can spin up whole infrastructures in minutes, but you need to understand the AWS resources and their interdependencies to create a template that works.
We’re still at the beginning of the AWS Journey. There’s a lot more ground to cover before we arrive at a production-ready, continuously deployable system.
Here’s a list of the questions I want to answer on this journey. If there’s a link, it has already been answered with a blog post! If not, stay tuned!
- How can I deploy an application from the web console?
- How can I deploy an application from the command line? (this article)
- How can I implement high availability for my deployed application? (this article)
- How do I set up load balancing? (this article)
- How can I deploy a database in a private subnet and access it from my application?
- How can I deploy my application from a CI/CD pipeline?
- How can I deploy a new version of my application without downtime?
- How can I deploy my application into multiple environments (test, staging, production)?
- How can I auto-scale my application horizontally on high load?
- How can I implement sticky sessions in the load balancer (if I’m building a session-based webapp)?
- How can I monitor what’s happening on my application?
- How can I bind my application to a custom domain?
- How can I access other AWS resources (like SQS queues and DynamoDB tables) from my application?
- How can I implement HTTPS?
Check Out the Book!
This article gives only a first impression of what you can do with Docker and AWS.
If you want to go deeper and learn how to deploy a Spring Boot application to the AWS cloud and how to connect it to cloud services like RDS, Cognito, and SQS, make sure to check out the book Stratospheric - From Zero to Production with Spring Boot and AWS!


