Whenever we make a change in our database schema, we also have to make a change in the code that uses that database schema.
When we add a new column to the database, we need to change the code to use that new column.
When we delete a column from the database, we need to change the code to not use that column anymore.
In this tutorial, we’ll discuss how we can coordinate the code changes with the database changes and deploy them to our production environment without a downtime. We’ll go through an example use case step by step and use feature flags to help us.
Example Code
This article is accompanied by a working code example on GitHub.The Problem: Coordinating Database Changes with Code Changes
If we release both the change of the database and the change of the code at the same time, we double the risk that something goes wrong. We have coupled the risk of the database change with the risk of the code change.
Usually, our application runs on multiple nodes and during a new release, the new code is deployed to one node at a time. This is often called a “rolling deployment” or “round-robin release” with the goal of zero downtime. During the deployment, there will be nodes running with the old code that is not compatible with the new database schema! How can we handle this?
What do we do when the deployment of the code change failed because we have introduced a bug? We have to roll back to the old version of the code. But the old version of the code may not be compatible with the database anymore, because we have already applied the database change! So we have to roll back the database change, too! The rollback in itself bears some risk of failure because a rollback is often not a well-planned and well-rehearsed activity. How can we improve this situation?
The answer to these questions is to decouple the database changes from the code changes using feature flags.
With feature flags, we can deploy database changes and code any time we want, and activate them at any time after the deployment.
This tutorial provides a step-by-step guide on how to release database changes and the corresponding code changes safely and with no downtime using Spring Boot, Flyway, and feature flags implemented with a feature flagging platform like LaunchDarkly.
Example Use Case: Splitting One Database Column into Two
As the example use case we’re going to split a database column into two.
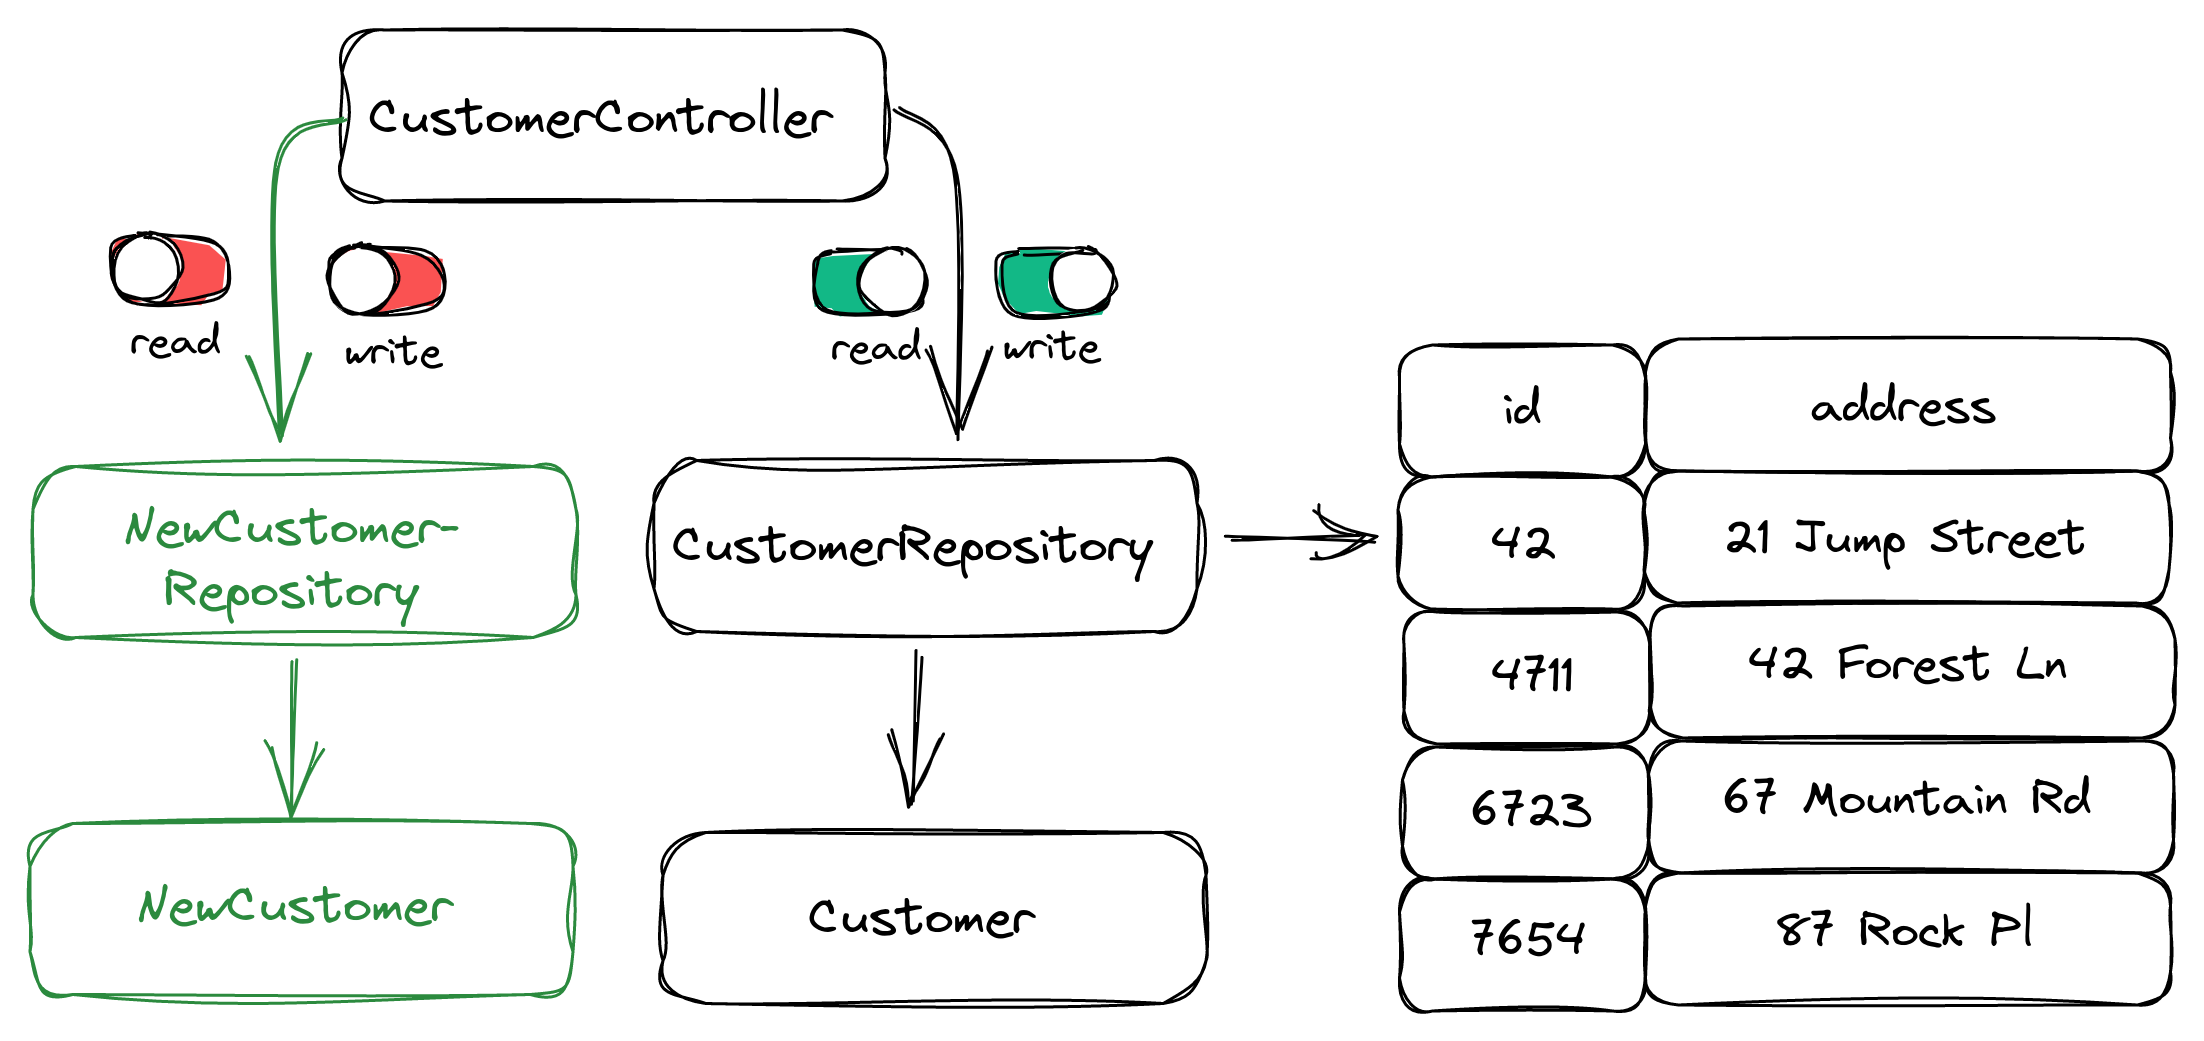
Initially, our application looks like this:

We have a CustomerController that provides a REST API for our Customer entities. It uses the CustomerRepository, which is a Spring Data repository that maps entries in the CUSTOMER database table to objects of type Customer. The CUSTOMER table has the columns id and address for our example.
The address column contains both the street name and street number in the same field. Imagine that due to some new requirements, we have to split up the address column into two columns: streetNumber and street.
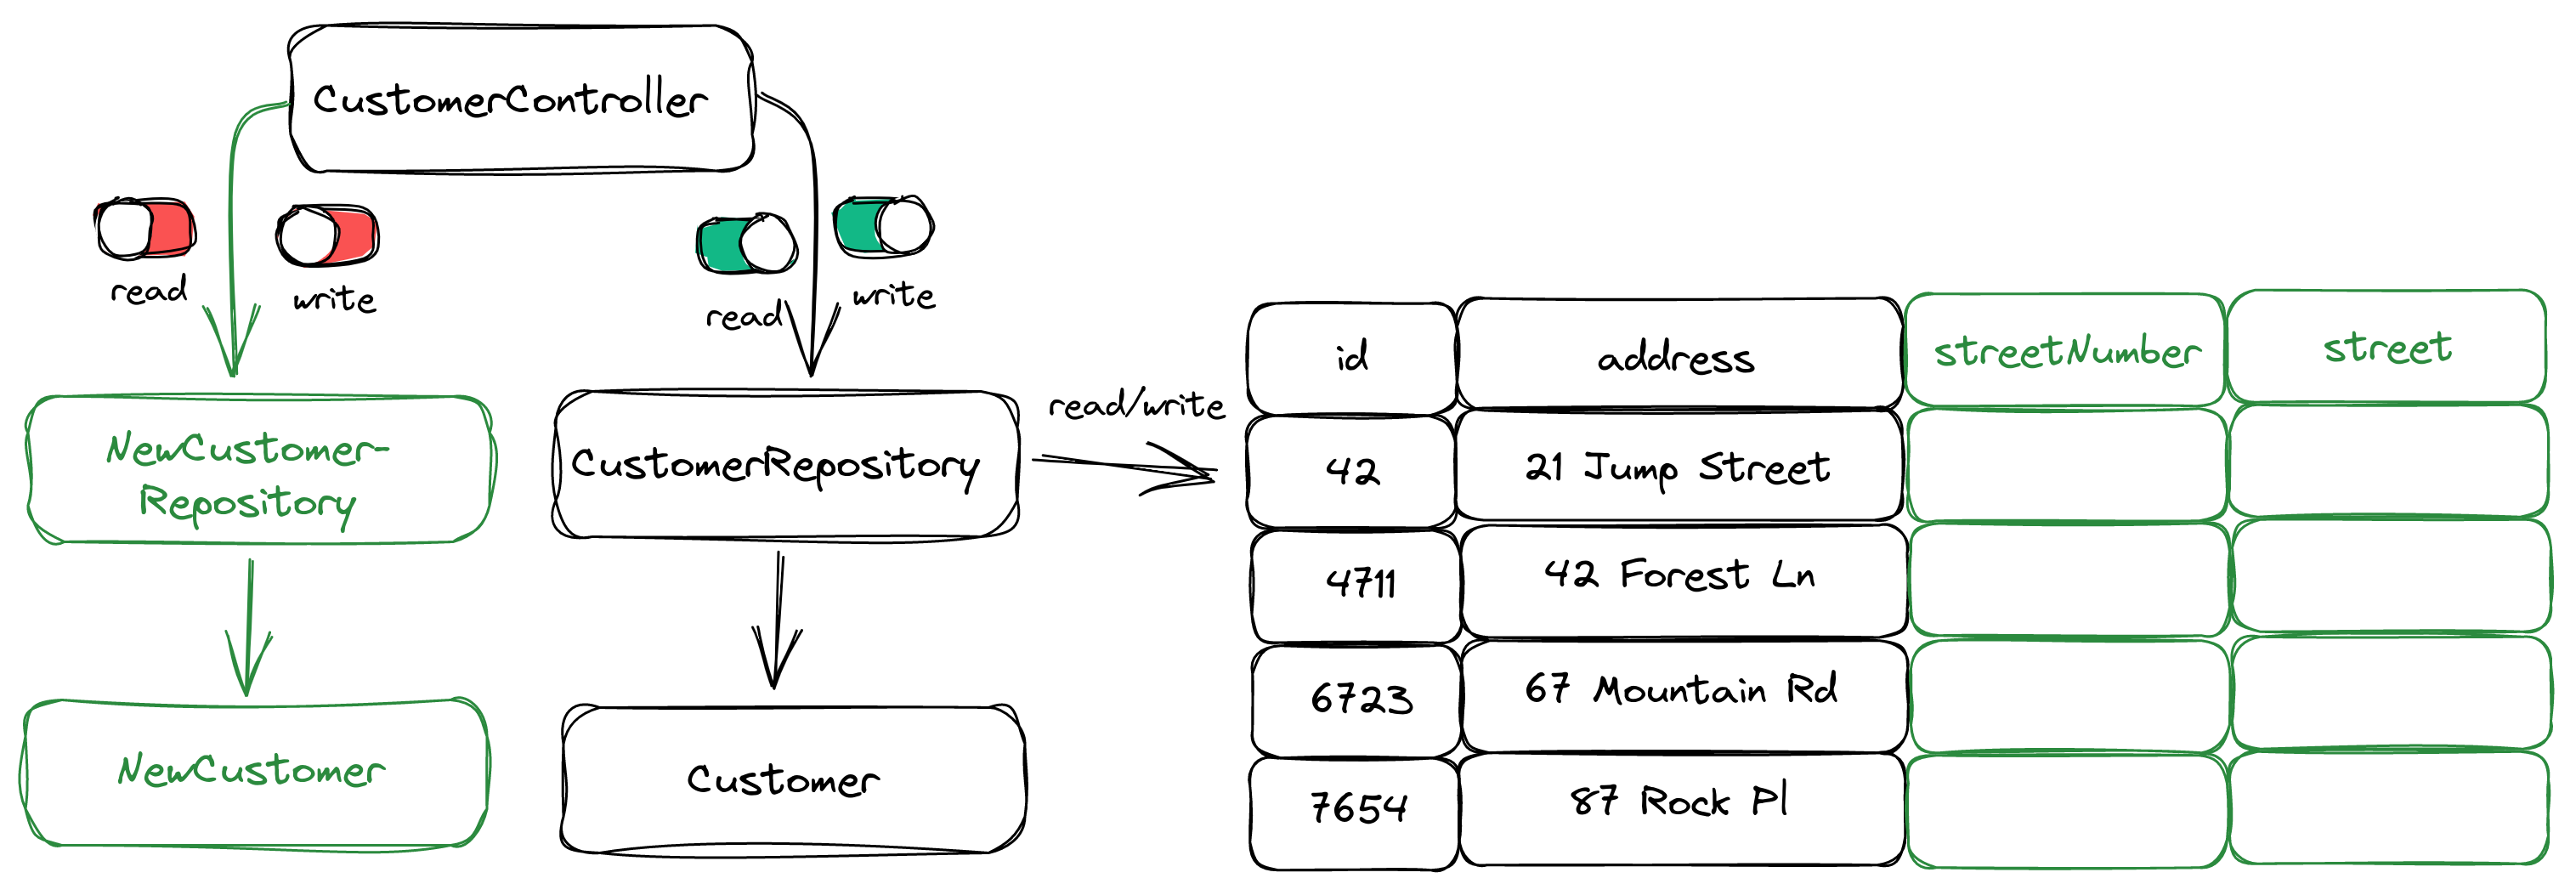
In the end, we want the application to look like this:

In this guide, we’ll go through all the changes we need to do to the database and the code and how to release them as safely as possible using feature flags and multiple deployments.
Step 1: Decouple Database Changes from Code Changes
Before we even start with changing code or the database schema, we’ll want to decouple the execution of database changes from the deployment of a Spring Boot app.
By default, Flyway executes database migration on application startup. This is very convenient but gives us little control. What if the database change is incompatible with the old code? During the rolling deployment, there may be nodes with the old codes still using the database!
We want full control over when we execute our database schema changes! With a little tweak to our Spring Boot application, we can achieve this.
First, we disable Flyway’s default to execute database migrations on startup:
@Configuration
class FlywayConfiguration {

    private final static Logger logger = LoggerFactory.getLogger(FlywayConfiguration.class);

    @Bean
    FlywayMigrationStrategy flywayStrategy() {
        return flyway -> logger.info("Flyway migration on startup is disabled! Call the endpoint /flywayMigrate instead.");
    }

}
Instead of executing all database migrations that haven’t been executed, yet, it will now just print a line to the log saying that we should call an HTTP endpoint instead.
But we also have to implement this HTTP endpoint:
@RestController
class FlywayController {

    private final Flyway flyway;

    public FlywayController(Flyway flyway) {
        this.flyway = flyway;
    }

    @PostMapping("/flywayMigrate")
    String flywayMigrate() {
        flyway.migrate();
        return "success";
    }

}
Whenever we call /flywayMigrate via HTTP POST now, Flyway will run all migration scripts that haven’t been executed, yet. Note that you should protect this endpoint in a real application, so that not everyone can call it.
With this change in place, we can deploy a new version of the code without being forced to change the database schema at the same time. We’ll make use of that in the next step.
Step 2: Deploy the New Code Behind a Feature Flag
Next, we write the code that we need to work with the new database schema:
Since we’re going to change the structure of the CUSTOMER database table, we create the class NewCustomer that maps to the new columns of the table (i.e. streetNumber and street instead of just address). We also create NewCustomerRepository as a new Spring Data repository that binds to the same table as the CustomerRepository but uses the NewCustomer class to map database rows into Java.
Note that we have deployed the new code, but haven’t activated it yet. It can’t work, yet, because the database still is in the old state.
Instead, we’ve hidden it behind feature flags. In the CustomerController we now have code that looks something like this:
@PostMapping("/customers/create")
String createCustomer() {
  if (featureFlagService.writeToNewCustomerSchema()) {
      NewCustomer customer = new NewCustomer("Bob", "Builder", "Build Street", "21");
      newCustomerRepository.save(customer);
  } else {
      OldCustomer customer = new OldCustomer("Bob", "Builder", "21 Build Street");
      oldCustomerRepository.save(customer);
  }
  return "customer created";
}

@GetMapping("/customers/{id}}")
String getCustomer(@PathVariable("id") Long id) {
  if (featureFlagService.readFromNewCustomerSchema()) {
    Optional<NewCustomer> customer = newCustomerRepository.findById(id);
    return customer.get().toString();
  } else {
    Optional<OldCustomer> customer = oldCustomerRepository.findById(id);
    return customer.get().toString();
  }
}
With a feature flagging tool like LaunchDarkly, we have created two feature flags:
The boolean flag featureFlagService.writeToNewCustomerSchema() defines whether the write path to the new database schema is active. This feature flag is currently still disabled because we haven’t updated the database schema yet.
The boolean flag featureFlagService.readFromNewCustomerSchema() defines whether the read path from the new database schema is active. This feature flag is also disabled for now.
With the help of feature flags, we have deployed the new code without even touching the database, yet, which we will do in the next step.
Step 3: Add the New Database Columns
With the deployment of the new code in the previous step, we have also deployed a new SQL script for Flyway to execute. After successful deployment, we can now call the /flywayMigrate endpoint that we prepared in step 1. This will execute the SQL script and update the database schema with the new streetNumber and street fields:
These new columns will be empty for now. Note that we have kept the existing address column untouched for now. In the end state, we’ll want to remove this column, but we have to migrate the data into the new columns first.
The feature flags are still disabled for now, so that both reads and writes go into the old address database column.
Step 4: Activate Writes into the New Database Columns
Next, we activate the writeToNewCustomerSchema feature flag so that the application now writes to the new database columns but still reads from the old one:

Every time the application now writes a new customer to the database, it uses the new code. Note that the new code will still fill the old address column in addition to the new columns streetNumber and street for backwards compatibility because the old code is still responsible for reading from the database.
We can’t switch the new code to read data from the database, yet, because the new columns will be empty for most customers. The new columns will fill up slowly over time as the new code is being used to write data to the database.
To fill the new columns for all customers, we need to run a migration.
Step 5: Migrate Data into the New Database Columns
Next, we’re going to run a migration that goes through all customers in the database whose streetNumber and street fields are still empty, reads the address field, and migrates it into the new fields:
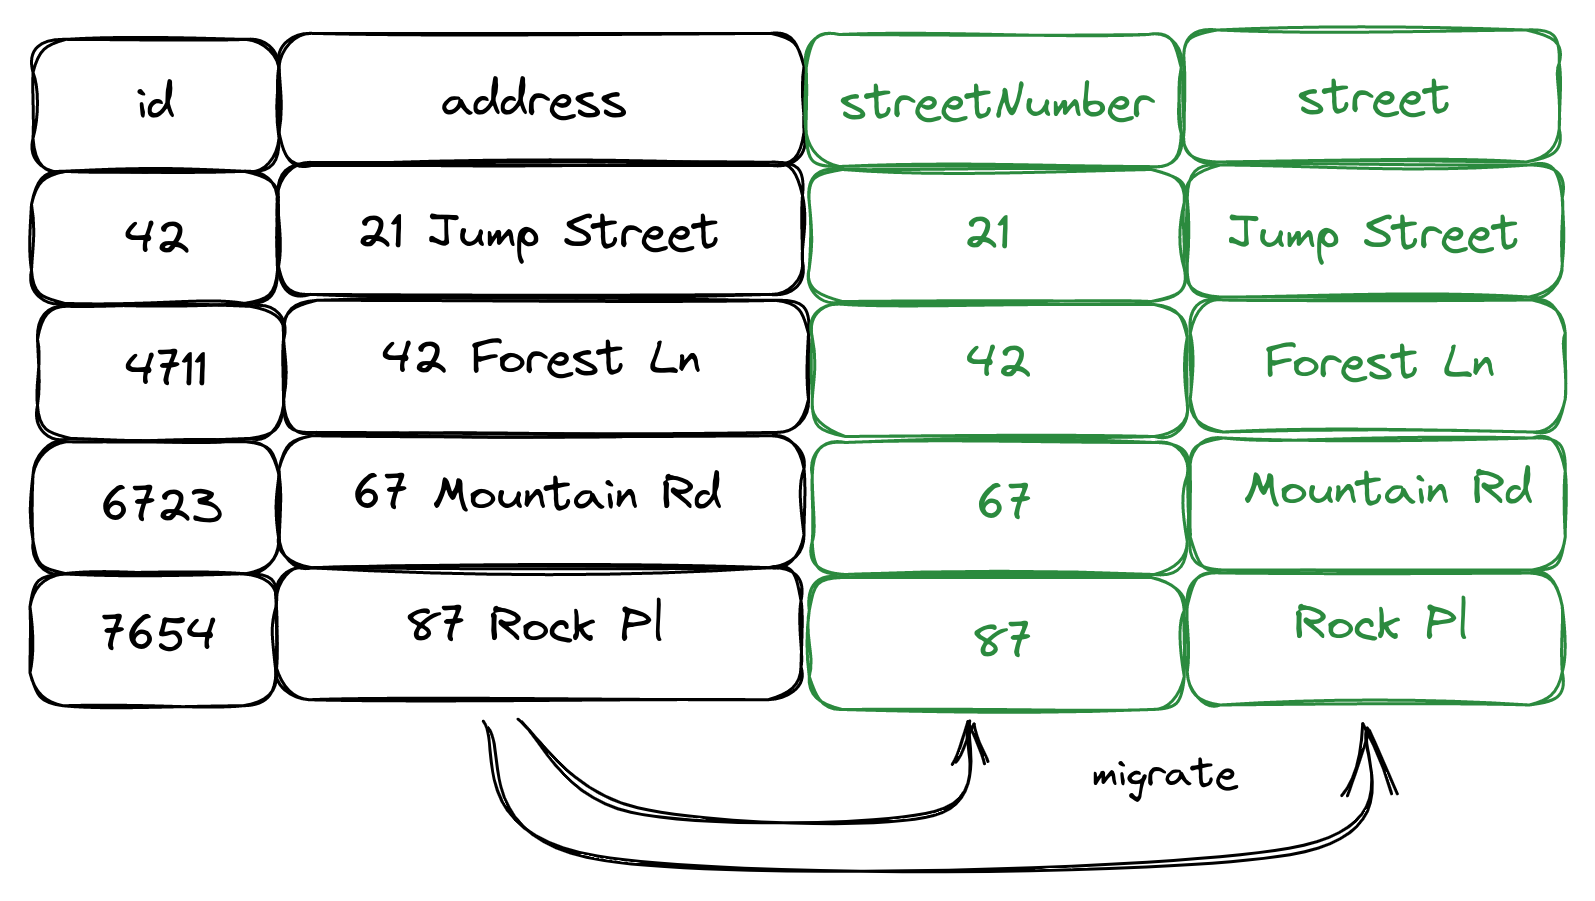
This migration can be an SQL script, some custom code, or actual people looking at the customer data one by one and making the migration manually. It depends on the use case, data quality, and complexity of the migration task to decide the best way.
Data Migrations with Flyway?
Note that the type of migration we're talking about in this section is usually not a task for Flyway. Flyway is for executing scripts that migrate the database schema from one state to another. Migrating data is a very different task.
Yes, Flyway can be used for migrating data. After all, a data migration can very well just be an SQL script. However, a data migration can cause issues like long-running queries and table locks, which should not happen in the context of a Flyway migration because we have little control over it there.
Step 6: Activate Reads from the New Database Columns
Now that all the customer data is migrated into the new data structure, we can activate the feature flag to use the new code to read from the database:
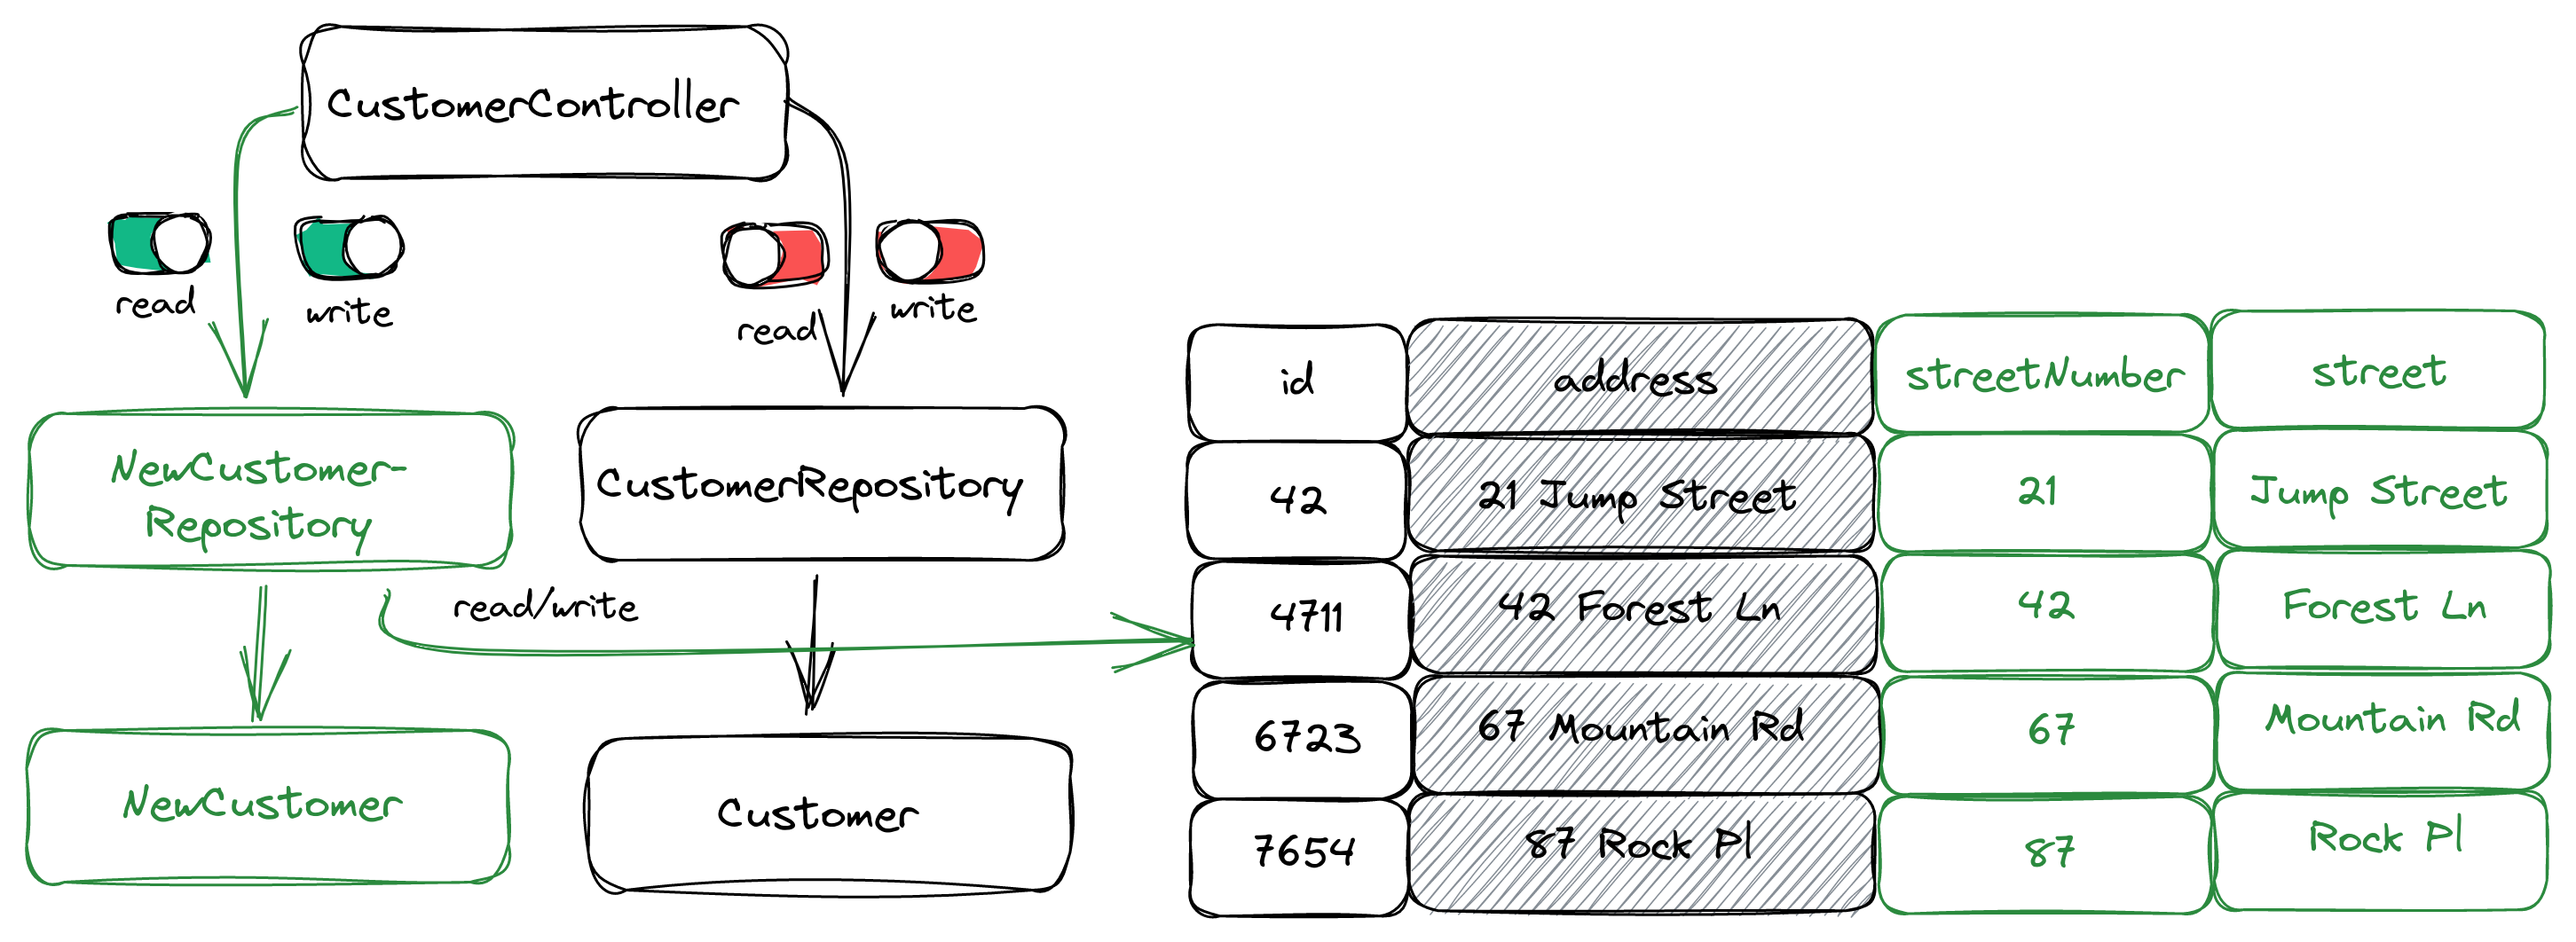
The new code is now being used to write and read from the database. The old code and the old address database column are both not used anymore.
Step 7: Remove the Old Code and Database Column
The last step is to clean up:
We can remove the old code that isn’t used anymore. And we can run another Flyway migration that removes the old address column from the database.
We should also remove the feature flags from the code now because we’re no longer using the old code. If we don’t remove the old code, we’ll accrue technical debt that will make the code harder to understand for the next person. When using feature flags at scale across a whole organization, a feature flagging platform like LaunchDarkly can help with this, because it’s tracking the usage of feature flags across the codebase.
We can now also rename the NewCustomerRepository to CustomerRepository and NewCustomer to Customer to make the code clean and understandable once more.
Deploy with Confidence
The 7 steps above will be spread out across multiple deployments of the application. Some of them can be combined into a single deployment, but there will be at least two deployments: one to deploy the new code and the feature flags, and one to remove the old code and the feature flags.
The feature flags give us a lot of flexibility and confidence in database changes like in the use case we discussed above. Feature flags allow us to decouple the code changes from the database changes. Without feature flags, we can only activate new code by deploying a new version of the application, which makes scenarios that require backwards compatibility with an old database schema a lot harder to manage (and riskier!).
If you want to learn more about feature flagging, make sure to read my tutorial about LaunchDarkly and Togglz, two of the most popular feature flagging tools in the JVM world.


