With feature flags, we can reduce the risk of rolling out software changes to a minimum. We deploy the software with the changes, but the changes are behind a deactivated feature flag. After successful deployment, we can choose when and for which users to activate the feature.
By reducing the deployment risk, feature flags are a main driver of DevOps metrics like lead time and deployment frequency - which are proven to have a positive impact on organizational performance (see my book notes on “Accelerate” for more about DevOps metrics).
In this article, we’re going to implement feature flags with Togglz and LaunchDarkly: Togglz is an extensible Java library, and LaunchDarkly is a cloud-based feature management platform. We’ll explore how we can implement some common feature flagging use cases with each of them and discuss the pros and cons of each tool.
If you’re only interested in one of the two solutions, jump ahead to the section covering it:
Code Example
You can follow along with the code examples in this article by browsing or cloning the code of a fully functional example application on GitHub.
Feature Flagging Use Cases
Before we dive into the tools, let’s take a look at some common feature flagging use cases. We’ll try to implement each of these use cases with each of the feature flag tools so we get a feeling of what we can do with them.
There are more than the use cases discussed in this article, of course. The idea is to look at the most common use cases to compare what the different feature flagging tools can do.
Use Case 1: Global Rollout
This is the simplest feature flag possible. We want to enable or disable a certain feature for all users.
We deploy a new version of the application with a deactivated feature and after successful deployment, we activate (roll out) the feature for all users. We can later decide to deactivate it again - also for all users:

Use Case 2: Percentage Rollout
The global rollout use case is very simple and raises the question of why we would even need a feature flagging tool because we could just implement it ourselves with a simple if/else construct. So let’s look at a bit more complex use case.
A percentage rollout is another very common rollout strategy in which we activate a feature for a small percentage of users first, to see if it’s working as expected, and then ramp up the percentage over days or weeks until the feature is active for all users:

Important in this use case is that a user stays in the same cohort over time. It’s not enough to just enable a feature for 20% of the requests, because a user could issue multiple requests and have the feature enabled for some requests and disabled for others - which make for a rather awkward user experience. So, the evaluation of the feature flag has to take the user into account.
Also, if the percentage is increased from 20% to 30%, the new 30% cohort should include the previous 20% cohort so the feature is not suddenly deactivated for the early adopters.
You can see that we don’t really want to implement this ourselves but instead rely on a tool to do it for us.
Use Case 3: Rollout Based on a User Attribute
The last use case we’re going to look at is a targeted rollout based on a user attribute or behavior. A user attribute can be anything: the location of the user, demographic information, or attributes that are specific to our application like “the user has done a specific thing in our application”.
In our example, we’ll activate a certain feature after a user has clicked a certain button:

Our application will set the user’s clicked attribute to true after clicking the button. The feature flagging tool should take this attribute into account when evaluating the feature flag.
Togglz
Togglz is a Java library that we can include as a dependency into our application. The concepts of the library rotate around the FeatureManager class:

Once configured, we can ask the FeatureManager if a certain feature is active for a given user. Before a feature can be active, it needs to be enabled. This is to ensure that we’re not accidentally activating features that are not ready to be served to our users, yet.
The FeatureManager has access to a UserProvider, which knows about the user who is currently using our application. This way, Togglz can distinguish between users and we can build features that are active for some users and inactive for others.
The FeatureProvider provides the Features that we want to control in our application. Different FeatureProvider implementations load the feature data from different locations. This feature data contains the names of the features, whether they are enabled by default, and their activation strategy. We can decide to load our features from a Java enum, a config file, or from environment variables, for example.
Each Feature has an ActivationStrategy that defines under which circumstances the feature will be active for a given user.
Finally, the FeatureManager has access to a StateRepository which stores feature state. Most importantly, this state includes whether the feature is enabled and which ActivationStrategy the feature is using. By default, Togglz is using an in-memory store for the feature states.
Let’s set up Togglz in our Java application to see what it can do!
Initial Setup
We’re going to set Togglz up in a Spring Boot application. We need to declare the following dependency in our pom.xml:
<dependency>
    <groupId>org.togglz</groupId>
    <artifactId>togglz-spring-boot-starter</artifactId>
    <version>2.6.1.Final</version>
</dependency>
To get Togglz running, we need to declare our features somewhere. We’re choosing to do this in an enum:
public enum Features implements Feature {

    GLOBAL_BOOLEAN_FLAG,

    //... more features

    public boolean isActive() {
        return FeatureContext.getFeatureManager().isActive(this);
    }
}
For each feature that we want to use, we add a new enum constant. We can influence the features with a handful of different annotations.
What’s left to do is to tell Togglz that it should use this Features enum. We do this by setting the togglz.feature-enums property in Spring Boot’s application.yml configuration file:
togglz:
  feature-enums: io.reflectoring.featureflags.togglz.Features
This configuration property points to the fully qualified class name of our Features enum and the Spring Boot Starter that we included in the dependencies will automatically configure Togglz with a FeatureProvider that uses this enum as the source of feature definitions.
We’re now ready to use Togglz, so let’s see how we can implement our feature flagging use cases.
Global Boolean Rollout with Togglz
We’ve already seen our global boolean feature in the enum, but here it is again:
public enum Features implements Feature {

    GLOBAL_BOOLEAN_FLAG;

    public boolean isActive() {
      return FeatureContext.getFeatureManager().isActive(this);
    }
}
We can check if the feature is active by asking the Feature Manager like in the isActive() convenience method in the code above.
Features.GLOBAL_BOOLEAN_FLAG.isActive() would return false, currently, because features are disabled by default. Only if a feature is enabled will its ActivationStrategy decide whether the feature should be active for a given user.
We can enable the feature by setting a property in application.yml:
togglz:
  features:
    GLOBAL_BOOLEAN_FLAG:
      enabled: true
Alternatively, we could start the application with the environment variable TOGGLZ_FEATURES_GLOBAL_BOOLEAN_FLAG_ENABLED set to true.
If we call Features.GLOBAL_BOOLEAN_FLAG.isActive() now, it will return true.
But why is the feature active as soon as we enabled it? Aren’t enabled and active different things as explained above? Yes, they are, but we haven’t declared an ActivationStrategy for our feature.
Without an ActivationStrategy all enabled features are automatically active.
We just implemented a global boolean flag that is controlled by a configuration property or environment variable.
Percentage Rollout with Togglz
Next, let’s build a percentage rollout. Togglz calls this a “gradual rollout”.
A proper percentage rollout only works when Togglz knows which user is currently using the application. So, we have to implement the UserProvider interface:
@Component
public class TogglzUserProvider implements UserProvider {

  private final UserSession userSession;

  public TogglzUserProvider(UserSession userSession) {
    this.userSession = userSession;
  }

  @Override
  public FeatureUser getCurrentUser() {
    return new FeatureUser() {
      @Override
      public String getName() {
        return userSession.getUsername();
      }

      @Override
      public boolean isFeatureAdmin() {
        return false;
      }

      @Override
      public Object getAttribute(String attributeName) {
        return null;
      }
    };
  }
}
This implementation of UserProvider reads the current user from the session. UserSession is a session-scoped bean in the Spring application context (see the full code in the example application).
We annotate our implementation with the @Component annotation so that Spring creates an object of it during startup and puts it into the application context. The Spring Boot starter dependency we added previously will automatically pick up UserProvider implementations from the application context and configure Togglz' FeatureManager with it. Togglz will now know which user is currently browsing our application.
Next, we define our feature in the Features enum like this:
public enum Features implements Feature {

  @EnabledByDefault
  @DefaultActivationStrategy(id = GradualActivationStrategy.ID, parameters = {
          @ActivationParameter(name = GradualActivationStrategy.PARAM_PERCENTAGE, value = "50")
  })
  USER_BASED_PERCENTAGE_ROLLOUT;

  // ...
}
This time, we’re using the @EnabledByDefault annotation. That means the feature is enabled and will let its activation strategy decide whether the feature is active or not for a given user. That means we don’t need to add togglz.features.GLOBAL_BOOLEAN_FLAG.enabled: true to application.yml to enable it.
We’re also using the @DefaultActivationStrategy annotation to configure this new feature to use the GradualActivationStrategy and configure it to activate the feature for 50% of the users.
This activation strategy creates a hashcode of the user name and the feature name, normalizes it to a value between 0 and 100, and then checks if the hashcode is below the percentage value (in our case 50). Only then will it activate the feature. See the full code of this activation strategy here.
Features.USER_BASED_PERCENTAGE_ROLLOUT.isActive() will now return true for approximately 50% of the users using our application. If we have very few users with hashcodes that are close together, it might be considerably more or less than 50%, however.
Rollout Based on a User Attribute with Togglz
Now, let’s look at how to build a feature that activates only after a user has done a certain action in our application.
For this, we’re going to implement the getAttribute() method in our UserProvider implementation:
@Component
public class TogglzUserProvider implements UserProvider {

  // ...

  @Override
  public FeatureUser getCurrentUser() {
    return new FeatureUser() {
      @Override
      public String getName() {
        return userSession.getUsername();
      }

      @Override
      public boolean isFeatureAdmin() {
        return false;
      }

      @Override
      public Object getAttribute(String attributeName) {
        if (attributeName.equals("clicked")) {
          return userSession.hasClicked();
        }
        return null;
      }
    };
  }
}
Similar to getName(), the getAttribute() method returns a value from the session. We’re assuming here that userSession.hasClicked() returns true only after a user has clicked a certain button in our application. In a real application, we should persist this value in the database so it will stay the same even between user sessions!
Our Togglz user objects now have the attribute clicked set to true after they have clicked the button.
Next, we implement a custom UserClickedActivationStrategy:
public class UserClickedActivationStrategy implements ActivationStrategy {

    @Override
    public String getId() {
        return "clicked";
    }

    @Override
    public String getName() {
        return "Rollout based on user click";
    }

    @Override
    public boolean isActive(FeatureState featureState, FeatureUser user) {
        return (Boolean) user.getAttribute("clicked");
    }

    @Override
    public Parameter[] getParameters() {
        return new Parameter[0];
    }
}
Note that the isActive() method returns the value of the user’s clicked attribute, which we just implemented in our custom UserProvider implementation.
Now we can finally declare the feature in the Features enum:
public enum Features implements Feature {

    @EnabledByDefault
    @DefaultActivationStrategy(id = "clicked")
    USER_ACTION_TARGETED_FEATURE;

    // ...
}
Again, we enable it by default, so that we don’t have to so manually. As the activation strategy, we’re using our custom UserClickedActivationStrategy by passing the ID of that strategy into the DefaultActivationStrategy annotation.
Features.USER_ACTION_TARGETED_FEATURE.isActive() will now return true only after the user has clicked a certain button in our application.
Managing Feature Flags with the Togglz Web Console
Now that we have a few features, we want to toggle them on or off. For example, we want to do a “dark launch” for a feature. That means we don’t enable it by default, deploy the feature in its disabled state, and only then decide to activate it.
We could, of course, change the enabled state in the application.yml file and then re-deploy the application, but the point of feature flagging is that we separate deployments from enabling features, so we don’t want to do this.
For managing features, Togglz offers a web console that we can deploy next to our application. With the Spring Boot integration, we can set a few properties in application.yml to activate it:
togglz:
  console:
    enabled: true
    secured: false
    path: /togglz
    use-management-port: false
The secured property should be set to true in a production environment (or you secure it yourself). If set to true, only users for which FeatureUser.isFeatureAdmin() returns true will have access to the web console. This can be controlled in the UserProvider implementation.
Setting use-management-port to false will start the web console on the same port as our Spring Boot application.
Once the application is started with this configuration, we can access the web console on http://localhost:8080/togglz:
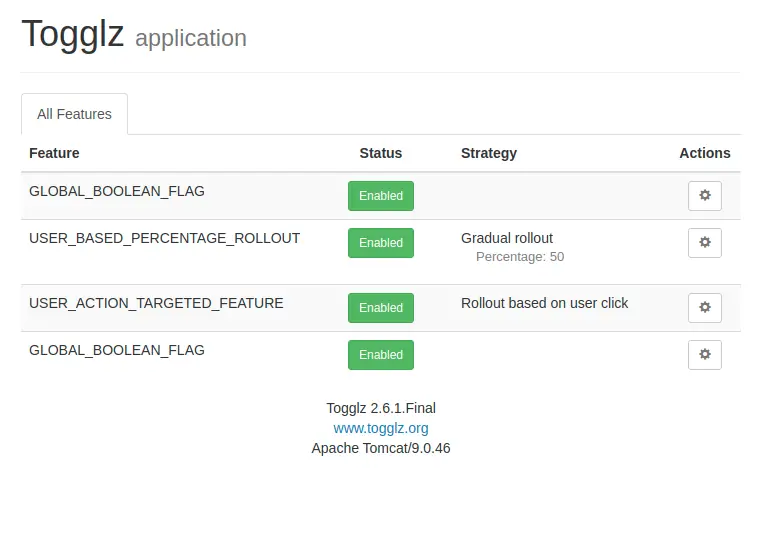
The web console allows us to enable and disable features and even to change their activation strategy on the fly. There seems to be a bug that causes the GLOBAL_BOOLEAN_FLAG to be listed twice, probably because the web console reads it once from the Features enum and once from the application.yml file.
Deploying Togglz into Production
In a production environment, we usually want to deploy multiple nodes of our application. So, as soon as we think about a production environment for our application, we need to answer the question of how to use Togglz across multiple application nodes.
This diagram outlines what a production deployment could look like:
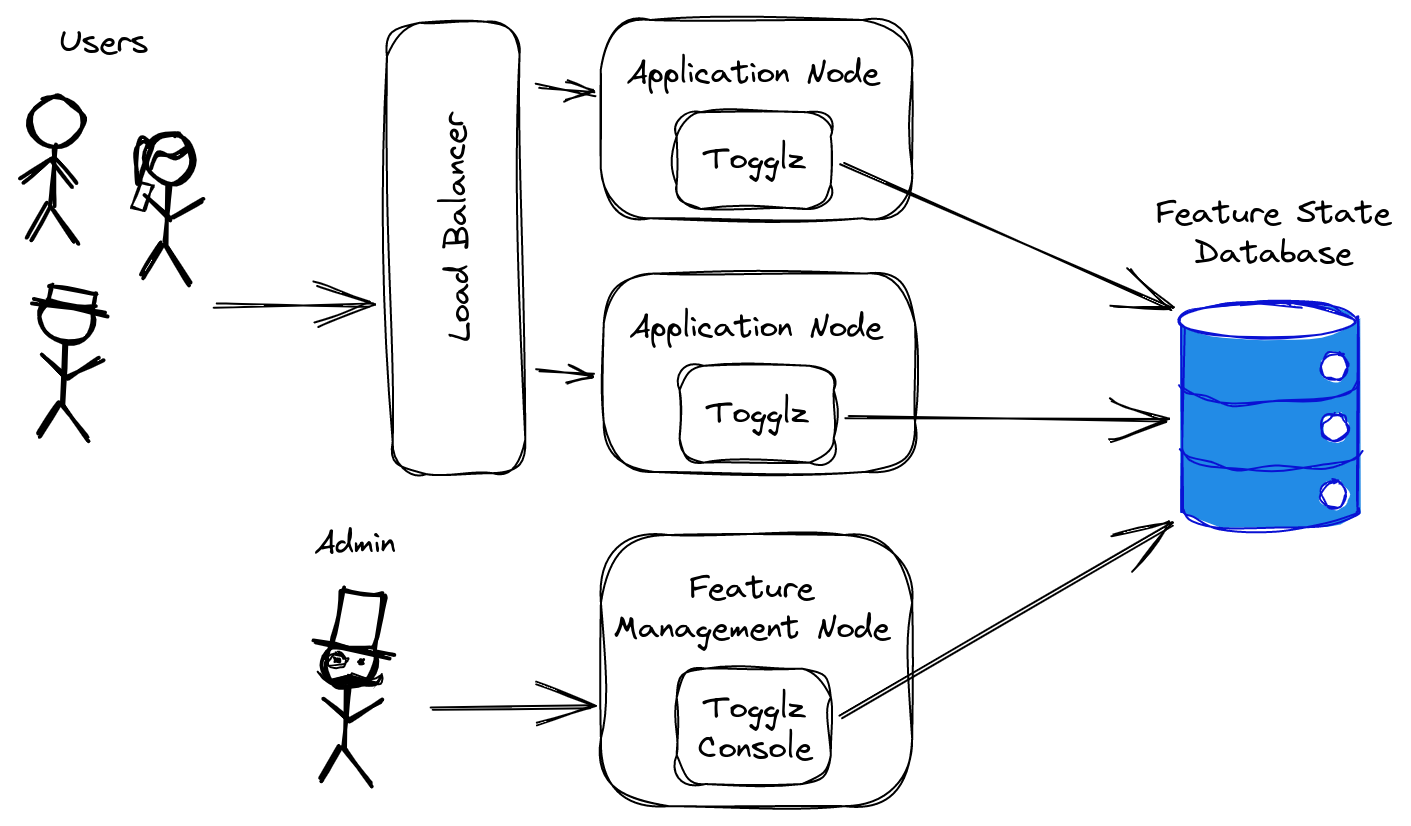
Our users are accessing the application over a load balancer that shares the traffic across multiple application nodes. Each of these nodes is using Togglz to decide whether certain features are active or not.
Since all application nodes should have the same state for all features, we need to connect Togglz to a feature state database that is shared across all application nodes. We can do this by implementing Togglz' StateRepository interface (or use an existing implementation like the JdbcStateRepository) and pointing it to a database.
To manage features, we need at least one node that serves the Togglz web console. This can be one (or all) of the application nodes, or a separate node as shown in the diagram above. This web console also has to be connected to the shared feature state database and it has to be protected from unauthorized access.
Other Togglz Features
In addition to what we discussed above, Togglz offers:
- a handful of different activation strategies to control how to activate a feature,
- a handful of different state repository implementations to store feature state in different databases,
- some pre-canned user provider implementations that integrate with authentication providers like Spring Security,
- grouping features in the admin console,
- support for JUnit 4 and 5 to help control feature state in tests.
In conclusion, Togglz provides a great framework to build your own feature flagging solution, but there’s quite some manual work involved. Let’s see how we can delegate that work using a feature management service in the cloud.
LaunchDarkly
LaunchDarkly is a full-fledged feature management service that does most of the dirty feature flagging work for us. The name stems from the concept of a “dark launch”, which is deploying a feature in a deactivated state and only activating it when the time is right.
Let’s take a look at the core LaunchDarkly concepts before diving into the technicalities of controlling feature flags in Java:

Being a cloud service, LaunchDarkly provides web UI for us to create and configure feature flags. We could also create Feature Flag programmatically via the UI or various integrations with other tools, but we’ll stick to the UI in this article.
For each feature flag, we can define one or more variations. A variation is a possible value the feature flag can have for a specific user. A boolean flag, for example, has exactly two variations: true and false. But we’re not limited to boolean feature flags, but can create flags with arbitrary numbers, string values, or even JSON snippets.
To decide which variation a feature flag will show to a given user, we can define targeting rules for each feature flag. The simplest targeting rule is “show variation A for all users”. A more complex targeting rule is “show variation A for all users with attribute X, variation B for all users with attribute Y, and variation C for all other users”. We will define a different targeting rule for each of our feature flagging use cases shortly.
By default, targeting for a feature flag is deactivated. That means that the targeting rules will not be evaluated. In this state, a feature flag always serves its default variation (which would be the value false for a boolean flag, for example).
To make their decision about which variation to serve, a targeting rule needs to know about the user for whom it’s making the decision.
In our code, we’ll be asking a LaunchDarkly client to tell us the variation of a given feature flag for a given user. The client loads the targeting rules that we have defined in the web UI from the LaunchDarkly server and evaluates them locally.
So, even though we are defining the targeting rules in the LaunchDarkly web UI (i.e. on a LaunchDarkly server), the LaunchDarkly client doesn’t call out to a LaunchDarkly server to poll for the variation we should serve to a given user! Instead, the client connects to the server on startup, downloads the targeting rules, and then evaluates them on the client side. LaunchDarkly is using a streaming architecture instead of a polling architecture.
This architecture is interesting from a scalability perspective because our application doesn’t have to make a network call every time we need to evaluate a feature flag. It’s also interesting from a resilience perspective because feature flag evaluation will still work if the LaunchDarkly server has exploded and is not answering our calls anymore.
With these concepts in mind, let’s see how we can use LaunchDarkly in a Spring Boot application.
Initial Setup
To use the LaunchDarkly Java client, we need to first include it as a dependency in our application. We add the following to our pom.xml file:
<dependency>
    <groupId>com.launchdarkly</groupId>
    <artifactId>launchdarkly-java-server-sdk</artifactId>
    <version>5.3.0</version>
</dependency>
Before the client can talk to the LaunchDarkly server, we also need to create a LaunchDarkly account. If you want to play along with the example, you can sign up for a free trial account here.
After signup, you get an “SDK key” that the client uses to authenticate to the server.
We will put this key into Spring Boot’s application.yml configuration file:
launchdarkly:
  sdkKey: ${LAUNCHDARKLY_SDK_KEY}
This will set the configuration property launchdarkly.sdkKey to the value of the environment variable LAUNCHDARKLY_SDK_KEY on startup of the Spring Boot application.
We could have hard-coded the SDK key into the application.yml file, but it’s better practice to inject secrets like this via environment variables so they don’t accidentally end up in version control and who knows where from there.
The final piece of setup is to create an instance of the LaunchDarkly client and make it available to our application:
@Configuration
public class LaunchDarklyConfiguration {

    private LDClient launchdarklyClient;

    @Bean
    public LDClient launchdarklyClient(@Value("${launchdarkly.sdkKey}") String sdkKey) {
        this.launchdarklyClient = new LDClient(sdkKey);
        return this.launchdarklyClient;
    }

    @PreDestroy
    public void destroy() throws IOException {
        this.launchdarklyClient.close();
    }

}
This configuration class will create an LDClient instance and add it to the Spring application context. On instantiation, the client will download the current targeting rules from a LaunchDarkly server. This means we should make sure that we don’t instantiate a new LDClient instance for each feature flag evaluation.
To create the LDClient instance, we inject the SDK key.
We also implement a @PreDestroy method that is called when the Spring application context is shutting down (i.e. when the application is shutting down). This method tells the client to close gracefully, sending any events that it might have queued up to the server. Such events include evaluation counters for feature flags and changes in a user’s attributes, for example.
With this setup, we’re ready to implement our first feature flag!
Global Boolean Rollout with LaunchDarkly
Let’s start with the simplest feature flag possible: a simple boolean toggle that activates a feature for all users or none.
First, we create a feature flag with the key global-boolean-flag in the LaunchDarkly UI:

Note that we created the feature flag as a boolean flag, which means that it has exactly two variations: true and false. We also have not created a specific targeting rule, so the default rule will always serve the false variation.
In the screenshot, you can see that the targeting is already set to “on”, which means that whatever targeting rules we define will be “live” and have an effect on our users.
As soon as the feature is saved, we can ask our LDClient to evaluate the feature for us:
LDUser user = new LDUser.Builder(userSession.getUsername())
        .build();

boolean booleanFlagActive = launchdarklyClient
        .boolVariation("global-boolean-flag", user, false);
To evaluate a feature flag, the LaunchDarkly client needs to know which user the feature should be evaluated for. With our simple global boolean flag, we don’t really need a user, because we want to enable the feature for everyone or nobody, but most targeting rules will evaluate differently for different users, so we need to always pass a user to the client.
In the example, we’re just getting the (unique) username from our session and creating an LDUser object with it. Whatever we pass as a key into the LDUser, it needs to be a unique identifier for the user so that LaunchDarkly can recognize the user.
A username is not the best key, by the way, because it’s personally identifiable information, so a more opaque user ID is probably the better choice in most contexts.
In our code, we need to know what kind of variations the feature flag provides to call the appropriate method. In our case, we know the feature flag is a boolean flag, so we use the method boolVariation(). The third parameter to this method (false) is the value the feature should evaluate to in case the client could not make a connection to the LaunchDarkly server.
If the feature flag is configured as shown in the screenshot above, the client will know that the targeting is “on” for the feature global-boolean-flag, and then evaluate the default rule, which evaluates to false. If we change the default rule to true, LaunchDarkly will inform our client and the next call to boolVariation() will evaluate to true.
Percentage Rollout with LaunchDarkly
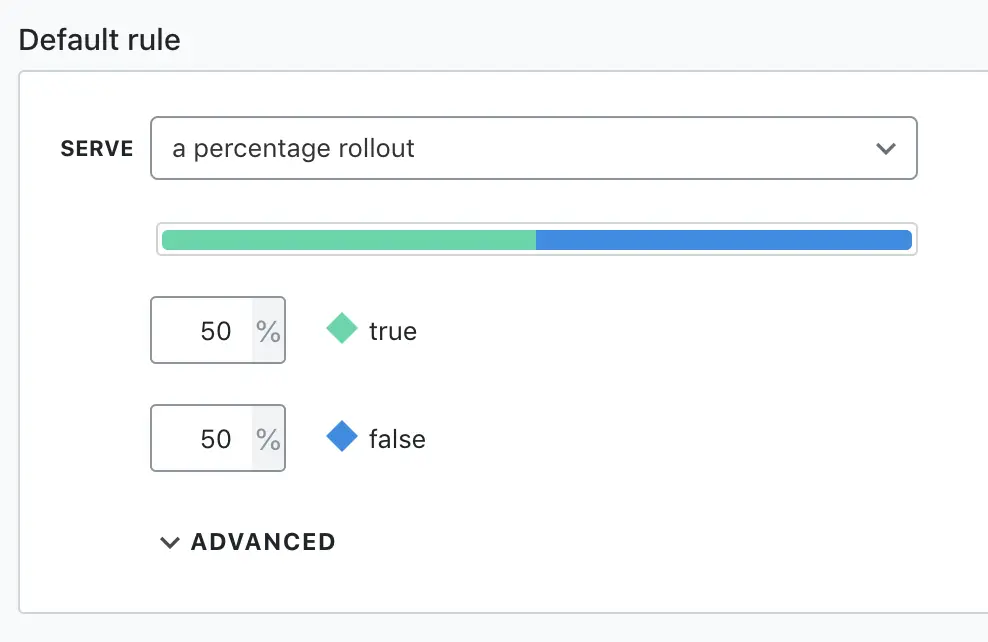
To implement a percentage rollout with LaunchDarkly, we create a new feature named user-based-percentage-rollout in the LaunchDarkly UI and set the default targeting rule to a percentage rollout:
In our code, we can now evaluate this feature flag the same as we did before:
boolean percentageFlagActive = launchdarklyClient
        .boolVariation("user-based-percentage-rollout", user, false);
For each variation of a percentage feature flag, LaunchDarkly creates a bucket. In the case of our example, we have two buckets, one for the variation true, and one for the variation false, and each bucket has the same size (50%).
The LaunchDarkly client knows about these buckets. To determine which bucket the current user falls into, the LaunchDarkly client creates a hashcode for the user and uses it to decide on which bucket the user to put in. This allows multiple - potentially distributed - LaunchDarkly clients to evaluate to the same value for the same user, because they calculate the same hashcode.
Rollout Based on a User Attribute with LaunchDarkly
We can implement more complex targeting strategies in the same fashion. We configure the targeting rules in the LaunchDarkly UI, and then ask the LaunchDarkly client for the variation for the given user.
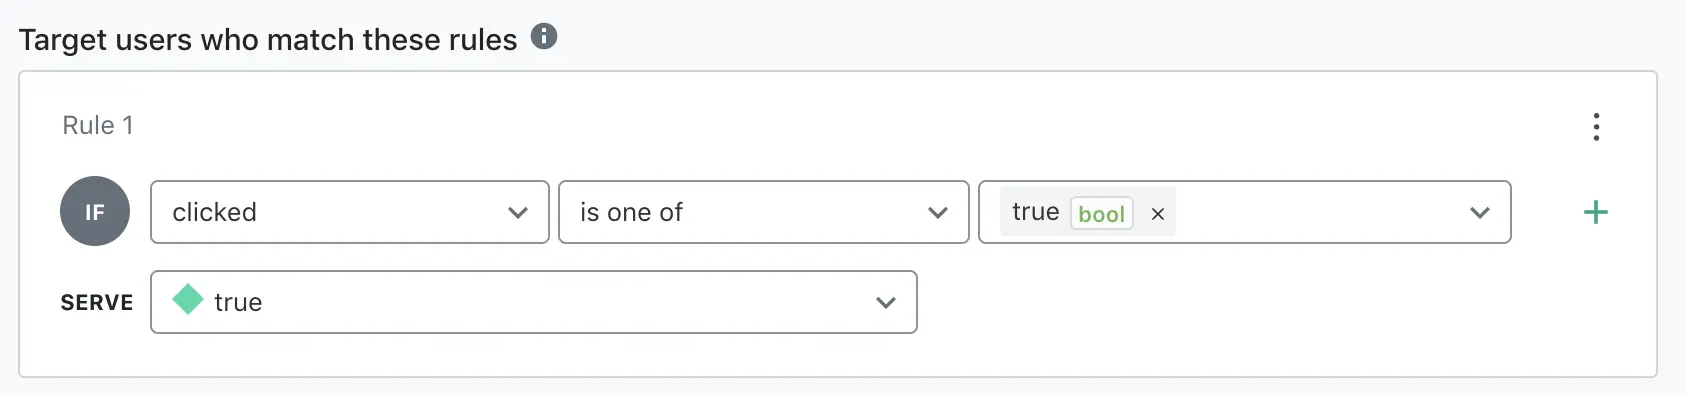
Let’s assume that we want to enable a certain feature for users only after they have clicked a certain button in our application. For this case, we can create a targeting rule that serves true only for users with the clicked attribute set to true:
But how does LaunchDarkly know about the clicked attribute of a user? We need to pass it into the client:
LDUser user = new LDUser.Builder(userSession.getUsername())
        .custom("clicked", userSession.hasClicked())
        .build();

boolean clickedFlagActive = launchdarklyClient
        .boolVariation("user-clicked-flag", user, false);
When we create the LDUser object, we now set the clicked custom attribute to a value that - in our example - we get from the user session. With the clicked attribute, the LaunchDarkly client can now properly evaluate the feature flag.
After a feature has been evaluated for a user with a given attribute, LaunchDarkly will show the user’s attributes in its user dashboard:
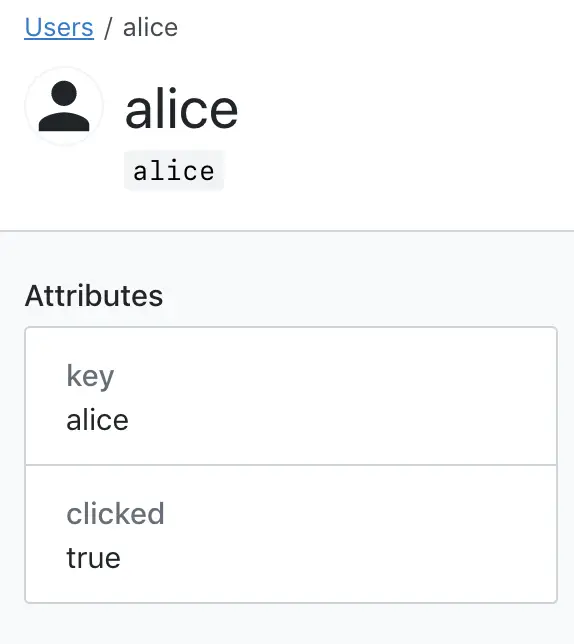
Note that LaunchDarkly only shows these user attributes as a convenience. The user attributes are evaluated by the LaunchDarkly client, not the LaunchDarkly server! So, if our application doesn’t set the clicked attribute of the LDUser object, our example feature flag will evaluate to false, even if we have set the clicked attribute to true in a previous call!
Additional Features
The targeting rules in our examples above are still rather simple examples, given the flexibilty the LaunchDarkly UI offers to create targeting rules.
As mentioned, LaunchDarkly not only supports boolean feature flags, but any number of variations of different types like strings, numbers, or JSON. This opens the door to pretty much every feature flagging use case one can think of.
In addition to flexible targeting rules, LaunchDarkly offers a lot of features that a geared towards teams and even Enterprises:
- analytics across our feature flags,
- designing feature workflows with scheduled feature releases and approval steps,
- auditing on feature flag changes, so we can reconstruct the variations of a feature flag at a given point in time,
- debugging feature flags in the LaunchDarkly UI to verify that features are evaluated to the expected variation,
- slicing our user base into segments to target each segment differently,
- running experiments by pairing a feature flag with a certain metric from our application to gauge how the feature impacts the metric,
- and a lot more.
Conclusion - What’s the Best Feature Flagging Solution for Me?
The two solutions discussed in this article are very different. As is often the case when deciding on a tool that solves a specific problem, you can’t really say that one solution is “better” than another without taking your context into account.
Togglz is a Java library that we can easily extend by implementing some interfaces, but it doesn’t scale well with a lot of features (because they will be hard to find in the web console) and we have some custom work to self-host the web console and to integrate it with a database, for example.
LaunchDarkly, on the other hand, is a full-blown feature management platform that supports many programming languages, allows very flexible targeting rules and scales to an almost limitless number of feature flags without impacting performance too much. But it follows a subscription model and we’re sharing our feature data with them.
For small teams who are working on a few - exclusively Java - codebases with tens of features, Togglz is a great way to get started with feature flags.
For bigger teams or enterprises with multiple codebases - potentially across multiple programming languages - and hundreds or even thousands of feature flags, there is no way around a feature management platform like LaunchDarkly.
Here’s an (incomplete) list of aspects to think about when deciding on a feature flagging solution for your context:
| Aspect | Togglz | LaunchDarkly |
|---|---|---|
| Targeting strategies | By implementing the ActivationStrategy interface |
By configuring a targeting rule in the UI, via API, or via integration |
| Changing the targeting | Might need redeployment of a new ActivationStrategy |
Any time by changing a rule in the UI |
| Targeting by application environment (staging, prod, …) | No concept of application environments | Feature flags can be configured to evaluate differently for different environments |
| Programming Languages | Java | Many |
| Feature variations | Only boolean | Booleans, strings, numbers, and JSON |
| Feature management | Via self-hosted web console | Via web console in the cloud |
| Feature state | By implementing a StateRepository interface |
Managed by LaunchDarkly servers or a self-hosted Relay Proxy |
| Feature analytics | Needs to be custom-built | Out-of-the-box |
| Working in a team | Simple feature management in the web console | Audit logs, user dashboard, feature ownership, … |
| Enterprise | Simple feature management in the web console | Workflows, custom roles, SSO/SCIM/SAML login, code references, … |
| Cost | Cost of customizing | Per-seat fee |
| Integrations | Spring Boot, Spring Security, EJB | No out-of-the-box integrations with Java frameworks |


