Spring Security is a framework that helps secure enterprise applications. By integrating with Spring MVC, Spring Webflux or Spring Boot, we can create a powerful and highly customizable authentication and access-control framework. In this article, we will explain the core concepts and take a closer look at the default configuration that Spring Security provides and how they work. We will further try to customize them and analyse their impact on a sample Spring Boot application.
Example Code
This article is accompanied by a working code example on GitHub.Creating a Sample Application
Let’s begin by building a Spring Boot application from scratch and look at how spring configures and provides security. Let’s create an application from spring starter and add the minimum required dependencies.
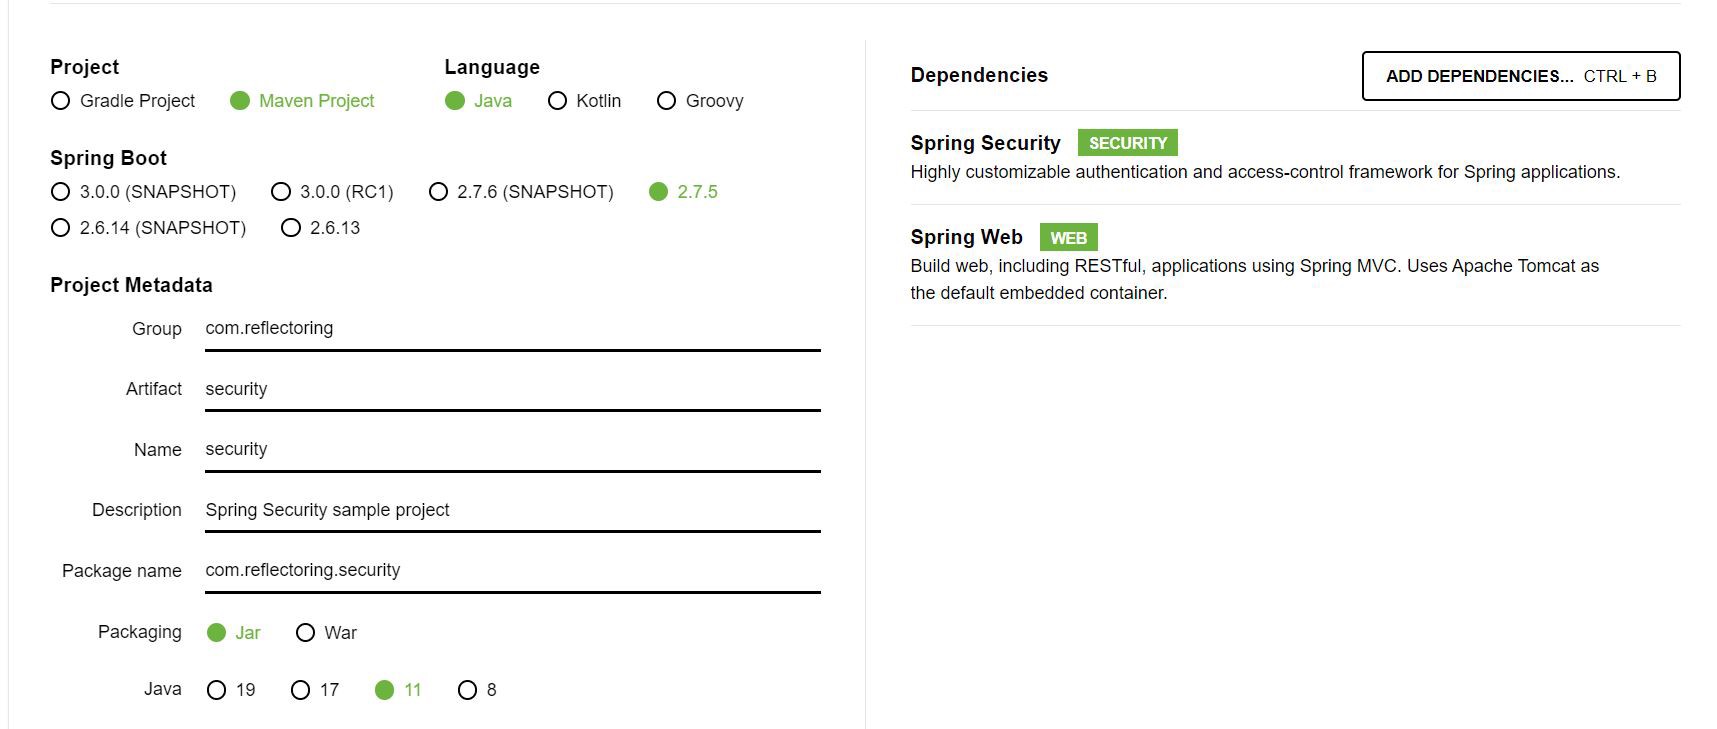
Once the project is generated, we will import it into our IDE and configure it to run on port 8083.
mvnw clean verify spring-boot:run (for Windows)
./mvnw clean verify spring-boot:run (for Linux)
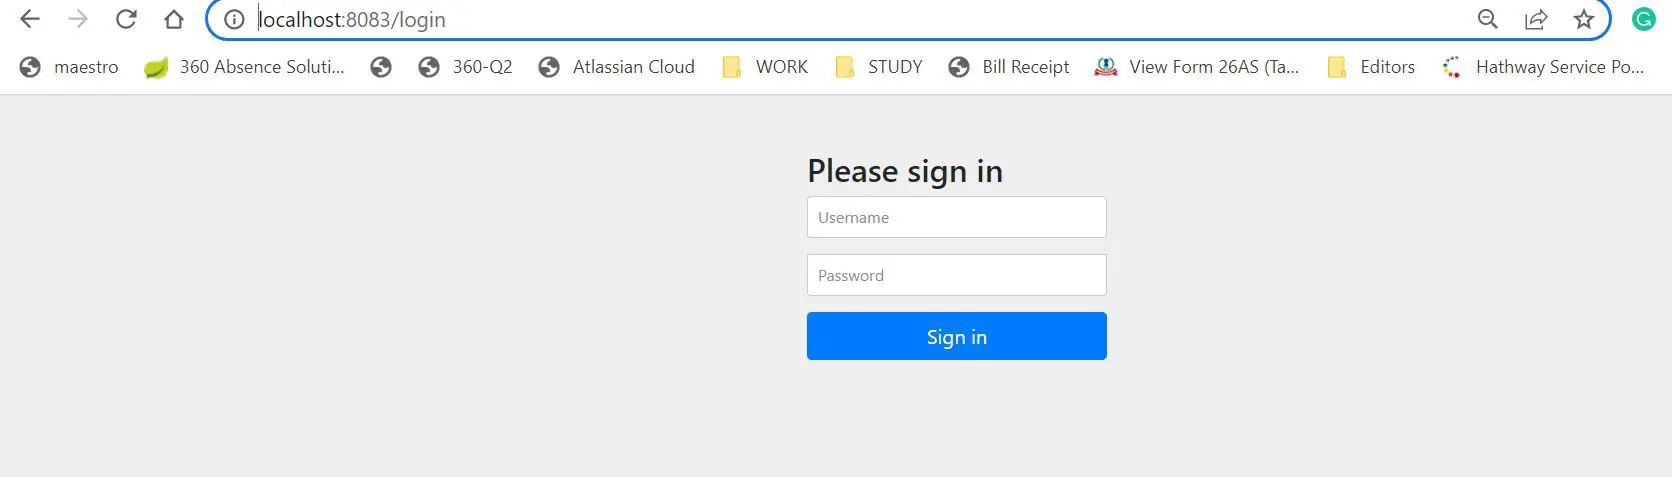
On application startup, we should see a login page.
The console logs print the default password that was randomly generated as a part of the default security configuration:
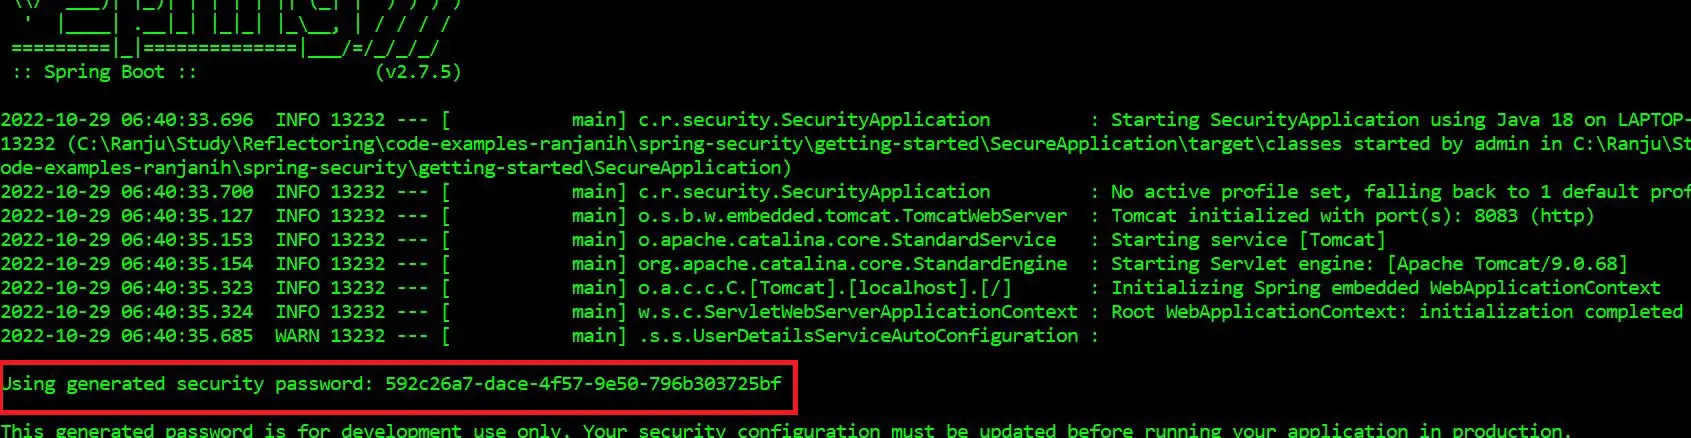
With the default username user and the default password (from the logs), we should be able to login to the application.
We can override these defaults in our application.yml:
spring:
  security:
    user:
      name: admin
      password: passw@rd
Now, we should be able to login with user admin and password passw@rd.
Starter dependency versions
Here, we have used Spring Boot version 2.7.5. Based on this version, Spring Boot internally resolves Spring Security version as 5.7.4.
However, we can override these versions if required in our pom.xml as below:
<properties>
    <spring-security.version>5.2.5.RELEASE</spring-security.version>
</properties>
Understanding the Security Components
To understand how the default configuration works, we first need to take a look at the following:
- Servlet Filters
- Authentication
- Authorization
Servlet Filters
Let’s take a closer look at the console logs on application startup.
We see that the DefaultSecurityFilterChain triggers a chain of filters before the request reaches the DispatcherServlet.
The DispatcherServlet is a key component in the web framework that handles incoming web requests and dispatches them to the appropriate handler for processing.
o.s.s.web.DefaultSecurityFilterChain     : Will secure any request with
[org.springframework.security.web.session.DisableEncodeUrlFilter@2fd954f,
org.springframework.security.web.context.request.async.
  WebAsyncManagerIntegrationFilter@5731d3a,
org.springframework.security.web.context.SecurityContextPersistenceFilter@5626d18c,
org.springframework.security.web.header.HeaderWriterFilter@52b3bf03,
org.springframework.security.web.csrf.CsrfFilter@30c4e352,
org.springframework.security.web.authentication.logout.LogoutFilter@37ad042b,
org.springframework.security.web.authentication.
UsernamePasswordAuthenticationFilter@1e60b459,
org.springframework.security.web.authentication.ui.
  DefaultLoginPageGeneratingFilter@29b40b3,
org.springframework.security.web.authentication.ui.
  DefaultLogoutPageGeneratingFilter@6a0f2853,
org.springframework.security.web.authentication.www.
  BasicAuthenticationFilter@254449bb,
org.springframework.security.web.savedrequest.RequestCacheAwareFilter@3dc95b8b,
org.springframework.security.web.servletapi.
  SecurityContextHolderAwareRequestFilter@2d55e826,
org.springframework.security.web.authentication.
  AnonymousAuthenticationFilter@1eff3cfb,
org.springframework.security.web.session.SessionManagementFilter@462abec3,
org.springframework.security.web.access.ExceptionTranslationFilter@6f8aba08,
org.springframework.security.web.access.intercept.
  FilterSecurityInterceptor@7ce85af2]
To understand how the FilterChain works, let’s look at the flowchart from the Spring Security documentation
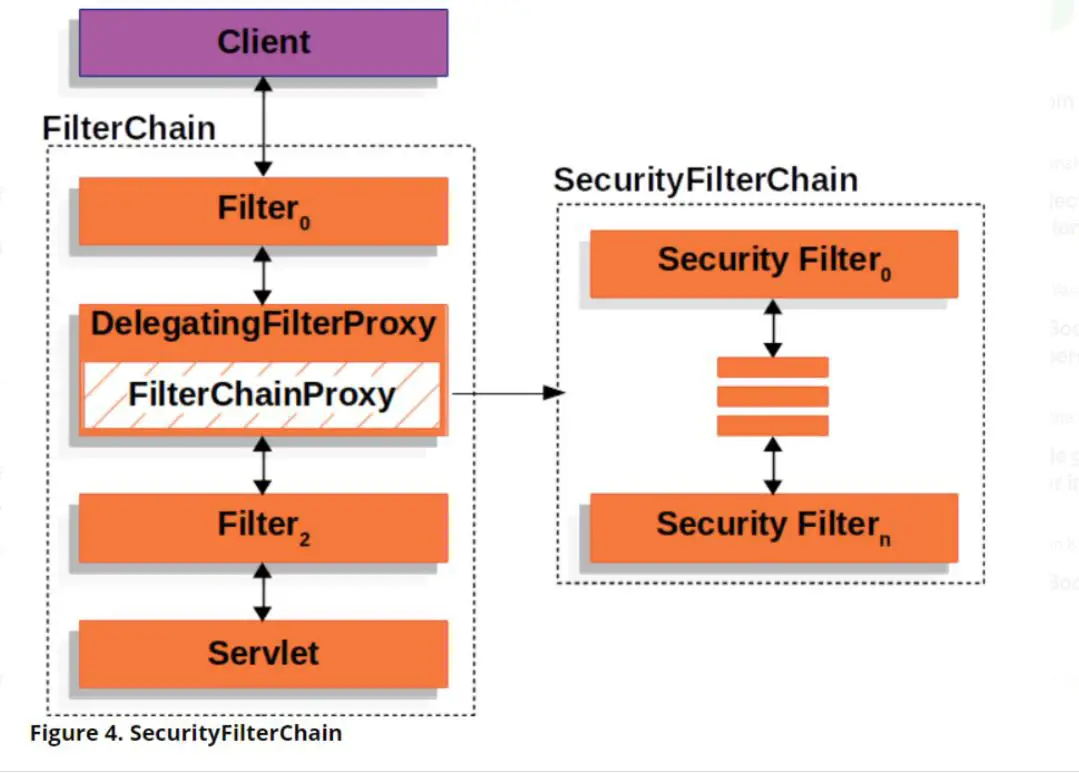
Now, let’s look at the core components that take part in the filter chain:
- DelegatingFilterProxy
It is a servlet filter provided by Spring that acts as a bridge between the Servlet container and the Spring Application Context. The
DelegatingFilterProxyclass is responsible for wiring any class that implementsjavax.servlet.Filterinto the filter chain. - FilterChainProxy
Spring security internally creates a
FilterChainProxybean namedspringSecurityFilterChainwrapped inDelegatingFilterProxy. TheFilterChainProxyis a filter that chains multiple filters based on the security configuration. Thus, theDelegatingFilterProxydelegates request to theFilterChainProxywhich determines the filters to be invoked. - SecurityFilterChain:
The security filters in the
SecurityFilterChainare beans registered withFilterChainProxy. An application can have multipleSecurityFilterChain.FilterChainProxyuses theRequestMatcherinterface onHttpServletRequestto determine whichSecurityFilterChainneeds to be called.
Additional Notes on Spring Security Chain
- The default fallback filter chain in a Spring Boot application has a request matcher
/**, meaning it will apply to all requests. - The default filter chain has a predefined
@OrderSecurityProperties.BASIC_AUTH_ORDER. - We can exclude this complete filter chain by setting security.basic.enabled=false.
- We can define the ordering of multiple filter chains. For instance, to call a custom filter chain before the default one, we need to set a lower
@Order. Example@Order(SecurityProperties.BASIC_AUTH_ORDER - 10). - We can plugin a custom filter within the existing filter chain (to be called at all times or for specific URL patterns) using the
FilterRegistrationBeanor by extendingOncePerRequestFilter. - For the defined custom filter, if no @Order is specified, it is the last in the security chain. (Has the default order
LOWEST_PRECEDENCE.) - We can also use methods
addFilterAfter(),addFilterAt()andaddFilterBefore()to have more control over the ordering of our defined custom filter.
We will define custom filters and filter chain in the later sections.
Now that we know that Spring Security provides us with a default filter chain that calls a set of predefined and ordered filters, let’s try to briefly understand the roles of a few important ones in the chain.
- org.springframework.security.web.csrf.CsrfFilter : This filter applies CSRF protection by default to all REST endpoints. To learn more about CSRF capabilities in spring boot and spring security, refer to this article.
- org.springframework.security.web.authentication.logout.LogoutFilter :
This filter gets called when the user logs out of the application. The default registered instances of
LogoutHandlerare called that are responsible for invalidating the session and clearing theSecurityContext. Next, the default implementation ofLogoutSuccessHandlerredirects the user to a new page (/login?logout). - org.springframework.security.web.authentication.UsernamePasswordAuthenticationFilter :
Validates the username and password for the URL (
/login) with the default credentials provided at startup. - org.springframework.security.web.authentication.ui.DefaultLoginPageGeneratingFilter :
Generates the default login page html at
/login - org.springframework.security.web.authentication.ui.DefaultLogoutPageGeneratingFilter :
Generates the default logout page html at
/login?logout - org.springframework.security.web.authentication.www.BasicAuthenticationFilter :
This filter is responsible for processing any request that has an HTTP request header of Authorization, Basic Authentication scheme, Base64 encoded username-password.
On successful authentication, the
Authenticationobject will be placed in theSecurityContextHolder. - org.springframework.security.web.authentication.AnonymousAuthenticationFilter :
If no
Authenticationobject is found in theSecurityContext, it creates one with the principalanonymousUserand roleROLE_ANONYMOUS. - org.springframework.security.web.access.ExceptionTranslationFilter :
Handles
AccessDeniedExceptionandAuthenticationExceptionthrown within the filter chain. ForAuthenticationExceptioninstances ofAuthenticationEntryPointare required to handle responses. ForAccessDeniedException, this filter will delegate toAccessDeniedHandlerwhose default implementation isAccessDeniedHandlerImpl. - org.springframework.security.web.access.intercept.FilterSecurityInterceptor : This filter is responsible for authorising every request that passes through the filter chain before the request hits the controller.
Authentication
Authentication is the process of verifying a user’s credentials and ensuring their validity. Let’s understand how the spring framework validates the default credentials created:
Step.1: UsernamePasswordAuthenticationFilter gets called as a part of the security filter chain when FormLogin is enabled i.e when the request is made to the URL /login.
This class is a specific implementation of the base AbstractAuthenticationProcessingFilter.
When an authentication attempt is made, the filter forwards the request to an AuthenticationManager.
Step.2: UsernamePasswordAuthenticationToken is an implementation of Authentication interface.
This class specifies that the authentication mechanism must be via username-password.
Step.3: With the authentication details obtained, an AuthenticationManager tries to authenticate the request with the help of an appropriate implementation of
AuthenticationProvider and a fully authenticated Authentication object is returned. The default implementation is the DaoAuthenticationProvider which retrieves user details from UserDetailsService.
If authentication fails, AuthenticationException is thrown.
Step.4: The loadUserByUsername(username) method of the UserDetailsService returns UserDetails object that contains user data.
If no user is found with the given username, UsernameNotFoundException is thrown.
Step.5: On successful authentication, SecurityContext is updated with the currently authenticated user.
To understand the outlined steps above, let’s take a look at the authentication architecture as defined in the Spring Security documentation.
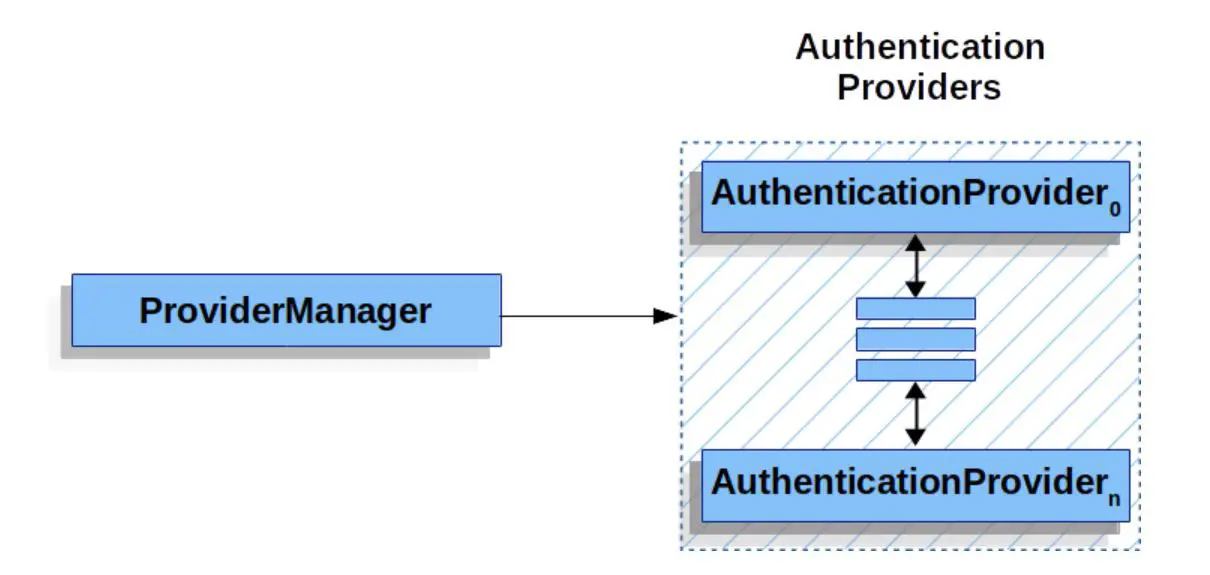
The ProviderManager is the most common implementation of AuthenticationManager. As seen in the diagram, the ProviderManager
delegates the request to a list of configured AuthenticationProvider each of which is queried to see if it can perform the authentication.
If the authentication fails with ProviderNotFoundException, which is a special type of AuthenticationException, it indicates that
the ProviderManager does not support the type of Authentication passed.
This architecture allows us to configure multiple authentication types within the same application.
The AuthenticationEntryPoint is an interface that acts as a point of entry for authentication that determines if the client
has included valid credentials when requesting for a resource. If not, an appropriate implementation of the interface
is used to request credentials from the client.
Now, let’s understand how the Authentication object ties up the entire authentication process.
The Authentication interface serves the following purposes:
- Provides user credentials to the
AuthenticationManager. - Represents the current authenticated user in
SecurityContext. Every instance ofAuthenticationmust contain
principal- This is an instance ofUserDetailsthat identifies an user.credentialsauthorities- Instances ofGrantedAuthorityGrantedAuthorityplay an important role in the authorization process.
Additional Notes on Spring Authentication
- There could be scenarios where we need Spring Security to be used in case of Authorization alone since it has already been reliably authenticated by an external system before our application was accessed. Refer to the pre-authentication documentation to understand how to configure and handle such scenarios.
- Spring allows various means to customize the authentication mechanism We will take a look at a couple of them in the later sections.
Authorization
Authorization is a process of ensuring that the user or a system accessing a resource has valid permissions.
In the Spring security filter chain, the FilterSecurityInterceptor triggers the authorization check. As seen from the order of filter execution,
authentication runs before authorization. This filter checks for valid permissions after the user has been successfully authenticated.
In case authorization fails, AccessDeniedException is thrown.
Granted Authority
As seen in the previous section, every user instance holds a list of GrantedAuthority objects.
GrantedAuthority is an interface that has a single method:
public interface GrantedAuthority extends Serializable {
    String getAuthority();
}
Spring security by default calls the concrete GrantedAuthority implementation, SimpleGrantedAuthority.
The SimpleGrantedAuthority allows us to specify roles as String, automatically mapping them into GrantedAuthority instances.
The AuthenticationManager is responsible for inserting the GrantedAuthority object list into the Authentication object.
The AccessDecisionManager then uses the getAuthority() to decide if authorization is successful.
Granted Authorities vs Roles
Spring Security provides authorization support via both granted authorities and roles using the hasAuthority() and hasRole() methods respectively.
These methods are used for expression-based security and are a part of the interface SecurityExpressionOperations.
For most cases, both methods can be interchangeably used, the most notable difference being the hasRole() need not specify the ROLE prefix while the hasAuthority() needs the complete string to be explicitly specified.
For instance, hasAuthority("ROLE_ADMIN") and hasRole("ADMIN") perform the same task.
Additional Notes on Spring Authorization
- Spring allows us to configure method-level securities using
@PreAuthorizeand@PostAuthorizeannotations. As the name specifies, they allow us to authorize the user before and after the method execution. Conditions for authorization checks can be specified in Spring Expression Language (SpEL). We will look at a few examples in the further sections. - We can configure the authorization rules to use a different prefix (other than
ROLE_) by exposing aGrantedAuthorityDefaultsbean.
Common Exploit Protection
The default spring security configuration comes with a protection against a variety of attacks enabled by default. We will not cover the details of those in this article. You can refer to the Spring documentation for a detailed guide. However, to understand in-depth spring security configuration on CORS and CSRF refer to these articles:
Implementing the Security Configuration
Now that we are familiar with the details of how Spring Security works, let’s understand the configuration setup in our application to handle the various scenarios we briefly touched upon in the previous sections.
Default configuration
The SpringBootWebSecurityConfiguration class from the org.springframework.boot.autoconfigure.security.servlet package provides a default set of spring security configurations for spring boot applications.
The decompiled version of this class looks like this:
class SpringBootWebSecurityConfiguration {
    @ConditionalOnDefaultWebSecurity
    static class SecurityFilterChainConfiguration {
        SecurityFilterChainConfiguration() {
        }

        @Bean
        @Order(2147483642)
        SecurityFilterChain defaultSecurityFilterChain(HttpSecurity http)
                throws Exception {
            ((AuthorizedUrl) http.authorizeRequests().anyRequest()).authenticated();
            http.formLogin();
            http.httpBasic();
            return (SecurityFilterChain) http.build();
        }
    }
}
Spring uses the above configurations to create the default SecurityFilterChainBean:
authorizeRequests()restricts access based onRequestMatcherimplementations. HereauthorizeRequests().anyRequest()will allow all requests. To have more control over restricting access, we can specify URL patterns viaantMatchers().authenticated()requires that all endpoints called be authenticated before proceeding in the filter chain.formLogin()calls the defaultFormLoginConfigurerclass that loads the login page to authenticate via username-password and accordingly redirects to corresponding failure or success handlers. For a diagrammatic representation of how form login works, refer to the detailed notes in the Spring documentation.httpBasic()calls theHttpBasicConfigurerthat sets up defaults to help with basic authentication. To understand in detail, refer to the Spring documentation.
Spring Security with SecurityFilterChain
- From Spring Security 5.7.0-M2, the
WebSecurityConfigurerAdapterhas been deprecated and replaced withSecurityFilterChain, thus moving into component based security configuration. - To understand the differences, refer to this Spring blog post.
- All examples in this article, will make use of the newer configuration that uses
SecurityFilterChain.
Common Use cases
Now that we understand how the spring security defaults work, let’s look at a few scenarios and customize the configurations accordingly.
1. Customize default configuration
@Configuration
@EnableWebSecurity
public class SecurityConfiguration {

    public static final String[] ENDPOINTS_WHITELIST = {
            "/css/**",
            "/",
            "/login",
            "/home"
    };
    public static final String LOGIN_URL = "/login";
    public static final String LOGOUT_URL = "/logout";
    public static final String LOGIN_FAIL_URL = LOGIN_URL + "?error";
    public static final String DEFAULT_SUCCESS_URL = "/home";
    public static final String USERNAME = "username";
    public static final String PASSWORD = "password";

    @Bean
    public SecurityFilterChain filterChain(HttpSecurity http) throws Exception {
        http.authorizeRequests(request ->
                request.antMatchers(ENDPOINTS_WHITELIST).permitAll()
                        .anyRequest().authenticated())
                .csrf().disable()
                .formLogin(form -> form
                        .loginPage(LOGIN_URL)
                        .loginProcessingUrl(LOGIN_URL)
                        .failureUrl(LOGIN_FAIL_URL)
                        .usernameParameter(USERNAME)
                        .passwordParameter(PASSWORD)
                        .defaultSuccessUrl(DEFAULT_SUCCESS_URL));
        return http.build();
    }
}
Instead of using the spring security login defaults, we can customize every aspect of login:
loginPage- Customize the default login Page. Here, we have created a customlogin.htmland its correspondingLoginControllerclass.loginProcessingUrl- The URL that validates username and password.failureUrl- The URL to direct to in case the login fails.defaultSuccessUrl- The URL to direct to on successful login. Here, we have created a customhomePage.htmland its correspondingHomeControllerclass.antMatchers()- to filter out the URLs that will be a part of the login process.
Similarly, we can customize the logout process too.
    @Bean
    public SecurityFilterChain filterChain(HttpSecurity http) throws Exception {
        http.authorizeRequests(request ->
                request.antMatchers(ENDPOINTS_WHITELIST).permitAll()
                        .anyRequest().authenticated())
                .csrf().disable()
                .formLogin(form -> form
                        .loginPage(LOGIN_URL)
                        .loginProcessingUrl(LOGIN_URL)
                        .failureUrl(LOGIN_FAIL_URL)
                        .usernameParameter(USERNAME)
                        .passwordParameter(PASSWORD)
                        .defaultSuccessUrl(DEFAULT_SUCCESS_URL))
                .logout(logout -> logout
                        .logoutUrl("/logout")
                        .invalidateHttpSession(true)
                        .deleteCookies("JSESSIONID")
                        .logoutSuccessUrl(LOGIN_URL + "?logout"));
        return http.build();
    }
Here, when the user logs out, the http session gets invalidated, however the session cookie does not get cleared.
Using deleteCookies("JSESSIONID") helps avoid session based conflicts.
Further, we can manage and configure sessions via Spring Security.
    @Bean
    public SecurityFilterChain filterChain(HttpSecurity http) throws Exception {
        http.authorizeRequests(request ->
                request.antMatchers(ENDPOINTS_WHITELIST).permitAll()
                        .anyRequest().authenticated())
                .csrf().disable()
                .formLogin(form -> form
                        .loginPage(LOGIN_URL)
                        .loginProcessingUrl(LOGIN_URL)
                        .failureUrl(LOGIN_FAIL_URL)
                        .usernameParameter(USERNAME)
                        .passwordParameter(PASSWORD)
                        .defaultSuccessUrl(DEFAULT_SUCCESS_URL))
                .logout(logout -> logout
                        .logoutUrl("/logout")
                        .invalidateHttpSession(true)
                        .deleteCookies("JSESSIONID")
                        .logoutSuccessUrl(LOGIN_URL + "?logout"))
                .sessionManagement(session -> session
                        .sessionCreationPolicy(SessionCreationPolicy.ALWAYS)
                        .invalidSessionUrl("/invalidSession.htm")
                        .maximumSessions(1)
                        .maxSessionsPreventsLogin(true));


        return http.build();
    }
It provides us with the following values for session attribute sessionCreationPolicy:
- SessionCreationPolicy.STATELESS - No session will be created or used.
- SessionCreationPolicy.ALWAYS - A session will always be created if it does not exist.
- SessionCreationPolicy.NEVER - A session will never be created. But if a session exists, it will be used.
- SessionCreationPolicy.IF_REQUIRED - A session will be created if required. (Default Configuration)
Other options include:
invalidSessionUrl- The URL to redirect to when an invalid session is detected.maximumSessions- Limits the number of active sessions that a single user can have concurrently.maxSessionsPreventsLogin- The Default value isfalse, which indicates that the authenticated user is allowed access while the existing user’s session expires.trueindicates that the user will not be authenticated whenSessionManagementConfigurer.maximumSessions(int)is reached. In this case, it will redirect to/invalidSessionwhen multiple logins are detected.
2. Configure Multiple Filter Chains
Spring Security allows us to have more than one co-existing security configuration giving us more control over the application.
To demonstrate this, let’s create REST endpoints for a Library application that uses H2 database to store books based on genre.
Our BookController class will have an endpoint defined as below:
@GetMapping("/library/books")
    public ResponseEntity<List<BookDto>> getBooks(@RequestParam String genre) {
        return ResponseEntity.ok().body(bookService.getBook(genre));
    }
In order to secure this endpoint, lets use basic auth and configure details in our SecurityConfiguration class:
@Configuration
@EnableWebSecurity
@EnableConfigurationProperties(BasicAuthProperties.class)
public class SecurityConfiguration {

    private final BasicAuthProperties props;

    public SecurityConfiguration(BasicAuthProperties props) {
        this.props = props;
    }

    @Bean
    @Order(1)
    public SecurityFilterChain bookFilterChain(HttpSecurity http) throws Exception {
        http
                .csrf().disable()
                .sessionManagement(session -> session
                        .sessionCreationPolicy(SessionCreationPolicy.STATELESS))
                .antMatcher("/library/**")
                .authorizeRequests()
                .antMatchers(HttpMethod.GET, "/library/**").hasRole("USER")
                .anyRequest().authenticated()
                .and()
                .httpBasic()
                .and()
                .exceptionHandling(exception -> exception
                        .authenticationEntryPoint(userAuthenticationErrorHandler())
                        .accessDeniedHandler(new UserForbiddenErrorHandler()));

        return http.build();
    }

    @Bean
    public UserDetailsService userDetailsService() {
        return new InMemoryUserDetailsManager(props.getUserDetails());
    }

    @Bean
    public AuthenticationEntryPoint userAuthenticationErrorHandler() {
        UserAuthenticationErrorHandler userAuthenticationErrorHandler =
                new UserAuthenticationErrorHandler();
        userAuthenticationErrorHandler.setRealmName("Basic Authentication");
        return userAuthenticationErrorHandler;
    }

    public static final String[] ENDPOINTS_WHITELIST = {
            "/css/**",
            "/login",
            "/home"
    };
    public static final String LOGIN_URL = "/login";
    public static final String LOGIN_FAIL_URL = LOGIN_URL + "?error";
    public static final String DEFAULT_SUCCESS_URL = "/home";
    public static final String USERNAME = "username";
    public static final String PASSWORD = "password";

    @Bean
    @Order(2)
    public SecurityFilterChain filterChain(HttpSecurity http) throws Exception {
        http.authorizeRequests(request ->
                request.antMatchers(ENDPOINTS_WHITELIST).permitAll()
                        .anyRequest().authenticated())
                .csrf().disable()
                .antMatcher("/login")
                .formLogin(form -> form
                        .loginPage(LOGIN_URL)
                        .loginProcessingUrl(LOGIN_URL)
                        .failureUrl(LOGIN_FAIL_URL)
                        .usernameParameter(USERNAME)
                        .passwordParameter(PASSWORD)
                        .defaultSuccessUrl(DEFAULT_SUCCESS_URL))
                .logout(logout -> logout
                        .logoutUrl("/logout")
                        .invalidateHttpSession(true)
                        .deleteCookies("JSESSIONID")
                        .logoutSuccessUrl(LOGIN_URL + "?logout"))
                .sessionManagement(session -> session
                        .sessionCreationPolicy(SessionCreationPolicy.ALWAYS)
                        .invalidSessionUrl("/invalidSession")
                        .maximumSessions(1)
                        .maxSessionsPreventsLogin(true));

        return http.build();
    }
}
Let’s take a closer look at the code:
- We have two SecurityFilterChain methods
bookFilterChain()andfilterChain()methods with@Order(1)and@Order(2). Both of them will execute in the mentioned order. - Since both filter chains cater to separate endpoints, different credentials exist in
application.yml
auth:
  users:
    loginadmin:
      role: admin
      password: loginpass
    bookadmin:
      role: user
      password: bookpass
For Spring Security to utilize these credentials, we will customize UserDetailsService as :
@Bean
    public UserDetailsService userDetailsService() {
        return new InMemoryUserDetailsManager(props.getUserDetails());
    }
- To cater to
AuthenticationExceptionandAccessDeniedException, we have customizedexceptionHandling()and configured custom classesUserAuthenticationErrorHandlerandUserForbiddenErrorHandler.
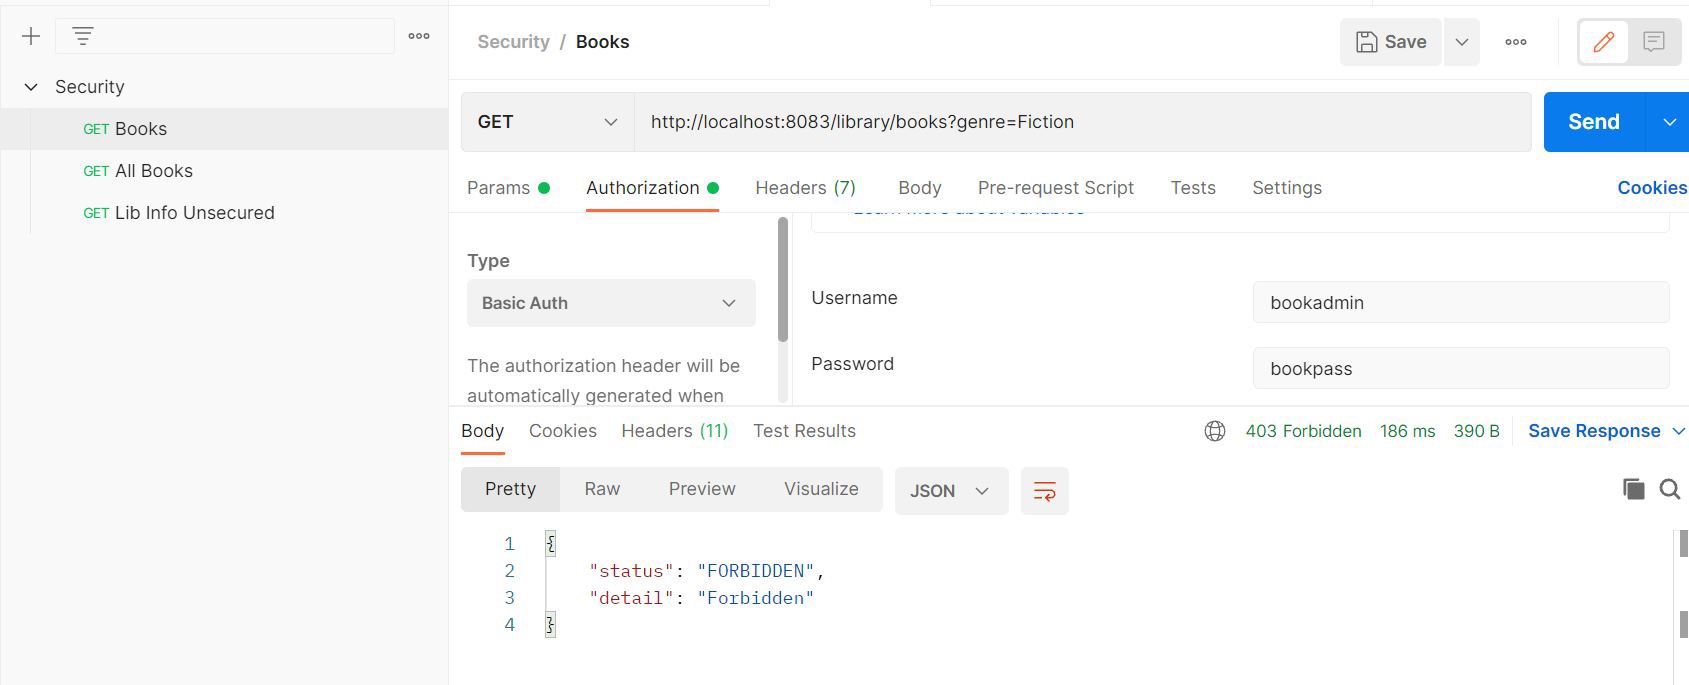
With this configuration, the postman response for the REST endpoint looks like this:
Success Response:

Unauthorized Response:
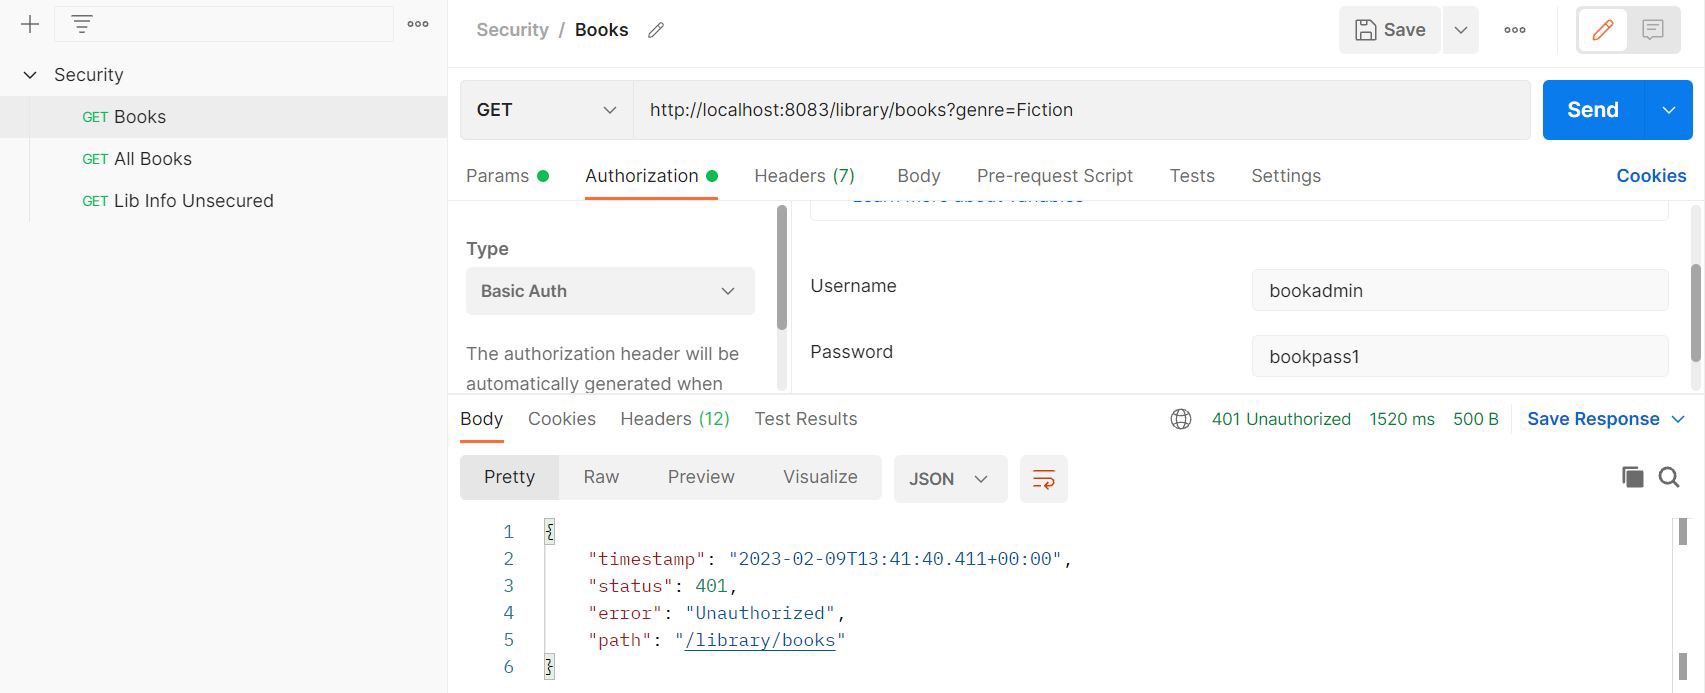
Forbidden Response:
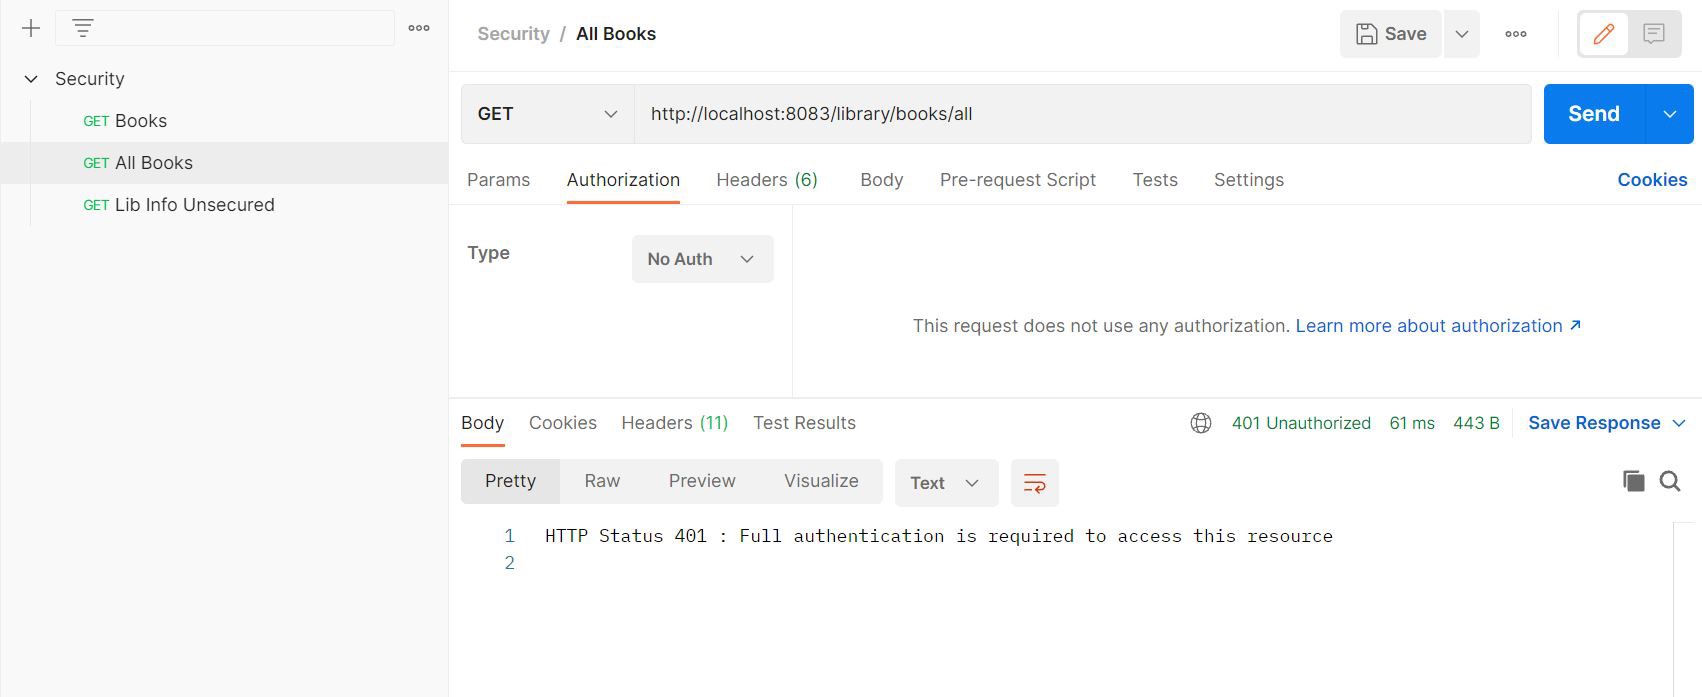
3. Additional endpoints secured by default
Once spring security is configured for a request matcher, additional endpoints added get secured by default.
For instance, let’s add an endpoint to the BookController class
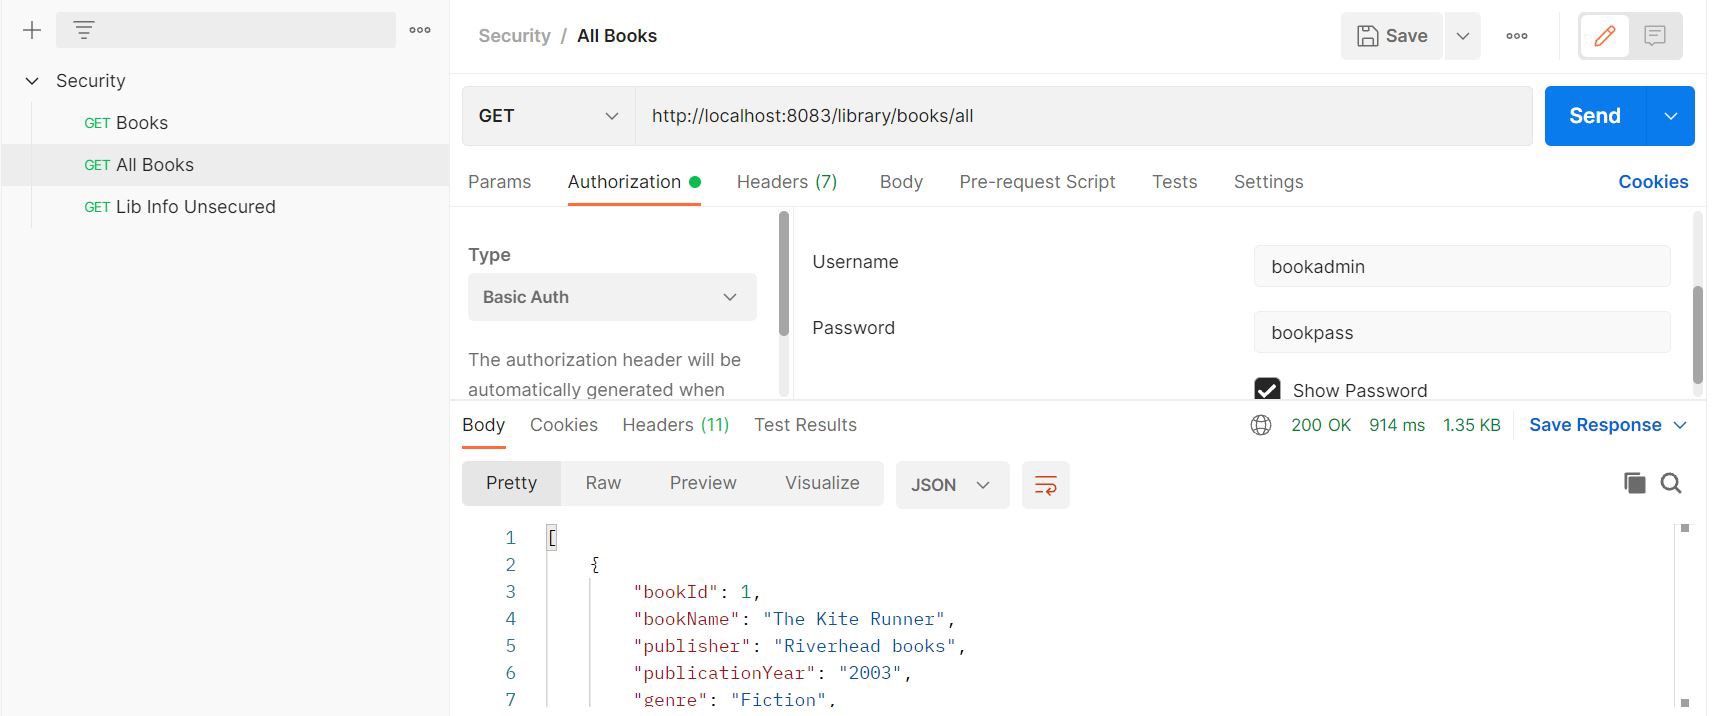
@GetMapping("/library/books/all")
    public ResponseEntity<List<BookDto>> getAllBooks() {
        return ResponseEntity.ok().body(bookService.getAllBooks());
    }
For this endpoint to be called successfully, we need to provide basic auth credentials.
Error response when no credentials passed:
Success response:
4. Unsecure Specific Endpoints
We can specify a list of endpoints that need to be excluded from the security configuration.
To achieve this, let’s first add another endpoint to our BookController class and add the below configuration:
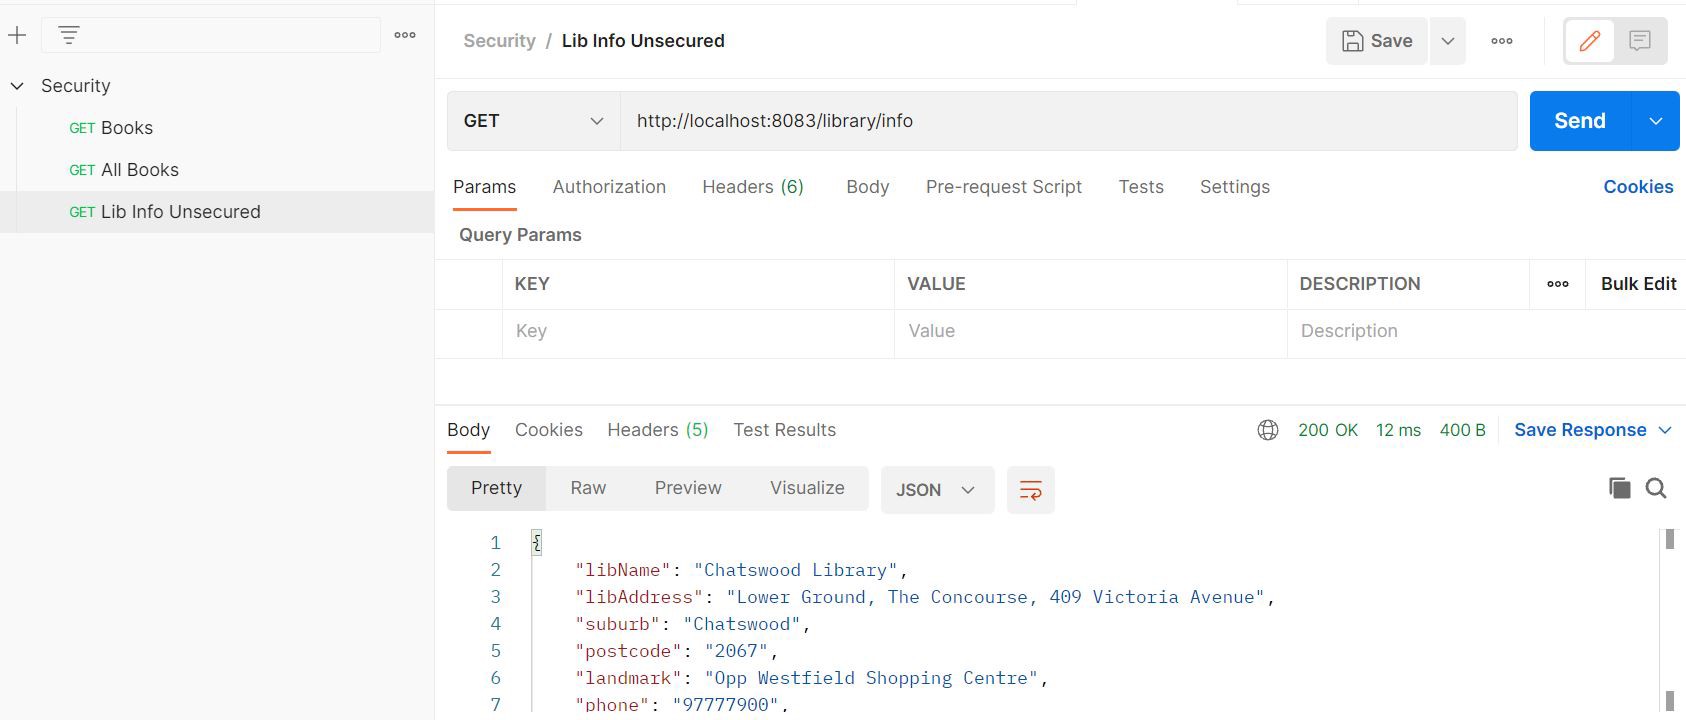
@GetMapping("/library/info")
    public ResponseEntity<LibraryInfo> getInfo() {
        return ResponseEntity.ok().body(bookService.getLibraryInfo());
    }
@Bean
    public WebSecurityCustomizer webSecurityCustomizer() {
        return (web) -> web.ignoring().antMatchers("/library/info");
    }
Now, we should be able to hit the endpoint from postman without passing credentials:
5. Add Custom Filters
Spring provides security by executing a sequence of filters in a chain. In cases where we need to add additional checks to the request before it reaches the controller, Spring Security provides us with the below methods that help us add a custom filter at the desired position in the chain.
- addFilterBefore(Filter filter, Class<? extends Filter> beforeFilter): This method lets us add the custom filter before the specified filter in the chain.
- addFilterAfter(Filter filter, Class<? extends Filter> afterFilter): This method lets us add the custom filter after the specified filter in the chain.
- addFilterAt(Filter filter, Class<? extends Filter> atFilter): This method lets us add the custom filter at the specified filter in the chain with the same priority. Once the custom filter gets added, both the filters will get called in the filter chain (in no specific order).
Let’s take a look at a sample configuration:
@Configuration
@EnableWebSecurity
@EnableConfigurationProperties(BasicAuthProperties.class)
public class SecurityConfiguration {

    private final BasicAuthProperties props;

    public SecurityConfiguration(BasicAuthProperties props) {
        this.props = props;
    }

    @Bean
    @Order(1)
    public SecurityFilterChain bookFilterChain(HttpSecurity http) throws Exception {
        http
                .csrf().disable()
                .sessionManagement(session -> session
                        .sessionCreationPolicy(SessionCreationPolicy.STATELESS))
                .antMatcher("/library/**")
                .authorizeRequests()
                .antMatchers(HttpMethod.GET, "/library/**").hasRole("USER")
                .anyRequest().authenticated()
                .and()
                .httpBasic()
                .and()
                .exceptionHandling(exception -> exception
                        .authenticationEntryPoint(userAuthenticationErrorHandler())
                        .accessDeniedHandler(new UserForbiddenErrorHandler()));

        http.addFilterBefore(customHeaderValidatorFilter(),
                BasicAuthenticationFilter.class);

        return http.build();
    }

    @Bean
    public CustomHeaderValidatorFilter customHeaderValidatorFilter() {
        return new CustomHeaderValidatorFilter();
    }
}
In order to write a custom filter, we create a class CustomHeaderValidatorFilter that extends a special filter OncePerRequestFilter created for this purpose.
This makes sure that our filter gets invoked only once for every request.
public class CustomHeaderValidatorFilter extends OncePerRequestFilter {

    private static final Logger log = LoggerFactory.getLogger
            (CustomHeaderValidatorFilter.class);
    @Override
    protected void doFilterInternal(HttpServletRequest request,
                                    HttpServletResponse response,
                                    FilterChain filterChain)
            throws ServletException, IOException {
        log.info("Custom filter called...");
        if (StringUtils.isEmpty(request.getHeader("X-Application-Name"))) {
            response.setStatus(HttpServletResponse.SC_FORBIDDEN);
            response.setContentType("application/json");
            response.getOutputStream().println(new ObjectMapper().
                    writeValueAsString(CommonException.headerError()));
        } else {
            filterChain.doFilter(request, response);
        }
    }
}
Here, we have overridden the doFilterInternal() and added our logic. In this case, the request will proceed in the filter chain only if the required header
X-Application-Name is passed in the request. Also, we can verify that this filter gets wired to our SecurityConfiguration class from the logs.
Will secure Ant [pattern='/library/**'] with
[org.springframework.security.web.session.DisableEncodeUrlFilter@669469c9,
 org.springframework.security.web.context.request.async.
   WebAsyncManagerIntegrationFilter@7f39ad3f,
 org.springframework.security.web.context.SecurityContextPersistenceFilter@1b901f7b,
 org.springframework.security.web.header.HeaderWriterFilter@64f49b3,
 org.springframework.security.web.authentication.logout.LogoutFilter@628aea61,
 com.reflectoring.security.CustomHeaderValidatorFilter@3d40a3b4,
 org.springframework.security.web.authentication.www.
   BasicAuthenticationFilter@8d23cd8,
 org.springframework.security.web.savedrequest.RequestCacheAwareFilter@1a1e38ab,
 org.springframework.security.web.servletapi.
   SecurityContextHolderAwareRequestFilter@5bfdabf3,
 org.springframework.security.web.authentication.
   AnonymousAuthenticationFilter@7524125c,
 org.springframework.security.web.session.SessionManagementFilter@3dc14f80,
 org.springframework.security.web.access.ExceptionTranslationFilter@58c16efd,
 org.springframework.security.web.access.intercept.FilterSecurityInterceptor@5ab06829]
Here the filter gets called for all endpoints /library/**. To further restrict it to cater to specific endpoints, we can modify the Filter class as :
@Override
    protected boolean shouldNotFilter(HttpServletRequest request)
            throws ServletException {
        String path = request.getRequestURI();
        return path.startsWith("/library/books/all");
    }
With this change, for the endpoint /library/books/all the doFilterInternal() method will not be executed.
The same concept applies to filters added using addFilterAt() and addFilterAfter() methods.
6. Role-based Authorization
In the context of Spring Security, authorization occurs after the user is authenticated. In the previous sections, we have looked at an example where we handled AccessDeniedException.
This exception is thrown when user authorization fails. In our example we have defined roles for the users bookadmin and loginadmin in application.yml as :
auth:
  users:
    loginadmin:
      role: admin
      password: loginpass
    bookadmin:
      role: user
      password: bookpass
To ensure authorization, we have configured spring security to have:
public class SecurityConfiguration {
    @Bean
    @Order(1)
    public SecurityFilterChain filterChain(HttpSecurity http) throws Exception {
        http.authorizeRequests(request ->
             request.antMatchers(ENDPOINTS_WHITELIST).hasRole("ADMIN")
                .anyRequest().authenticated());
        /* Code continued.. */
        return http.build();
    }
}
and
public class SecurityConfiguration {
    @Bean
    @Order(2)
    public SecurityFilterChain bookFilterChain(HttpSecurity http) throws Exception {
        http
                .csrf().disable()
                .sessionManagement(session -> session
                        .sessionCreationPolicy(SessionCreationPolicy.STATELESS))
                .antMatcher("/library/**")
                .authorizeRequests()
                .antMatchers(HttpMethod.GET, "/library/**").hasRole("USER")
                .anyRequest().authenticated();
        /* Code continued.. */
        return http.build();
    }
}
Let’s take a look at the methods that can be used to authorize endpoints.
hasRole(String role): Returnstrueif the current principal has the specified role. eg.hasRole("ADMIN")hasAnyRole(String... roles): Multiple roles can be specified. If any of the role matches, returnstrue. eg.hasAnyRole("ADMIN", "USER")NOTE : In both the above casesROLE_prefix is added by default to the provided role string.hasAuthority(String authority): Returnstrueif the current principal has the specified authority. eg.hasAuthority(ROLE_ADMIN)hasAnyAuthority(String... authorities): Multiple authorities can be specified. If any of the authority matches, returnstrue. eg.hasAnyAuthority("ROLE_ADMIN", "ROLE_USER")
Additional Notes on Spring Security Access Control
- All the methods discussed above use spEL for more complex access control support. This allows us to use specific classes for web and method security to access values such as current principal. To understand how spEL can be leveraged refer to this Spring documentation
- Also, if we do not need to set authorization we can use methods
permitAll()anddenyAll()to allow or deny all roles and authorities respectively.
Let’s take a look at an example configuration that uses different roles for different endpoints within the same method.
public class SecurityConfiguration {
    @Bean
    public SecurityFilterChain bookFilterChain(HttpSecurity http) throws Exception {
        http
                .authorizeRequests()
                .antMatchers(HttpMethod.GET, "/library/info").permitAll()
                .antMatchers(HttpMethod.GET, "/library/books").hasRole("USER")
                .antMatchers(HttpMethod.GET, "/library/books/all").hasRole("ADMIN");

        return http.build();
    }
}
7. @PreAuthorize and @PostAuthorize
Spring Security allows us to extend the security mechanism to methods via @PreAuthorize and @PostAuthorize annotations.
These annotations use spEL to evaluate and authorize based on the arguments passed.
@PreAuthorize: Authorizes the condition before executing the method.@PostAuthorize: Authorizes the condition after the method is executed. In order to get these annotations to work, we need to add@EnableGlobalMethodSecurity(prePostEnabled = true)to our configuration class as below:
@Configuration
@EnableWebSecurity
@EnableGlobalMethodSecurity(prePostEnabled = true)
@EnableConfigurationProperties(BasicAuthProperties.class)
public class SecurityConfiguration {
    /* ... */
}
Next, let’s look at how to use these annotations. Here we have used @PreAuthorize in our Controller class.
@Controller
public class BookController {

    private static final Logger log = LoggerFactory.getLogger(BookController.class);

    private final BookService bookService;

    public BookController(BookService bookService) {
        this.bookService = bookService;
    }

    @GetMapping("/library/books")
    @PreAuthorize("#user == authentication.principal.username")
    public ResponseEntity<List<BookDto>> getBooks(@RequestParam String genre,
                                                  @RequestParam String user) {
        return ResponseEntity.ok().body(bookService.getBook(genre));
    }

    @GetMapping("/library/books/all")
    @PreAuthorize("hasRole('ROLE_USER')")
    public ResponseEntity<List<BookDto>> getAllBooks() {
        return ResponseEntity.ok().body(bookService.getAllBooks());
    }
}
Here, we have demonstrated two ways in which @PreAuthorize annotations can be used.
@PreAuthorize("#user == authentication.principal.username"): The logged-in username is passed as a request param and verified with the current principal. For a successful match, postman returns a valid response.
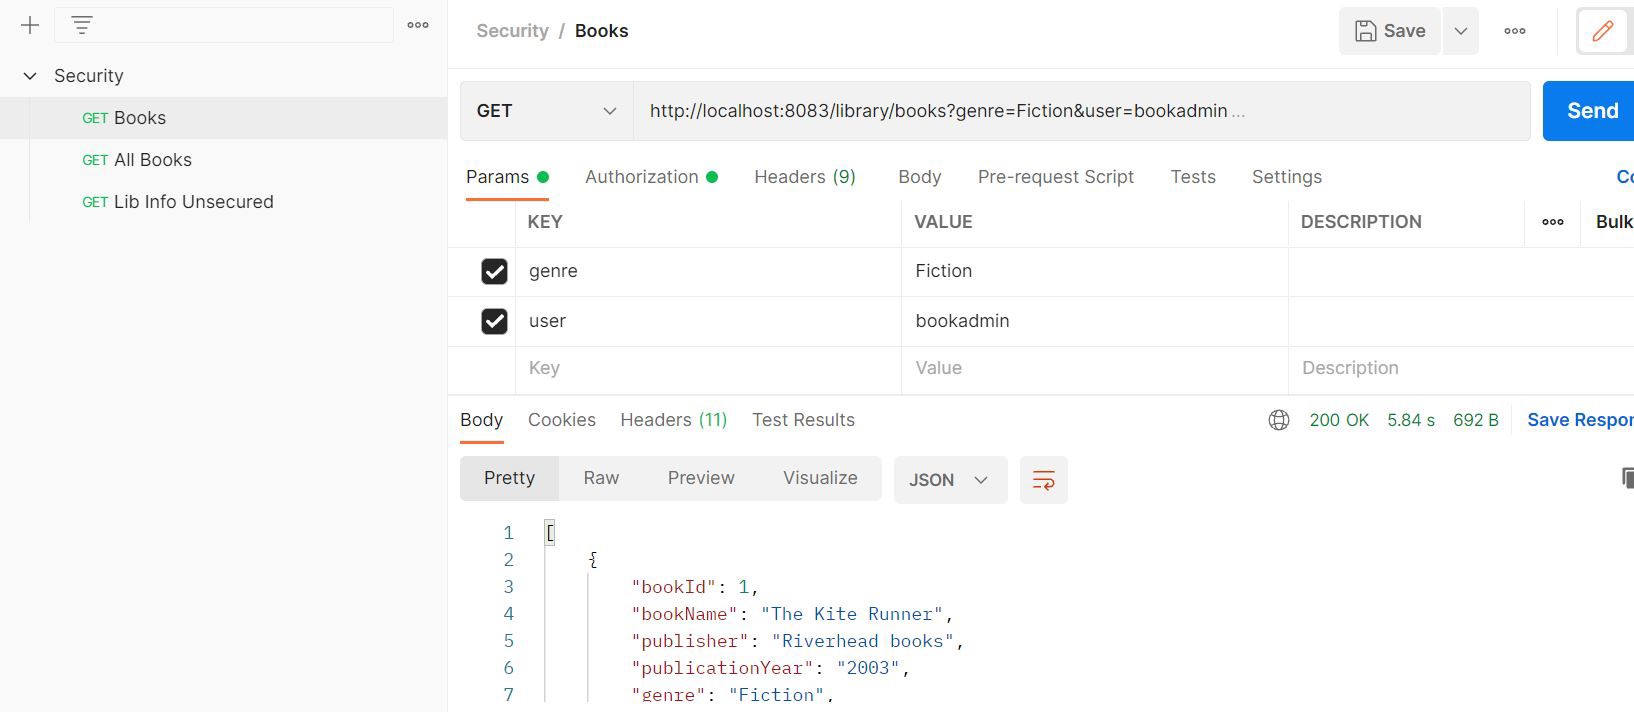
In case of an error, we get:
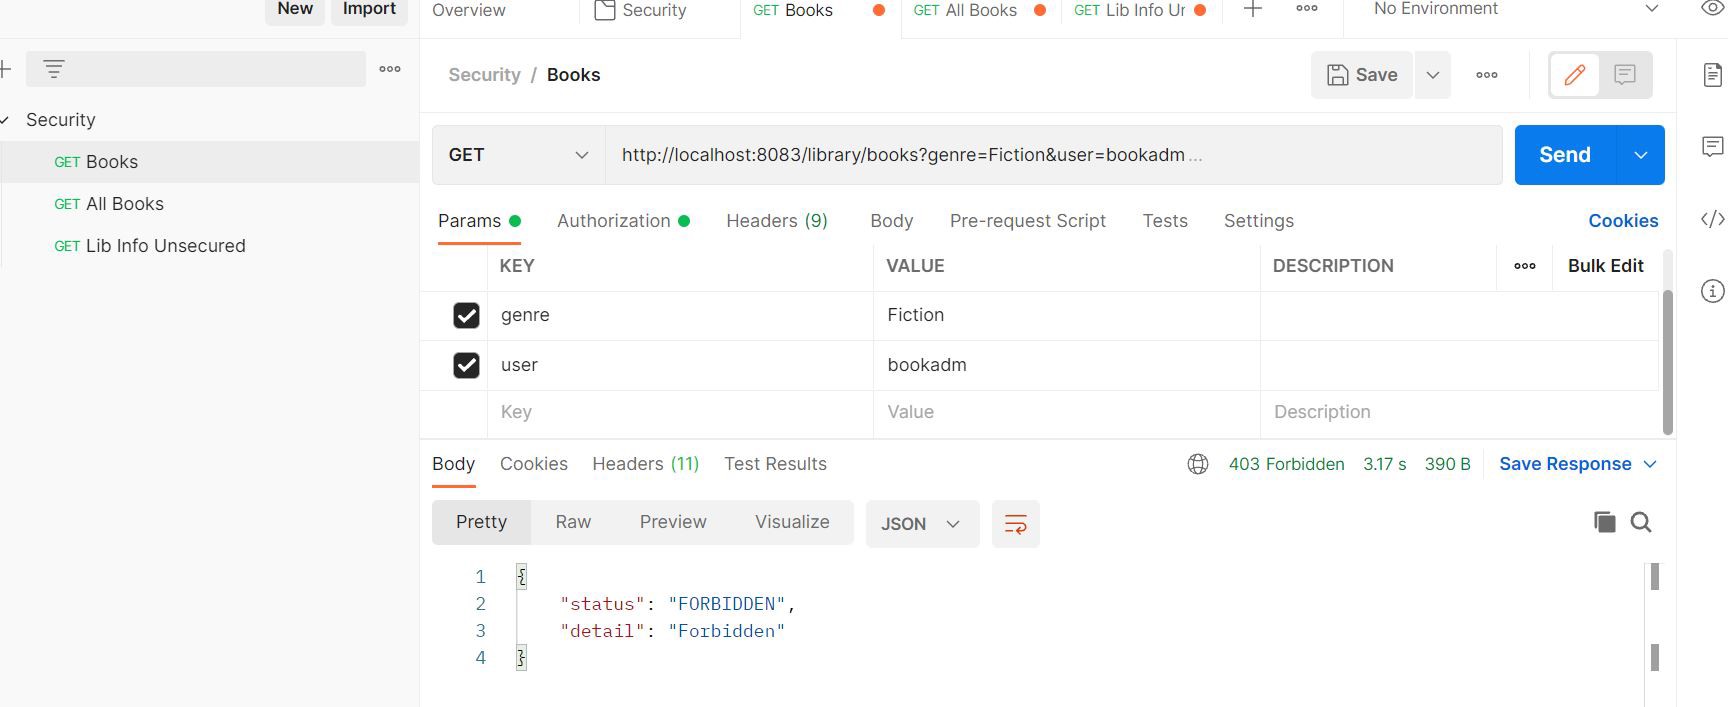
@PreAuthorize("hasRole('ROLE_USER')"): We get a success response only if the current principal has a USER role.
Next, let’s use @PostAuthorize in our Repository class.
@Repository
public interface BookRepository extends JpaRepository<Book, Long> {


    List<Book> findByGenre(String genre);

    @PostAuthorize("returnObject.size() > 0")
    List<Book> findAll();
}
Here, the returnObject denotes List<Book>. Therefore, when size() returns 0, we will get an error response.
Customize Authorization
- To customize the way expressions are handled, we need to expose
MethodSecurityExpressionHandleras a bean. - Spring method security is built using Spring AOP. For more examples, refer to the Method Security documentation.
8. DB-based Authentication and Authorization
In all of our previous examples, we have configured users, password, roles using the InMemoryUserDetailsManager.
Spring Security allows us to customize the authentication and authorization process.
We can also configure these details in a database and get spring security to access them accordingly.
For a working example, refer to this article. It also explains the different ways in which passwords should be handled for better security.
Let’s outline the steps required to get this configuration working.
Step.1 : Customize UserDetailsService by overriding loadUserByUsername() to load user credentials from the database.
Step.2 : Create PasswordEncoder bean depending on the encoding mechanism used.
Step.3 : Since the AuthenticationProvider is responsible for validating credentials, customize and override the authenticate() to validate with the DB credentials.
Additional information on Password Encoder
- Prior to Spring Security 5.0, the default
PasswordEncoderwasNoOpPasswordEncoder, which required plain-text passwords. - From Spring Security 5.0, we use the
DelegatingPasswordEncoderwhich ensures that passwords are encoded using the current password storage recommendations. - For more info on
DelegatingPasswordEncoder, refer to this documentation
Testing with Spring Security
Now that we have learnt about the workings of the various security configuration, let’s look at unit testing them. Spring security provides us with the below dependency:
    <dependency>
			<groupId>org.springframework.security</groupId>
			<artifactId>spring-security-test</artifactId>
			<scope>test</scope>
		</dependency>
In addition, we have also added Hamcrest dependency. Hamcrest is a framework that allows us to use Matcher objects in our assertions for a more expressive response matching. Refer to Hamcrest documentation for an in-depth look at its features.
    <dependency>
			<groupId>org.hamcrest</groupId>
			<artifactId>hamcrest-library</artifactId>
			<version>2.2</version>
			<scope>test</scope>
		</dependency>
First, let’s setup our ApplicationContext for testing our BookController class. Here we have defined a sample test data using @Sql
@SpringBootTest
@AutoConfigureMockMvc
@SqlGroup({
        @Sql(value = "classpath:init/first.sql", executionPhase = BEFORE_TEST_METHOD),
        @Sql(value = "classpath:init/second.sql", executionPhase = BEFORE_TEST_METHOD)
})
public class BookControllerTest {
}
Now, let’s look at the various options available to test basic authentication secured endpoints.
@WithMockUser
As the name suggests, we use this annotation with the default username user, password password and role ROLE_USER.
Since we are mocking the user, the user need not actually exist. As long as our endpoint is secured, the @WithMockUser will be successful.
public class BookControllerTest {

    @Autowired
    private MockMvc mockMvc;

    @Test
    @DisplayName("TestCase1 Check if spring security applies to the endpoint")
    @WithMockUser(username = "bookadmin", roles = {"USER"})
    void successIfSecurityApplies() throws Exception {
        mockMvc.perform(get("/library/books")
                        .param("genre", "Fiction")
                        .param("user", "bookadmin")
                        .header("X-Application-Name", "Library"))
                .andDo(print())
                .andExpect(status().isOk())
                .andExpect(authenticated().withUsername("bookadmin"))
                .andExpect(authenticated().withRoles("USER"))
                .andExpect(jsonPath("$", hasSize(3)))
        ;
    }

    @Test
    @DisplayName("TestCase2 Fails when wrong roles are provided")
    @WithMockUser(username = "bookadmin", roles = {"ADMIN"})
    void failsForWrongAuthorization() throws Exception {
        mockMvc.perform(get("/library/books")
                        .param("genre", "Fiction")
                        .param("user", "bookadmin")
                        .header("X-Application-Name", "Library"))
                .andDo(print())
                .andExpect(status().isForbidden())
        ;
    }

    @Test
    @DisplayName("TestCase3 Fails when we run the test with no security")
    void failsIfSecurityApplies() throws Exception {
        mockMvc.perform(get("/library/books")
                        .param("genre", "Fiction")
                        .param("user", "bookadmin")
                        .header("X-Application-Name", "Library"))
                .andDo(print())
                .andExpect(status().isUnauthorized())
        ;
    }
}
@WithMockUser(username = "bookadmin", roles = {"USER"}): Here we are running the test with the usernamebookadminand roleUSER. This test is used only to verify if the endpoint is secured. Further we have also used methodsauthenticated()to verify the authentication details and hamcrest matcherhasSize()to verify the response object.@WithMockUser(username = "bookadmin", roles = {"ADMIN"}): Here, we get a Forbidden response since the roles do not match. Although the user is mocked, roles re required to match for a success response.- When no user details are specified, the endpoint is not secured and therefore we get Unauthorized response.
@WithUserDetails
Instead of mocking the user, we could also use the UserDetailsService bean created in the SecurityConfiguration class.
public class BookControllerTest {

    @Autowired
    private MockMvc mockMvc;

    @Test
    @DisplayName("TestCase4 Run the test with configured UserDetailsService")
    @WithUserDetails(value = "bookadmin",
            userDetailsServiceBeanName = "userDetailsService")
    void testBookWithConfiguredUserDetails() throws Exception {
        mockMvc.perform(get("/library/books")
                        .param("genre", "Fantasy")
                        .param("user", "bookadmin")
                        .header("X-Application-Name", "Library"))
                .andDo(print())
                .andExpect(status().isOk())
                .andExpect(jsonPath("$", hasSize(1)))
        ;
    }

    @Test
    @DisplayName("TestCase5 Fails when execution of CustomHeaderValidatorFilter " +
            "does not meet the criteria")
    @WithUserDetails(value = "bookadmin",
            userDetailsServiceBeanName = "userDetailsService")
    void failsIfMandatoryHeaderIsMissing() throws Exception {
        mockMvc.perform(get("/library/books")
                        .param("genre", "Fantasy")
                        .param("user", "bookadmin"))
                .andDo(print())
                .andExpect(status().isForbidden())
        ;
    }

    @Test
    @DisplayName("TestCase6 Fails when preauthorization " +
            "of current principal fails")
    @WithUserDetails(value = "bookadmin",
            userDetailsServiceBeanName = "userDetailsService")
    void failsIfPreAuthorizeConditionFails() throws Exception {
        mockMvc.perform(get("/library/books")
                        .param("genre", "Fantasy")
                        .param("user", "bookuser")
                        .header("X-Application-Name", "Library"))
                .andDo(print())
                .andExpect(status().isForbidden())
        ;
    }

    @Test
    @DisplayName("TestCase7 Fails when wrong basic auth credentials are applied")
    void testBookWithWrongCredentialsUserDetails() throws Exception {
        mockMvc.perform(get("/library/books")
                        .param("genre", "Fantasy")
                        .param("user", "bookadmin")
                        .header("X-Application-Name", "Library")
                        .with(httpBasic("bookadmin", "password")))
                .andDo(print())
                .andExpect(status().isUnauthorized());
    }
}
With this configuration, the endpoints will be authenticated with the userDetailsService bean.
We can use httpBasic() to ensure wrong credentials are rejected.
Also, the tests above validate pre-authorization and custom filter checks.
Conclusion
In this article, we looked at the basic concept that applies in spring security. Further, we explained the default configuration that spring provides and how to override them. Also, we looked at a few commonly encountered use-cases and verified them with unit tests. As we have seen, spring provides a lot of flexibility and allows us to customize security for complex applications. We can extend the sample configuration applied in our application on GitHub to suit our needs.