Cross-site Request Forgery (CSRF, sometimes also called XSRF) is an attack that can trick an end-user using a web application to unknowingly execute actions that can compromise security. To understand what constitutes a CSRF attack, refer to this introductory article. In this article, we will take a look at how to leverage Spring’s built-in CSRF support when creating a web application.
To understand the detailed guidelines for preventing CSRF vulnerabilities, refer to the OWASP Guide.
Example Code
This article is accompanied by a working code example on GitHub.CSRF Protection in Spring
The standard recommendation is to have CSRF protection enabled when we create a service that could be processed by browsers. If the created service is exclusively for non-browser clients we could disable CSRF protection. Spring provides two mechanisms to protect against CSRF attacks.
- Synchronizer Token Pattern
- Specifying the
SameSiteattribute on your session cookie
Sample Application to Simulate CSRF
First, we will create a sample Spring Boot application that uses Spring Security and Thymeleaf. We will also add the thymeleaf extras module to help us integrate both individual modules.
Maven dependencies:
<dependency>
    <groupId>org.springframework.boot</groupId>
    <artifactId>spring-boot-starter-security</artifactId>
</dependency>
<dependency>
    <groupId>org.springframework.boot</groupId>
    <artifactId>spring-boot-starter-thymeleaf</artifactId>
</dependency>
<dependency>
    <groupId>org.thymeleaf.extras</groupId>
    <artifactId>thymeleaf-extras-springsecurity5</artifactId>
</dependency>
Gradle dependencies:
dependencies {
    compile "org.springframework.boot:spring-boot-starter-security"
    compile "org.springframework.boot:spring-boot-starter-thymeleaf"
    compile "org.thymeleaf.extras:thymeleaf-extras-springsecurity5"
}
Starter dependency versions
Here, we have used Spring Boot version 2.6.3. Based on this version, Spring Boot internally resolves Spring Security version as 5.6.1 and Thymeleaf version as
3.0.14.RELEASE. However, we can override these versions if required in our pom.xml as below:
<properties>
    <spring-security.version>5.2.5.RELEASE</spring-security.version>
    <thymeleaf.version>3.0.1.RELEASE</thymeleaf.version>
</properties>
This application uses the Spring Security default login page to sign in. Once logged in, we will create a simple email registration
template. We will customize our login credentials in our application.yaml as:
spring:
  security:
    user:
      name: admin
      password: passw@rd
We have configured our application to run on port 8090. Now, let us start up our application:
mvnw clean verify spring-boot:run (for Windows)
./mvnw clean verify spring-boot:run (for Linux)
CSRF in Spring
Spring security, provides CSRF protection by default. Therefore, to demonstrate a CSRF attack, we need to explicitly disable CSRF protection.
public class SecurityConfiguration
        extends WebSecurityConfigurerAdapter {

   @Override
   protected void configure(HttpSecurity http) {
      http
        .authorizeRequests()
        .antMatchers("/**").permitAll()
        .and()
        .httpBasic()
        .and()
        .formLogin().permitAll()
        .and().csrf().disable();
   }
}
Next, let’s create a sample attacker application. This is another Spring Boot application that uses Thymeleaf to create a template that the attacker will use to register a fake email id. This application is configured to run on port 8091.
mvnw clean verify spring-boot:run (for Windows)
./mvnw clean verify spring-boot:run (for Linux)
Now, before we try to simulate this attack, let’s understand the parameters the attacker needs to know to carry out a successful CSRF attack:
- The user has an active session and the attack is triggered from within the session.
- The attacker knows the valid URL that will change the state and result in a security breach.
- The attacker is aware of all the valid parameters required to be sent to ensure the request goes through.
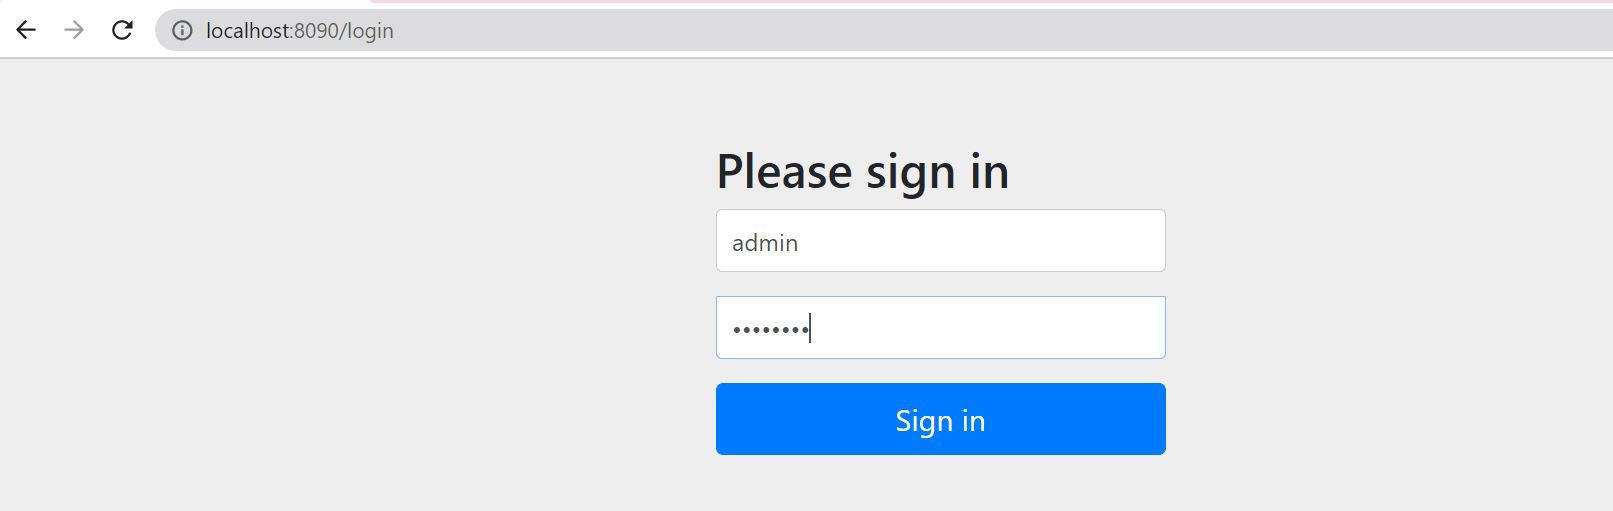
Now, let’s log in to the application and go to the email registration page.
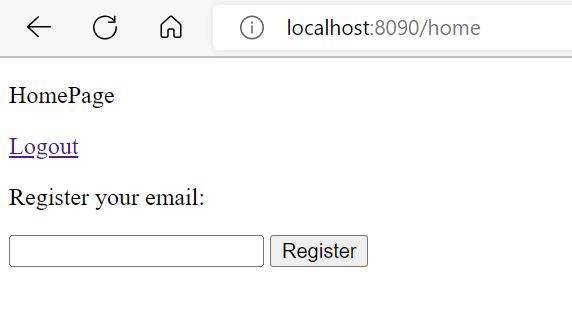
Before we enter the email to register, let’s open a second tab and load the attacker’s application. This action is similar to an attacker tricking the user into clicking a button/link to make use of the same session and trigger the request on behalf of the user.
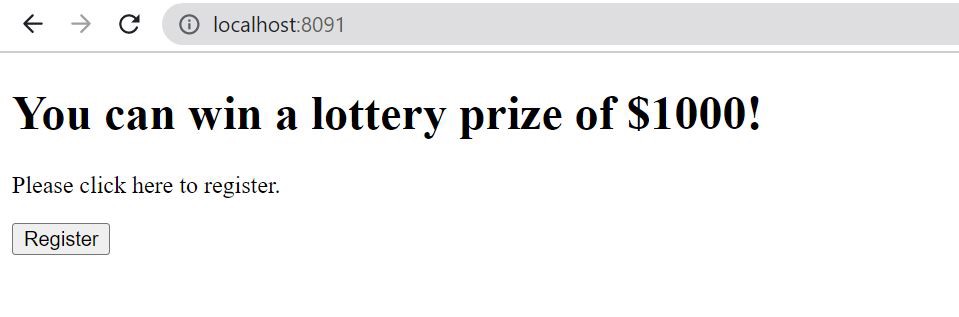
When the user clicks on the Register button, the attacker triggers a request to the endpoint http://localhost:8090/registerEmail, registering his email id
for all further communication. Here, since CSRF was disabled and the attacker knew all required valid parameters the request would go through successfully, and we would see this page

Default CSRF protection in Spring
In the previous section, we were able to simulate a CSRF attack by explicitly disabling CSRF protection. Let’s take a look at what happens if we remove the CSRF configuration in Spring Security. Let’s set the security configuration to:
@Configuration
@EnableWebSecurity
public class SecurityConfiguration
        extends WebSecurityConfigurerAdapter {

  @Override
  protected void configure(HttpSecurity http) {
    http
      .authorizeRequests()
      .antMatchers("/**").permitAll()
      .and()
      .httpBasic()
      .and()
      .formLogin().permitAll();
  }
}
As we can see here, we haven’t explicitly enabled, disabled or configured any CSRF properties. Now, when we open the attacker application and click on the Register button, we see:
Whitelabel Error Page
This application has no explicit mapping for /error, so you are seeing this as a fallback.

Thu Sep 29 04:50:02 AEST 2022
There was an unexpected error (type=Forbidden, status=403).

This is because, as of Spring Security 4.0, CSRF protection is enabled by default.
How does the default Spring CSRF protection work?
Spring Security uses the Synchronizer Token pattern to generate a CSRF token that protects against CSRF attacks.
Features of the CSRF token are:
- The default CSRF token is generated at the server end by the Spring framework.
- This CSRF token (resolved automatically in thymeleaf due to the addition of thymeleaf-extras-springsecurity5 module) should be a part of every HTTP request. This is not a part of the cookie since the browser automatically includes cookies with every HTTP request.
- When an HTTP request is submitted, Spring Security will compare the expected CSRF token with the one sent in the HTTP request. The request will be processed only if the token values match else the request will be treated as a forged request and be rejected with status 403 (Forbidden).
- The CSRF token is generally included with requests that change state i.e. POST, PUT, DELETE, PATCH.
- Idempotent methods such as GET are not vulnerable to CSRF attacks since they do not change the server-side state and are protected by same origin policy.
Understanding key classes that enable CSRF protection
CsrfFilter
When CSRF is enabled, this filter is automatically called as part of the filter chain. To know the list of filters that apply, let’s enable debug logs in our application.yaml as :
logging:
  level:
    org.springframework.security.web: DEBUG
On application startup, we should see the CsrfFilter in the console log along with others:
o.s.s.web.DefaultSecurityFilterChain     : Will secure any request with
[org.springframework.security.web.context.request.async.WebAsyncManagerIntegrationFilter@773c7147,
 org.springframework.security.web.context.SecurityContextPersistenceFilter@7e20f4e3,
 org.springframework.security.web.header.HeaderWriterFilter@79144d0e,
 org.springframework.security.web.csrf.CsrfFilter@34070bd2,
 org.springframework.security.web.authentication.logout.LogoutFilter@105c6c9e,
 org.springframework.security.web.authentication.UsernamePasswordAuthenticationFilter@3c6fb501,
 org.springframework.security.web.authentication.ui.DefaultLoginPageGeneratingFilter@7a34c1f6,
 org.springframework.security.web.authentication.ui.DefaultLogoutPageGeneratingFilter@5abc5854,
 org.springframework.security.web.authentication.www.BasicAuthenticationFilter@1d0dad12,
 org.springframework.security.web.savedrequest.RequestCacheAwareFilter@4f6ff62,
 org.springframework.security.web.servletapi.SecurityContextHolderAwareRequestFilter@7af9595d,
 org.springframework.security.web.authentication.AnonymousAuthenticationFilter@5c3007d,
 org.springframework.security.web.session.SessionManagementFilter@2579d8a,
 org.springframework.security.web.access.ExceptionTranslationFilter@46b21632,
 org.springframework.security.web.access.intercept.FilterSecurityInterceptor@3ba5c4dd]
The CsrfFilter extends the OncePerRequestFilter thus guaranteeing that the Filter would be called exactly once for a request.
Its doFilterInternal() is responsible for generating and validating the token. It skips the Csrf validation and processing for GET, HEAD, TRACE and OPTIONS requests.
HttpSessionCsrfTokenRepository
This is the default implementation of the CsrfTokenRepository interface in Spring Security. The CsrfToken object is stored and validated in the HttpSession object.
The token created is set to a pre-defined parameter name _csrf and header X-CSRF-TOKEN that can be accessed by valid client applications.
The default implementation of token creation in the class is:
public final class HttpSessionCsrfTokenRepository implements CsrfTokenRepository {
    private static final String DEFAULT_CSRF_PARAMETER_NAME = "_csrf";
    private static final String DEFAULT_CSRF_HEADER_NAME = "X-CSRF-TOKEN";
    private static final String DEFAULT_CSRF_TOKEN_ATTR_NAME = HttpSessionCsrfTokenRepository.class.getName().concat(".CSRF_TOKEN");
    private String parameterName = "_csrf";
    private String headerName = "X-CSRF-TOKEN";

    private String createNewToken() {
        return UUID.randomUUID().toString();
    }
    // Other methods here....
}
UUID is a class that represents an immutable universally unique identifier.
CsrfTokenRepository
This interface helps customize the CSRF implementation. It contains the below methods:
public interface CsrfTokenRepository {
    CsrfToken generateToken(HttpServletRequest request);

    void saveToken(CsrfToken token, HttpServletRequest request, HttpServletResponse response);

    CsrfToken loadToken(HttpServletRequest request);
}
We need to implement these methods if we want to provide a custom implementation of CSRF token generation and its validation. Next, we need to plugin this class in our security configuration as below:
@Configuration
@EnableWebSecurity
public class SecurityConfiguration extends WebSecurityConfigurerAdapter {

    @Override
    protected void configure(HttpSecurity http) throws Exception {
        http.csrf().csrfTokenRepository(csrfTokenRepository());
    }

    private CsrfTokenRepository csrfTokenRepository() {
        return new CustomCsrfTokenRepository();
    }
}
This configuration will ensure our CustomCsrfTokenRepository class is called instead of the default HttpSessionCsrfTokenRepository.
CookieCsrfTokenRepository
This implementation of CsrfTokenRepository is most commonly used when working with Angular or similar front-end frameworks that use session cookie authentication.
It follows AngularJS conventions and stores the CsrfToken object in a cookie named XSRF-TOKEN and in the header X-XSRF-TOKEN.
public final class CookieCsrfTokenRepository implements CsrfTokenRepository {
    static final String DEFAULT_CSRF_COOKIE_NAME = "XSRF-TOKEN";
    static final String DEFAULT_CSRF_PARAMETER_NAME = "_csrf";
    static final String DEFAULT_CSRF_HEADER_NAME = "X-XSRF-TOKEN";
    private String parameterName = "_csrf";
    private String headerName = "X-XSRF-TOKEN";
    private String cookieName = "XSRF-TOKEN";
}
We can use the below security configuration to plug it into this repository:
@Configuration
public class SecurityConfiguration extends WebSecurityConfigurerAdapter {
  @Override
  public void configure(HttpSecurity http) throws Exception {
    http
      .csrf()
      .csrfTokenRepository(CookieCsrfTokenRepository.withHttpOnlyFalse());
  }
}
With this configuration token value is set in the XSRF-TOKEN cookie. The withHttpOnlyFalse() method ensures that the Angular client will be able to retrieve the cookie for all further requests.
Once retrieved the client copies the token value to X-XSRF-TOKEN header for every state modifying XHR request. Spring will then compare the header and the cookie values and accept the request only if they are the same.
CSRF protection in Angular
CookieCsrfTokenRepository is intended to be used only when the client application is developed in a framework such as Angular. AngularJS comes with built-in protection for CSRF.
For a detailed understanding refer to its documentation.
Customizing CsrfTokenRepository
In most cases, we’ll be happy with the default implementation of HttpSessionCsrfTokenRepository. However, if we intend to create custom tokens or
save the tokens to a database we might need some customization.
Let’s take a closer look at how we can customize CsrfTokenRepository.
In our demo application, consider we need to customize token generation and add/update tokens based on the logged-in user.
As we have seen in the previous section, we would need to implement three methods:
generateToken(HttpServletRequest request)
public class CustomCsrfTokenRepository implements CsrfTokenRepository {
    public CsrfToken generateToken(HttpServletRequest request) {
        return new DefaultCsrfToken(headerName, "_csrf", generateRandomToken());
    }

    private String generateRandomToken() {
        int random = ThreadLocalRandom.current().nextInt();
        return random + System.currentTimeMillis() + "";
    }
}
As shown above, we have customised the token creation instead of using the default UUID random token.
saveToken(CsrfToken token, HttpServletRequest request, HttpServletResponse response)
public class CustomCsrfTokenRepository implements CsrfTokenRepository {
  @Autowired
  public TokenRepository tokenRepository;

  private String headerName = "X-CSRF-TOKEN";

  public void saveToken(CsrfToken token, HttpServletRequest request,
                        HttpServletResponse response) {
    String username = request.getParameter("username");
    Optional<Token> tokenValueOpt = tokenRepository.findByUser(username);

    if (!tokenValueOpt.isPresent()) {
      Token tokenObj = new Token();
      tokenObj.setUser(username);
      tokenObj.setToken(token.getToken());
      tokenRepository.save(tokenObj);
    }
  }
}
Here, the saveToken() uses the generated random token to either save/retrieve from TokenRepository which maps to a H2 Database table Token that is responsible for storing user tokens.
loadToken(HttpServletRequest request)
public class CustomCsrfTokenRepository implements CsrfTokenRepository {
  public CsrfToken loadToken(HttpServletRequest request) {
    Optional<Token> tokenOpt = Optional.empty();
    String user = request.getParameter("username");
    if (Objects.nonNull(user)) {
      tokenOpt = tokenRepository.findByUser(user);
    } else if (Objects.nonNull(
            SecurityContextHolder.getContext().getAuthentication())) {
      Object principal =
              SecurityContextHolder.getContext().getAuthentication().getPrincipal();
      String username = "";
      if (principal instanceof UserDetails) {
        username = ((UserDetails) principal).getUsername();
      } else {
        username = principal.toString();
      }
      tokenOpt = tokenRepository.findByUser(username);
    }

    if (tokenOpt.isPresent()) {
      Token tokenValue = tokenOpt.get();
      return new DefaultCsrfToken(
              "X-CSRF-TOKEN",
              "_csrf",
              tokenValue.getToken());
    }
    return null;
  }
}
Here, we get the logged-in user and fetch its token from the underlying database.
Exposing the token to HTTP requests
In our example, we used the Spring thymeleaf template to make calls to the registerEmail endpoint.
Let’s look at a valid email registration process:
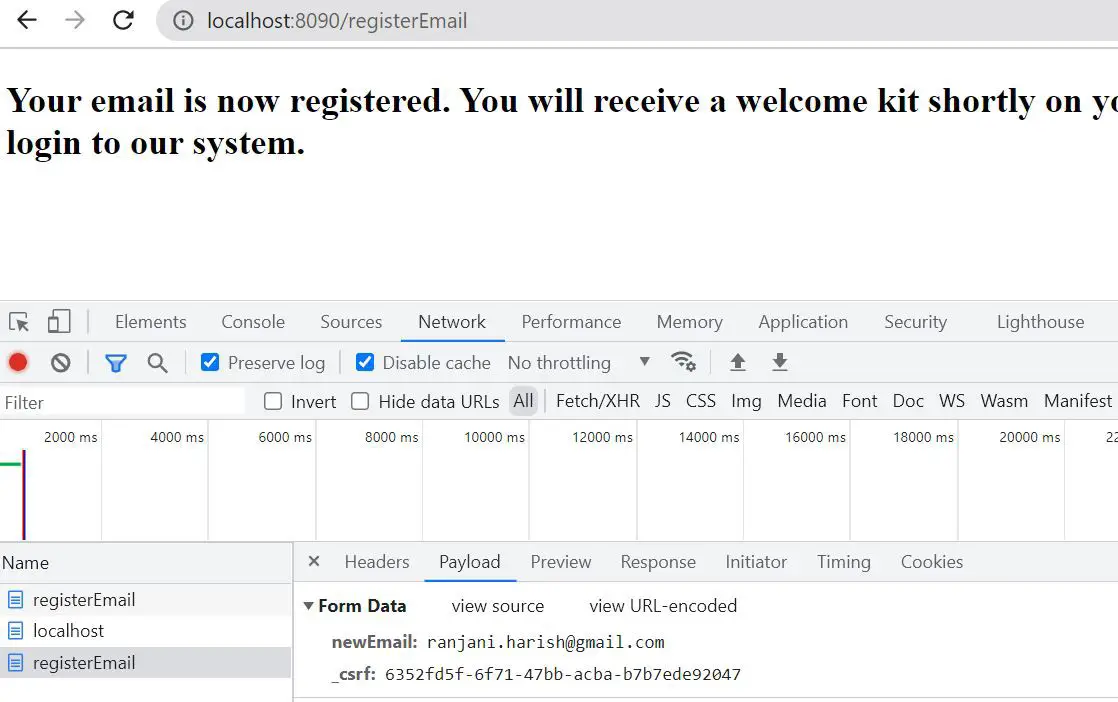
Here, we see the payload having _csrf parameter that the Spring application could validate and therefore the HTTP request was processed successfully.
For this parameter to be passed in the HTTP request, we need to add the below code to the thymeleaf template:
<input type="hidden" th:name="${_csrf.parameterName}" th:value="${_csrf.token}" />
Spring dynamically resolves the _csrf.parameterName to _csrf and _csrf.token to a random UUID string.
This is detailed in the Spring documentation that states:
Spring Security’s CSRF support provides integration with Spring’s RequestDataValueProcessor via its CsrfRequestDataValueProcessor. This means that if you leverage Spring’s form tag library, Thymeleaf, or any other view technology that integrates with RequestDataValueProcessor, then forms that have an unsafe HTTP method (i.e. post) will automatically include the actual CSRF token.
Every HTTP request in the session will have the same CSRF token. Since this value is random and is not automatically included in the browser, the attacker application wouldn’t be able to deduce its value and his request would be rejected.
Selective URL protection
Spring Security provides a requireCsrfProtectionMatcher() method to enable CSRF protection selectively i.e we could enable CSRF for only
a limited set of URLs as desired. The other endpoints will be excluded from CSRF protection.
@Configuration
@EnableWebSecurity
public class SecurityConfiguration extends WebSecurityConfigurerAdapter {

  @Override
  protected void configure(HttpSecurity http) {
    http
      .authorizeRequests()
      .antMatchers("/**").permitAll()
      .and()
      .httpBasic()
      .and()
      .formLogin().permitAll()
      .and()
      .csrf()
      .requireCsrfProtectionMatcher(
              new AntPathRequestMatcher("**/login"));
  }
}
If we have multiple URLs that need to have CSRF protection, it can be achieved in the following ways:
@Configuration
@EnableWebSecurity
public class SecurityConfiguration extends WebSecurityConfigurerAdapter {

  @Override
  protected void configure(HttpSecurity http) {
    http
      .authorizeRequests()
      .antMatchers("/**").permitAll()
      .and()
      .httpBasic()
      .and()
      .formLogin().permitAll()
      .and()
      .csrf().requireCsrfProtectionMatcher(
              new AntPathRequestMatcher("**/login"))
      .and()
      .csrf().requireCsrfProtectionMatcher(
              new AntPathRequestMatcher("**/registerEmail"));
  }
}
OR
We define a custom class called CustomAntPathRequestMatcher that implements Requestmatcher and handle URL pattern matching in that class.
public class CustomAntPathRequestMatcher implements RequestMatcher {
  private final AndRequestMatcher andRequestMatcher;

  public CustomAntPathRequestMatcher(String[] patterns) {
    List<RequestMatcher> requestMatchers = Arrays.asList(patterns)
            .stream()
            .map(p -> new AntPathRequestMatcher(p))
            .collect(Collectors.toList());

    andRequestMatcher = new AndRequestMatcher(requestMatchers);
  }

  @Override
  public boolean matches(HttpServletRequest request) {
    return andRequestMatcher.matches(request);
  }
}
Then we can use this class in our security configuration.
@Configuration
@EnableWebSecurity
public class SecurityConfiguration extends WebSecurityConfigurerAdapter {

  String[] patterns = new String[]{
          "/favicon.ico",
          "/login",
          "/registerEmail"
  };

  @Override
  protected void configure(HttpSecurity http) throws Exception {
    http
      .authorizeRequests()
      .antMatchers("/**").permitAll()
      .and()
      .httpBasic()
      .and()
      .formLogin().permitAll()
      .and()
      .csrf().requireCsrfProtectionMatcher(
              new CustomAntPathRequestMatcher(patterns));
  }
}
On the other hand, we could have situations where we need to enable CSRF by default, but we need only a handful of URLs for which CSRF protection needs to be turned OFF. In such cases, we can use the below configuration:
@Configuration
@EnableWebSecurity
public class SecurityConfiguration extends WebSecurityConfigurerAdapter {

    @Override
    protected void configure(HttpSecurity http) throws Exception {
        String[] patterns = new String[] {
                "**/disabledEndpoint",
                "**/simpleCall"
        };
        http
          .authorizeRequests().antMatchers("/**")
          .permitAll().and().httpBasic().and().formLogin().permitAll()
          .and()
          .csrf().ignoringAntMatchers(patterns);
    }
}
SameSite Cookie Attribute
Spring Security provides us with another approach that could mitigate CSRF attacks. According to OWASP,
“SameSite prevents the browser from sending the cookie along with cross-site requests. The main goal is mitigating the risk of cross-origin information leakage. It also provides some protection against cross-site request forgery attacks.”
This attribute can be set to three values:
- Strict - This will prevent the browser from sending the cookie to the target site in all cross-site browsing contexts. This is the most restrictive forbidding third-party cookies to be sent in cross-site scenarios.
- Lax - This rule is slightly relaxed as with this value the server maintains the user’s logged-in session after the user arrives from an external link.
- None - This value is used to turn off the
SameSiteproperty. However, this is possible only if theSecureproperty is also set i.e the application needs to be HTTPS enabled.
Browser compatibility for SameSite attribute
All recent versions of known browsers support the SameSite attribute. Its default value in case the attribute isn’t specified is set to Lax to enable defence against CSRF attacks.
To configure the SameSite attribute in a SpringBoot application, we need to add the below configuration in application.yml:
server:
  servlet:
    session:
      cookie:
        same-site: Lax
This configuration is supported only in SpringBoot versions 2.6.0 and above.
Another way to set this attribute in Set-Cookie is via org.springframework.http.ResponseCookie
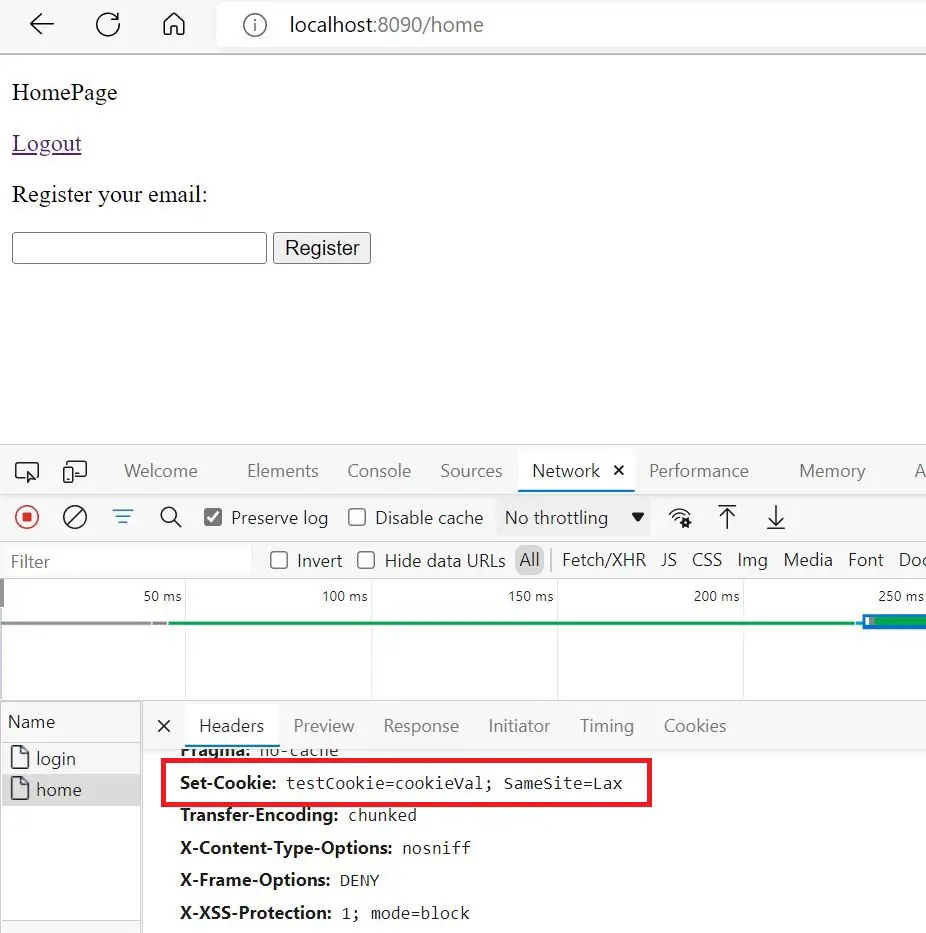
@Controller
public class HomeController {
  @GetMapping
  public String homePage(HttpServletResponse response) {
    ResponseCookie responseCookie =
            ResponseCookie.from("testCookie", "cookieVal")
                    .sameSite("Lax")
                    .build();
    response.setHeader(
            HttpHeaders.SET_COOKIE,
            responseCookie.toString());
    return "homePage";
  }
}
With this cookie set, we should see:
Testing CSRF in Spring
Now that we have looked at how CSRF is configured and applied, let’s take a look at how to test them. First, we need to add the below testing dependencies:
<dependency>
  <groupId>org.springframework.boot</groupId>
  <artifactId>spring-boot-starter-test</artifactId>
  <scope>test</scope>
</dependency>
<dependency>
  <groupId>org.springframework.security</groupId>
  <artifactId>spring-security-test</artifactId>
  <scope>test</scope>
</dependency>
The spring-boot-starter-test includes basic testing tools like Junit, Mockito which will be used to test the application.
The spring-security-test will integrate MockMvc with Spring Security allowing us to test security features incorporated in the application.
@SpringBootTest(classes = {EmailController.class,
        HomeController.class,
        SecurityConfiguration.class})
@ExtendWith(SpringExtension.class)
@ActiveProfiles("test")
public class ControllerTest {
  @MockBean
  public CustomerEmailService customerEmailService;

  @Autowired
  private WebApplicationContext context;

  private MockMvc mockMvc;

  @BeforeEach
  public void setup() {
    this.mockMvc = MockMvcBuilders
            .webAppContextSetup(this.context)
            .apply(springSecurity())
            .build();
  }
}
Here, we have set up the MockMvc object using SecurityMockMvcConfigurers.springSecurity(). This will perform the initial setup we need to integrate Spring Security with Spring MVC Test.
Spring Security testing framework provides static imports to help with the testing of various security scenarios:
import static org.springframework.security.test.web.servlet.request.SecurityMockMvcRequestPostProcessors.*;
To test with CSRF, let’s implement a test SecurityConfiguration:
@TestConfiguration
@EnableWebSecurity
public class SecurityConfiguration extends WebSecurityConfigurerAdapter {

  @Override
  protected void configure(HttpSecurity http) throws Exception {
    http
      .authorizeRequests()
      .antMatchers("/**").permitAll()
      .and()
      .httpBasic()
      .and()
      .formLogin();
  }
}
Testing successful login
    @Test
    void shouldLoginSuccessfully() throws Exception {
        mockMvc.perform(formLogin().user("admin").password("password"))
                .andExpect(status().is3xxRedirection());
    }
Here, we have configured a sample user and password in our application-test.yaml.
SecurityMockMvcRequestBuilders.FormLoginRequestBuilder.formLogin() method internally sets up SecurityMockMvcRequestPostProcessors.csrf() that will internally handle csrf tokens and validate user login successfully.
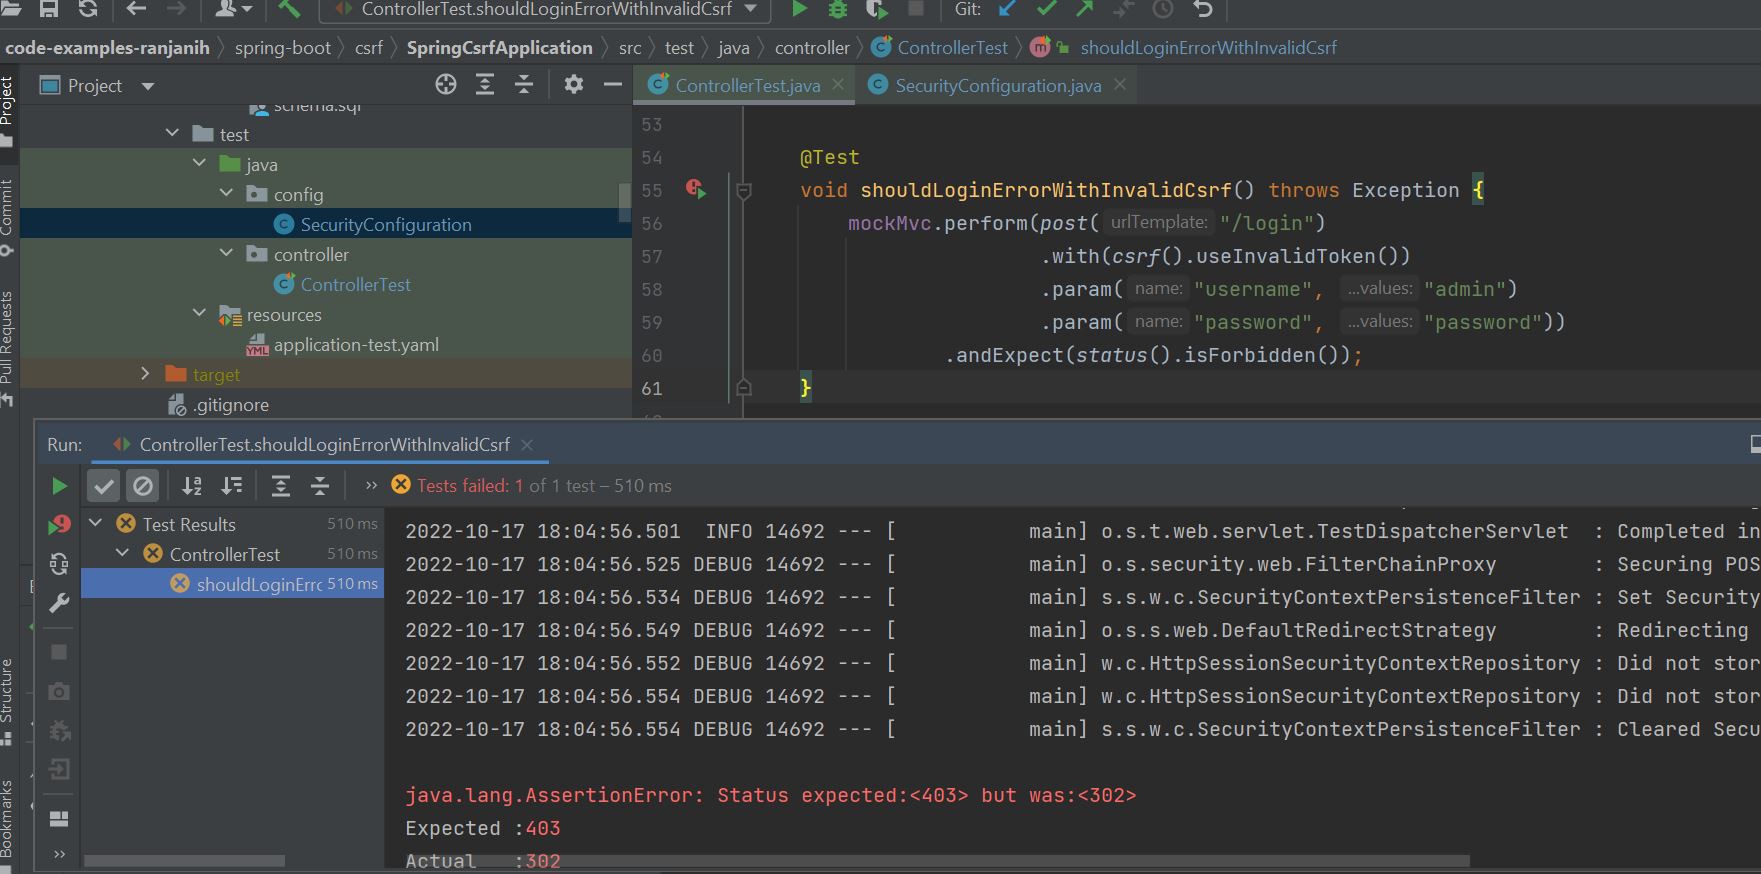
Testing login with invalid CSRF
    @Test
    void shouldLoginErrorWithInvalidCsrf() throws Exception {
        mockMvc.perform(post("/login")
                        .with(csrf().useInvalidToken())
                        .param("username", "admin")
                        .param("password", "password"))
                .andExpect(status().isForbidden());
    }
To test, if the login works with an invalid CSRF, the testing framework provides us methods, to forcibly add an invalid CSRF token. With this applied, the test now returns 403.
Testing login with invalid CSRF when we ignore /login
For the same test as above, let’s tweak our SecurityConfiguration to ignore login.
For testing, we can change our SecurityConfiguration to:
@TestConfiguration
@EnableWebSecurity
public class SecurityConfiguration extends WebSecurityConfigurerAdapter {

  @Override
  protected void configure(HttpSecurity http) {
    http
      .authorizeRequests()
      .antMatchers("/**").permitAll()
      .and()
      .httpBasic()
      .and().formLogin()
      .and()
      .csrf().ignoringAntMatchers("/login");
  }
}
We notice that CSRF check is ignored for the endpoint, and despite setting an invalid CSRF, the login action was successful. For other state-changing endpoints, we can create similar scenarios and test for CSRF applicability.
Conclusion
In this article, we have looked at how we can leverage in-built Spring CSRF features to protect our endpoints from CSRF attacks. We took a look at how to configure and implement them with examples. We also briefly touched upon the spring security testing framework and its CSRF capabilities.
You can play around with the example code on GitHub.