The request/response pattern is well-known and widely used, mainly in synchronous communication. This article shows how to implement this pattern asynchronously with a message broker using the AMQP protocol and Spring Boot.
Example Code
This article is accompanied by a working code example on GitHub.What is the Request/Response Pattern?
The request/response interaction between two parties is pretty easy. The client sends a request to the server, the server starts the work and sends the response to the client once the work is done.
The best-known example of this interaction is communication via the HTTP protocol, where the request and response are sent through the same channel / the same connection.
Normally, the client sends the request directly to the server and waits for the response synchronously. In this case, the client has to know the API of the server.
Why Do We Need an Async Request/Response Pattern?
A software enterprise system consists of many components. These components communicate with each other. Sometimes it is enough just to send a message to another component and not wait for an answer. But in many cases, a component may need to get the response to a request.
When we use direct synchronous communication, the client has to know the API of the server. When one component has a big number of different API calls to another component, we’re building coupling them to eath other tightly, and the whole picture can become hard to change.
To reduce the coupling a bit we can use a message broker as a central component for communication between the components, instead of a synchronous protocol.
Asynchronous Communication
Since we use messaging for requests and responses, the communication is now working asynchronously.
Here’s how it works:
- The client sends the request to the request channel.
- The server consumes the request from the request channel.
- The server sends the response to the response channel.
- The client consumes the response from the response channel.
When the client sends a request, it waits for the response by listening to the response channel. If the client sends many requests, then it expects a response for every request. But how does the client know which response is for which request?
To solve this problem, the client should send a unique correlation IDentifier along with each request. The server should obtain this identifier and add it to the response. Now the client can assign a response to its request.
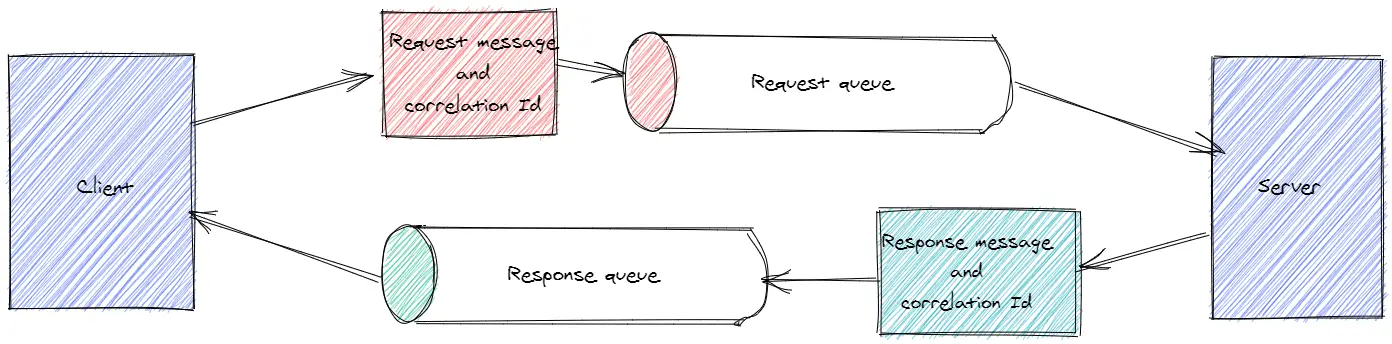
The important things are:
- We have two channels. One for requests and one for responses.
- We use a correlation ID on both ends of the communication.
Another point we have to note is that the client has to have a state.
The client generates a unique correlation ID, for example, my unique id.
Then the client sends the request to the channel and keeps the correlation ID in memory or in a database.
After that, the client waits for the responses in the response channel. Every response from the channel has a correlation ID, and the client has to compare this correlation ID with those in memory to find the respective request and proceed with processing the response in the context of that request.
The server, on the other hand, is still stateless. The server just reads the correlation ID from the request channel and sends it back to the response channel along with the response.
Remote Procedure Call with AMQP
Now let’s see how we can implement this asynchronous communication with Spring Boot as client and server, and RabbitMQ as a message broker.
Let’s create two Spring Boot applications. A client application that sends the request to the server and waits for the response, and a server application, that accepts the request, processes it, and sends the response back to the client.
We will use Spring AMQP for sending and receiving messages.
Client
First, we have to add the AMQP starter to the dependencies (Gradle notation):
implementation 'org.springframework.boot:spring-boot-starter-amqp:2.3.2.RELEASE'
Second, we create the configuration of the client application:
@Configuration
class ClientConfiguration {

  @Bean
  public DirectExchange directExchange() {
    return new DirectExchange("reflectoring.cars");
  }

  @Bean
  public MessageConverter jackson2MessageConverter() {
    return new Jackson2JsonMessageConverter();
  }
}
The DirectExchange supports binding to different queues depending on the routing key.
In this case, we create an exchange with the namereflectoring.cars. When sending a message to this exchange,
the client has to provide a routing key. The message broker will forward the message to the queue,
that is bound to the exchange with the given routing key.
You can find more details on the AMQP messaging concepts in the article about events with RabbitMQ.
We declare Jackson2JsonMessageConverter as default MessageConverter to send
the messages to the message broker in JSON format.
Now we are ready to send a request message:
@Component
class StatefulBlockingClient {

  private final RabbitTemplate template;
  private final DirectExchange directExchange;
  public static final String ROUTING_KEY = "old.car";

  public void send() {
    CarDto carDto = CarDto.builder()
            // ...
            .build();

    RegistrationDto registrationDto =
            template.convertSendAndReceiveAsType(
              directExchange.getName(),
              ROUTING_KEY,
              carDto,
              new ParameterizedTypeReference<>() {
              });
  }
}
Spring AMQP provides built-in support for the request/response pattern.
If we use the method convertSendAndReceiveAsType() of RabbitTemplate,
Spring AMQP takes care of the request/response scenario. It creates a callback channel for the response, generates a correlation ID, configures
the message broker, and receives the response from the server.
The information about the callback queue and correlation ID will be sent to the
server too. It is transparent for the caller.
Since we configured MessageConverter in the configuration above,
it will be used by the template and the carDto will be sent as JSON to the channel.
Server
Now let’s create a server application to proceed with the request and create the response. First, we create a configuration for the server:
@Configuration
class ServerConfiguration {

  @Bean
  public DirectExchange directExchange() {
    return new DirectExchange("reflectoring.cars");
  }

  @Bean
  public Queue queue() {
    return new Queue("request");
  }

  @Bean
  public Binding binding(DirectExchange directExchange,
               Queue queue) {
    return BindingBuilder.bind(queue)
        .to(directExchange)
        .with("old.car");
  }

  @Bean
  public MessageConverter jackson2MessageConverter() {
    return new Jackson2JsonMessageConverter();
  }
}
We declare the same exchange as on the client side. Then we create a queue for the request
and bind it to the exchange with the same routing key old.car that we used in the client.
All messages we send to the exchange
with this routing key will be forwarded to the request queue. We have to note that we don’t
configure the callback queue or response configuration at all.
Spring AMQP will detect this from the message properties of the request
and configure everything automatically.
Now we have to implement the listener that listens to the request queue:
@Component
class Consumer {

  @RabbitListener(queues = "#{queue.name}", concurrency = "3")
  public Registration receive(Car car) {
    return Registration.builder()
        .id(car.getId())
        .date(new Date())
        .owner("Ms. Rabbit")
        .signature("Signature of the registration")
        .build();
  }
}
This listener gets messages from the request queue.
We declare the Jackson2JsonMessageConverter in the configuration. This converter will convert the String payload of the message to a Car object.
The method receive() starts the business logic and returns a Registration object.
Spring AMQP takes care of the rest again. It will convert the Registration to
JSON, add the correlation ID of the request to the response, and send
it to the response queue. We don’t even know the name of the response queue or
the value of the correlation ID.
The client will get this response from the callback queue, read the correlation ID, and continue working.
If we have several threads on the client side that are working in parallel and sending requests, or if we have several methods that use the same request channel, or even if we have many instances of the client, Spring AMQP will always correlate the response message to the sender.
That’s it. Now the client can call a method that invokes logic on the server side. From the client perspective, this is a normal blocking remote call.
Retrieving An Asynchronous Result Later
Normally the APIs are fast, and the client expects the response after a few milliseconds or seconds.
But there are cases when the server takes longer to send the response. It can be because of security policies, high load, or some other long operations on the server-side. While waiting for the response, the client could work on something different and process the response later.
We can use AsyncRabbitTemplate to achieve this:
@Configuration
class ClientConfiguration {

  @Bean
  public AsyncRabbitTemplate asyncRabbitTemplate(
               RabbitTemplate rabbitTemplate){
    return new AsyncRabbitTemplate(rabbitTemplate);
  }
  // Other methods omitted.
}
We have to declare the bean of AsyncRabbitTemplate in the client configuration. We pass the rabbitTemplate
bean to the constructor, because Spring AMQP configured it for us, and we just want to use it asynchronously.
After that, we can use it for sending messages:
@Component
class StatefulFutureClient {

  public void sendWithFuture() {
    CarDto carDto = CarDto.builder()
         // ...
        .build();

    ListenableFuture<RegistrationDto> listenableFuture =
        asyncRabbitTemplate.convertSendAndReceiveAsType(
            directExchange.getName(),
            ROUTING_KEY,
            carDto,
            new ParameterizedTypeReference<>() {
            });

    // do some other work...

    try {
      RegistrationDto registrationDto = listenableFuture.get();
    } catch (InterruptedException | ExecutionException e) {
      // ...
    }
  }
}
We use the method with the same signature as with RabbitTemplate, but this method returns
an implementation of ListenableFuture interface. After calling the method convertSendAndReceiveAsType() we
can execute other code and then call the method get() on the ListenableFuture to obtain
the response from the server. If we call the method get() and the response is not returned,
we still have to wait and cannot execute further code.
Registering a Callback
To avoid a blocking call we can register a callback, that is called asynchronously when the response message
is received. The AsyncRabbitTemplate supports this approach:
@Component
class StatefulCallbackClient {
  public void sendAsynchronouslyWithCallback() {
    CarDto carDto = CarDto.builder()
         // ...
        .build();

    RabbitConverterFuture<RegistrationDto> rabbitConverterFuture =
           asyncRabbitTemplate.convertSendAndReceiveAsType(
               directExchange.getName(),
               ROUTING_KEY,
               carDto,
               new ParameterizedTypeReference<>() {});

    rabbitConverterFuture.addCallback(new ListenableFutureCallback<>() {
      @Override
      public void onFailure(Throwable ex) {
        // ...
      }

      @Override
      public void onSuccess(RegistrationDto registrationDto) {
        LOGGER.info("Registration received {}", registrationDto);
      }
    });
  }
}
We declare RabbitConverterFuture as return type of the method convertSendAndReceiveAsType().
Then we add an ListenableFutureCallback to the RabbitConverterFuture.
From this place, we can continue proceeding without waiting for the response. The ListenableFutureCallback
will be called when the response reaches in the callback queue.
Both approaches with using a ListenableFuture and registering a callback don’t require
any changes on the server-side.
Delayed Response with a Separate Listener
All these approaches work fine with Spring AMQP and RabbitMQ, but there are cases when they have a drawback. The client always has a state. It means if the client sends a request, the client has to keep the correlation ID in memory and assign the response to the request.
It means that only the sender of the request can get the response.
Let’s say we have many instances of the client. One instance sends a request to the server and this instance, unfortunately, crashes for some reason and is not available anymore. The response cannot be proceeded anymore and is lost.
In a different case, the server can take longer than usual for proceeding request and the client doesn’t want to wait anymore and times out. Again, the response is lost.
To solve this problem we have to let other instances proceed with the response.
To achieve this, we create the request sender and the response listener separately.
First, we have to create a response queue and set up a listener that is listening to this queue on the client side. Second, we have to take care about the correlation between requests and responses ourselves.
We declare the response queue in the client configuration:
@Configuration
class ClientConfiguration {

  @Bean
  public Queue response(){
    return new Queue("response");
  }
  // other methods omitted.
}
Now we send the request to the same exchange as in the example above:
@Component
class StatelessClient {

  public void sendAndForget() {
    CarDto carDto = CarDto.builder()
         // ...
        .build();

    UUID correlationId = UUID.randomUUID();

    registrationService.saveCar(carDto, correlationId);

    MessagePostProcessor messagePostProcessor = message -> {
      MessageProperties messageProperties
                = message.getMessageProperties();
      messageProperties.setReplyTo(replyQueue.getName());
      messageProperties.setCorrelationId(correlationId.toString());
      return message;
    };

    template.convertAndSend(directExchange.getName(),
        "old.car",
        carDto,
        messagePostProcessor);
  }
}
The first difference to the approach with the remote procedure call is that we generate a correlation ID in the code and don’t delegate it to Spring AMQP anymore.
In the next step, we save the correlation ID to the database. Another instance of the client, that
uses the same database, can read it later.
Now, we use the method convertAndSend() and not convertSendAndReceiveAsType(), because
we don’t want to wait for the response after the call. We send messages in a fire-and-forget manner.
It is important to add the information about the correlation ID and the response queue to the message. The server will read this information and send the response to the response queue.
We do this by using the MessagePostProcessor. With MessagePostProcessor we can change
the message properties. In this case,
we add the correlation ID we saved in the database and the name of the response queue.
The request message has all data to proceed on the server-side properly, so we don’t need to change anything on the server-side
Now we implement the listener, that is listening to the response queue:
@Component
class ReplyConsumer {

  @RabbitListener(queues = "#{response.name}")
  public void receive(RegistrationDto registrationDto, Message message){
    String correlationId
         = message.getMessageProperties().getCorrelationId();
    registrationService.saveRegistration(
              UUID.fromString(correlationId),
              registrationDto);
  }
}
We use the annotation @RabbitListener for the listener to the response queue. In the method
receive() we need the payload of the message and the meta information of the message to
read the correlation ID. We easily do it by adding the Message as the second parameter.
Now we can read the correlation ID from the message, find the correlated data in the database,
and proceed with the business logic.
Since we split the message sender and the listener for responses, we can scale the client application. One instance can send the request and another instance of the client can proceed with the response.
With this approach both sides of the interaction are scalable.
Conclusion
Spring AMQP provides support for implementing the request/response pattern with a message broker synchronously or asynchronously. With minimal effort, it is possible to create scalable and reliable applications.
You’ll find a project with sample code on GitHub.