In a microservice environment or any other distributed system you may come upon the requirement to exchange events between services. This article shows how to implement a messaging solution with RabbitMQ.
Example Code
This article is accompanied by a working code example on GitHub.Event Messaging Requirements
Before jumping into the solution let’s define some requirements that an eventing mechanism in a distributed system should fulfill. We’ll use the following diagram to derive those requirements.
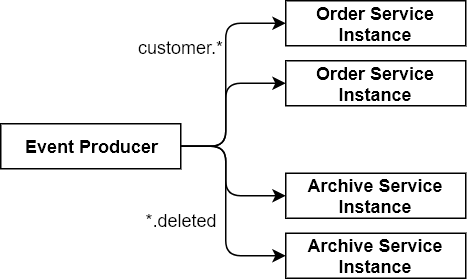
- The event producing service must not call the event consuming services directly in order to preserve loose coupling.
- The event producing service must be able to send events of different types (e.g. “customer.created” or “customer.deleted”).
- The event consuming services must be able to receive only events of types they are interested in (e.g. “*.deleted”, which means all events concerning a customer).
- In our distributed system we have several service clusters (e.g. a cluster of “order service” instances and a cluster of “archive service” instances). Each event must be processed by at most one instance per service cluster.
Messaging Concepts
The eventing solution presented in this article makes use of some messaging concepts that are described in the following sections.
Producer
A producer is simply a piece of software that sends a message to a message broker, for example a customer service
in a system of microservices that wants to tell other services that a new customer was created by sending
the event customer.created that contains the newly created customers' ID as a payload.
Consumer
A consumer is a piece of software that receives messages from a message broker and processes those messages.
In our example, this might be an order service that needs the address of all customers to create orders for
those customers. It would process the customer.created event by reading the ID from the event
and calling the customer service to load the corresponding customers' address.
Queue
A queue is first-in-first-out message store. The messages are put into a queue by a producer and read from it by a consumer. Once a message is read, it is consumed and removed from the queue. A message can thus only be processed exactly once.
Exchange
An exchange is a concept that is part of the AMQP protocol. Basically, it acts as an intermediary between the producer and a queue. Instead of sending messages directly to a queue, a producer can send them to an exchange instead. The exchange then sends those messages to one or more queues following a specified set of rules. Thus, the producer does not need to know the queues that eventually receive those messages.
Binding
A binding connects a queue to an exchange. The exchange forwards all messages it receives to the queues it is bound
to. A binding can contain a routing key that specifies which events should be forwarded. For example, a binding
might contain the routing key customer.* meaning that all events whose type starts with customer. will
be routed to the specified queue.
An Event Messaging Concept with AMQP
Using the concepts above, we can create an eventing solution with RabbitMQ. The solution is depicted in the figure below.
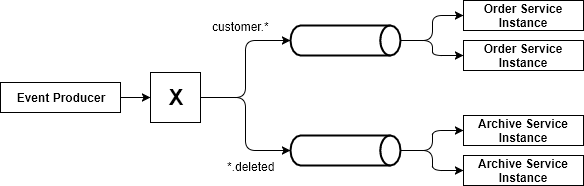
Each service cluster gets its own queue. This is necessary since not all events are relevant to each service
cluster. An order service may be interested in all customer events (customer.*) whereas an archiving service may be
interested in all events where an object has been deleted (*.deleted). If we had only one queue for all events
that queue would sooner or later overflow since it might contain events that no consumer is interested in.
Each consuming service cluster binds its queue the central exchange with a routing key that specifies which events it is interested in. Only those events are then routed into the queue. The events are then consumed by exactly one of the service instances connected to that queue.
The event producing services only need to know the central exchange and send all events to that exchange. Since the consuming services take care of the binding and routing, we have a real, loosely coupled eventing mechanism.
Implementing Event Messaging with Spring Boot and RabbitMQ
The eventing concept described above can be implemented with Spring Boot and RabbitMQ. The implementation is pretty straightforward. If you don’t feel like reading and more like delving into code, you will find a link to a github repository with a working example at the end of this article.
Including the Spring Boot AMQP Starter
Spring Boot offers a starter for Messaging with AMQP that integrates the Spring AMQP project with Spring Boot. The AMQP Starter currently only supports RabbitMQ as underlying message broker, which is fine for us. To use the starter, include the following dependency into your project (Gradle notation):
compile('org.springframework.boot:spring-boot-starter-amqp')
The starter contains an auto configuration which is automatically activated.
Connecting to RabbitMQ
In order to connect to a RabbitMQ server, the Spring AMQP starter reads the following properties, which you can
specify as environment variables, for example in your application.properties. The following settings are the
default connection settings once you have installed RabbitMQ locally.
spring.rabbitmq.host=localhost
spring.rabbitmq.port=5672
spring.rabbitmq.username=guest
spring.rabbitmq.password=guest
Configuring an Event Producer
Creating an event producer is pretty straightforward. We make use of the RabbitTemplate provided by the
AMQP starter and call the method convertAndSend() to send an event. The event in the code example
only contains a String. If the message should contain a complex object, you can make use of message converters.
The RabbitTemplate automatically uses the connection settings provided in the application.properties earlier.
public class CustomerService {

 private final RabbitTemplate rabbitTemplate;

  private final Exchange exchange;

  public CustomerService(RabbitTemplate rabbitTemplate, Exchange exchange) {
    this.rabbitTemplate = rabbitTemplate;
    this.exchange = exchange;
  }

  public void createCustomer() {
    // ... do some database stuff
    String routingKey = "customer.created";
    String message = "customer created";
    rabbitTemplate.convertAndSend(exchange.getName(), routingKey, message);
  }

}
Note that the call to RabbitTemplate needs the name of the exchange to which the event should be sent. To wire
our application against a specific exchange, we simply create a Spring Bean of type TopicExchange and choose a name
for that exchange (in case of the example code below, the exchange is called eventExchange).
The application will automatically connect to RabbitMQ and create an exchange with this name, if it doesn’t exist yet.
We use a so-called “topic exchange” here, since it allows to specify a routing key (a “topic”) when sending a message to it.
The RabbitTemplate passed into the CustomerService is provided to the Spring application context by the AMQP starter.
@Configuration
public class EventProducerConfiguration {

 @Bean
 public Exchange eventExchange() {
   return new TopicExchange("eventExchange");
 }

 @Bean
 public CustomerService customerService(RabbitTemplate rabbitTemplate, Exchange eventExchange) {
   return new CustomerService(rabbitTemplate, senderTopicExchange);
 }

}
Configuring an Event Consumer
First off, the event consumer itself is a simple java class. Again, to process more complex objects than
simple strings, you can use Spring AMQPs message converters. We use the @RabbitListener annotation
on a method to mark it as an event receiver.
public class EventConsumer {

  private Logger logger = LoggerFactory.getLogger(EventConsumer.class);

  @RabbitListener(queues="orderServiceQueue")
  public void receive(String message) {
    logger.info("Received message '{}'", message);
  }

}
We now need to declare a queue and bind it to the same exchange used in the event producer.
First, we define the same Exchange as we did in the event consumer configuration. Then, we define a Queue
with a unique name. This is the queue for our service cluster. To connect the two, we then create a Binding
with the routing key customer.* specifying that we are only interested in customer events.
As with the exchange before, a Queue and a Binding will be automatically created on the RabbitMQ server if they do not exist yet.
@Configuration
public class EventConsumerConfiguration {

  @Bean
  public Exchange eventExchange() {
    return new TopicExchange("eventExchange");
  }

  @Bean
  public Queue queue() {
    return new Queue("orderServiceQueue");
  }

  @Bean
  public Binding binding(Queue queue, Exchange eventExchange) {
    return BindingBuilder
            .bind(queue)
            .to(eventExchange)
            .with("customer.*");
  }

  @Bean
  public EventConsumer eventReceiver() {
    return new EventConsumer();
  }

}
Wrap-Up
With the concepts of exchanges, bindings and queues, AMQP provides everything we need to create an event mechanism for a distributed system. Spring AMQP and its integration into Spring Boot via the AMQP Starter provide a very convenient programming model to connect to such an event broker.


