Traditional web applications primarily used the HTTP request-response model, where clients sent requests to servers, and servers responded with data. However, implementing real-time features like live chat, notifications, collaborative tools, etc, was challenging. Developers had to resort to workarounds like long polling (repeatedly sending requests) or plugins such as Flash, to achieve real-time communication.
WebSockets changed the game by enabling constant, low-delay communication between clients and servers, breaking away from the old request-response model.
Socket.IO was introduced with the aim of simplifying real-time communication between servers and clients on the web. Socket.IO is built on top of WebSockets and allows developers to create real-time applications without worrying about low-level networking details.
In this article, we’ll explore the concept of using Socket.IO while creating a real-time chat application using Node.js + Socket.IO, that can be connected to any client-side application of our choice.
Prerequisites
Before we begin, please ensure that you have the following setup:
- Node.js installed on your computer.
- Basic knowledge of JavaScript and Node.js.
- Integrated Development Environment (IDE) (e.g. Visual Studio Code)
Example Code
This article is accompanied by a working code example on GitHub.How Communication Works Using Socket.IO
Socket.IO allows servers and clients to communicate in real time. To use Socket.IO it must be integrated on both the server and client.
Server
- The server is the central hub responsible for managing the Socket.IO connection with one or more clients.
- The server can broadcast messages to all clients, specific clients, or exclude the sender. This is useful for group notifications and chat rooms.
Client
- Clients, using Socket.IO, connect to the server by specifying the server’s address.
- Once connected, clients can exchange messages instantly with the server.
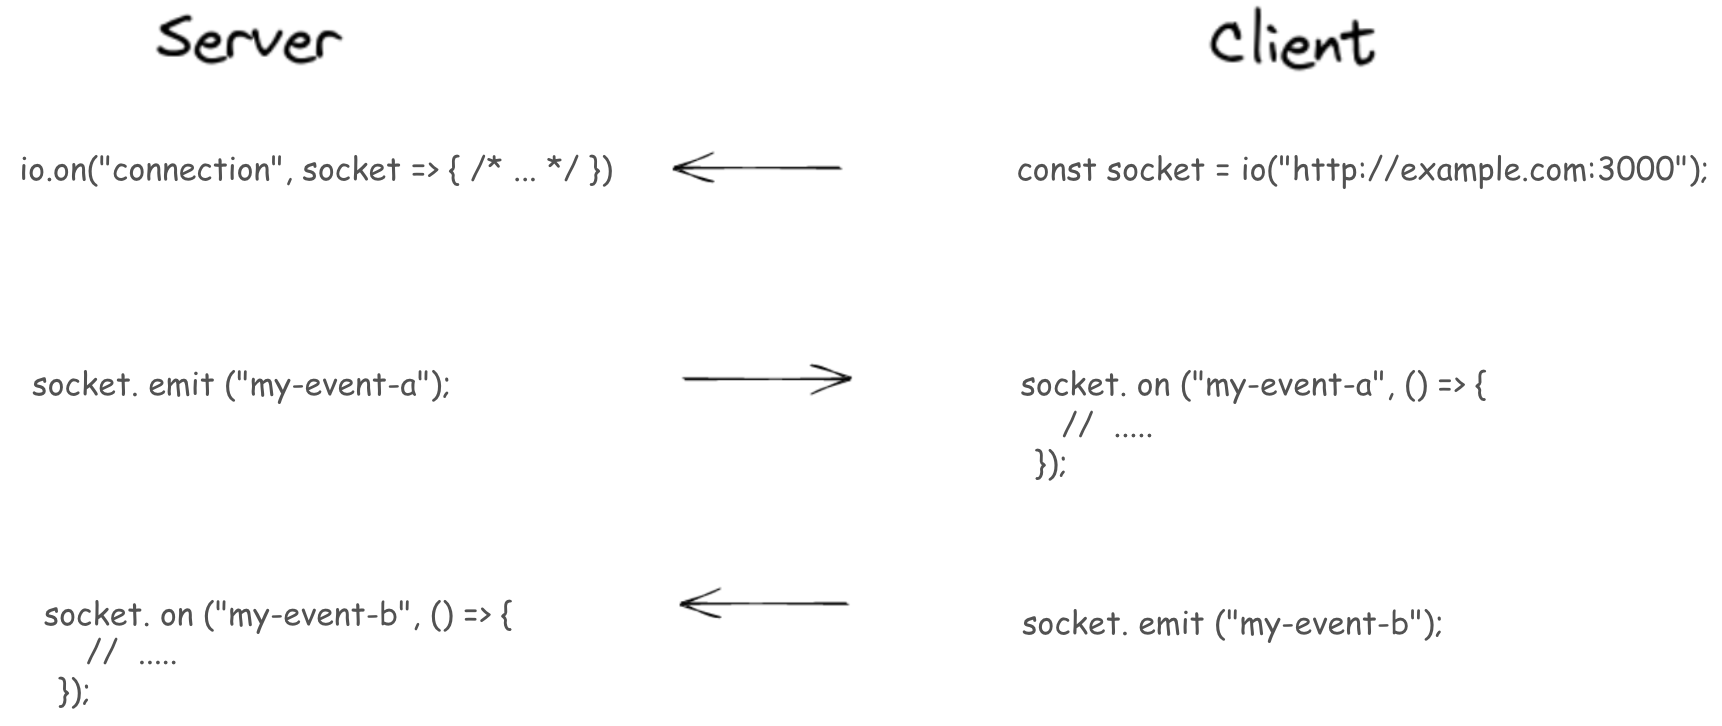
Bidirectional Communication
In this communication flow clients can emit events to the server and listen for events from the server. Likewise, the server can emit events to the clients and listen for events from them, enabling real-time bidirectional communication.
Socket.IO communication can also extend between servers (server-to-server) which is valuable for microservices and distributed applications that require real-time interactions.
Setting up Socket.IO in our Application
Server Side
We will start the integration of Socket.IO into our application from the server-side using Node.js.
To set up our application server, open a terminal in a directory of your choice. Create a new folder and initialize Node.js in it using the following command:
mkdir socket-chat-app
cd socket-chat-app
npm init -y
Next, install the dependencies necessary for setting up our server by running:
npm install express socket.io
Here’s a summary of what each dependency does:
- Express - This is used to create REST API and helps manage routes in our application.
- Socket.IO - is a library that enables real-time, bidirectional, and event-based communication between the client and the server.
To establish real-time server communication using Socket.IO, we can create a Socket.IO server instance by utilizing Node.js’s built-in HTTP module and Express, as demonstrated in the code snippet below:
const express = require("express");
const Socket = require("socket.io");
const server = require("http").createServer(app);

const io = Socket(server, {
  // options
});

io.on("connection", socket => {
  //...
});

server.listen(PORT);
Here’s how the above code works:
The io.on("connection", socket => { /* ... */ }) code subscribes to a "connection" event and waits for clients to connect.
"connection" is a predefined event in Socket.IO and is triggered when a client connects to the Socket.IO server.
Our socket argument above provides an object reference to individual client connections and it has various properties and methods.
Next, we will explore some of the commonly used socket properties and methods accompanied with example code snippet showing how they can be accessed or used:
Socket Properties
-
socket.id: This property contains a unique identifier for the connected client. Each client that connects to the server gets a distinctsocket.id.// Logging the unique socket.id of the connected client console.log("Client ID:", socket.id); -
socket.handshake: This is an object containing information about the handshake used to establish the connection, which can include headers, query parameters, and more.// Logging the handshake object console.log('Handshake details:', socket.handshake); -
socket.rooms: Is an array of room names that the socket is currently in. Rooms are used for broadcasting messages to specific groups of clients.// Logging the room names our socket is in console.log("Current rooms:", socket.rooms); -
Custom Properties: We can extend our socket argument properties by addinng custom properties to it. These custom properties allow us to store additional information or settings associated with a particular client connection.// adding our custom socket property socket.customProperty = 'This is a custom property'; // Logging the custom property console.log("Custom property value:", socket.customProperty);
Socket Methods
socket.emit(event, data): Thesocketobject allows us to send messages (events) specifically to the client associated with it. We can usesocket.emit()to send data to a specified client only.// Sending a "welcome" event with data to the client socket.emit('welcome', 'Hello, client!');socket.on(event, callback): We can use this method to listen for events sent from the client. When the client sends an event with the same name, the provided callback function is executed. This is how we handle messages or actions from the client.// Handling a "chatMessage" event from the client socket.on('chatMessage', (message) => { console.log(`Received message from client: ${message}`); });socket.join(room): Places thesocketin a specific room. You can use rooms to send messages to specific groups of clients.// Joining a chat room named "developers" socket.join('developers');socket.leave(room): Removes thesocketfrom a room.// Leaving the chat room named "developers" socket.leave('developers');socket.disconnect(): to forcefully disconnect a client from the server.// Disconnecting from a client socket.disconnect();socket.to(room).emit(event, data): Sends an event to all clients in a specific room.// Sending a "notification" event to all clients in the "developers" chat room socket.to('developers').emit('notification', 'New update!');socket.broadcast.emit(event, data): Sends an event to all connected clients except the sender.// Broadcasting a "news" event to all connected clients socket.broadcast.emit('news', 'Important announcement!');socket.broadcast.to(socket.id).emit(event, data): Send an event to a specific client based on their unique socket.id.// Sending a private "alert" event to a specific client using their socket.id socket.broadcast.to(targetSocketId).emit('alert', 'Important message!');socket.removeAllListeners(\[event\]): Removes all event listeners from the socket. If the event argument is provided, it removes listeners for the specified event.// Removing all event listeners from the socket socket.removeAllListeners(); // Removing listeners for a specific "chatMessage" event socket.removeAllListeners('chatMessage');
Using Socket.io to Build a Chat Application
Now let us go back to building our chat application, we’ll introduce Socket.IO into the application by creating a new file called server.js. This is where we’ll add all our server’s logic.
Copy and paste the following code into the server.js file:
const express = require("express");
const Socket = require("socket.io");
const PORT = 5000;

const app = express();
const server = require("http").createServer(app);

const io = Socket(server, {
  cors: {
    origin: "*",
    methods: ["GET", "POST"],
  },
});

const users = [];

io.on("connection", socket => {
  socket.on("adduser", username => {
    socket.user = username;
    users.push(username);
    io.sockets.emit("users", users);

    io.to(socket.id).emit("private", {
      id: socket.id,
      name: socket.user,
      msg: "secret message",
    });
  });

  socket.on("message", message => {
    io.sockets.emit("message", {
      message,
      user: socket.user,
      id: socket.id,
    });
  });

  socket.on("disconnect", () => {
    console.log(`user ${socket.user} is disconnected`);
    if (socket.user) {
      users.splice(users.indexOf(socket.user), 1);
      io.sockets.emit("user", users);
      console.log("remaining users:", users);
    }
  });
});

server.listen(PORT, () => {
  console.log("listening on PORT: ", PORT);
});
In the above code:
- We imported the necessary dependencies for our application and then created an HTTP server.
- We initialize our Socket.IO instance using the created HTTP server and configure it with CORS settings, allowing any domain to connect in this example. In a production environment, you should specify the actual origins allowed for security reasons.
- An empty
usersarray is declared to store randomly generated user data. - Our server handles real-time events and communication with connected clients by subscribing to an
ioconnection. Using the.onmethod to listen for events from clients, and the.emitmethod is used to send events and data to clients. When a client connects to our server:socket.on("adduser")listens for anadduserevent emitted from the client when a new user joins the chat. Upon this event, the user is added to the list ofusers, and both theuserslist and a private event are emitted back to the client.socket.on("message")is employed to handle incoming chat messages from clients.socket.on("disconnect")manages disconnections and ensures that disconnectedusersare removed from theusersarray.
- Finally, the server is set to listen on the specified port
5000.
Our server logic is ready to connect and emit events to available clients.
Client Side
Our server is operational and ready for connections. The choice of client can vary based on our technology stack, but the core principles of socket communication remain consistent. This includes integrating Socket.IO into the client, configuring the connection, and implementing event handlers and emitters.
In this article, we’ll create our client-side using HTML and vanilla JavaScript. For framework-specific guidance, refer to dedicated resources such as Vue and React.js.
To begin creating our client application. In the terminal run the following command to create the necessary folder and files for the client:
mkdir client
cd client
touch index.html index.js style.css
The chat view for our application will be located in our HTML file, copy and paste the following code in index.html
<!DOCTYPE html>
<html lang="en">
  <head>
    <meta charset="UTF-8" />
    <meta name="viewport" content="width=device-width, initial-scale=1.0" />
    <link rel="stylesheet" href="style.css" />
    <title>Socket Chat App</title>
  </head>

  <body>
    <h1>Socket Chat App</h1>
    <div class="container">
      <div class="chatbox">
        <ul id="messagelist"></ul>
        <form class="Input">
          <input type="text" placeholder="Type your message ..." />
          <button>Send</button>
        </form>
      </div>
      <br />
      <div class="activeusers">
        <h2>Active Users</h2>
        <ul id="users"></ul>
      </div>
    </div>
    <script src="https://cdnjs.cloudflare.com/ajax/libs/socket.io/4.4.1/socket.io.js"></script>
    <script src="index.js"></script>
  </body>
</html>
Above, we’re creating our chat application where we can view and send chat messages. Additionally, we’re integrating Socket.IO into our application by including the CDN in our HTML script.
For styling our application, copy and paste the following code into the style.css file.
* {
  padding: 0px;
  margin: 0px;
  box-sizing: border-box;
  font-family: Arial, Helvetica, sans-serif;
}

h2 {
  font-weight: 100;
}

nav {
  text-align: center;
  background-color: blueviolet;
  padding: 10px;
  color: white;
}

.container {
  max-width: 1000px;
  margin: 100px auto 50px;
  padding: 20px;
}

.chatbox {
  height: 500px;
  list-style: none;
  display: flex;
  flex-flow: column;
  background: #eee;
  border-radius: 6px;
  box-shadow: 1px 0px 10px #eee;
}

#messagelist {
  flex: 1;
  overflow-y: scroll;
}

#messagelist .private {
  background: #015e4b;
  color: #fff;
  margin-left: auto;
}

#messagelist li {
  list-style: none;
  background: white;
  max-width: 400px;
  padding: 10px;
  margin: 10px;
}

#messagelist p:first-child {
  color: #53bdea;
}

#messagelist .private p:first-child {
  color: #03c493;
}

form.Input {
  display: flex;
}

form.Input input {
  flex: 10;
  padding: 14px 10px;
  border: none;
}

form.Input button {
  padding: 4px;
  background: teal;
  border: none;
  flex: 1;
  color: white;
  cursor: pointer;
}

#users {
  list-style: none;
  display: flex;
  flex-wrap: wrap;
  height: 100px;
  overflow-y: scroll;
  flex-flow: row;
  padding-top: 20px;
}

#users li {
  min-width: 100px;
  max-height: 20px;
  border-radius: 10px;
  background: white;
  text-align: center;
  box-shadow: 0px 2px 10px #eee;
}
To configure our client socket connection and handle listening and emitting events, paste the following in the index.js file:
const messageform = document.querySelector(".chatbox form");
const messageList = document.querySelector("#messagelist");
const userList = document.querySelector("ul#users");
const chatboxinput = document.querySelector(".chatbox input");
const socket = io("http://localhost:5000");

let users = [];
let messages = [];
let isUser = "";

socket.on("message", message => {
  messages.push(message);
  updateMessages();
});

socket.on("private", data => {
  isUser = data.name;
});

socket.on("users", function (_users) {
  users = _users;
  updateUsers();
});

messageform.addEventListener("submit", messageSubmitHandler);

function updateUsers() {
  userList.textContent = "";
  for (let i = 0; i < users.length; i++) {
    var node = document.createElement("LI");
    var textnode = document.createTextNode(users[i]);
    node.appendChild(textnode);
    userList.appendChild(node);
  }
}

function updateMessages() {
  messageList.textContent = "";
  for (let i = 0; i < messages.length; i++) {
    const show = isUser === messages[i].user ? true : false;
    messageList.innerHTML += `<li class=${show ? "private" : ""}>
                     <p>${messages[i].user}</p>
                     <p>${messages[i].message}</p>
                       </li>`;
  }
}

function messageSubmitHandler(e) {
  e.preventDefault();
  let message = chatboxinput.value;
  socket.emit("message", message);
  chatboxinput.value = "";
}

function userAddHandler(user) {
  userName = user || `User${Math.floor(Math.random() * 1000000)}`;
  socket.emit("adduser", userName);
}

userAddHandler();
In the above code, we are setting up our client-side application to communicate with our server using Socket.IO.
Let’s break down what each part of the code does:
- First, we stored references to our HTML elements. These references allow us to manipulate these elements from JavaScript.
- Then we initialize a Socket.IO connection to a server running at http://localhost:5000. The client will use this connection to send and receive real-time messages.
usersandmessagesarrays are used to store information about connected users and chat messages,isUseris used to store the name of the current user.socket.on("message", message): This event listener listens for “message” events sent by the server. When a “message” event is received, the message is pushed into the messages array, and theupdateMessagesfunction is called to update the chat message display.socket.on("private", data): This event listener listens for “private” events. When a “private” event is received, the isUser variable is updated with the name of the sender.socket.on("users", function (_users)): This event listener listens forusersevents. When ausersevent is received, the users array is updated with the user data, and theupdateUsersfunction is called to update the user list display.updateUsers(): This function updates the user list displayed in the HTML. It clears the existing list and iterates through our users array to create list items for each user.updateMessages(): This function updates the chat messages displayed in the HTML. It clears the existing messages and iterates through the messages array to create message elements. Messages from the current user are styled differently.messageSubmitHandler(e): This function is called when the user submits a chat message. It prevents the default form submission behavior, sends the message to the server using Socket.IO, and clears the input field.userAddHandler(user): This function is responsible for adding a user to the chat. If a user is provided as an argument, it uses that name; otherwise, it generates a random username. It then emits anadduserevent to the server with the chosen username.
Testing the Application
To test our application, we need to start both the server and client.
Run the Node.js script to start the Socket.IO server:
node server.js
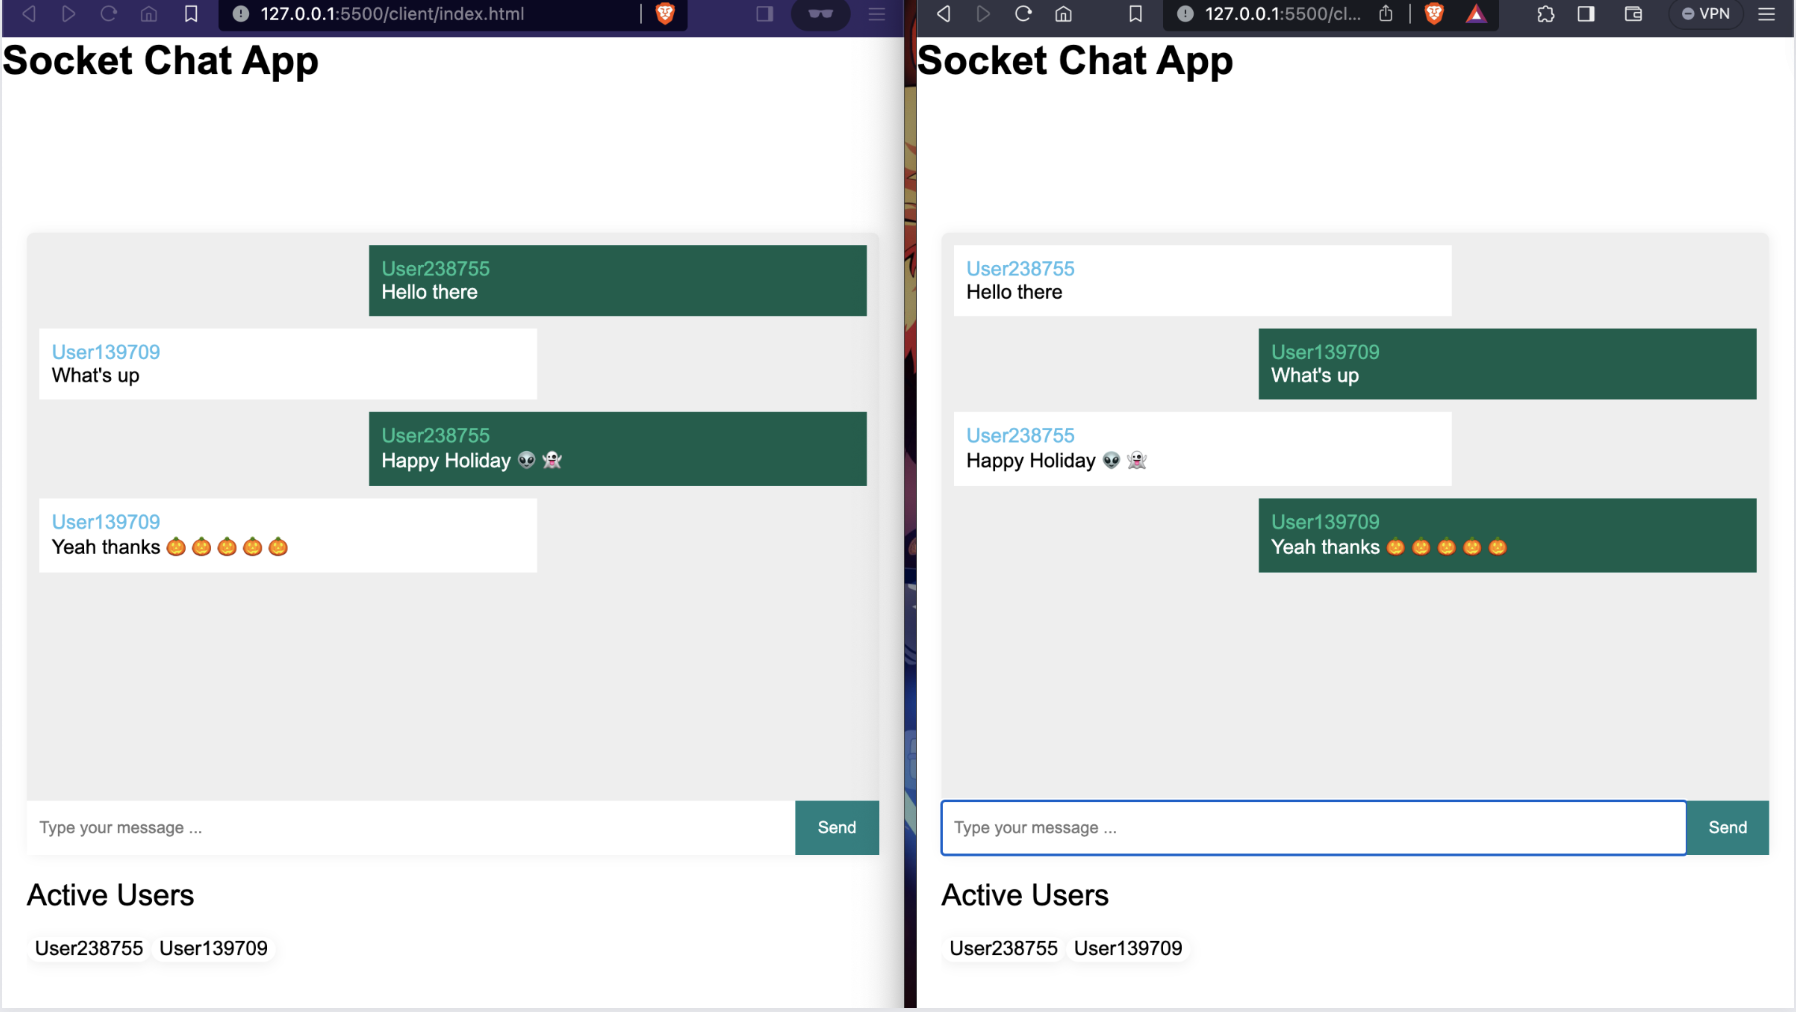
Next, Open the index.html file in a web browser. It will connect to our Socket.IO server running on http://localhost:5000.
To create another client for exchanging chat messages, open a new browser window in incognito mode. This will initiate our application and create a new client user. Now, both clients can exchange messages.
Conclusion
Mastering Socket.IO is a valuable skill for developers. It gives them the ability to handle complex scenarios where instant data exchange is required, allowing them to create high-performance real-time applications and improve user experiences.
You can refer to all the source code used in the article on Github.