REST API is a widely used client-server communication protocol, but it has limitations when dealing with clients such as web, iOS, Android, smart devices, etc. All of these have varying demands for data granularity, speed, and performance. GraphQL, on the other hand, excels in this area by allowing clients to define the structure of the data to be returned by the server, as well as allowing multiple resource requests in a single query call, which makes it faster and more efficient.
It’s like when a teacher keeps a class register with detailed information about each student, such as their name, age, favorite color, etc.
Now, let’s say we wanted to know just the names of all the students in our class. Without GraphQL, we might have to ask the teacher to read out the whole list of information, including things we don’t need like age and favorite color. That could be slow and confusing.
But with GraphQL, we can ask the teacher to just give us the names of all the students. That way, we only get the information we need and it’s much easier to understand. It’s like a magic spell that helps get exactly what we want, without having to look through lots of extra stuff.
In this article, we’ll explore how to build a web server with GraphQL API (powered by Apollo Server), MongoDB persistence layer and Node.js
Example Code
This article is accompanied by a working code example on GitHub.Why Graphql?
- GraphQL is declarative: The client, not the server, decides the query responses.
- GraphQL is strongly-typed: During development, a GraphQL query can be guaranteed to be valid within a GraphQL-type system. This strongly typed schema reduces GraphQL’s error rate and adds additional validation. This helps in smooth debugging and easy detection of bugs by client applications.
- Fetch Only Requested Data: Developers can use GraphQL to retrieve client-specified queries exactly as needed. This feature eliminates problems caused by over-fetching(when a response is more verbose and contains more information than was initially requested) and under-fetching (when a request provides less verbose data than expected and is often less useful than required).
- Versioning is optional: Versioning is unnecessary with GraphQL. The resource URL or address remains unchanged. You can add new fields and deprecate older ones. When querying a deprecated field, the client receives a deprecation warning.
- Saves Time and Bandwidth: By allowing multiple resource requests to be made in a single query call, GraphQL reduces the number of network round trips to the server, saving time and bandwidth.
When to Use Graphql?
GraphQL is an excellent solution to a unique problem involving the creation and consumption of APIs. They are most effective in the following scenarios where:
- Application bandwidth usage is important, such as mobile phones, smartwatches, and IoT devices.
- Large-scale applications with complex data requirements, GraphQL’s ability to provide only the data that is needed for each query can greatly improve performance by reducing network overhead.
- Application requires multiple clients with different data requirements, GraphQL’s flexible nature makes it easier to manage and maintain a consistent API across different platforms and devices.
- A hybrid pattern where applications access and manage data from multiple sources, For example, imagine a dashboard that displays data from multiple sources, such as logging services, backends for consumption statistics, and third-party analytics tools that capture end-user interactions.
Prerequisites:
To follow along, you’ll need the following:
- Basic knowledge of JavaScript
- Node and npm installed on your computer: A fundamental understanding of Node.js is required.
- A Curious mind.
Getting the Project Started
We’ll be building a Student register application, that stores students data using GraphQL APIs.
Let’s begin by pasting the following code in the terminal to create a student-register folder and navigate into it:
mkdir student-register &&
cd student-register
To initialize Node.js into our application run the following command:
npm init -y
Open the project in your preferred IDE.
Following that, we can proceed to install our application’s dependencies.
In the terminal, run the following code:
npm install @apollo/server graphql-tag mongoose
Above we are installing:
- @apollo/server: apollo Server turns HTTP requests and responses into GraphQL operations. It has plugins, extensible support, and other features for this article will be using Apollo Server 4.
- graphql-tag: In Apollo Server V4 template literal tag is no longer exported, we will be using the graphql-tag for our template literal tag to parse GraphQL query strings into the standard GraphQL AST.
- mongoose: a MongoDB object modeling tool.
Next, we’ll create the directory and files needed for our application. To do this enter the following command into the application terminal:
mkdir models
touch models/Student.js models/typeDefs.js resolvers.js index.js
Our application structure would look like this:
📂 student-register
┣ 📂 models
   ┣ Student.js
   ┣ typeDefs.js
┣ 📂 node_modules
┣ index.js
┣ package-lock.json
┣ package.json
┣ resolvers.js
The application is structured such that its modules are separated independently. The models directory will contain both our database Student model and GraphQL typeDefs schema file.
Our GraphQL schema types are defined in the typeDef.js file, hence the name typeDefs. Every GraphQL server makes use of type schema. Schemas are collections of type definitions that also specify the exact query clients can execute.
Let’s begin by setting up our Apollo GraphQL Server and sending a simple greetings message from the application.
Setting up the Apollo Server
Apollo Server is the most commonly used implementation of GraphQL specification. A query request is made to the Apollo GraphQL Server by a client application. This query will be parsed and validated against a schema defined in the server. If the query passes the schema validation, then an associated resolver function will be executed.
Resolvers contain logic to fetch and process data from an API or a database.
Here, let’s define our server schema. Paste the following code in the models/typeDef.js file:
const gql = require("graphql-tag");

const typeDefs = gql`
  type Query {
    greetings: String
  }
`;

module.exports = { typeDefs };
The type Query is the root of the schema. The above code defines a single field greetings of type String, GraphQL schema supports scalar types like String, Int, Float, Boolean, and ID so we can use them directly in our schema.
We also used graphql-tag this allows us write GraphQL queries and mutations as template literals which are then parsed as abstract syntax tree (AST) that represents the query. This AST can then be passed to a GraphQL client or server, such as Apollo. It allows us to embed GraphQL queries and mutations directly into our code in a simple and efficient manner.
ALso to access typeDefs outside the module, typeDefs template was exported using module.exports.
Next, We need to tell the GraphQL server what to retrieve and how to process our query. To do this we will use resolvers.
Resolvers are responsible for populating data into schema fields. They are functions that handle data for each field defined in the schema.
To create resolvers for our application, Navigate to and paste the following code into the resolvers.js file
// GraphQL Resolvers
const resolvers = {
  Query: {
    greetings: () => "GraphQL is Awesome",
  },
};

module.exports = { resolvers };
In the code above we created a resolvers function that returns a string when the greetings field is queried.
The resolver function acts as a GraphQL query handler, they must match a field name defined in the Schema.
In our case, we have one type definition Query, with the field greetings of type String. As a result, we defined a greetings resolver function that returns a string.
We’ve defined our schema types and resolver. They can now be used to create our ApolloServer instance.
Go to the index.js file in the root directory. Copy and paste the following code there:
const { ApolloServer } = require("@apollo/server");
const { startStandaloneServer } = require("@apollo/server/standalone");
const { resolvers } = require("./resolvers.js");
const { typeDefs } = require("./models/typeDefs.js");

const server = new ApolloServer({ typeDefs, resolvers });

startStandaloneServer(server, {
  listen: { port: 4000 },
}).then(({ url }) => {
  console.log(`Server ready at ${url}`);
});
The index.js file is the entry point for our server.
In the code above we imported ApolloServer constructor and created an instance by passing our typeDefs schema and resolvers as parameters.
The Apollo instance is then passed to a startStandaloneServer function.
This function creates an Express app, then uses the Apollo instance as middleware and prepares our application to handle incoming requests. The startStandaloneServer returns a Promise containing the URL on which our server is listening.
Run the following command in the terminal to start the server:
node index.js
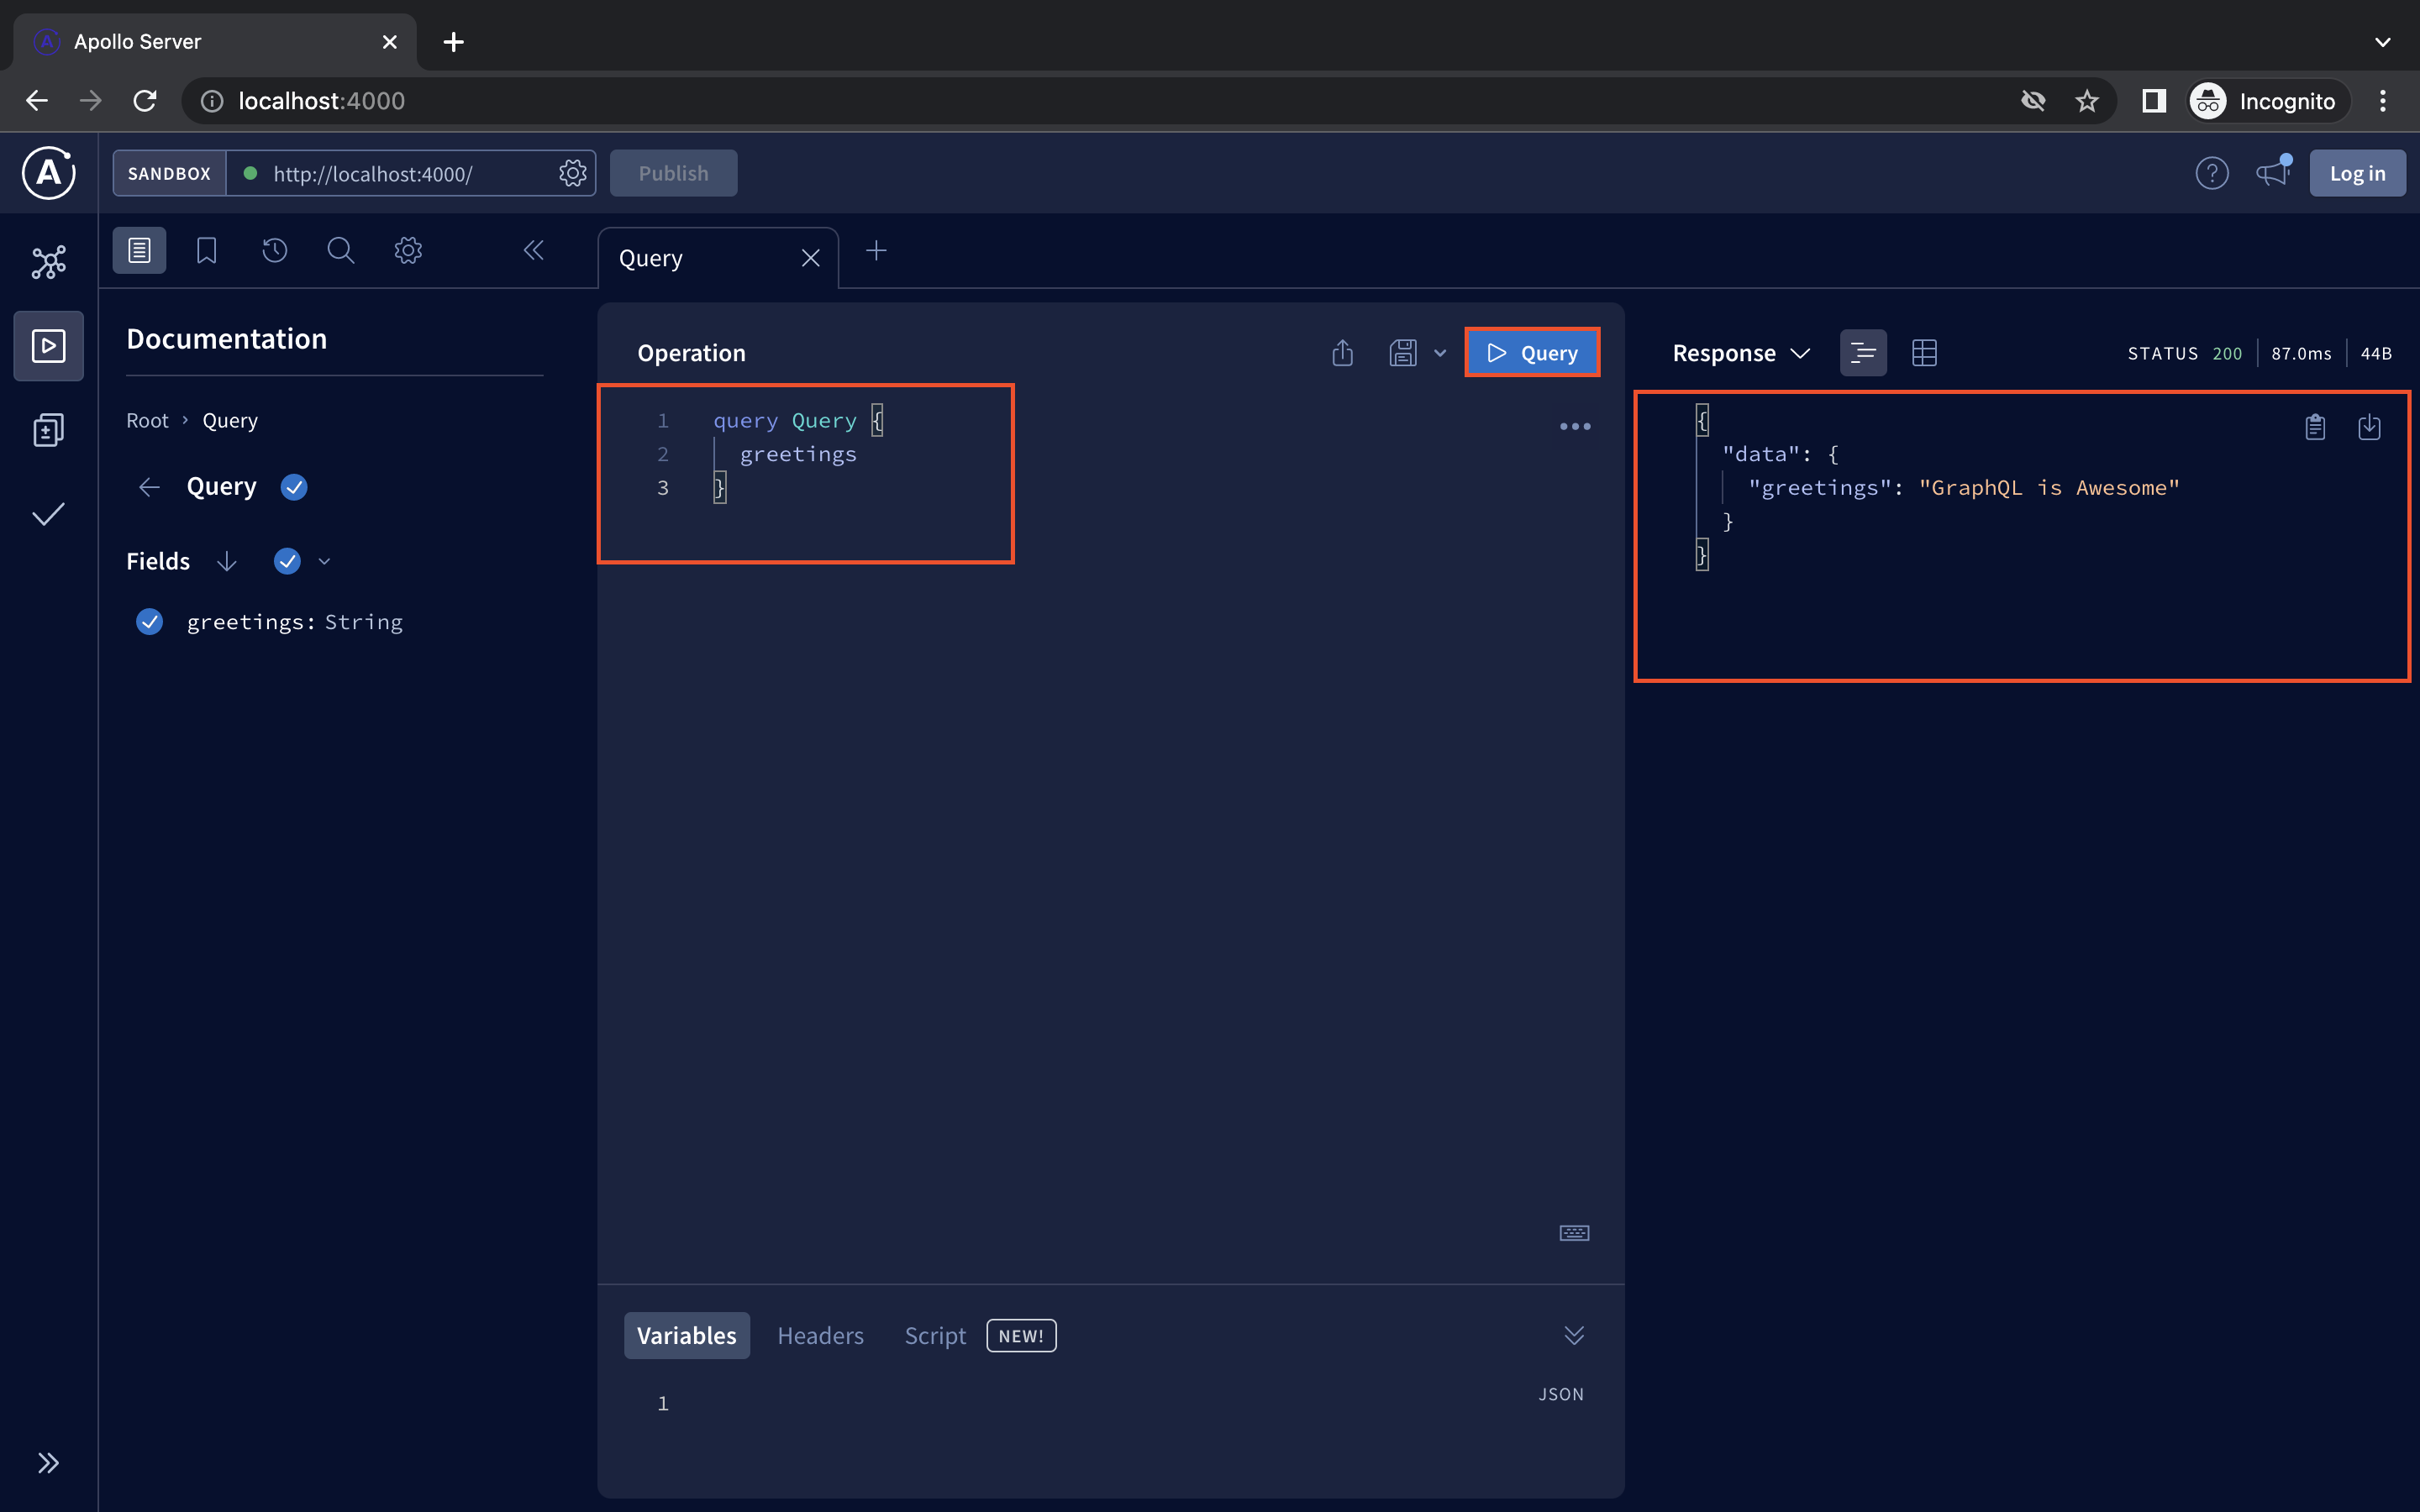
Go to http://localhost:4000 in a browser, we would see GraphQL Playground where you can execute our GraphQL queries:
In the query editor type in the following code
query Query {
  greetings
}
Next hit the ▶️ Query button and we will see our greetings message:
Next, we’ll be adding arguments to our Graphql query.
Adding Arguments to GraphQL Query
So far, all we did is return a simple string. Let’s upgrade by adding a new field with a name argument.
The application will take in a name as an argument and return a welcome message.
To do this we need to update our GraphQL schema and resolvers files:
Revisit the models/typeDef.js file and update as follows:
const gql = require("graphql-tag");

const typeDefs = gql`
  type Query {
    greetings: String
    welcome(name: String!): String
  }
`;

module.exports = { typeDefs };
Above, we’ve added a welcome field. The welcome field accepts a name argument with data type String!. Where ! indicates a non-nullable unique identifier field and it returns a String value just like our previous greetings field.
Then, in the resolver.js file, we’ll create a resolver function for the welcome field.
Update resolver.js file with the code below:
// GraphQL Resolvers
const resolvers = {
  Query: {
    greetings: () => "GraphQL is Awesome",
    welcome: (parent, args) => `Hello ${args.name}`,
  },
};

module.exports = { resolvers };
Every GraphQL resolver function accepts four positional arguments: (parent, args, contextValue, information) Learn more about these arguments by clicking here. Our focus will be on the second positional argument, which is the args argument.
The args is an object that holds all of the data passed from the query argument.
For example, when we execute a query eg: query{ welcome(name: "Peter Hills") } the args object passed to the welcome resolver is { "name": "Peter Hills" }.
Above, notice that we extract name from the args in welcome resolver function.
We can now test our application. Execute the command node index.js in the terminal.
Go to http://localhost:4000 GraphQL Playground
To test, we can use GraphQL Playground, which can help us easily generate queries with parameters:
Next, we can start creating our CRUD APIs.
Create CRUD APIs in Apollo (Graphql) Server
GraphQL operations can either be a read or a write. GraphQL query is used to read or fetch data while mutation is used to write or post values. Mutations modify data in the database and return a value.
In this section, we will use GraphQL query and mutation with a MongoDB database to create, read, update, and delete student data in our application.
Working with MongoDB in Apollo (Graphql) Server
To use MongoDB for our database. It can be installed on either a Mac or Windows machine. Here we will be using MongoDB Community Edition 6.0. I recommend installing with brew (on Mac) to do that in your terminal run the following:
xcode-select --install  # installing XCode tools
brew tap mongodb/brew
brew update
brew install mongodb-community@6.0
Run the following command in the terminal to start MongoDB on macOS (docs):
brew services start mongodb-community@6.0
MongoDB will start and be ready to use.
To connect to MongoDB from our application, we will use the mongoose dependency previously installed. Here’s a breakdown of how Mongoose interacts with MongoDB:
- To use Mongoose, we first need to connect to our MongoDB database using the
mongoose.connect()method, which takes a URI string pointing to the database port. - After establishing the connection to the MongoDB database, we can define schemas and models. Schemas are blueprints for datatypes use to validate the data received in the request, while models are classes representing a collection of documents in the MongoDB database. Models serve as an interface to interact with the MongoDB collection.
- Mongoose uses the created model to execute the request using its built-in methods like
find(),findOne(),updateOne(),findById(), etc.
To establish connection with MongoDB using Mongoose, add the following code to the index.js file:
const { ApolloServer } = require("@apollo/server");
const { startStandaloneServer } = require("@apollo/server/standalone");
const mongoose = require("mongoose");
const { resolvers } = require("./resolvers.js");
const { typeDefs } = require("./models/typeDefs.js");

const MONGO_URI = "mongodb://localhost:27017/student-register";

// Database connection
mongoose
  .connect(MONGO_URI, {
    useNewUrlParser: true,
    useUnifiedTopology: true,
  })
  .then(() => {
    console.log(`Db Connected`);
  })
  .catch(err => {
    console.log(err.message);
  });

const server = new ApolloServer({ typeDefs, resolvers });

startStandaloneServer(server, {
  listen: { port: 4000 },
}).then(({ url }) => {
  console.log(`Server ready at ${url}`);
});
Above we defined MONGO_URI which points to our MongoDB database. MongoDB by default connects on port 27017. The last part of the MONGO_URI string is our database name. We created a database connection using our MongoDB URL.
Creating Student Model
We can now map to our MongoDB collection by using mongoose to create schema and model. To create a Student model for our application, navigate to the models/Student.js file and paste the following code:
const mongoose = require("mongoose");

const Student = mongoose.model("Student", {
  firstName: String,
  lastName: String,
  age: Number,
});

module.exports = { Student };
Above, we created Student model, which serves as a blueprint for storing student data in our database.
Finally, we can begin CRUD operations in our application using GraphQL queries and mutations.
Create Student API
To create a new student detail using GraphQL, we need to create an object and Mutation type in our schema.
Update models/typeDef.js file:
const gql = require("graphql-tag");

const typeDefs = gql`
  type Query {
    hello: String
    welcome(name: String): String
  }

  # Student object
  type Student {
    id: ID
    firstName: String
    lastName: String
    age: Int
  }

  # Mutation
  type Mutation {
    create(firstName: String, lastName: String, age: Int): Student
  }
`;

module.exports = { typeDefs };
In the above code, we created a Student object type. An object type is a data type that represents an object, it consists of fields that define the properties of an object. This defines the structure of the data that can be returned in a GraphQL API.
We want our Student type to be able to return the id, firstName, lastName, and age.
Mutations are in a separate block in the schema. We added a create mutation that takes firstName, lastName, and age arguments and returns the Student object.
Now, we need to implement a resolver for our create mutation field.
Paste the following code in the resolver.js file
const { Student } = require("./models/Student.js");

const resolvers = {
  Query: {
    hello: () => "GraphQL is Awesome",
    welcome: (, params) => `Hello ${params.name}`,
  },
  Mutation: {
    create: async (parent, args) => {
      const { firstName, lastName, age } = args;
      const newStudent = new Student({
        firstName,
        lastName,
        age,
      });
      await newStudent.save();
      return newStudent;
    },
  },
};

module.exports = { resolvers };
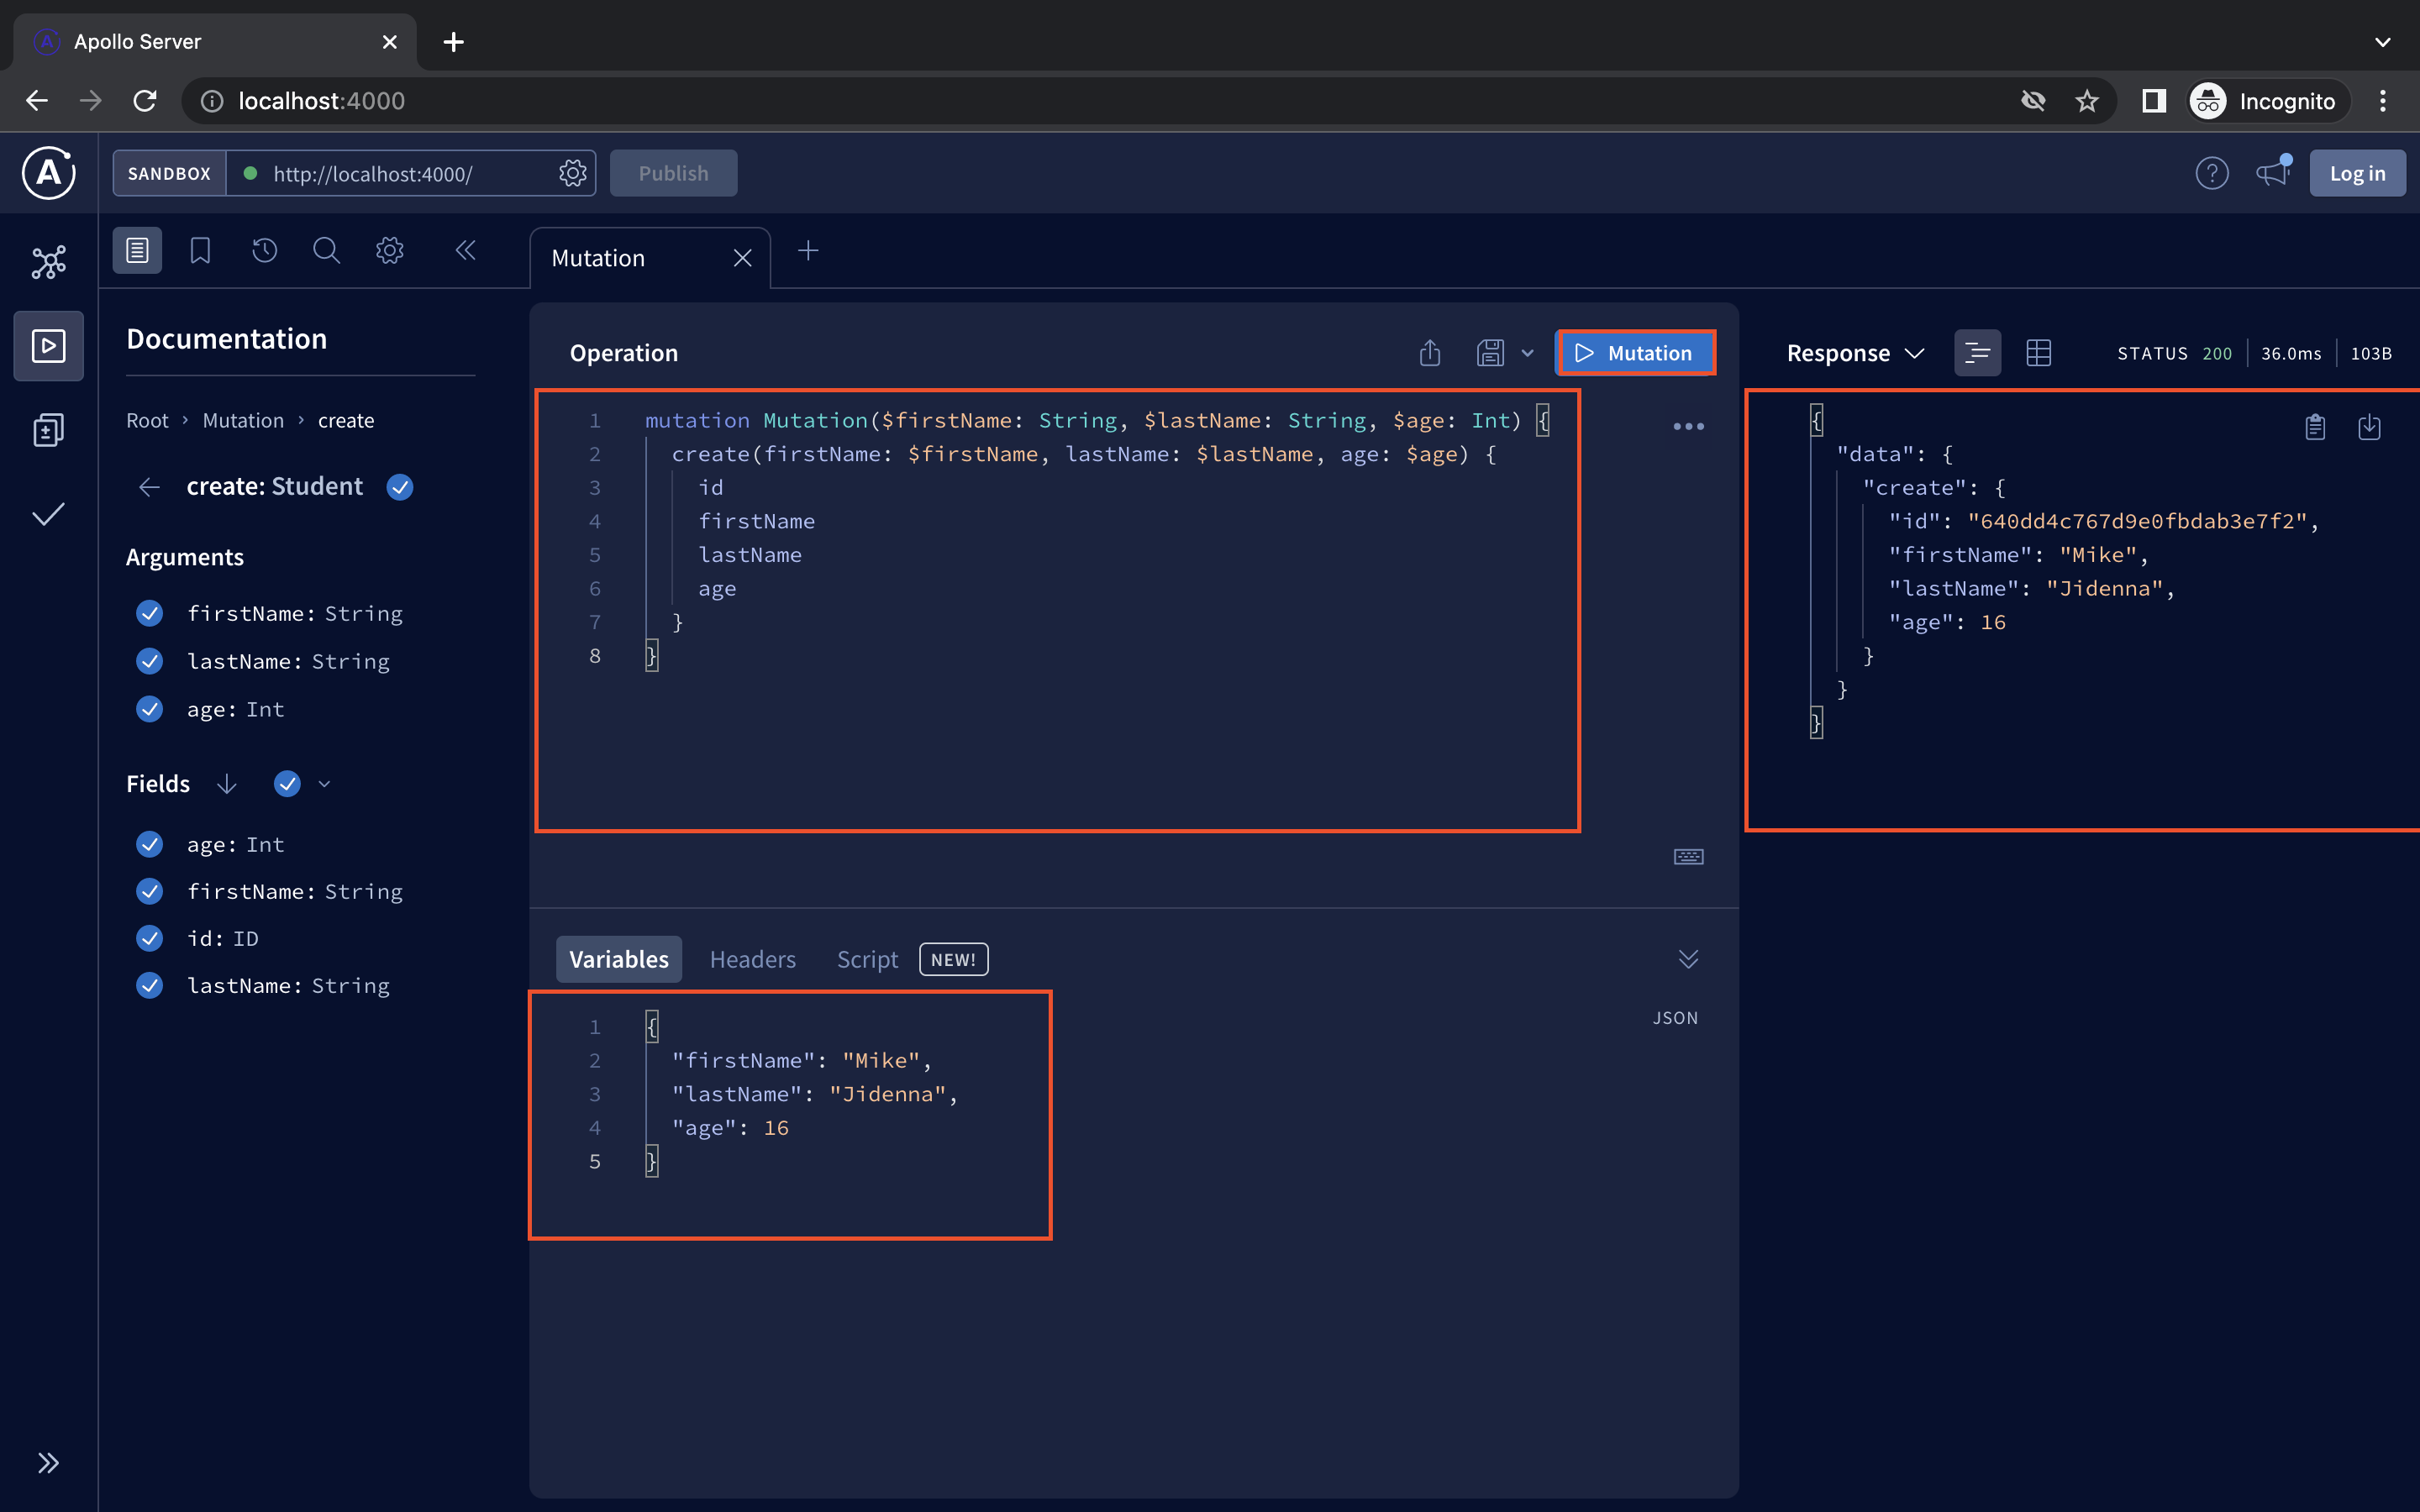
In the resolver, we added a separate mutation block and create a function. The create function adds and saves a new student to the database.
Create a student in GraphQL Playground:
Get Students Details API
We can fetch all students or a single student’s details in GraphQL by querying the Student model.
To do this we will update our models/typeDefs.js and resolvers.js files:
models/typeDef.js file:
const gql = require("graphql-tag");

const typeDefs = gql`
  type Query {
    hello: String
    welcome(name: String): String
    students: [Student] #return array of students
    student(id: ID): Student #return student by id
  }
  type Student {
    id: ID
    firstName: String
    lastName: String
    age: Int
  }
  type Mutation {
    create(firstName: String, lastName: String, age: Int): Student
  }
`;

module.exports = { typeDefs };
In the above code, we are adding two new queries to our schema type Query. A students type query that returns an array of Students elements and a student type query returns a single Student object fetched by id.
Next, update the resolver.js file:
const { Student } = require("./models/Student.js");

// GraphQL Resolvers
const resolvers = {
  Query: {
    hello: () => "Hello from Reflectoring Blog",
    welcome: (parent, args) => `Hello ${args.name}`,
    students: async () => await Student.find({}),
    student: async (parent, args) => await Student.findById(args.id),
  },
  Mutation: {
    create: async (parent, args) => {
      const newStudent = new Student({
        first_name: args.firstName,
        last_name: args.lastName,
        age: args.age,
      });
      await newStudent.save();
      return newStudent;
    },
  },
};

module.exports = { resolvers };
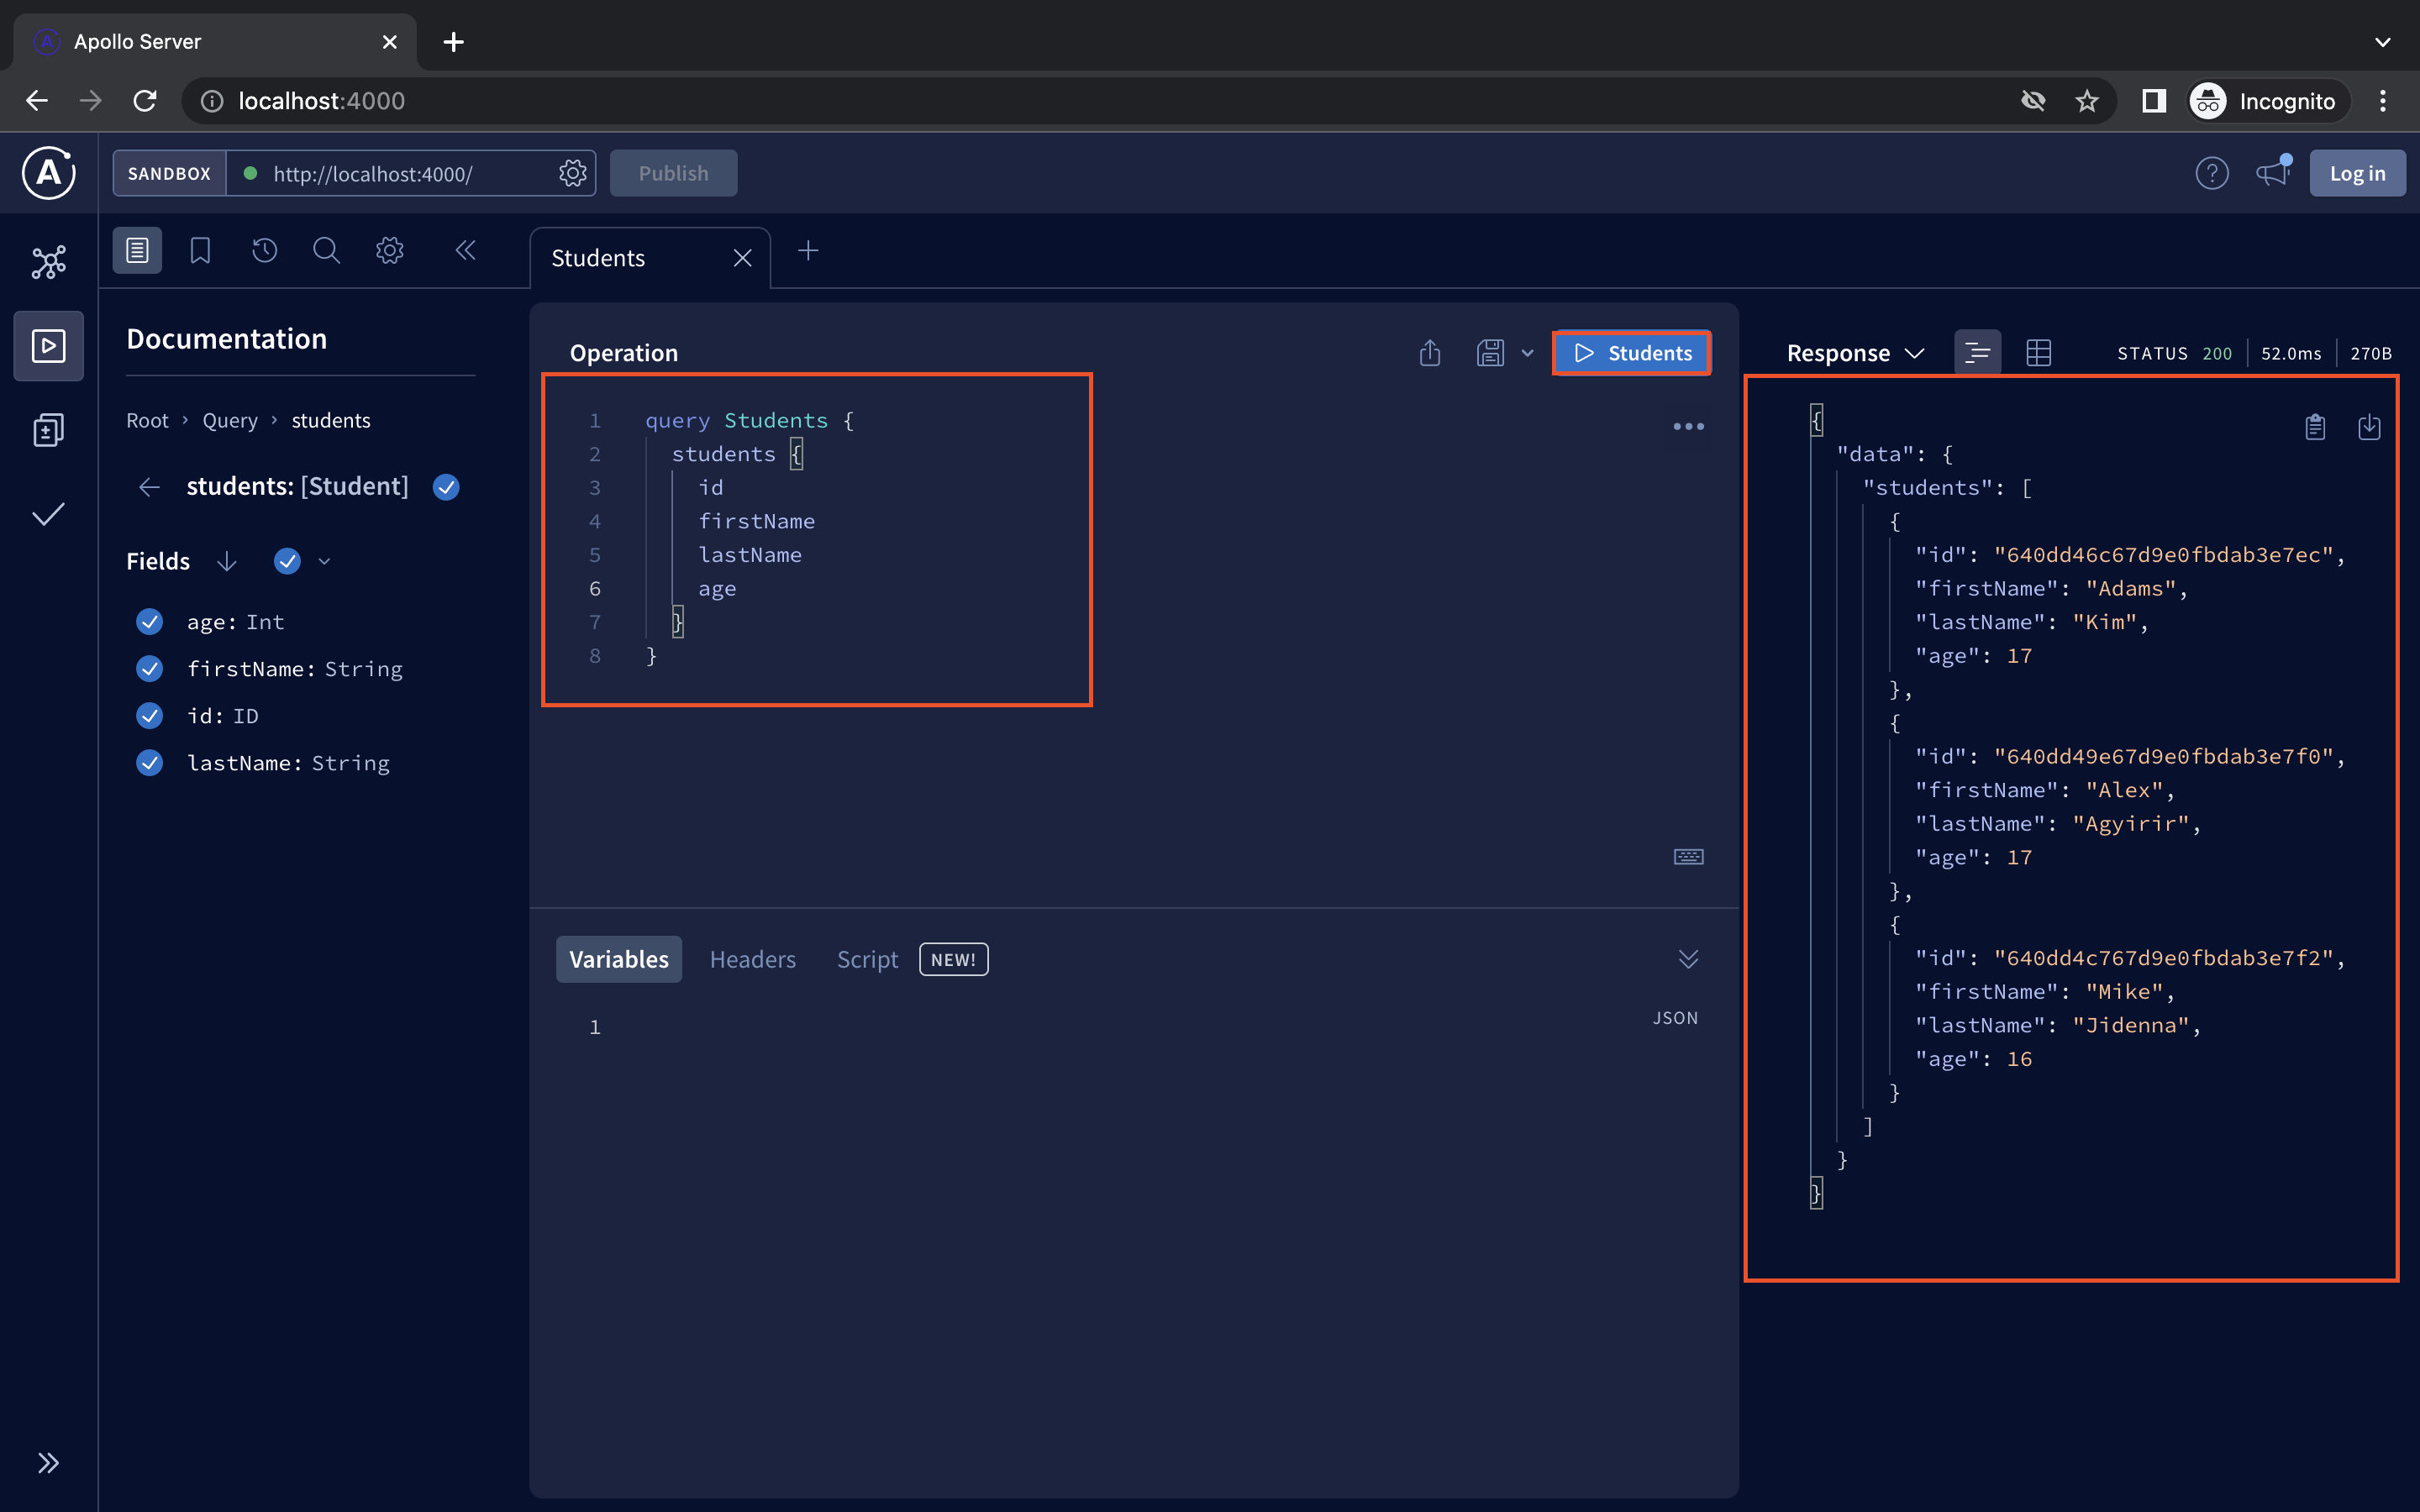
In the resolver file above we are adding two new functions, students function to get an array of all Students and a student function to return a single student’s detail.
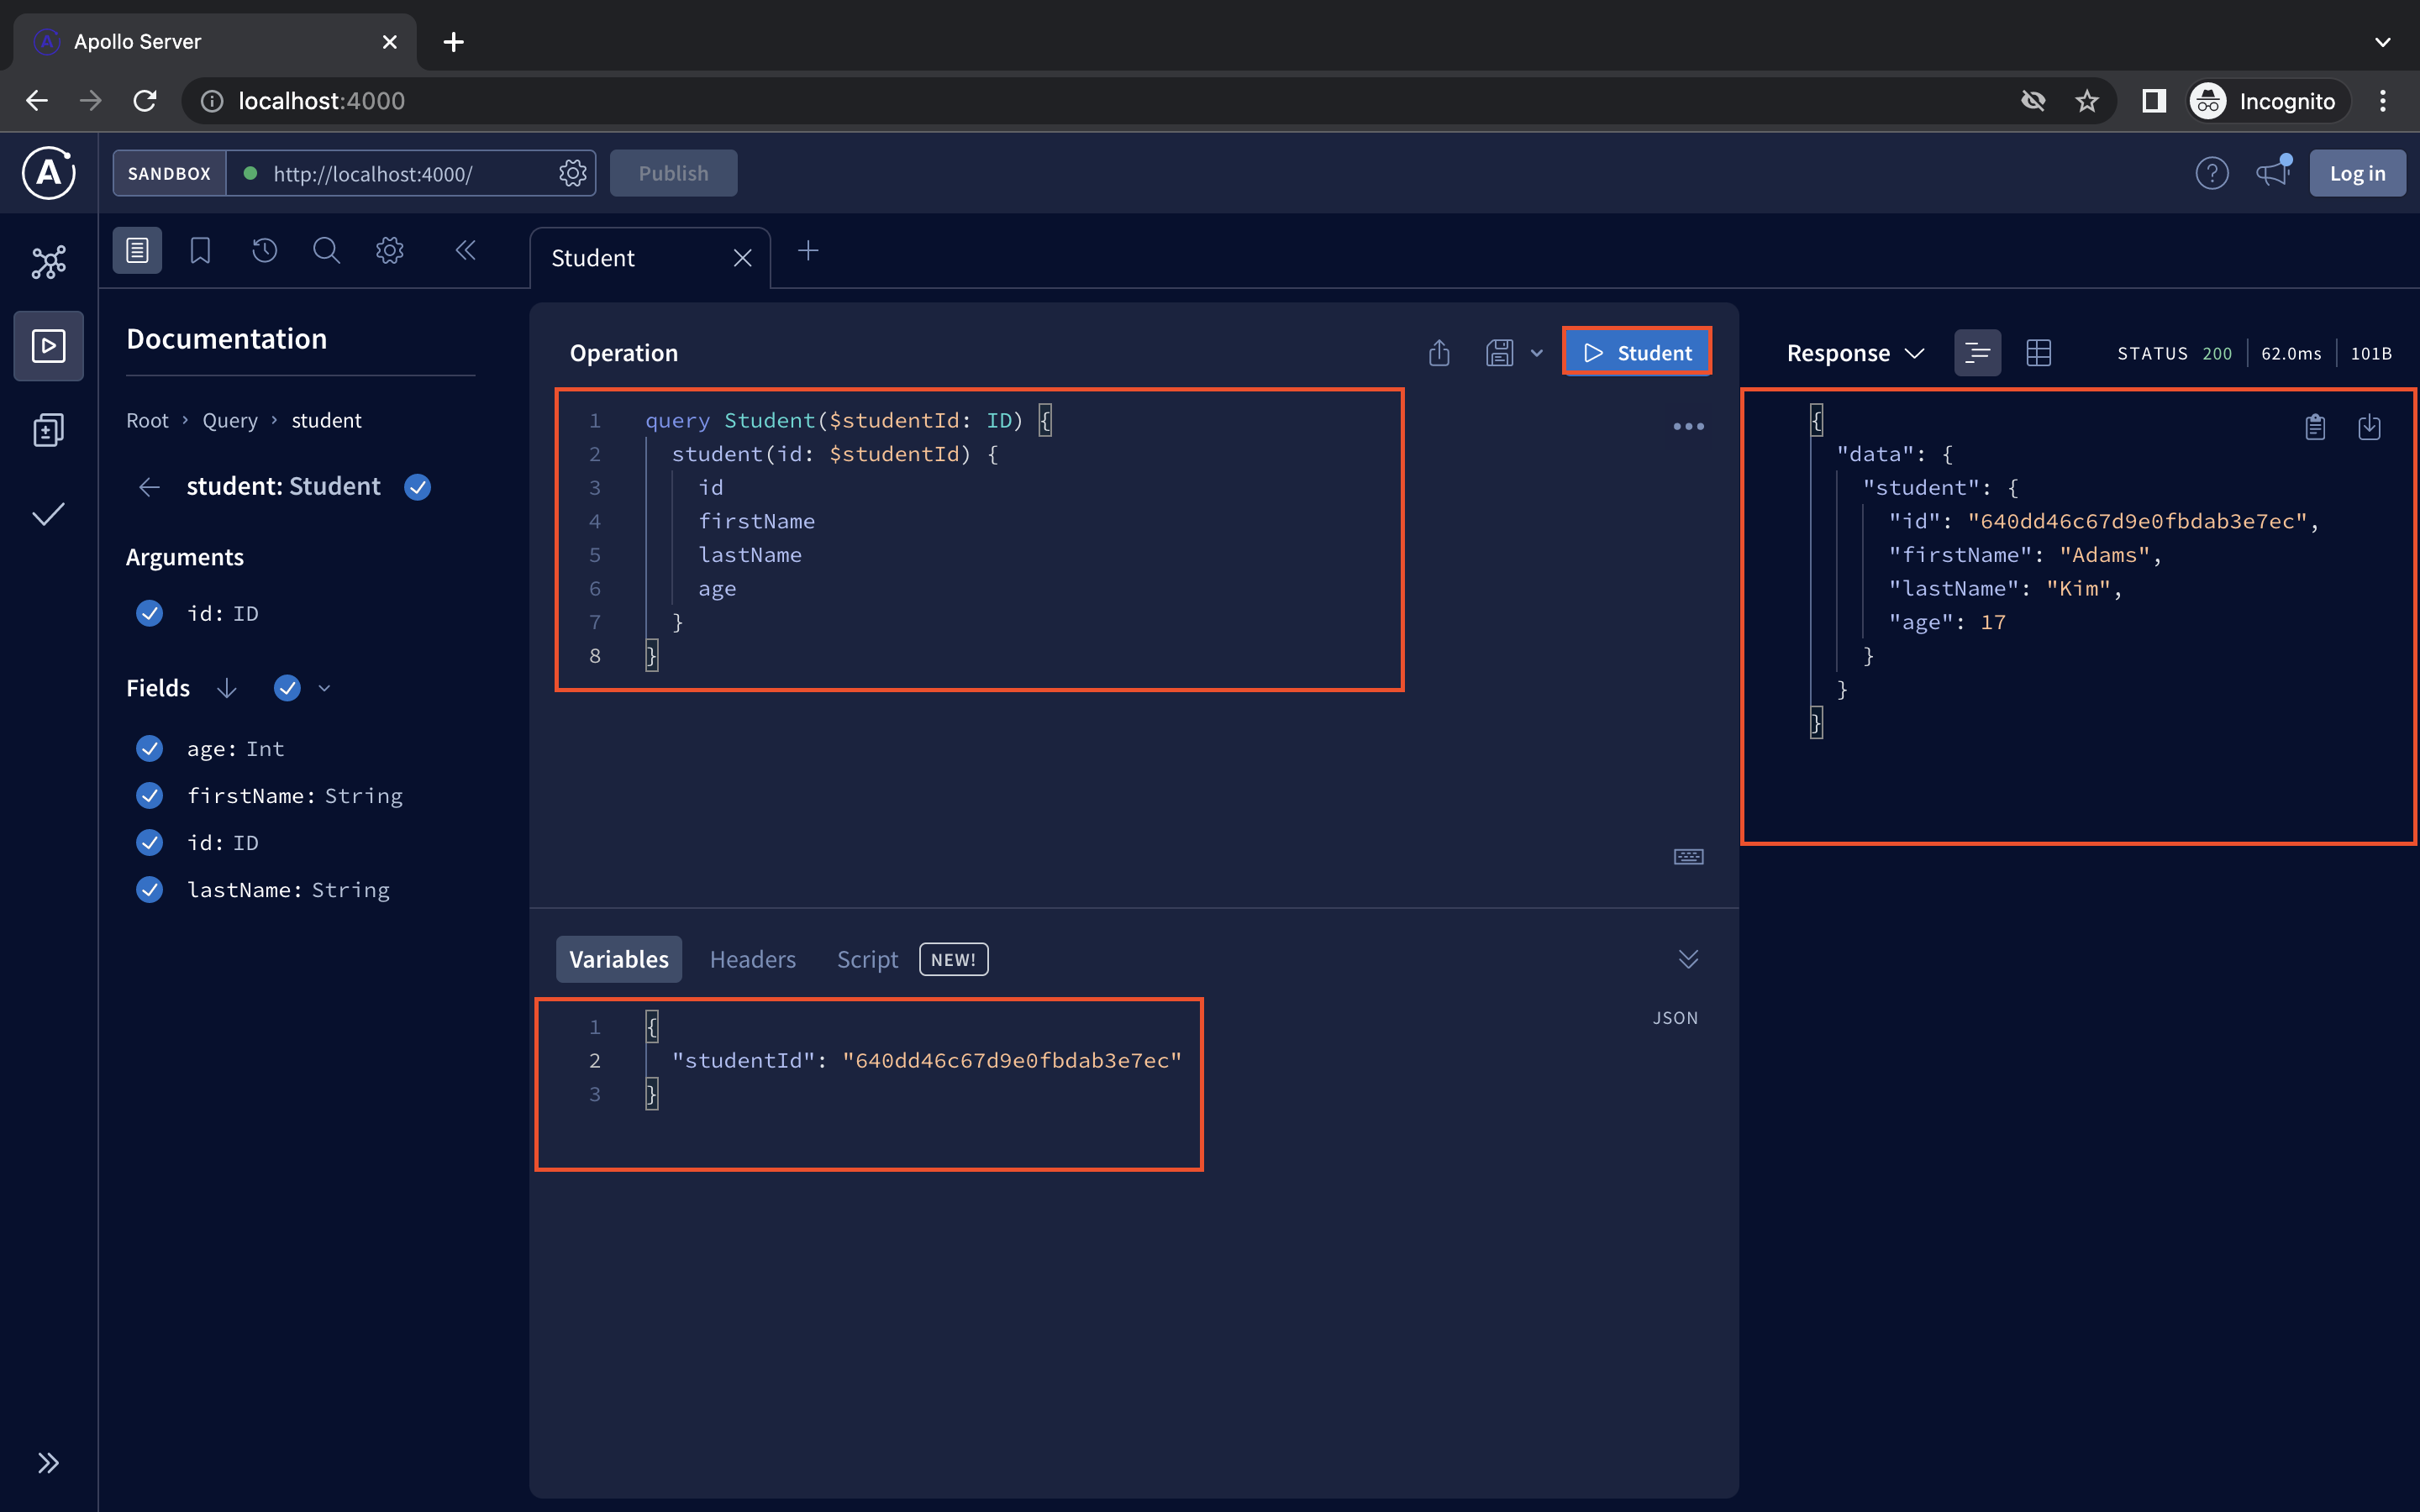
We can now use Playground to query for:
- All students:
- One Student:
Update Student Details API
Editing or Updating data is almost like creating, they are mutation query.
The models/typeDef.js and resolver.js file will need to be updated, to include an update schema and function.
To add update schema, copy and paste the following code into the models/typeDef.js file:
const gql = require("graphql-tag");

const typeDefs = gql`
  type Query {
    hello: String
    welcome(name: String): String
    students: [Student] #return array of students
    student(id: ID): Student #return student by id
  }
  type Student {
    id: ID
    firstName: String
    lastName: String
    age: Int
  }
  type Mutation {
    create(firstName: String, lastName: String, age: Int): Student
    update(id: ID, firstName: String, lastName: String, age: Int): Student
  }
`;

module.exports = { typeDefs };
In the code block above we added an update type to our type Mutation, which takes an id and the new student data as arguments and returns a Student object.
Update the resolver.js file as follows:
const { Student } = require("./models/Student.js");

// GraphQL Resolvers
const resolvers = {
  Query: {
    hello: () => "Hello from Reflectoring Blog",
    welcome: (parent, args) => `Hello ${args.name}`,
    students: async () => await Student.find({}),
    student: async (parent, args) => await Student.findById(args.id),
  },
  Mutation: {
    create: async (parent, args) => {
      const { firstName, lastName, age } = args;
      const newStudent = new Student({
        firstName,
        lastName,
        age,
      });
      await newStudent.save();
      return newStudent;
    },
    update: async (parent, args) => {
      const { id } = args;
      const result = await Student.findByIdAndUpdate(id, args);
      return result;
    },
  },
};

module.exports = { resolvers };
We’ve added an update function to our resolvers above. This function looks in the database for a student with the same id as the argument id and updates the student’s details.
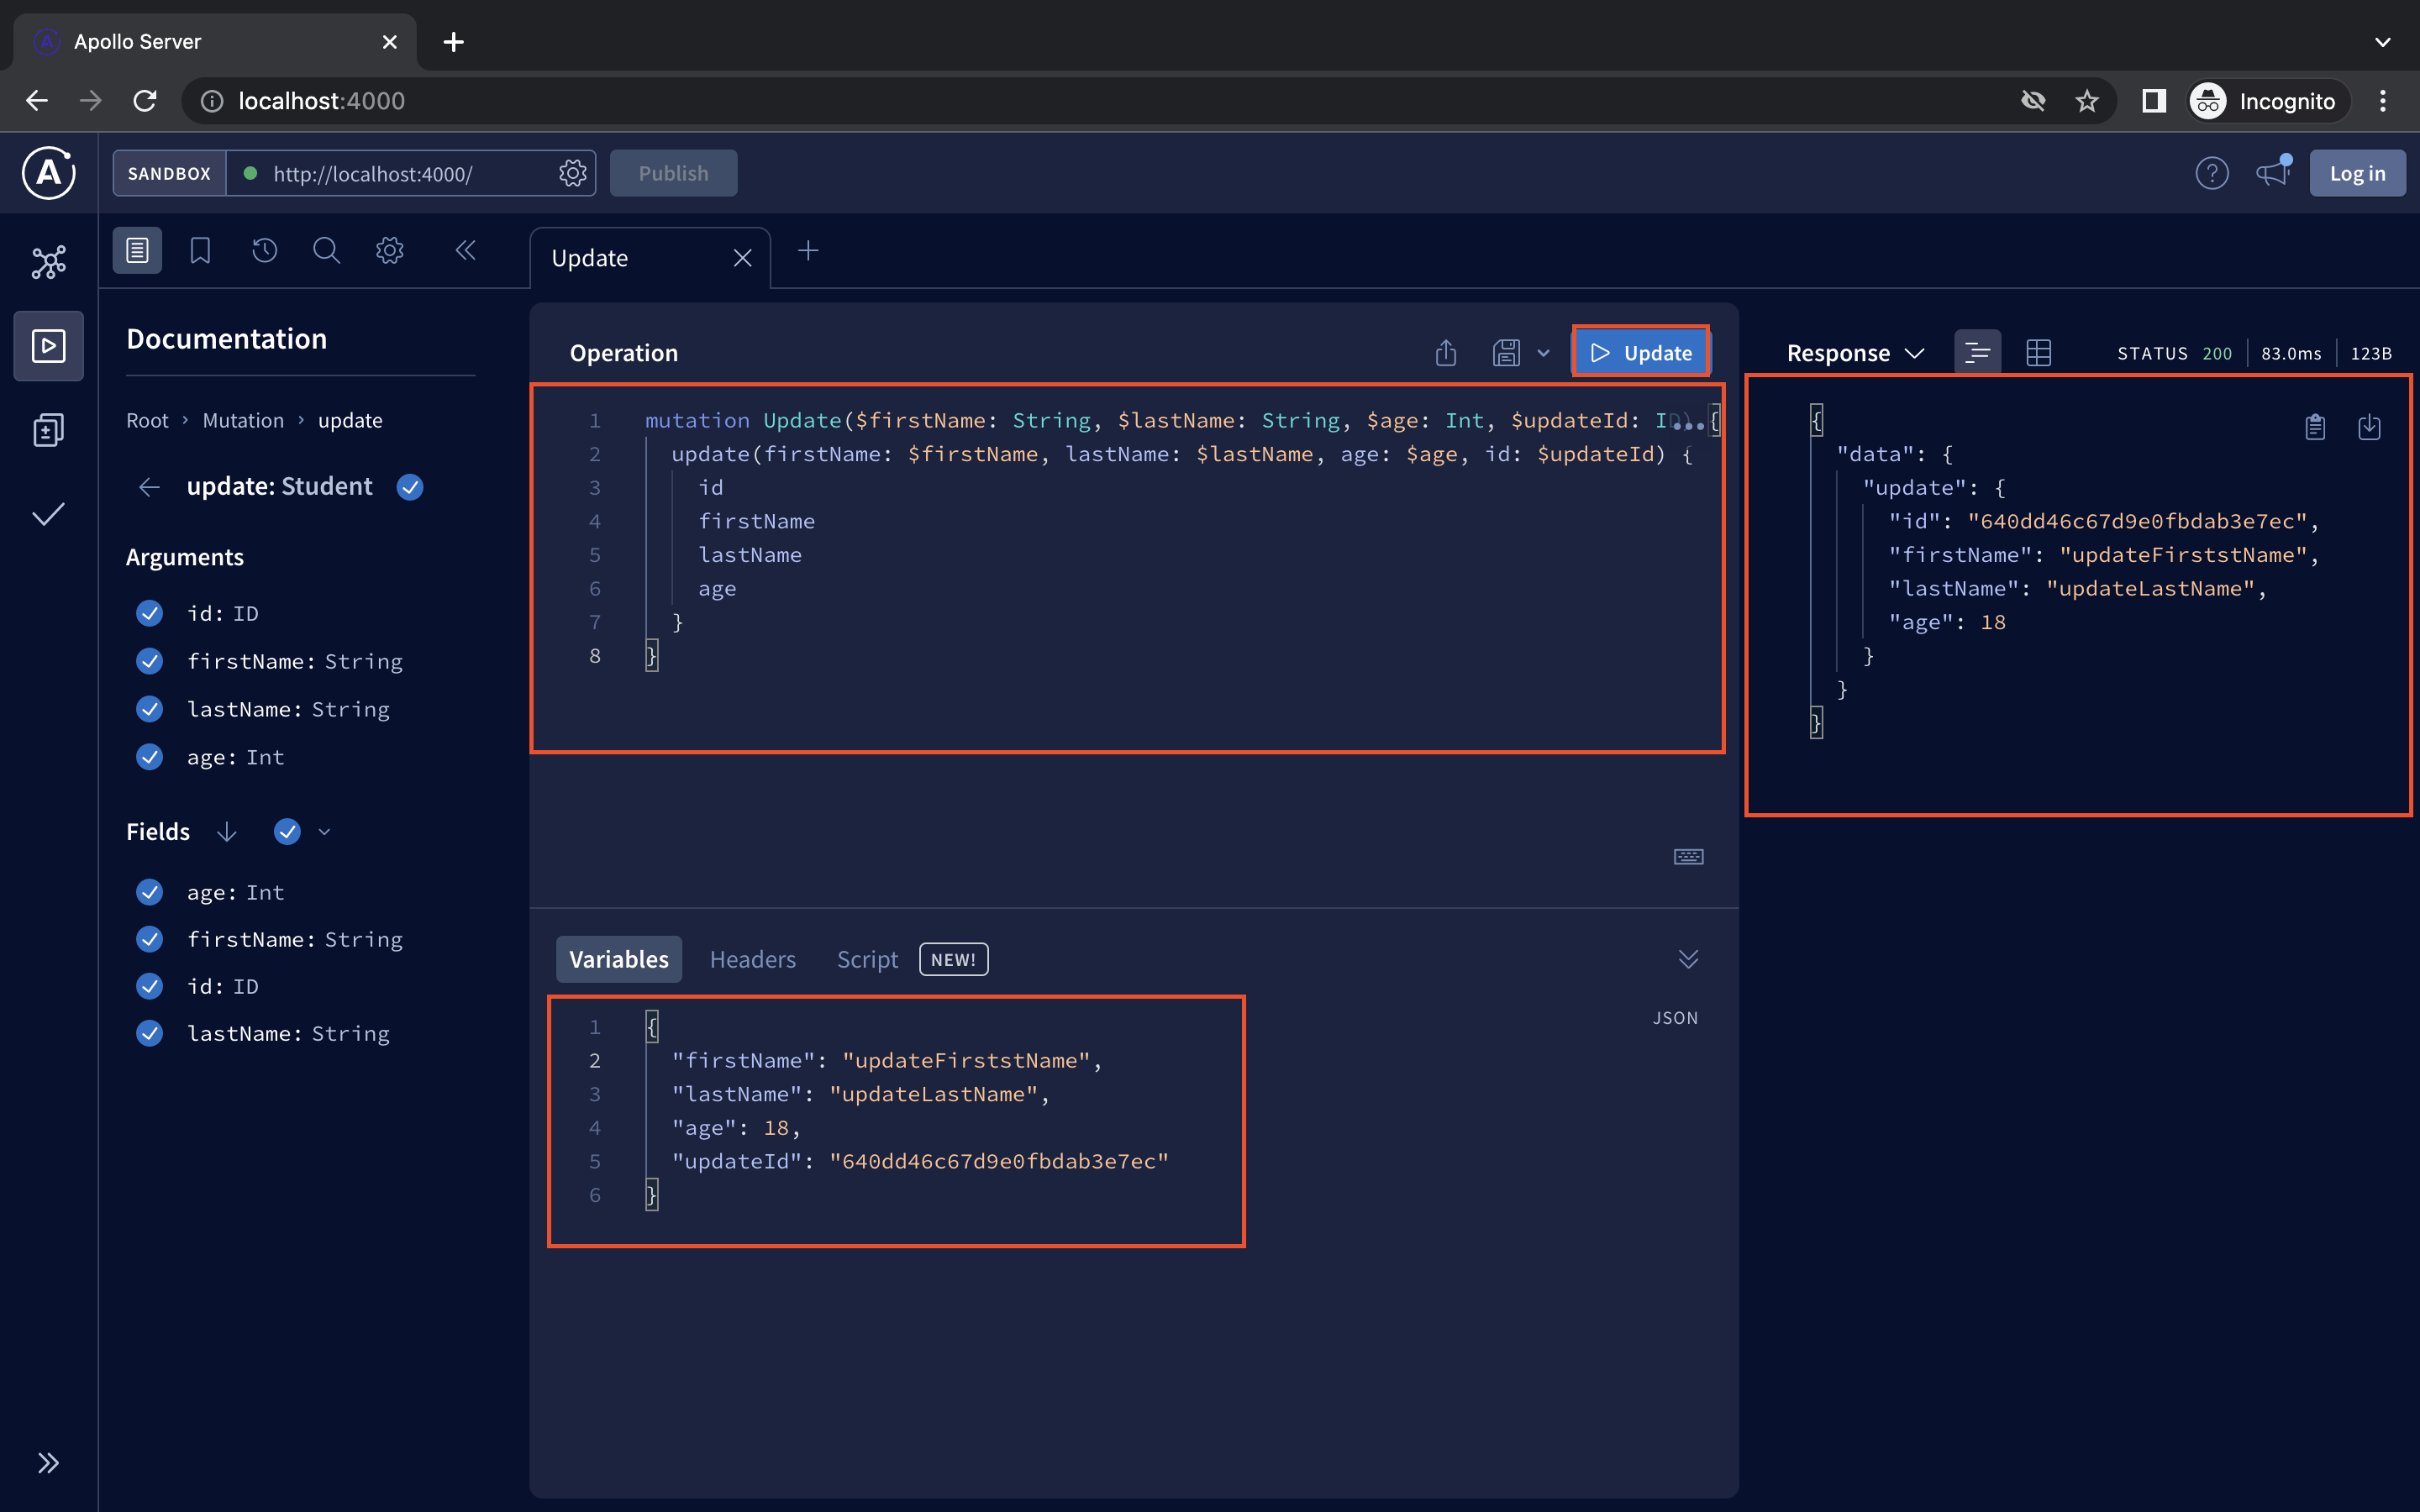
Now, we should be able to edit students details inline, we can use GraphQL Playground to do this:
Delete Student Details API
Lastly, we are going to attempt deleting students from our database. Delete mutation is similar to create and update mutation from the previous section. We simply require a mutation that takes the id of the student data to be deleted.
To add the delete feature to our application update the schema in models/typeDefs.js by adding delete mutation that takes id argument and returns the student object if successful:
const gql = require("graphql-tag");

const typeDefs = gql`
  type Query {
    hello: String
    welcome(name: String): String
    students: [Student] #return array of students
    student(id: ID): Student #return student by id
  }
  type Student {
    id: ID
    firstName: String
    lastName: String
    age: Int
  }
  type Mutation {
    create(firstName: String, lastName: String, age: Int): Student
    update(id: ID, firstName: String, lastName: String, age: Int): Student
    delete(id: ID): Student
  }
`;

module.exports = { typeDefs };
Update the resolvers.js file to implement the delete resolver function:
const { Student } = require("./models/Student.js");

// GraphQL Resolvers
const resolvers = {
  Query: {
    hello: () => "Hello from Reflectoring Blog",
    welcome: (parent, args) => `Hello ${args.name}`,
    students: async () => await Student.find({}),
    student: async (parent, args) => await Student.findById(args.id),
  },
  Mutation: {
    create: async (parent, args) => {
      const { firstName, lastName, age } = args;
      const newStudent = new Student({
        firstName,
        lastName,
        age,
      });
      await newStudent.save();
      return newStudent;
    },
    update: async (parent, args) => {
      const { id } = args;
      const updatedStudent = await Student.findByIdAndUpdate(id, args);
      if (!updatedStudent) {
        throw new Error(`Student with ID ${id} not found`);
      }
      return updatedStudent;
    },
    delete: async (parent, args) => {
      const { id } = args;
      const deletedStudent = await Student.findByIdAndDelete(id);
      if (!deletedStudent) {
        throw new Error(`Student with ID ${id} not found`);
      }
      return deletedStudent;
    },
  },
};

module.exports = { resolvers };
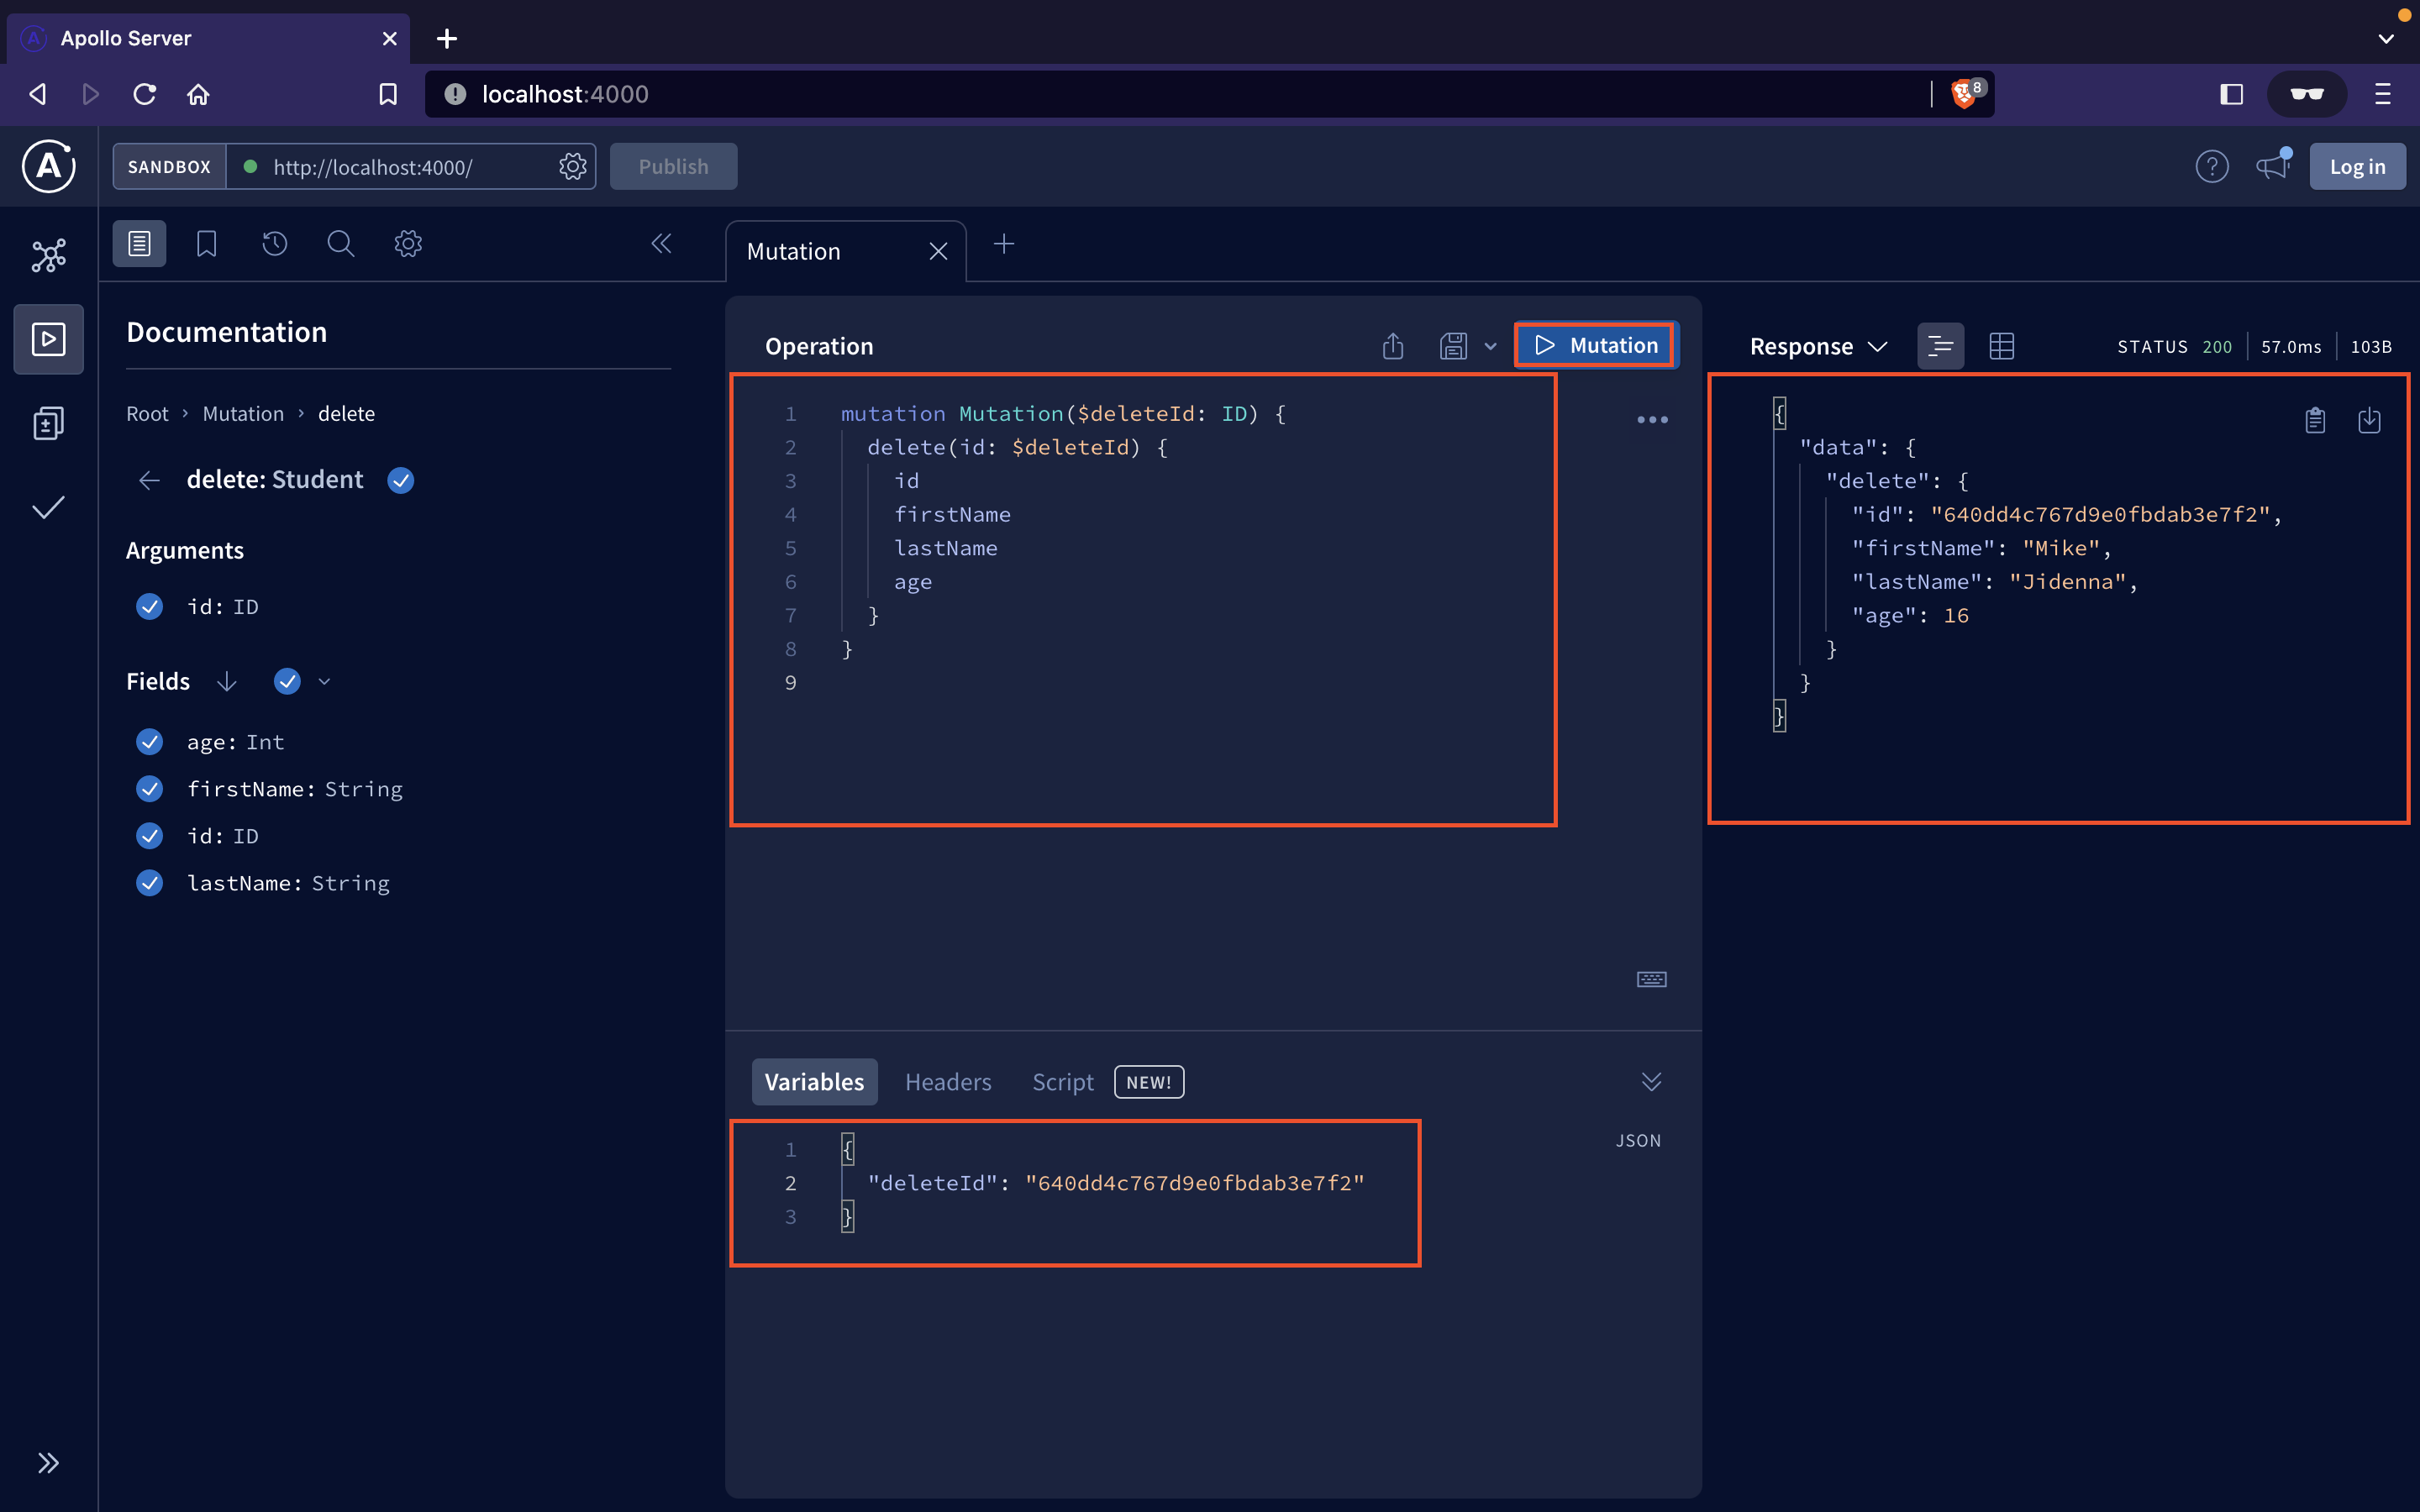
Grab a student id from the database, then delete the student in the GraphQL playground:
Great news! Our CRUD APIs on the backend are now operational!
To ensure that everything is working properly, double-check that students are being created, deleted, and updated in the database.
Conclusion:
In conclusion, Using GraphQL with Node.js can create flexible and efficient APIs with a better developer experience and improved performance. Apollo Server simplifies schema creation, resolvers, and request handling. To learn more about Apollo Server, check out the Apollo docs.
You can refer to all the source code used in the article on Github.