You and your team have spent countless hours meticulously crafting a groundbreaking application that could propel your Startup to new heights. Your code is a work of art, and you can’t wait to share it with the world. But as you prepare to deploy it to your production environment, disaster strikes! A critical bug emerges, bringing your entire application crashing down. The application hasn’t run through a Continuous Integration/Continuous Deployment (CI/CD) pipeline that would have flushed out this bug much earlier.
This cautionary tale highlights the vital role that CI/CD plays in the software development lifecycle. CI/CD acts as a resilient safety net, protecting applications from potential catastrophes and ensuring a seamless journey from development to deployment. In this article, we will delve into the concept of CI/CD, and its importance. Then, we’ll go over how to deploy a Node.js application on an AWS EC2 instance using GitHub Actions for CI/CD pipeline.
Prerequisites
Before we begin, make sure you have the following:
- Basic knowledge of JavaScript
- Node and npm installed on your computer
- Basic understanding of GitHub and a GitHub account
- AWS Account
Example Code
This article is accompanied by a working code example on GitHub.What is CI/CD?
CI/CD stands for Continuous Integration and Continuous Deployment/Delivery. It covers a set of strategies that help developers design and deploy software more effectively. Let’s break it down in the context of a team working on a software project.
Continuous Integration (CI)
When modifications are made to a code repository (eg. Git), CI inspects each team member’s code to ensure smooth compatibility with the existing codebase. It detects new code changes automatically and initiates a build process that includes code compilation, automated testing, and extensive checks and validations. CI establishes a solid foundation for successful software development.
Continuous Deployment/Delivery (CD)
After the code successfully passes all checks and tests in the CI phase, we can now go ahead with the deployment process. Continuous Deployment/Delivery allows organizations to rapidly and efficiently deploy software. Instead of waiting for lengthy release cycles, developers can deploy small, incremental changes to the software as soon as they are ready. This ensures that new features and bug fixes reach users or testing environments as soon as possible.
Importance of CI/CD
- Faster Building: CI/CD automates the build process, reducing manual effort and enabling faster software updates.
- Reduced Errors: Automated tests in CI/CD detect issues early, ensuring more stable and reliable software.
- Faster Feedback: CI/CD provides rapid feedback on code changes, boosting developer efficiency.
- Improved Team Collaboration: CI/CD fosters better collaboration and communication among team members.
- Reliable Releases: CD automates deployment, ensuring consistent and error-free software releases.
In this post, we’ll cover the following:
- Setting up a Node.js application
- Create an AWS EC2 Instance
- Create a Node.js GitHub Actions workflow
- Connect to AWS EC2 Instance via SSH
- Download and Configure Git Action Runner
- Setting up a Node.js application environment on an AWS EC2 instance
Setting up a Node.js Application
Here we’ll use our Node.js application with Express.js to display a basic HTML page. This application will be the basis for implementing our CI/CD pipeline.
To begin building our application, navigate to a desired location in your terminal or command prompt. Copy and paste the following command into the terminal:
mkdir cicd-app
cd cicd-app
npm init -y
The above command will create a new directory and initialize it with Node.js.
To install our application dependencies, paste the following command into the terminal:
npm install express jest supertest
Where:
- Jest: is used for executing automated tests.
- Supertest: is used for testing HTTP requests in Jest.
- Express: is a server framework for our application routing.
Run the following command to create all necessary directories and files for the application:
mkdir src
mkdir src/public
touch src/public/index.html src/app.js src/app.test.js src/index.js
touch .gitignore
In this setup:
app.js: contains the application’s endpoint routes and logic.index.js: serves as the entry point to our Node.js server.app.test.js: includes a sample test for our demo application.index.html: serves as our HTML home page..gitignore: contains a list of files and directories that we want Git to ignore and not include in the version control.
We can now open the application in our preferred IDE.
To begin creating our Node.js application, copy and paste the following code into the index.js file:
const app = require("./app");
const port = process.env.PORT || 3000;

app.listen(port, () => console.log("Server listening on port 3000!"));
The code above listens for incoming requests on the specified application port.
Next, in the app.js file, paste the following code:
const express = require("express");
const path = require("path");
const app = express();
app.use(express.static("public"));

app.get("/test", (_req, res) => {
  res.status(200).send("Hello world");
});

app.get("/", (req, res) => {
  res.sendFile(path.join(__dirname, "public", "index.html"));
});

module.exports = app;
This code defines two endpoints for our application. The /test endpoint returns a JSON message with Hello world, while the root path / serves as an HTML file from the public folder.
For our application’s test, copy and paste the following in the app.test.js file:
const app = require("./app");
const supertest = require("supertest");
const request = supertest(app);

describe("/test endpoint", () => {
  it("should return a response", async () => {
    const response = await request.get("/test");
    expect(response.status).toBe(200);
    expect(response.text).toBe("Hello world");
  });
});
Above, we have created a simple test to test our application /test route. Now, we can automate our application’s test process, which will allow us to run tests automatically and regularly as we make changes to the codebase.
Next, copy and paste the following into the index.html file.
<!DOCTYPE html>
<html>
  <head>
    <title>Demo Application Node Web Server</title>
    <style>
      h1 {
        text-align: center;
        margin-right: 5px;
      }
      body {
        color: #bcbcce;
        background-color: #151617;
        display: flex;
        justify-content: center;
        align-items: center;
        height: 100vh;
        margin: 0;
      }
    </style>
  </head>
  <body>
    <h1>Products Page</h1>
    <p>version 1.0</p>
  </body>
</html>
This file will serve as our home page. It contains a simple layout with a heading and version information.
Next, let’s make some changes to our package.json file. Modify the scripts value to the following:
"scripts": {
    "start": "node src",
    "test": "jest src/app.test.js"
  },
With these changes, we can easily start our application from the terminal using the npm start command, and all our application’s available tests can be executed using the npm run test command.
Our demo application is complete and ready to be pushed to GitHub. Start and test it locally at localhost:3000.

Before pushing the application to GitHub, it’s important to add the node_modules/ directory to the .gitignore file. Doing so will prevent unnecessary uploads of dependencies.
To add node_modules/ to the .gitignore file, simply open the .gitignore file in the root directory and add the following line:
node_modules/
Once everything is set up create a new GitHub repository. Initialize Git in the application’s directory, commit the changes and push the code to the remote repository.
Our newly created GitHub repository should look something like this:
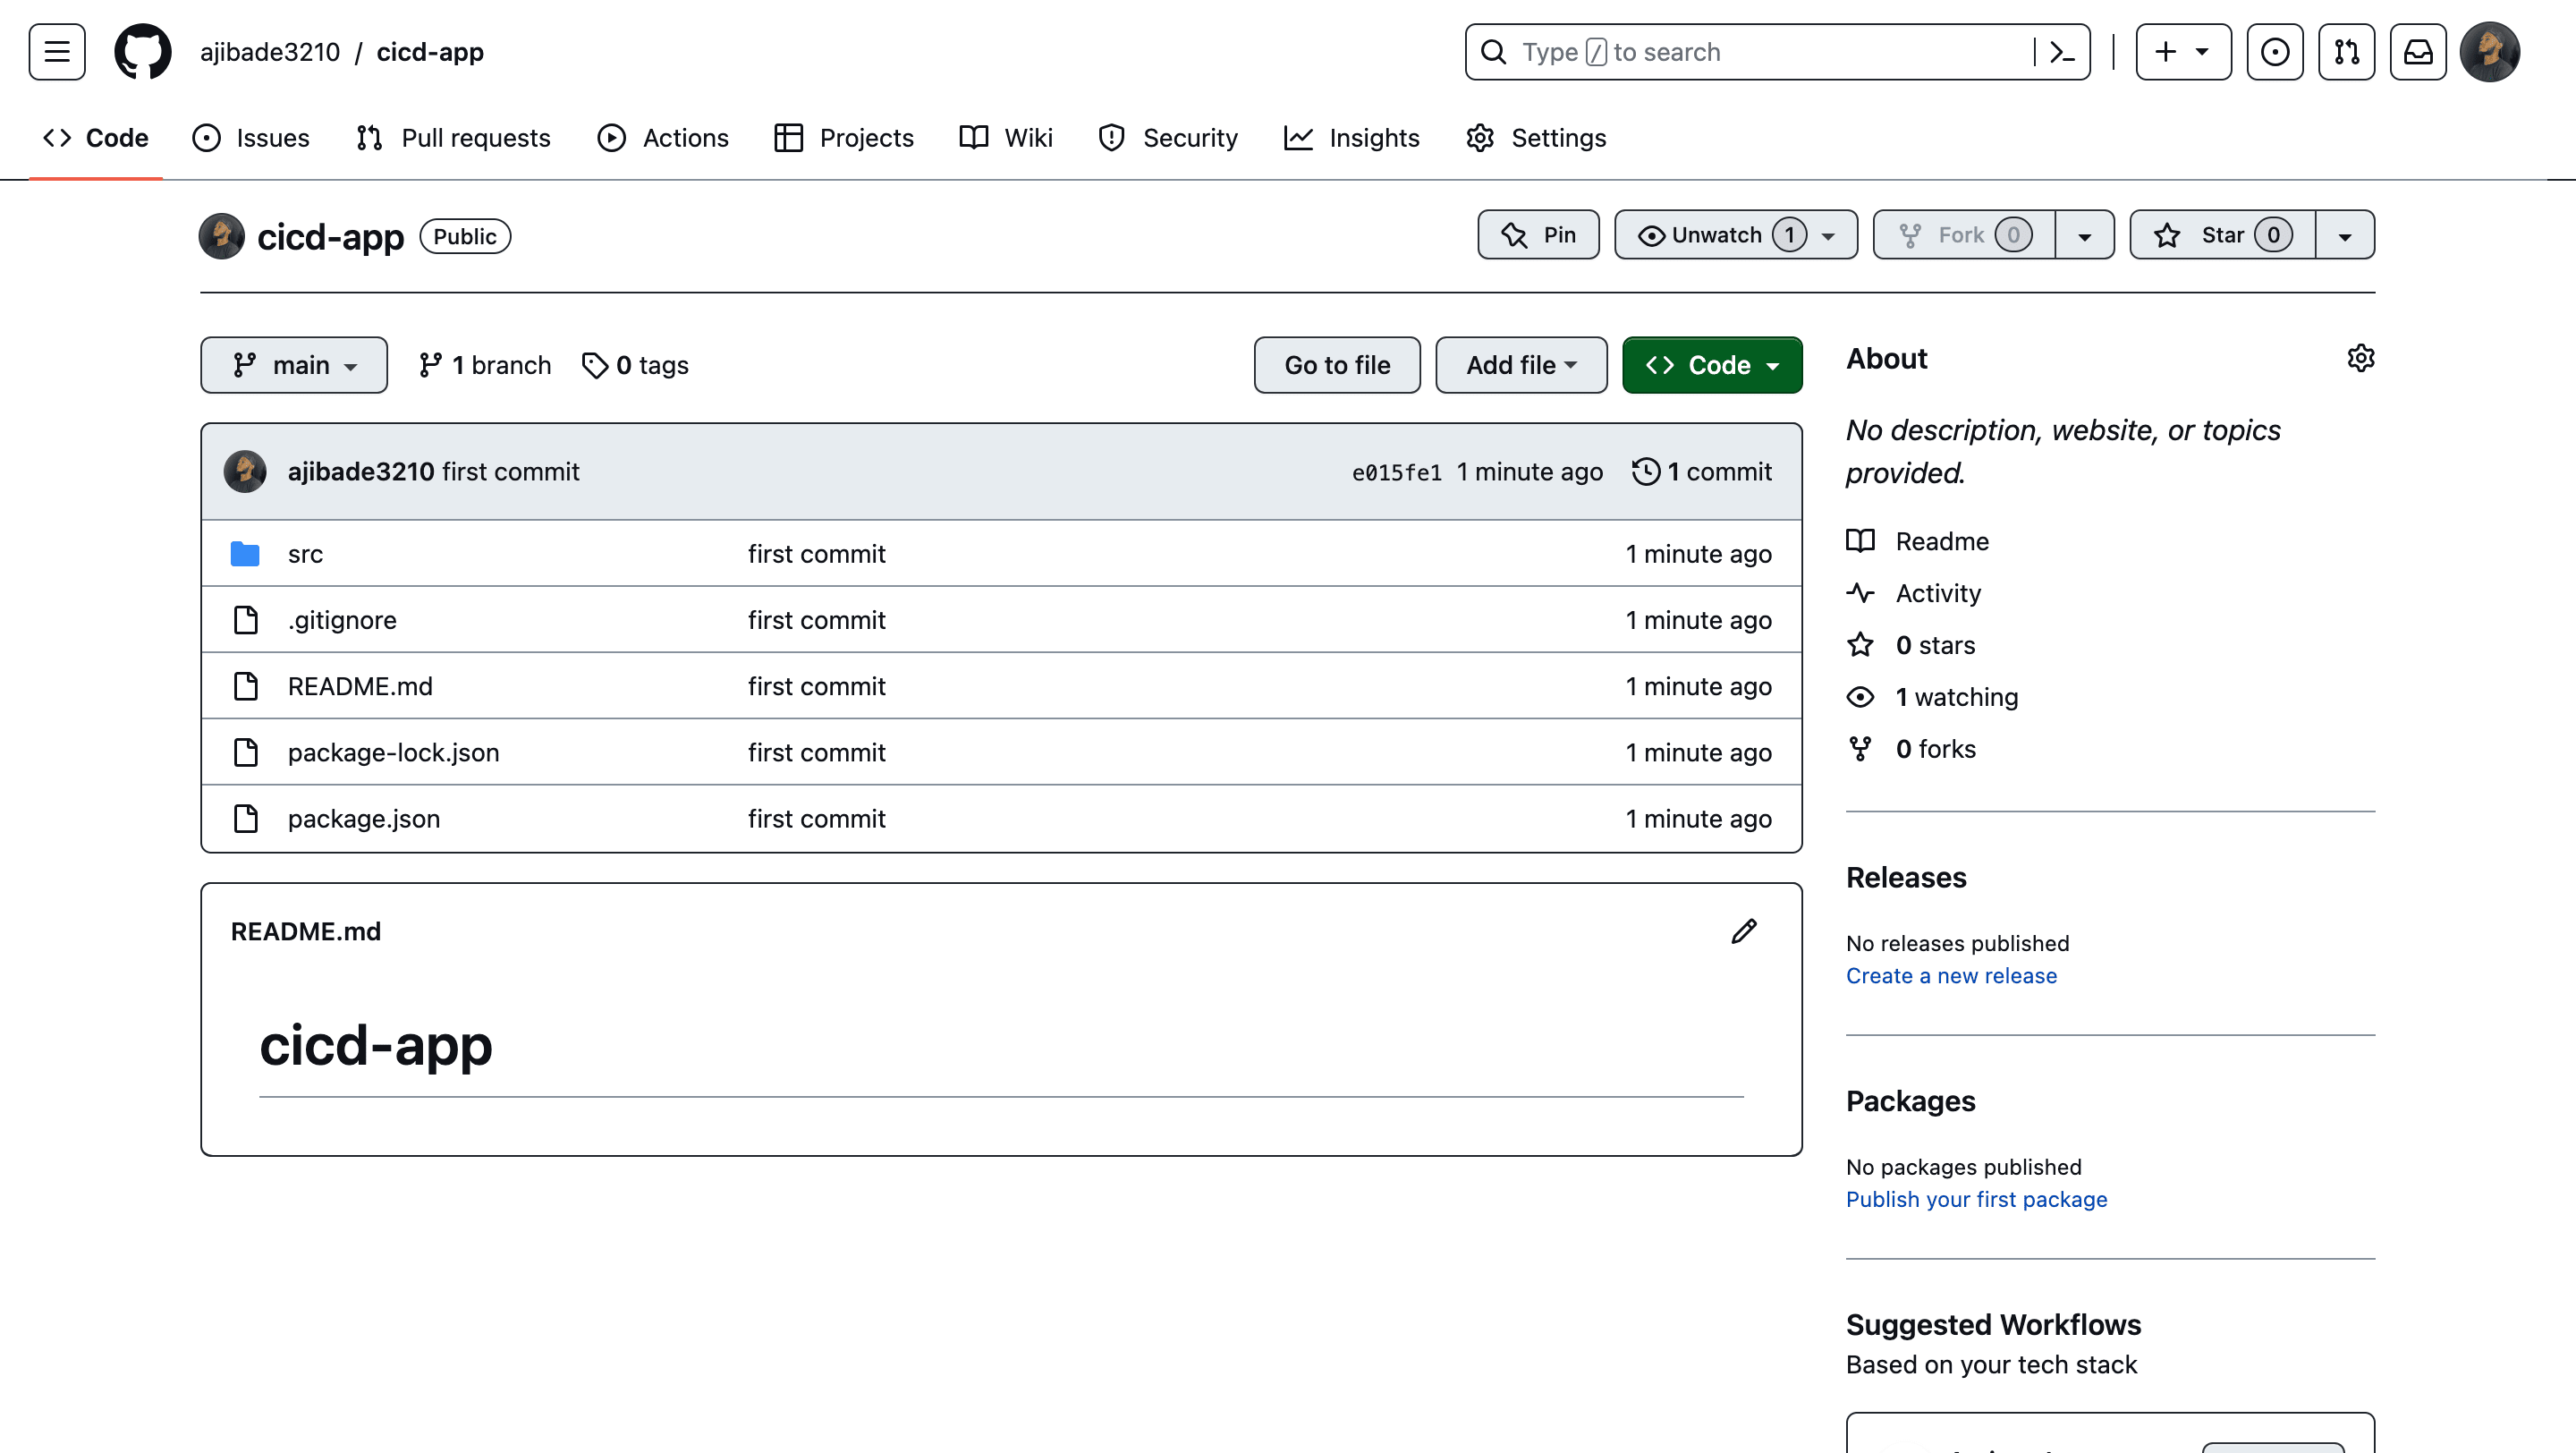
We can now proceed to the next step - creating our AWS EC2 instance.
Create an AWS EC2 Instance
AWS EC2 is a cloud computing service that allows us to launch and manage virtual machines known as instances in the cloud, hence providing flexible and scalable computing resources. It allows us to pay for only resources used, making it cost-effective for a wide range of applications and workloads.
Follow these simple steps to create an EC2 instance:
- Sign in to AWS Management Console and go to the EC2 dashboard.
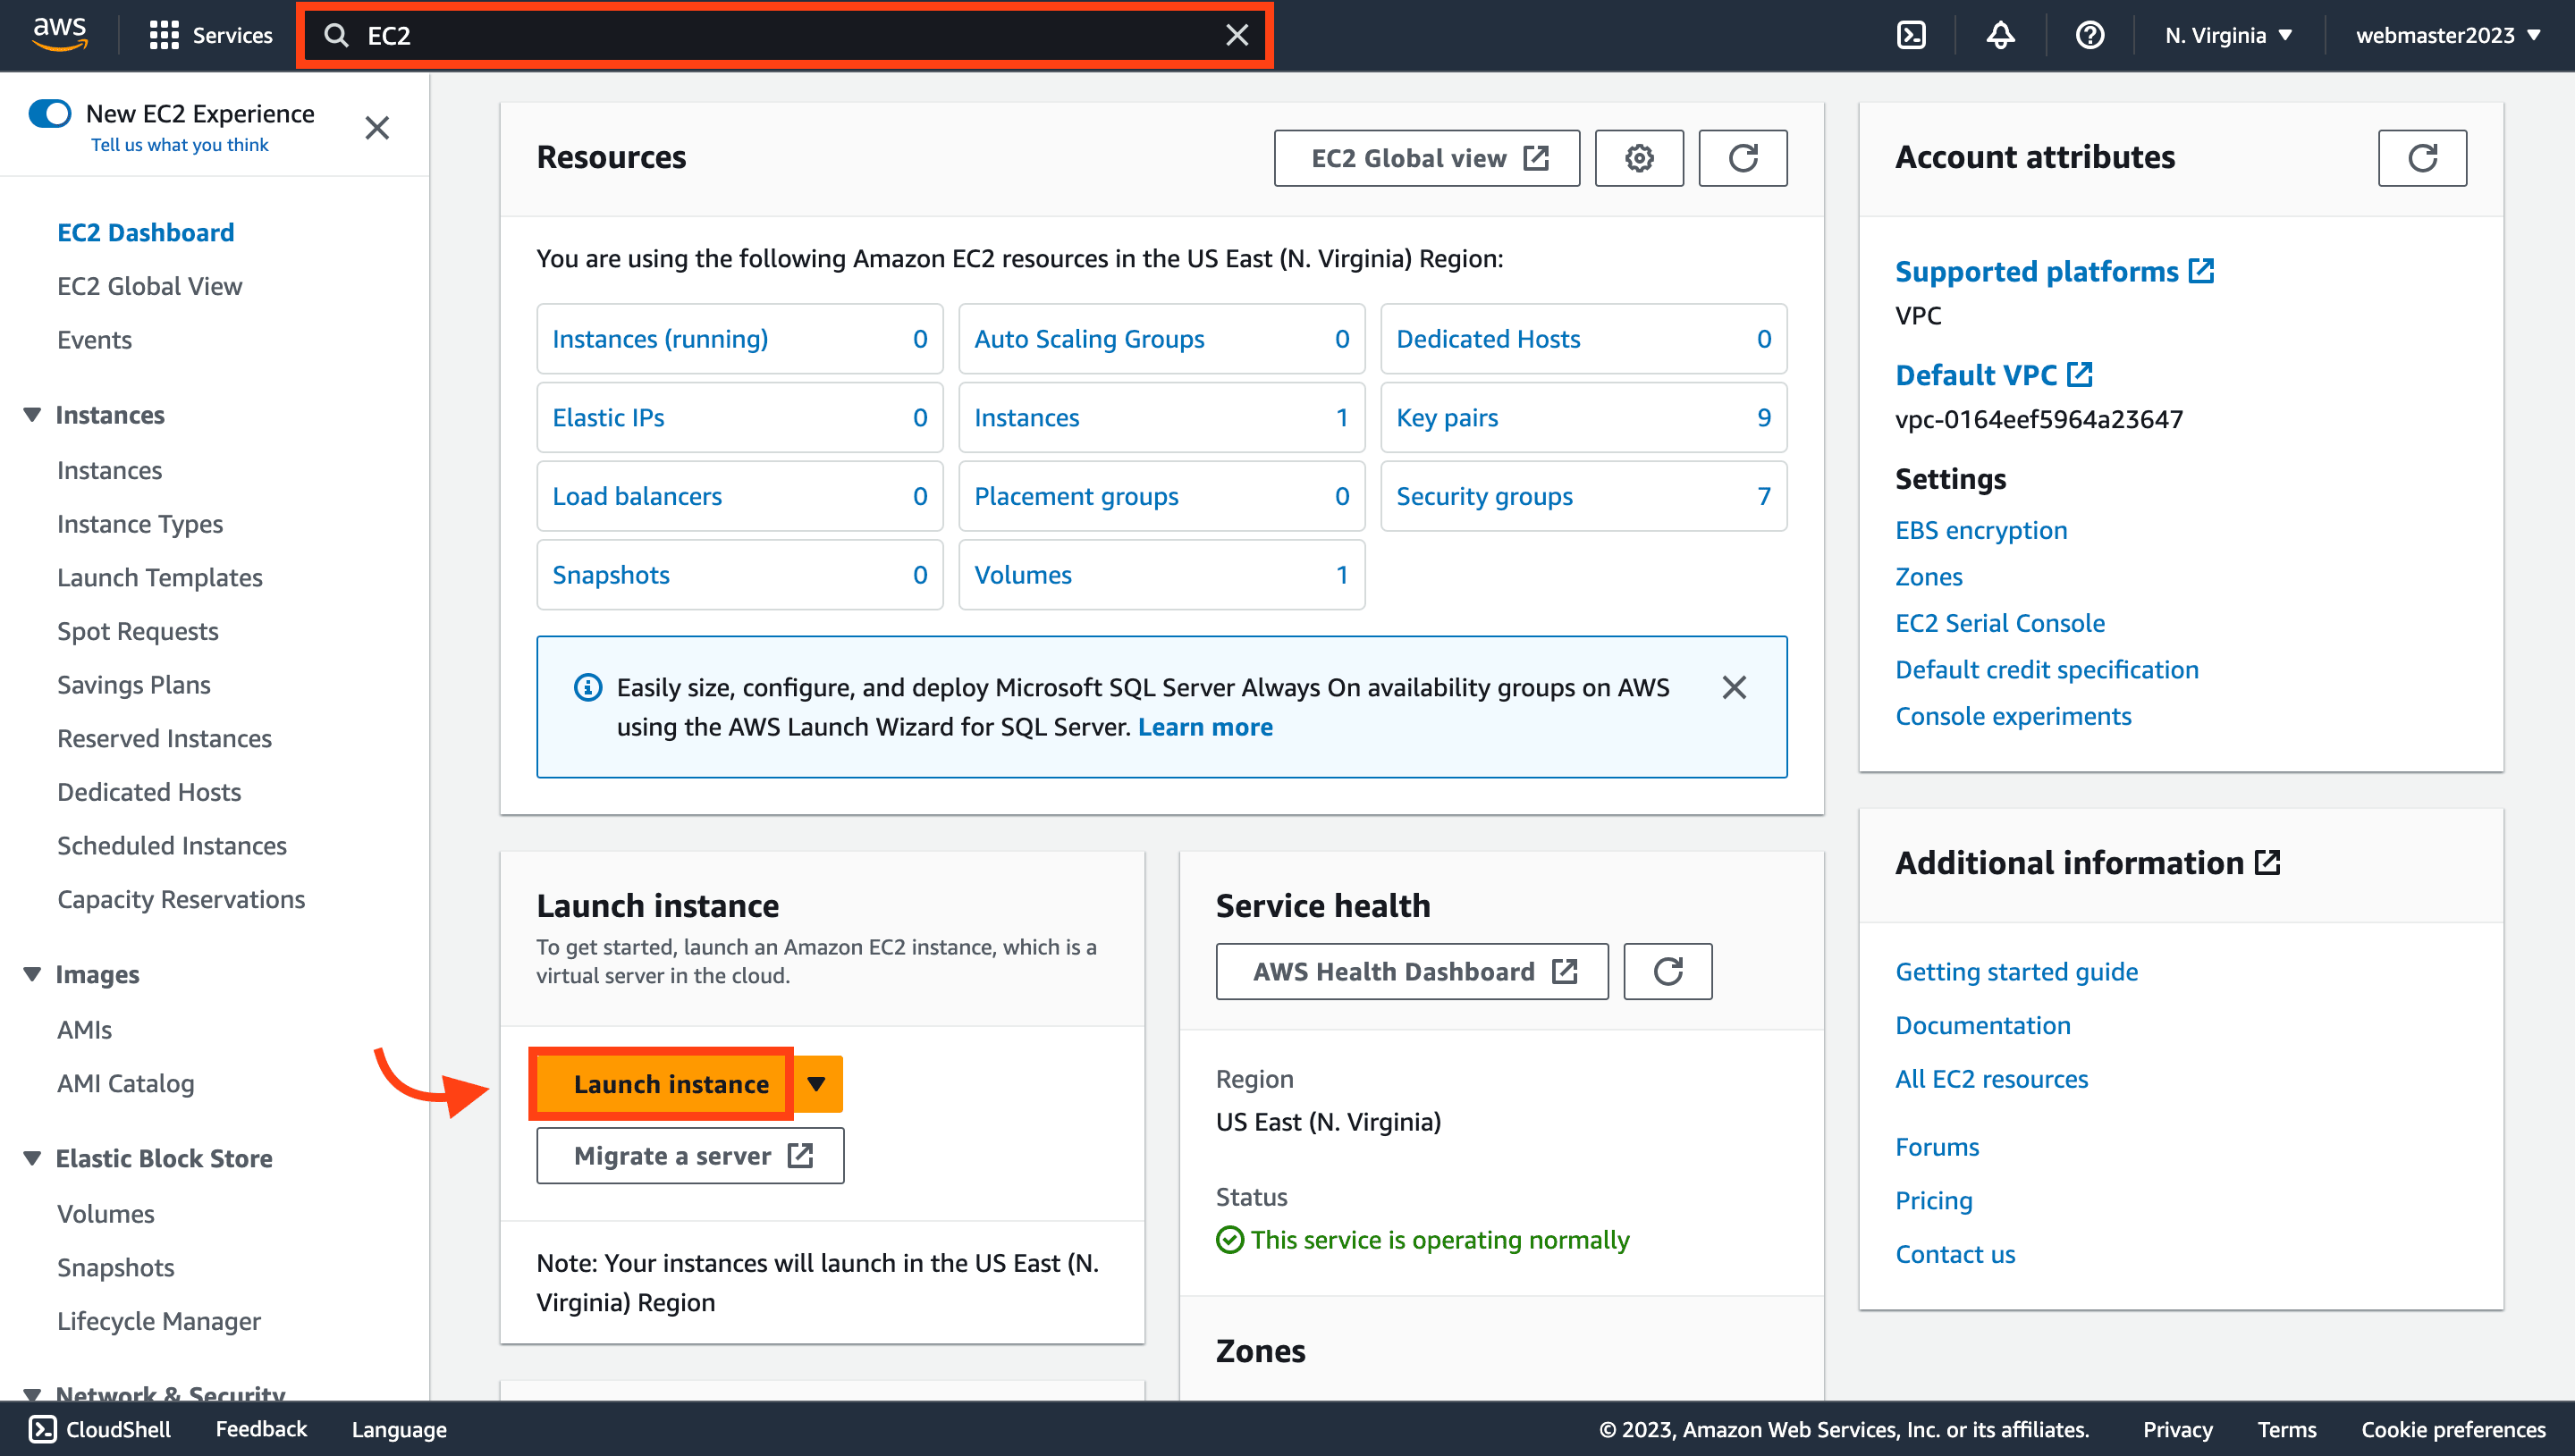
Click on the Launch instance button.
- Set up the instances and configure it to meet the needs of our application. Fill in the following information:
- Name:
node-cicd-app - Application and OS Images (Amazon Machine Image):
ubuntu
- Name:
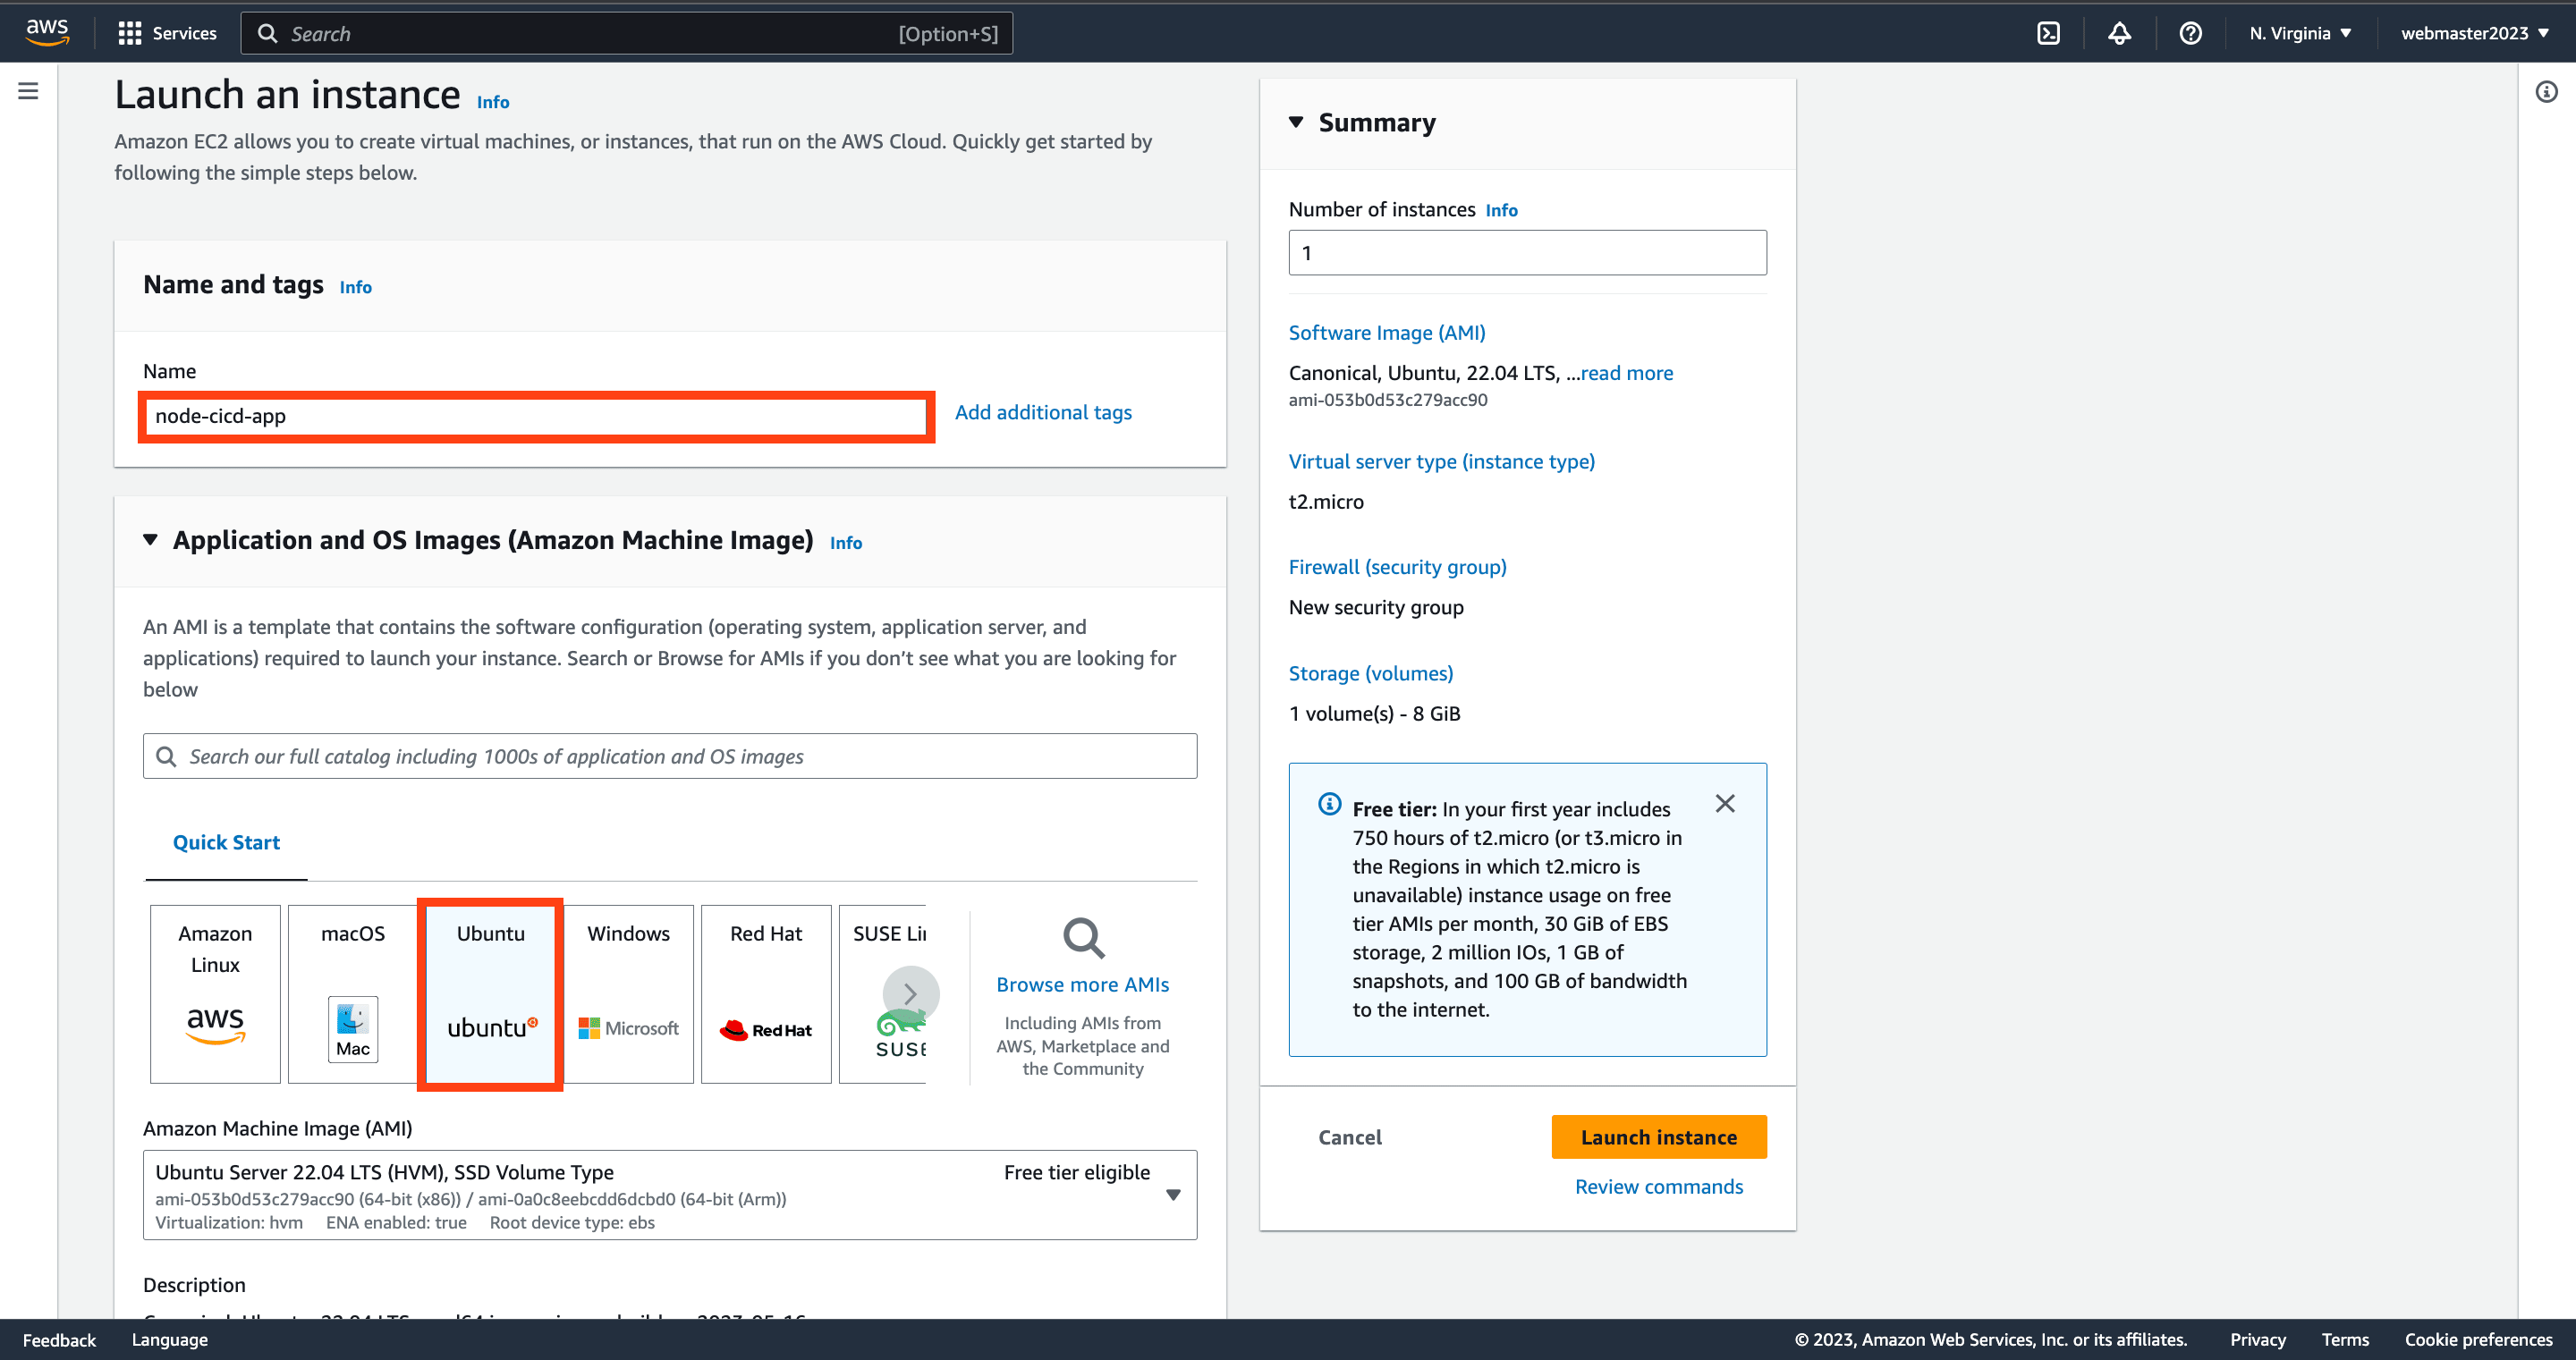
- Instance type:
t2.micro(Free tier)
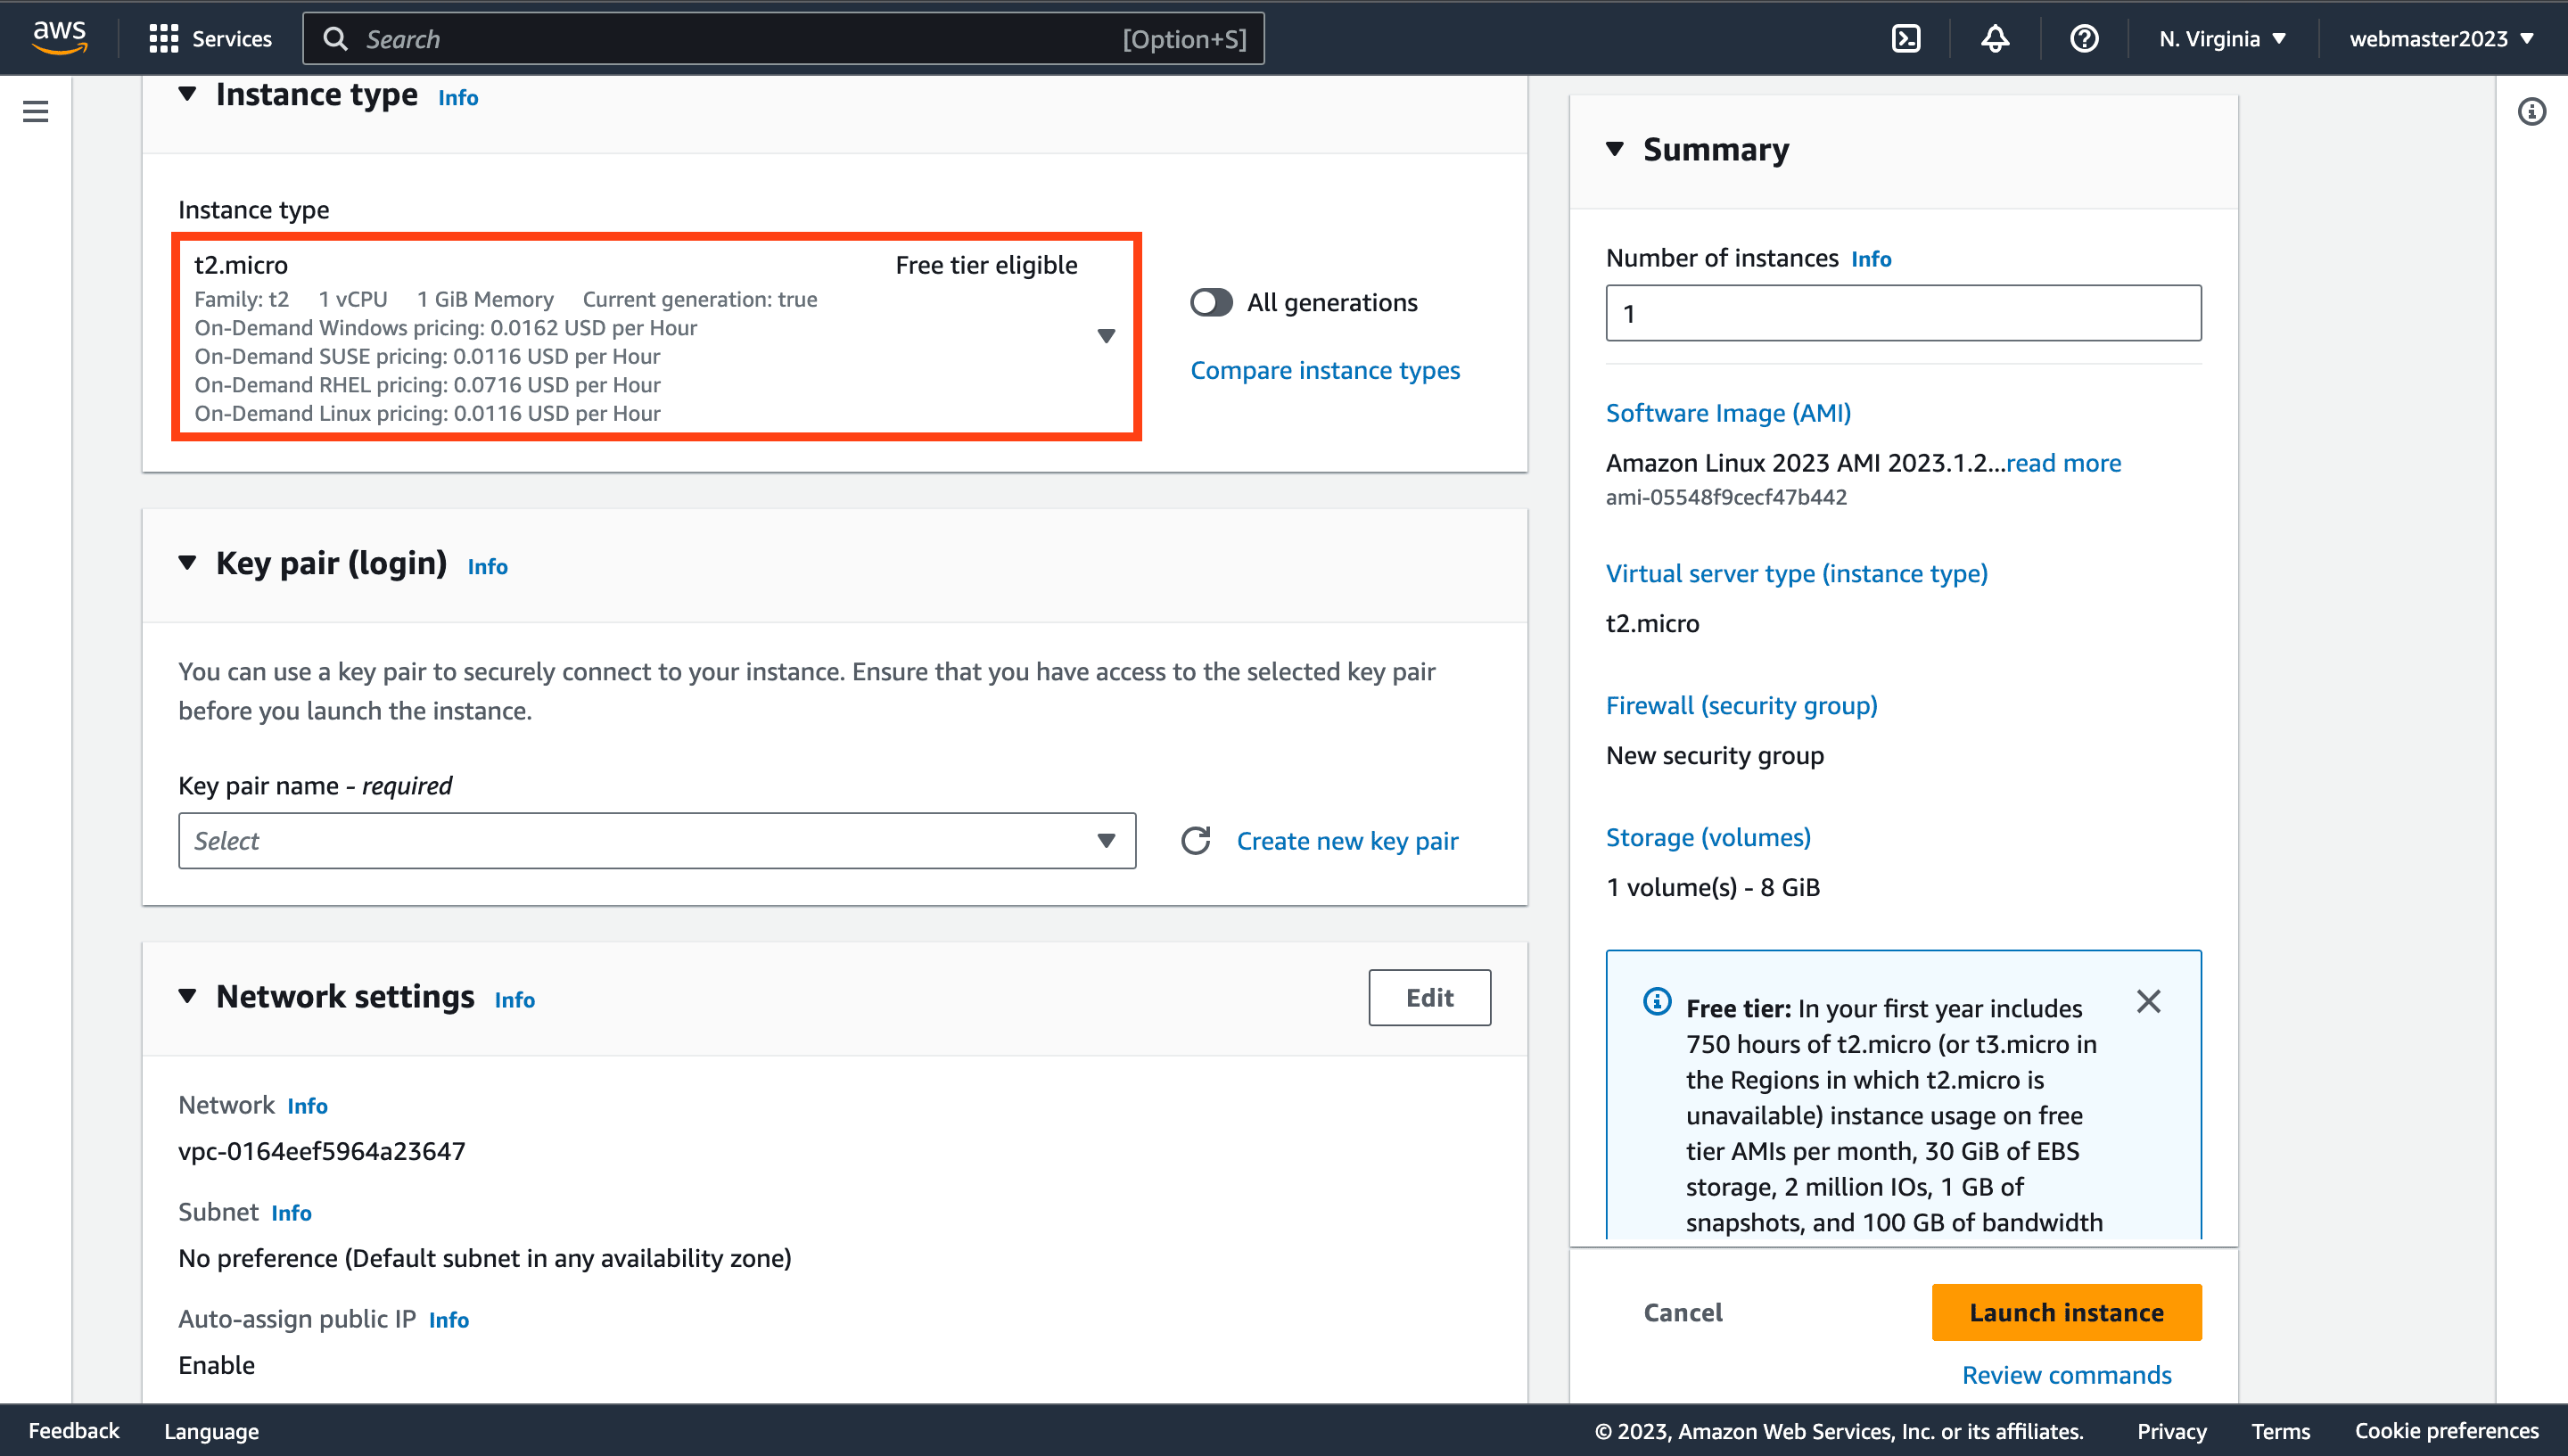
- Create Key Pair:
cicd-key
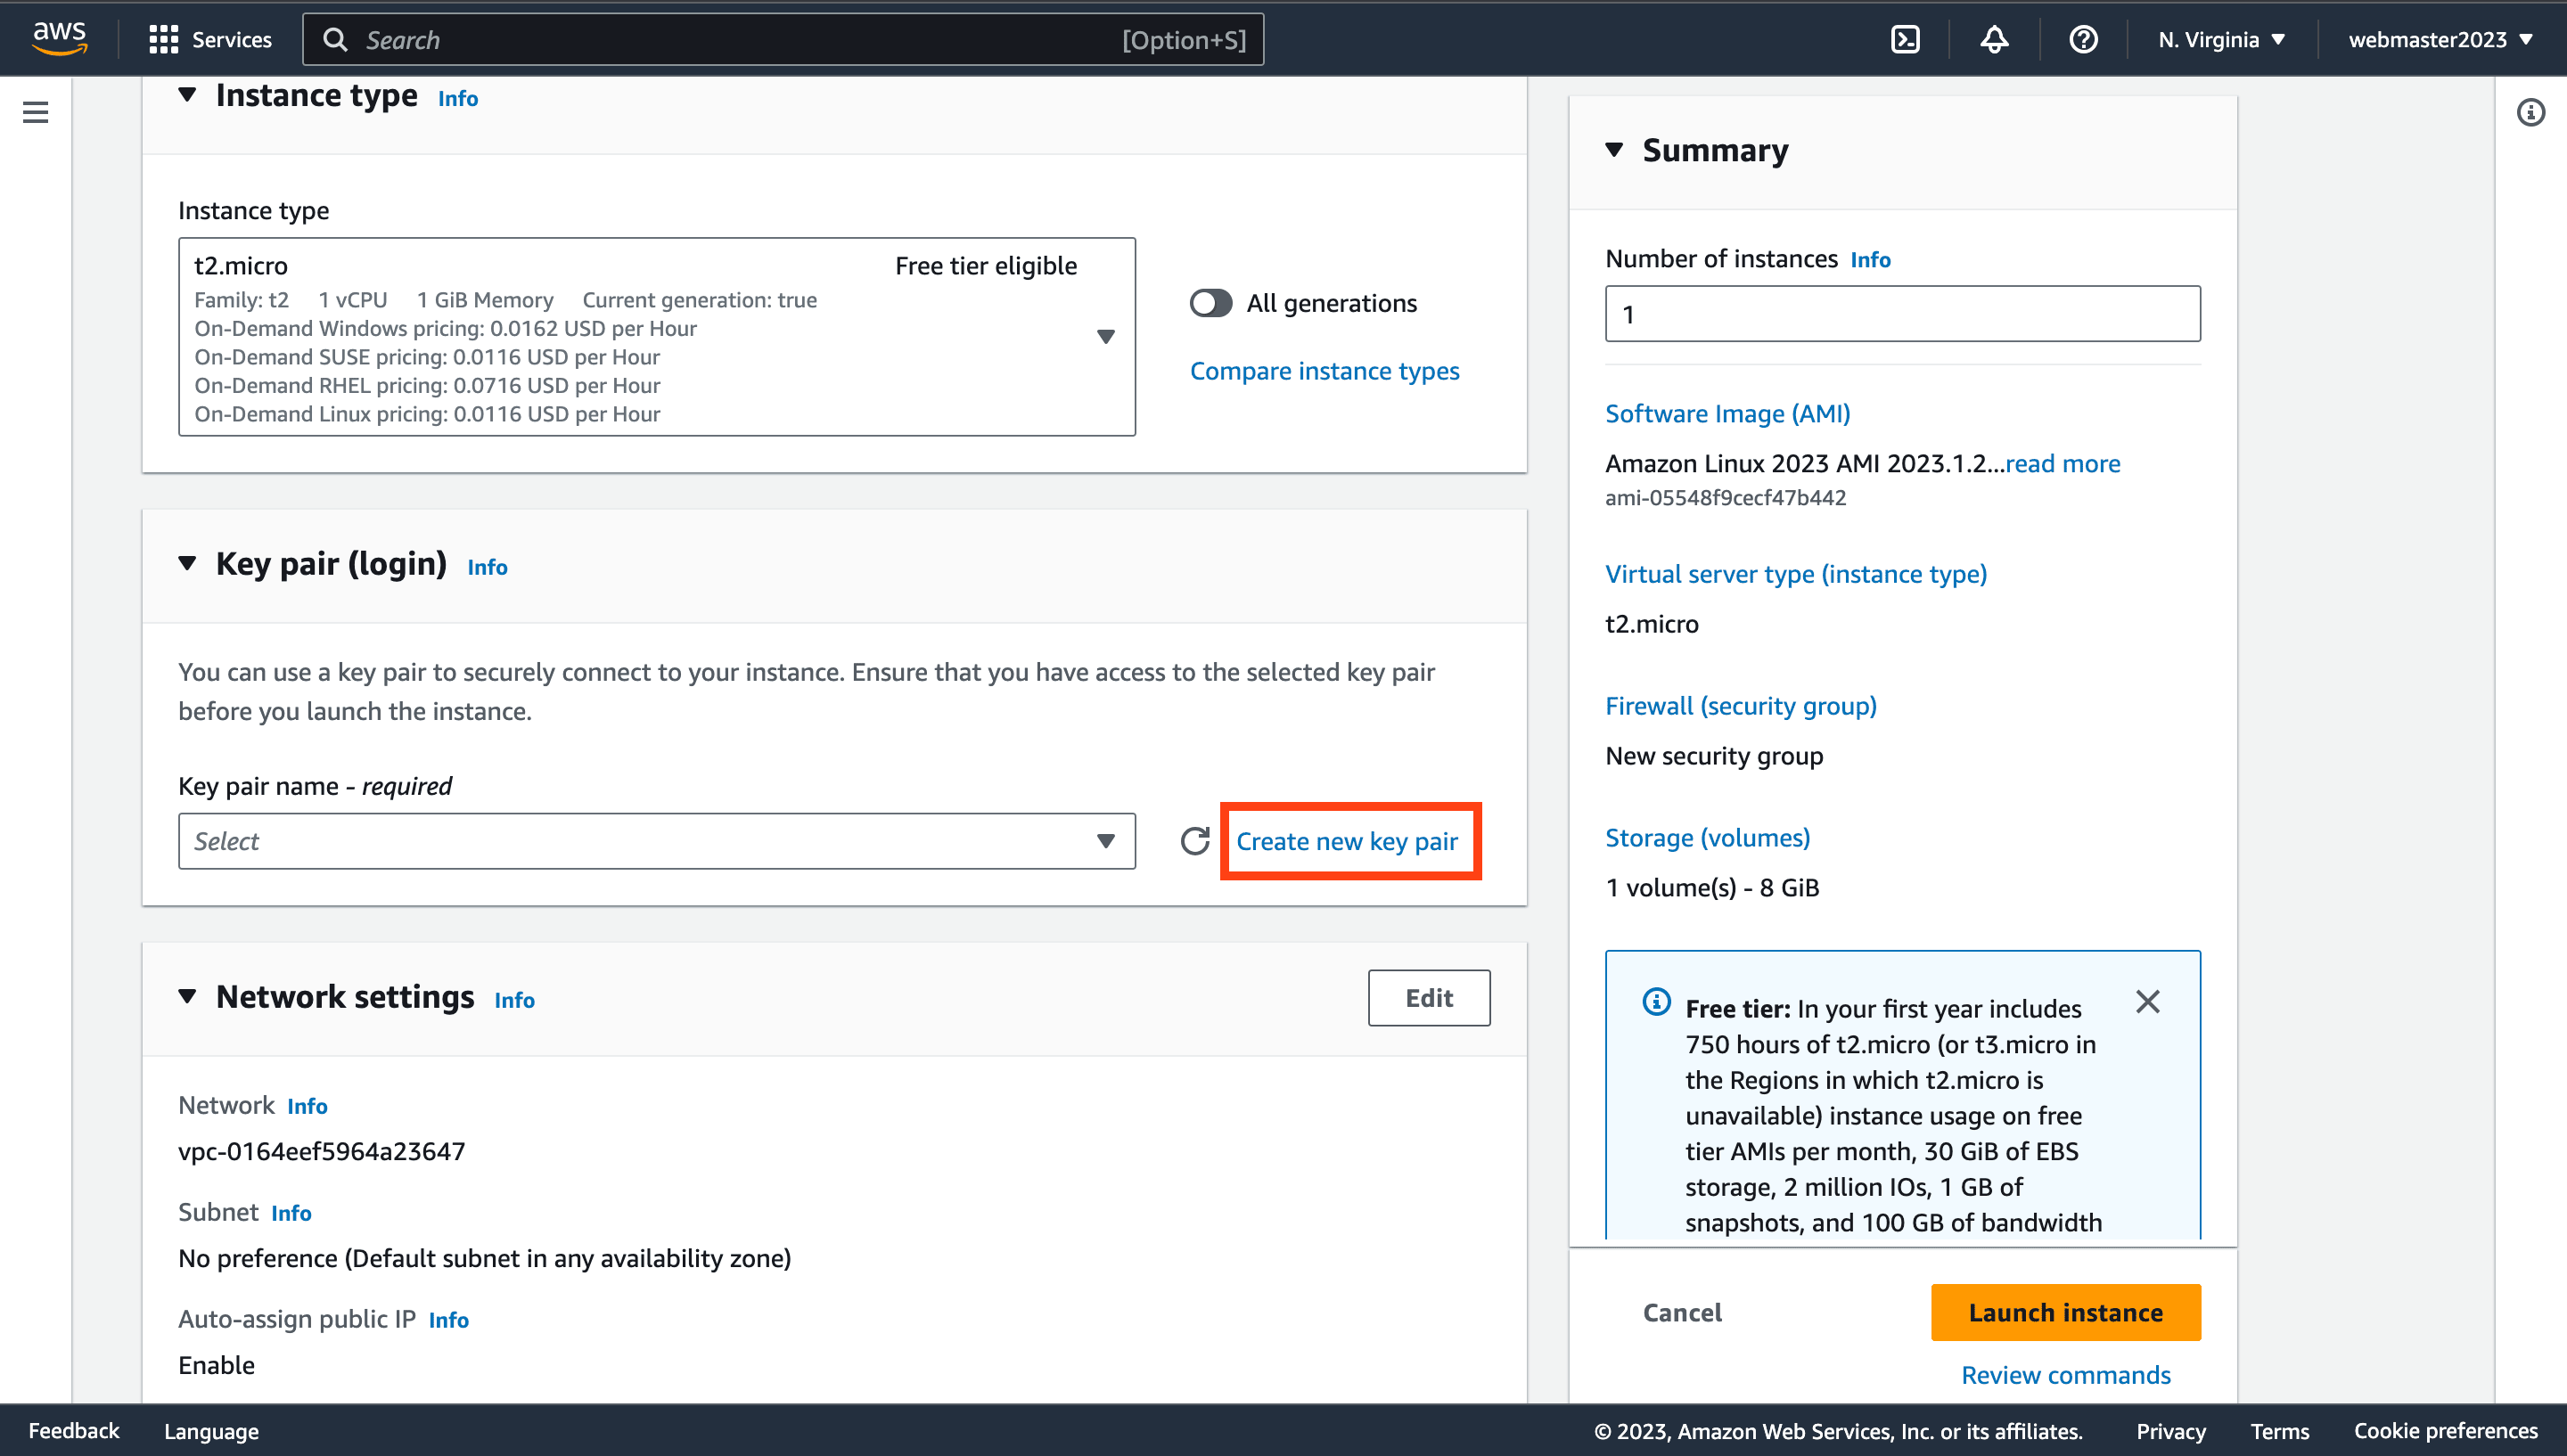
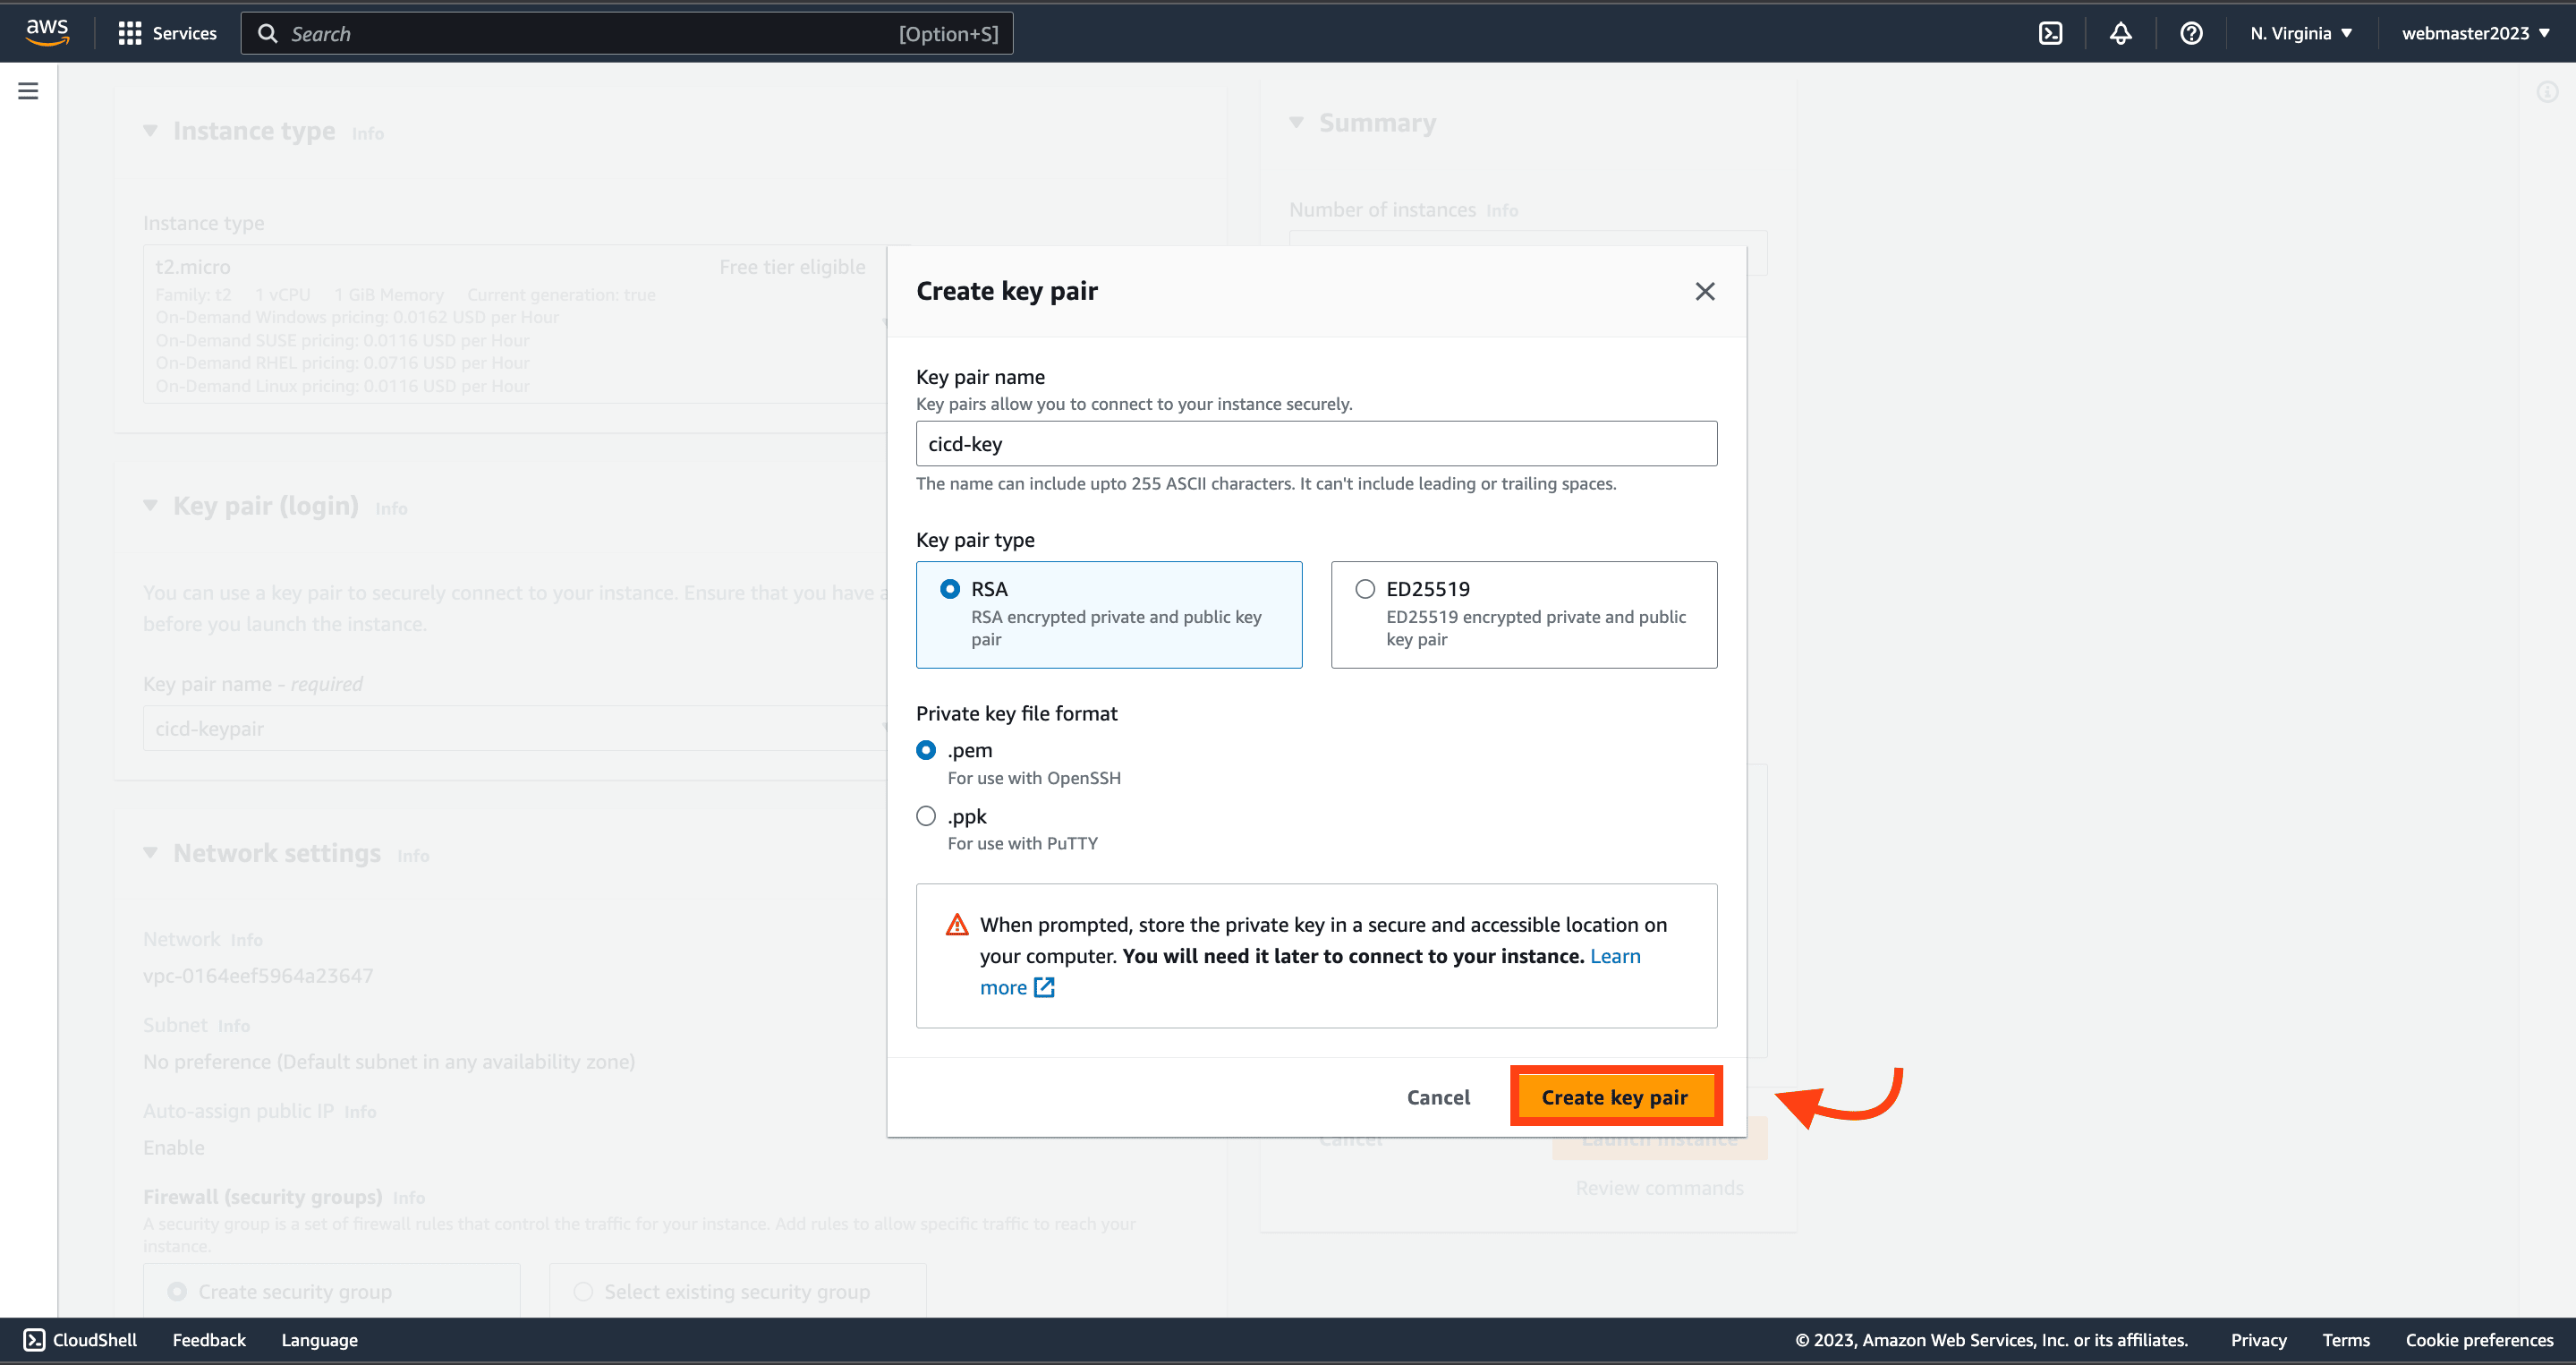
Click on the Create key pair button. AWS will generate and download a key pair .pem file into our computer. This key pair includes a public key for the EC2 instance and a private key to be kept locally.
This key pair allows a secure SSH connection to our EC2 instance. SSH (Secure Shell) is a communication protocol for remote server access and management. The private key ensures encrypted authentication, enhancing security compared to password-based access, and preventing unauthorized entry.
Remember to keep the private key safe and not share it with others, as it grants access to the EC2 instance.
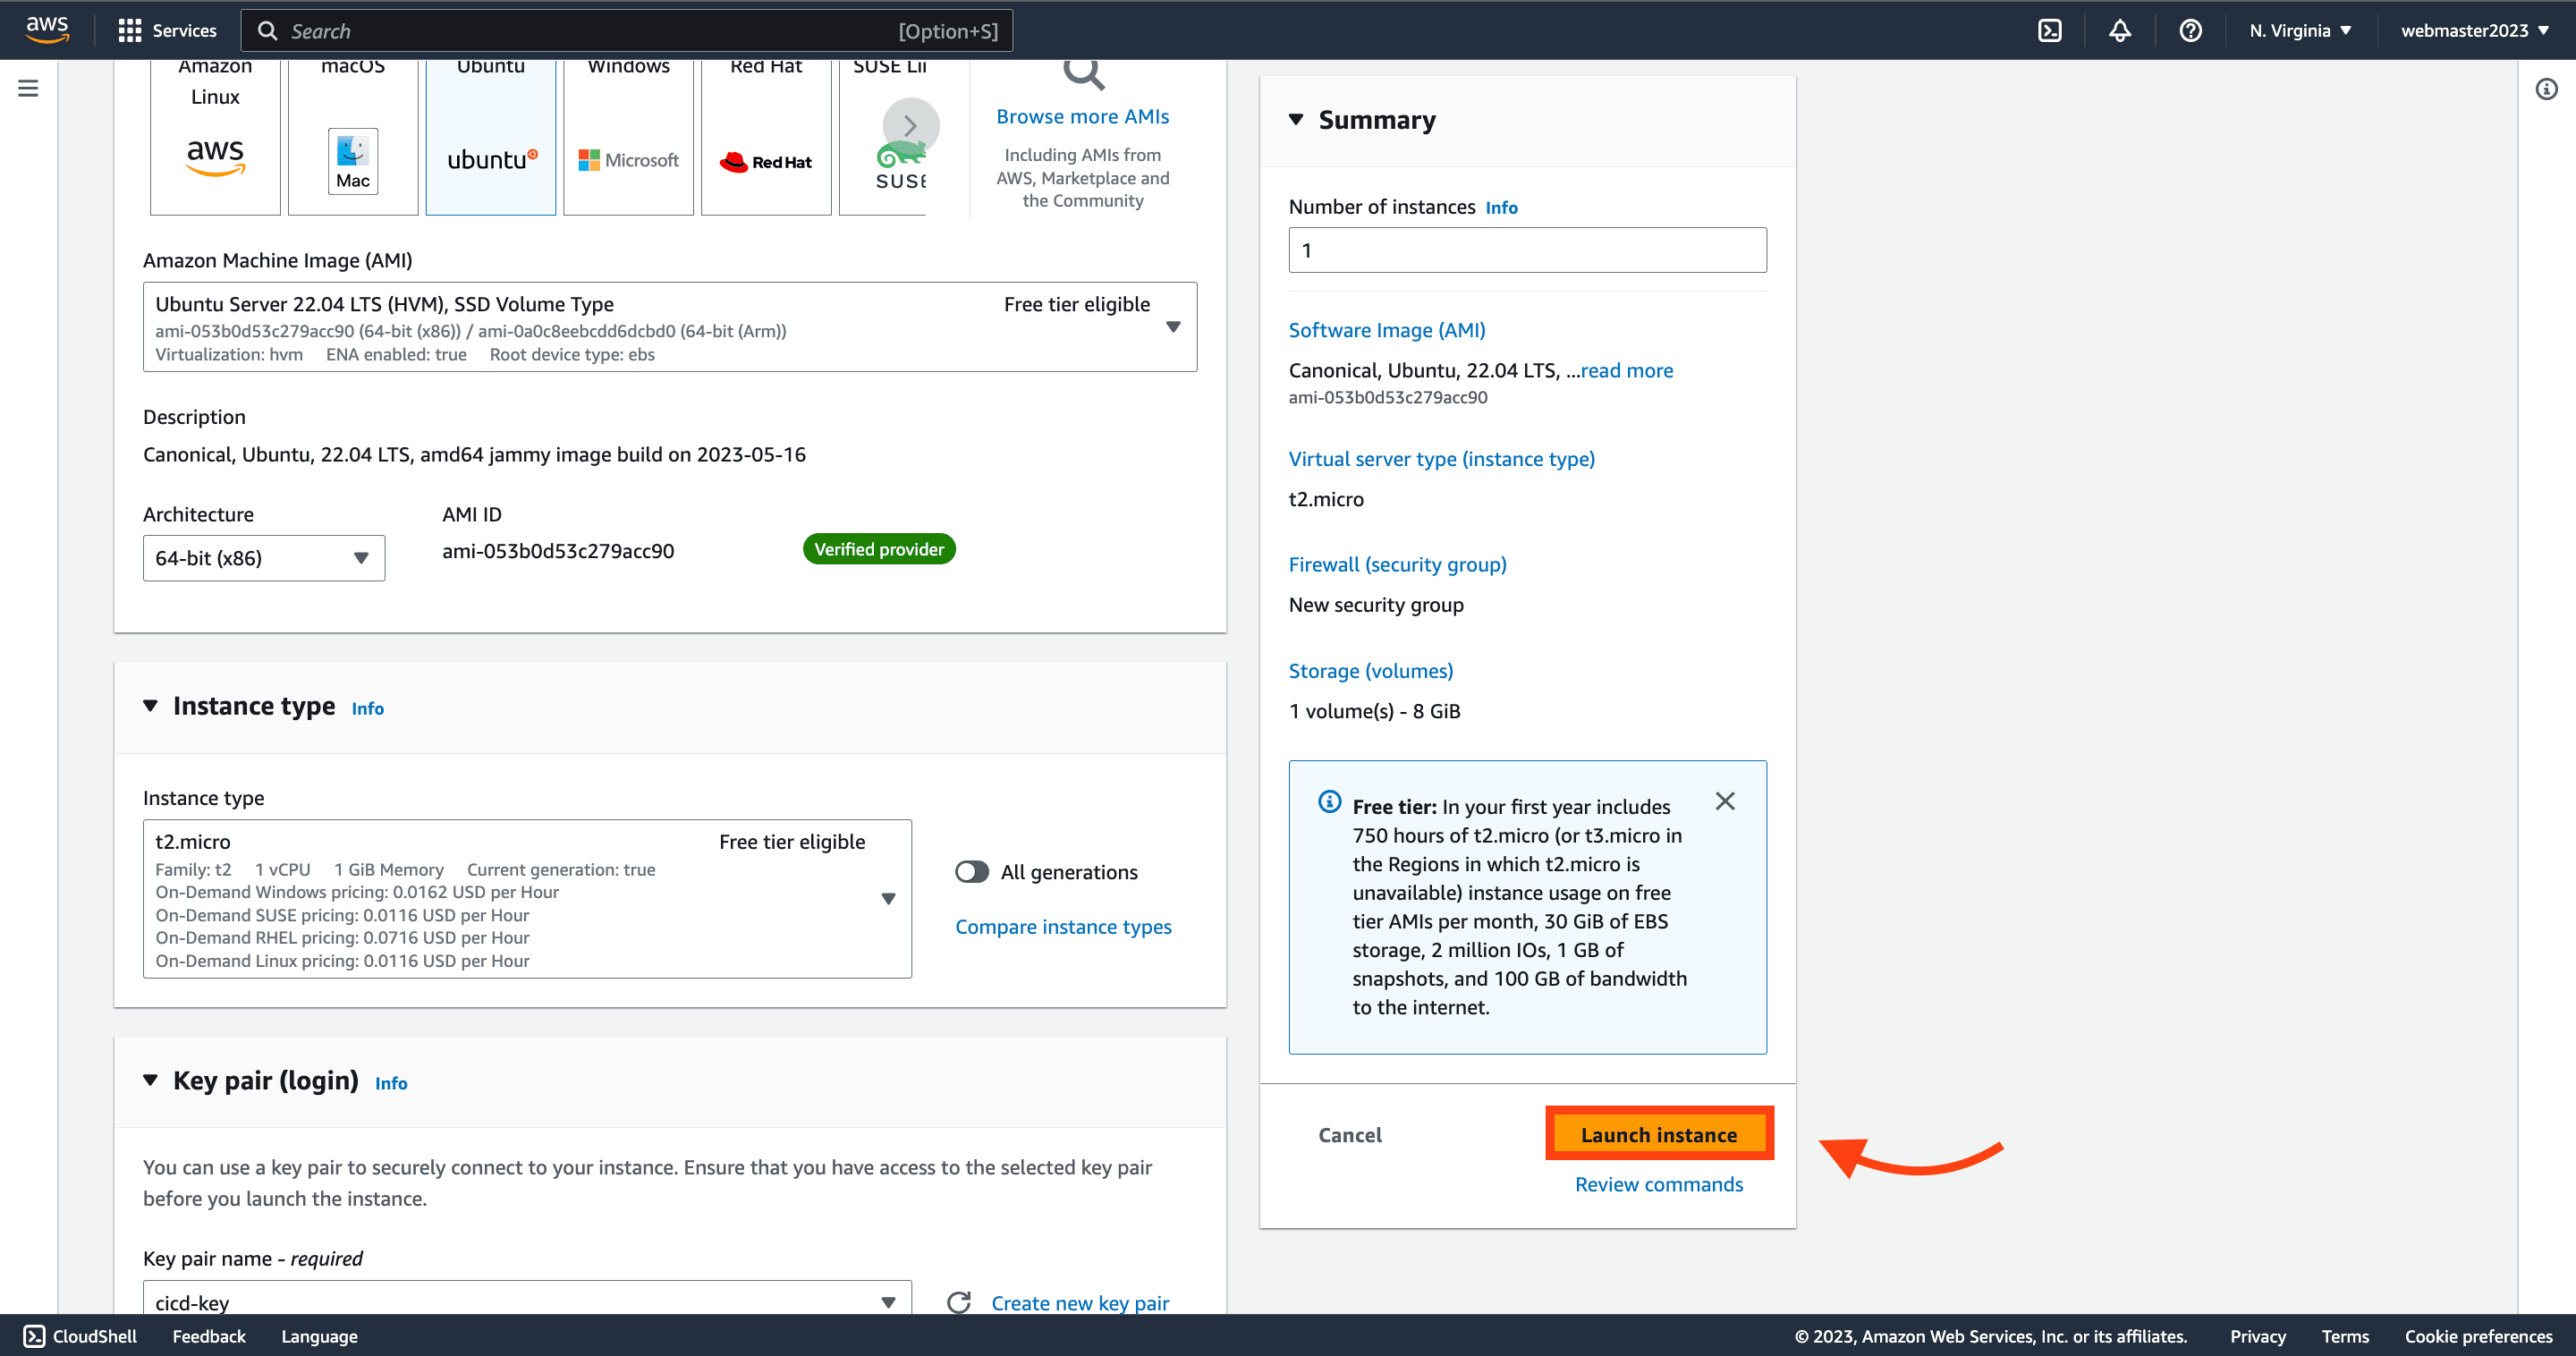
- Next, click on the Launch instance button to create our EC2 virtual machine.
- Next, we need to configure our security groups. Security groups are essential to control inbound traffic to our EC2 instance. Security groups act as virtual firewalls, allowing us to specify which ports and protocols are accessible to our instances from different sources (e.g., specific IP addresses, ranges, or the internet).
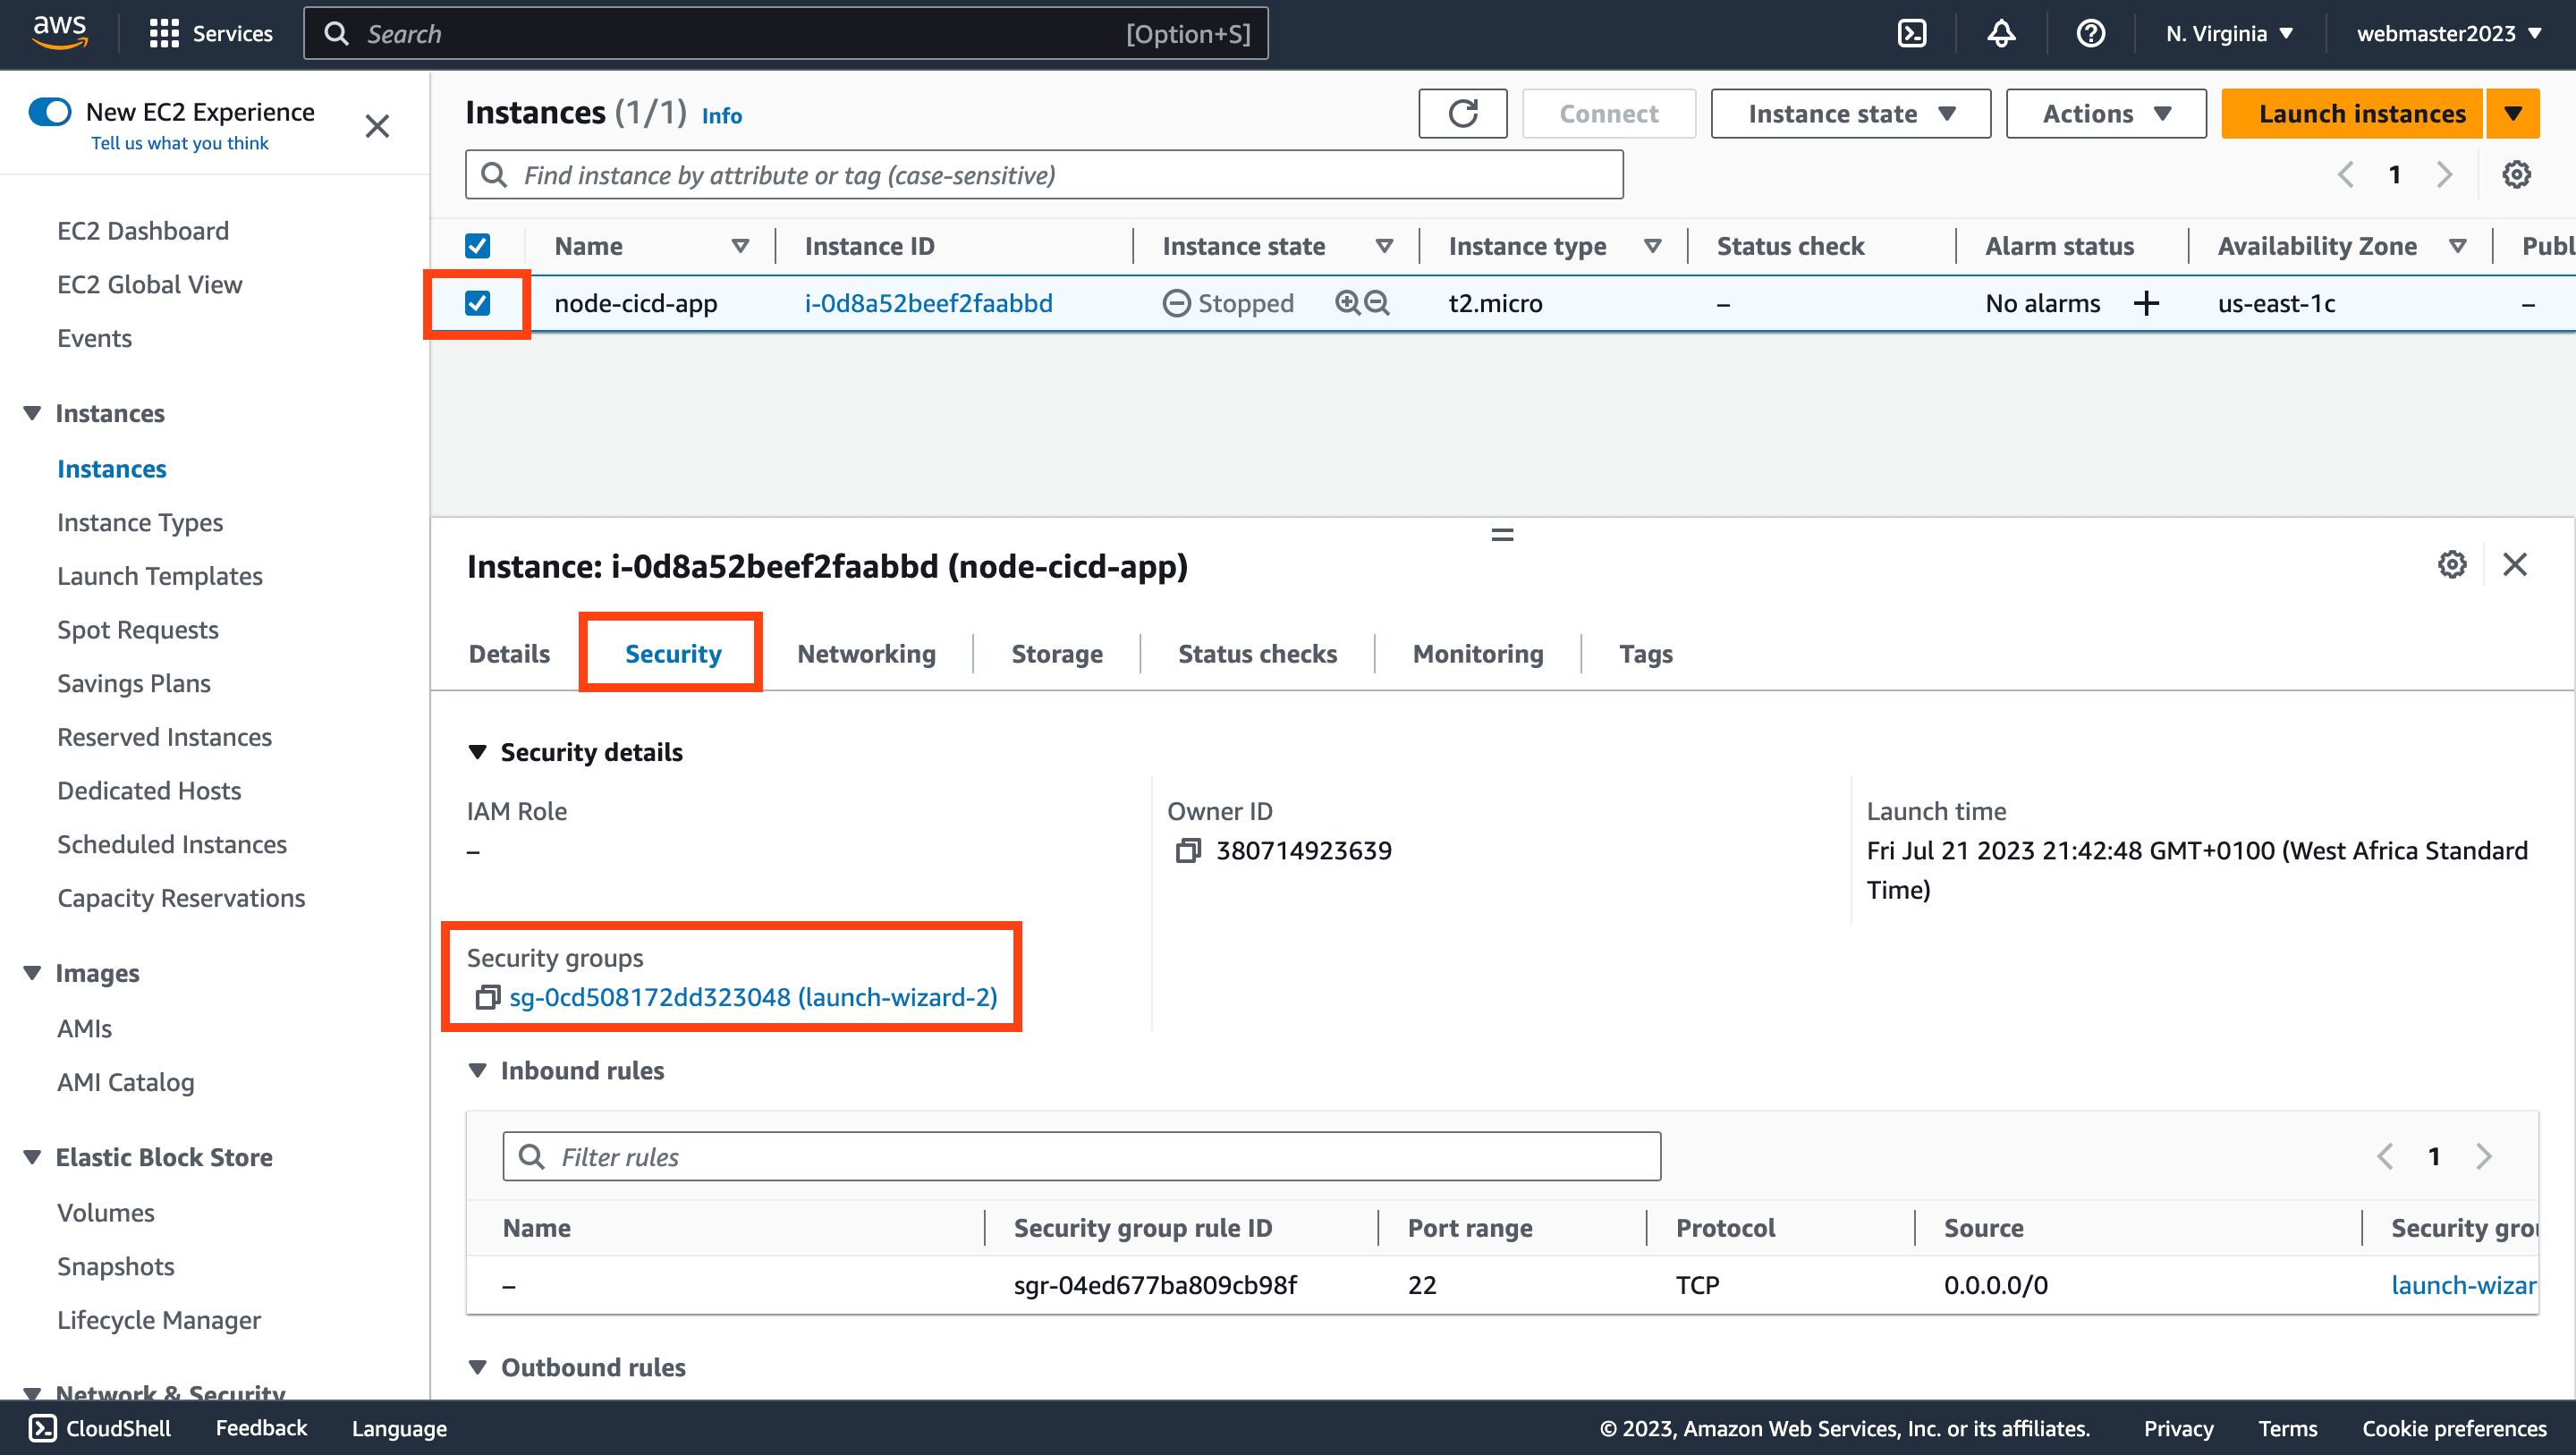
To set up a security group for our instance:
- Select the newly created instance for which you want to configure the security group.
- In the tabs below, click Security. Then click on the Security groups link associated with the instance.
- In the Inbound rules tab of the security group, click on Edit inbound rules
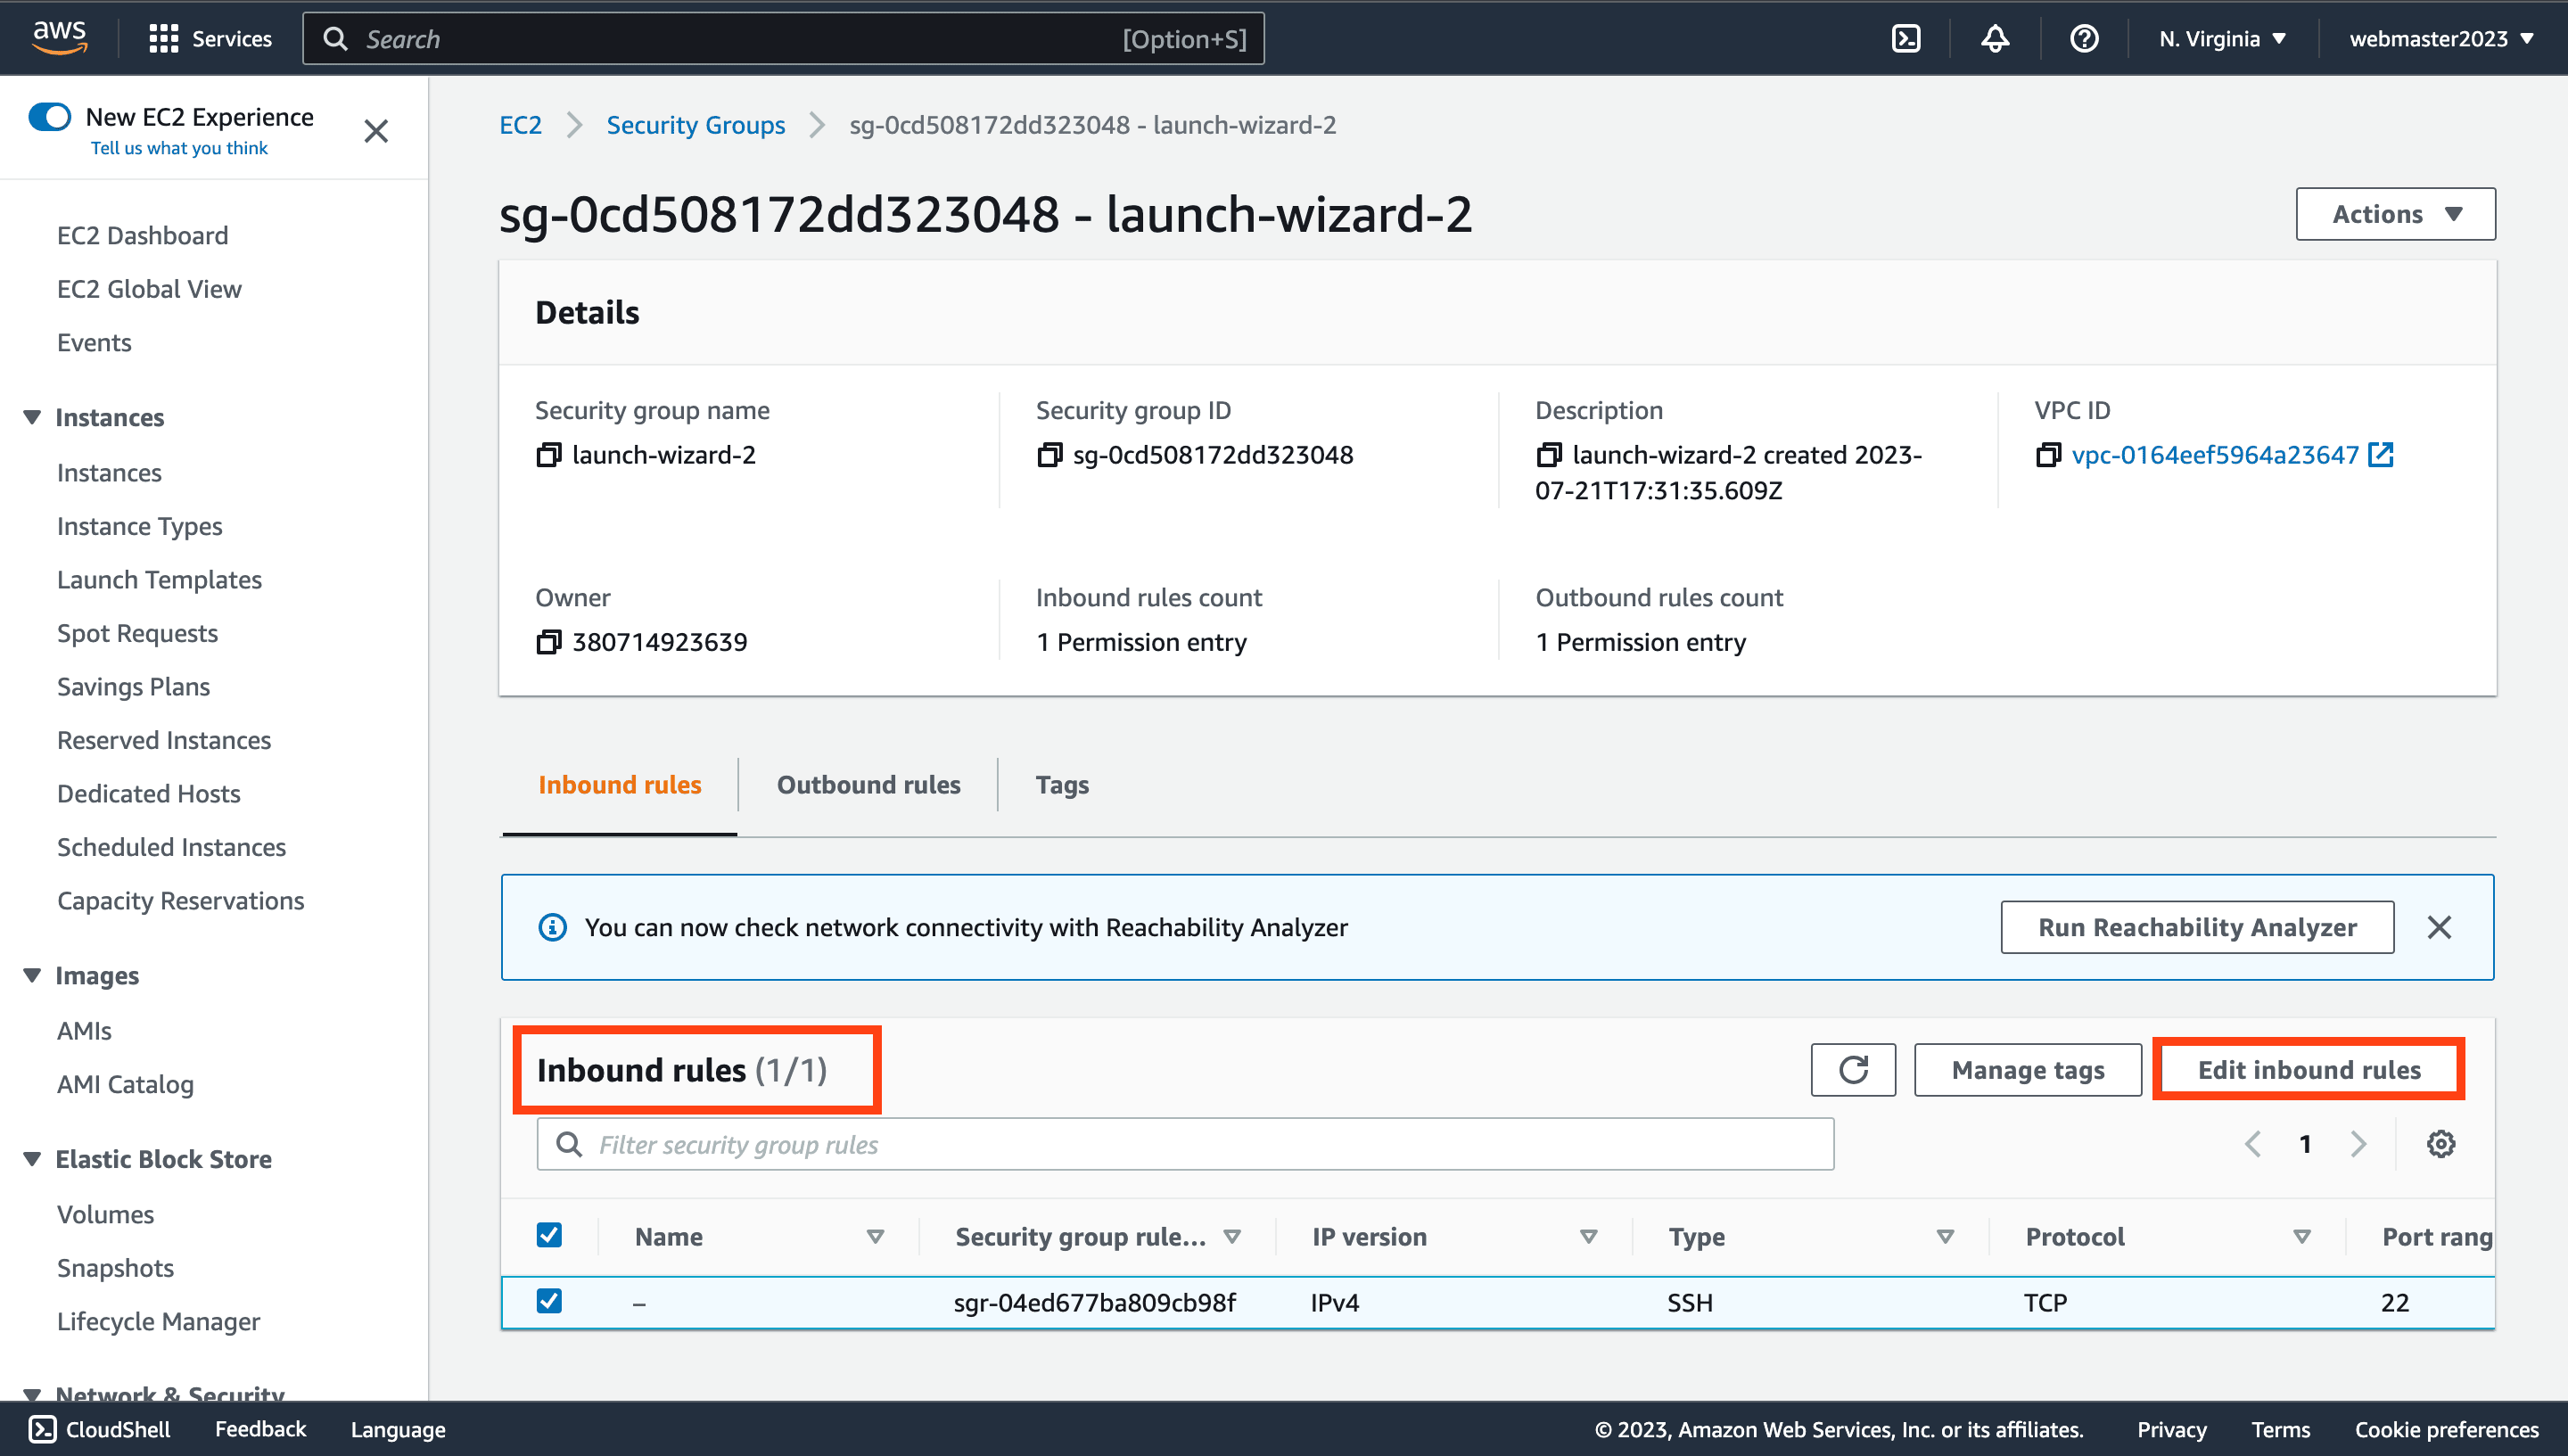
- Add new security rules by specifying the protocol, port range, and source to allow inbound traffic on the necessary ports. Click on the Save rules button to save the security group.

Above, we set up a Custom TCP security group rule for port 3000, allowing access from anywhere. This restricts inbound traffic to the necessary connections, enhancing application security against unauthorized access and potential threats.
Next, we’ll create a GitHub action workflow outlining the CI/CD steps to be executed when changes are pushed to our GitHub repository.
Create a Node.Js Github Actions Workflow
A GitHub Actions workflow automatically triggers necessary deployment steps on new code pushes or changes. It executes tasks defined in the workflow configuration. GitHub logs the workflow progress for monitoring.
In case of an error or failure, a red check mark appears in the logs, indicating an issue. Developers can review the log, fix the problem, and push changes to trigger a new workflow. A green check mark confirms a smooth workflow with successful tests and deployment. This visual feedback system ensures our codebase’s health and verifies the application’s functionality.
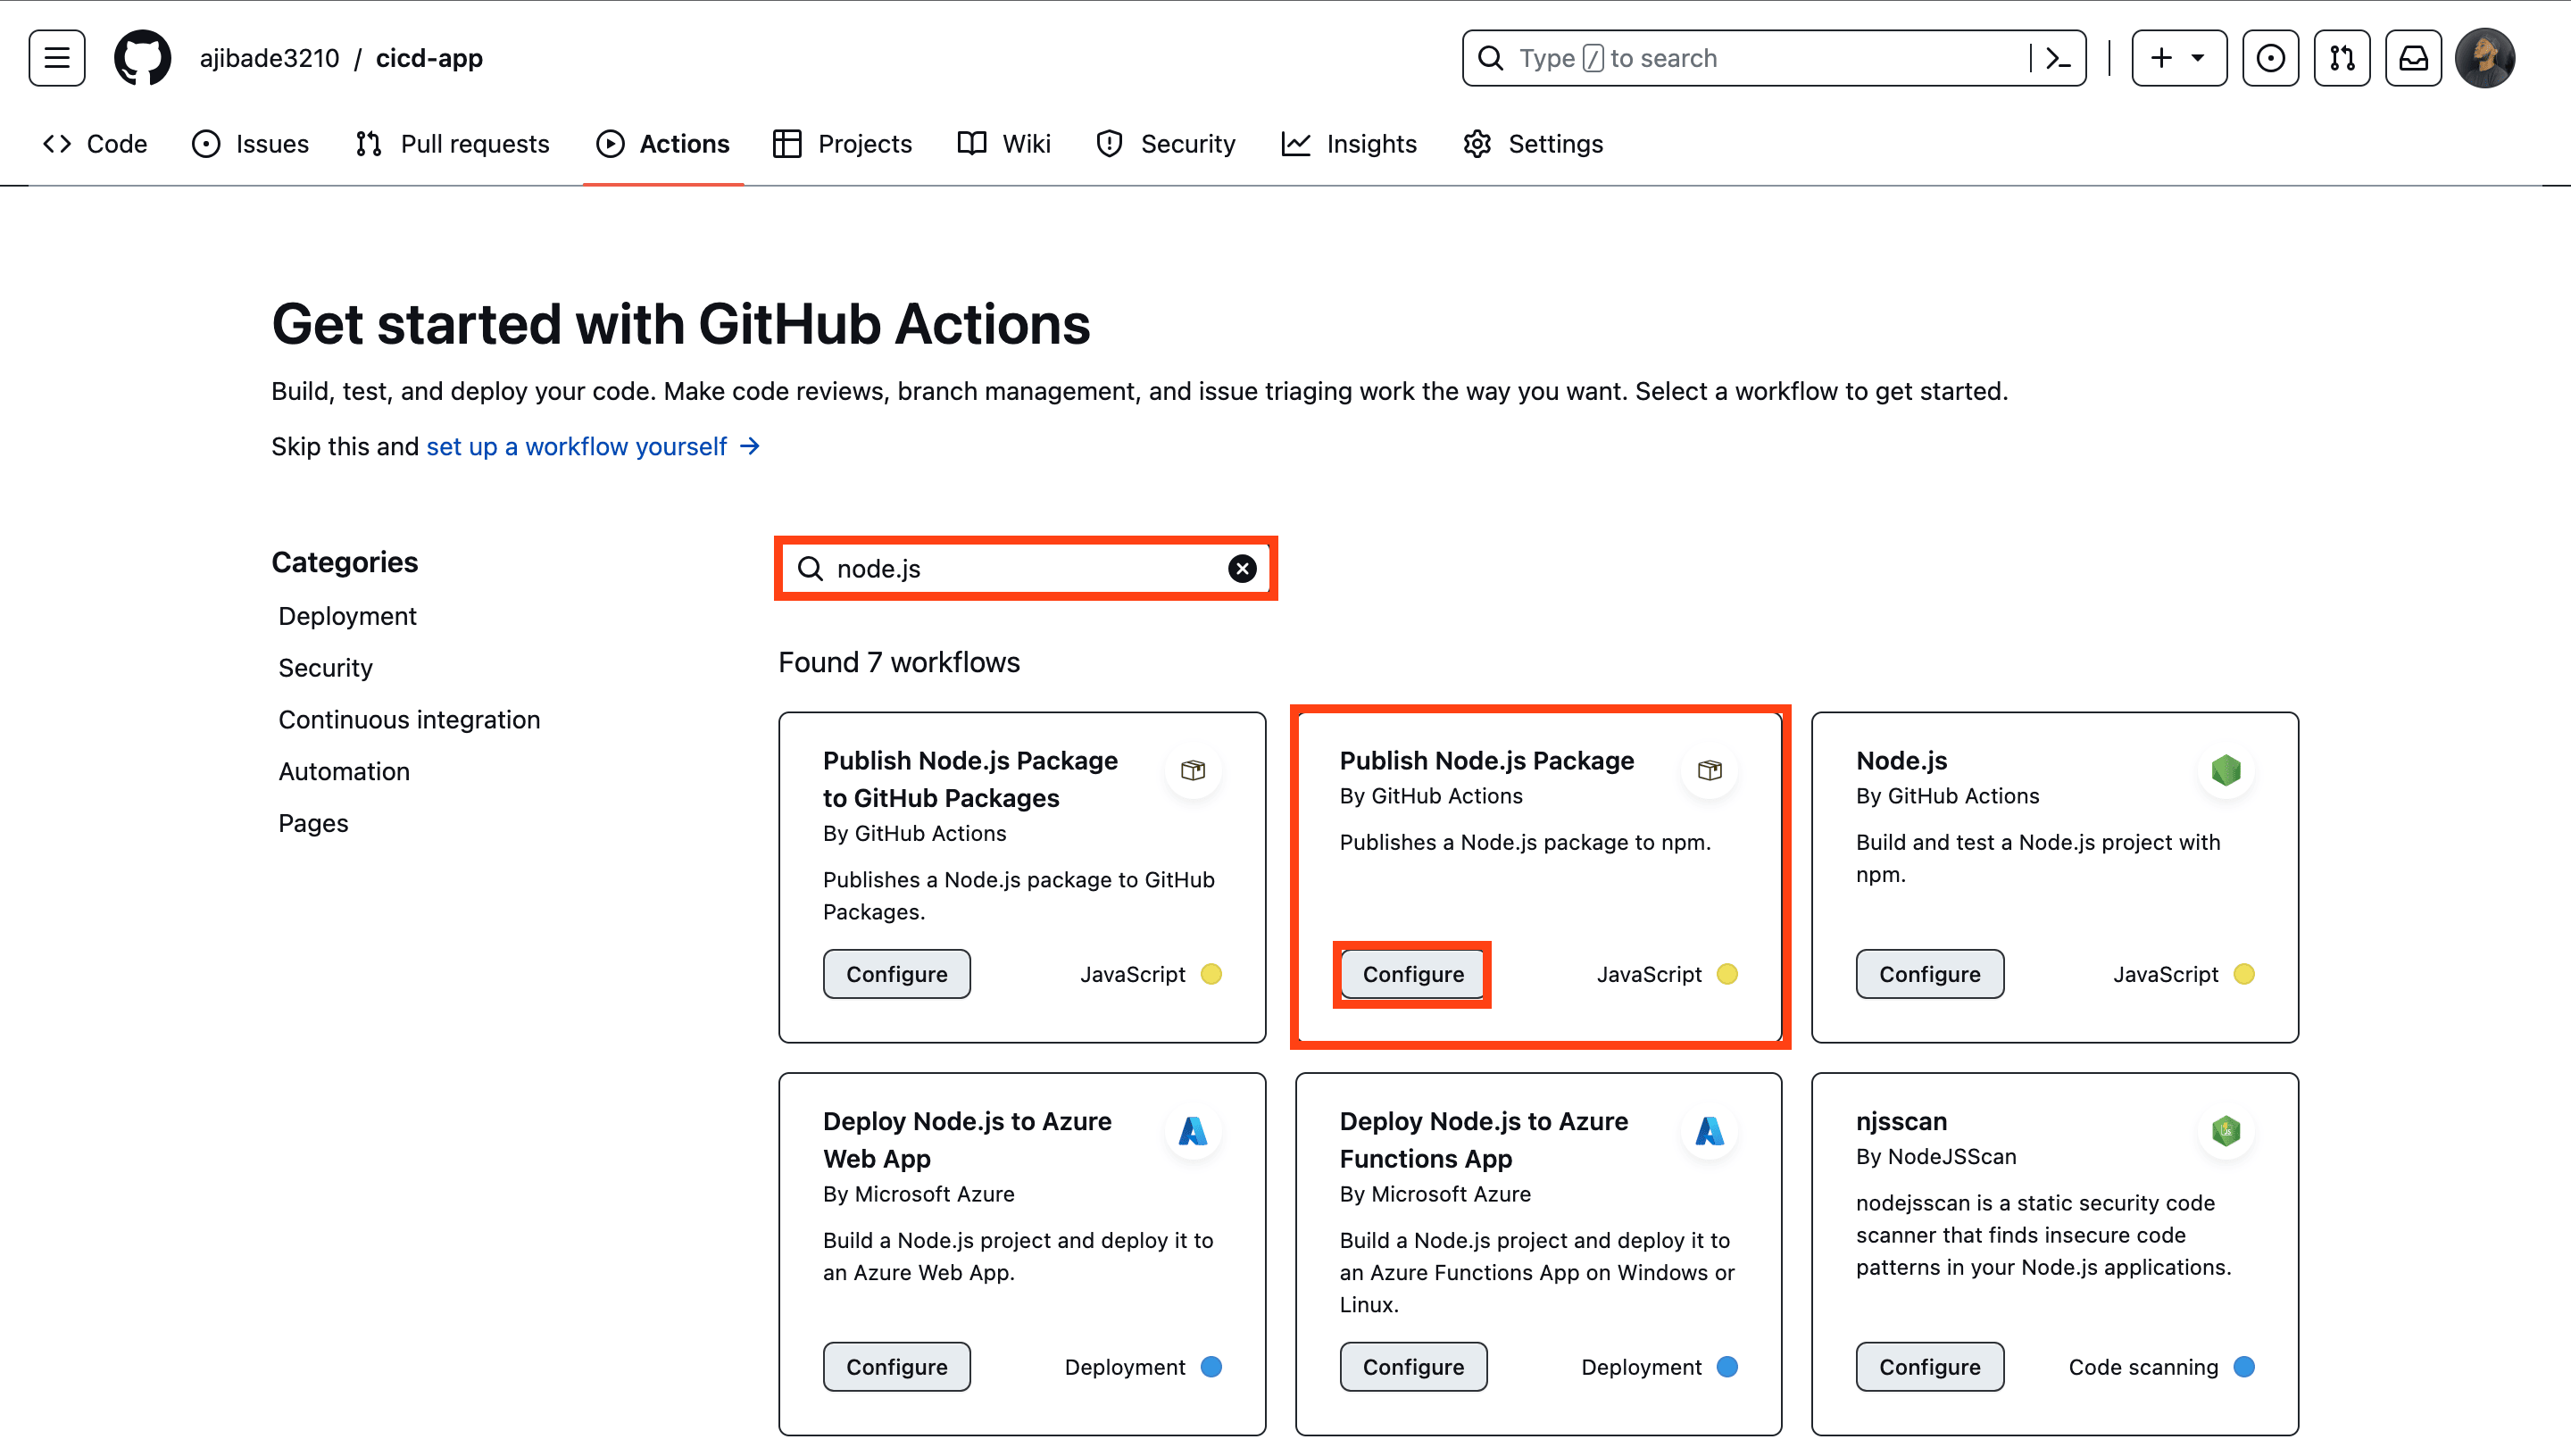
GitHub offers pre-built workflow actions for common problems. For our article, we’ll use the “Publish Node.js package” template, designed for Node.js projects. With this action, we can easily install dependencies, run tests, and deploy our Node.js application with minimal configuration.
To set up a workflow for our Node.js application, follow these steps:
- Access the GitHub repository where the Node.js application resides.
- In the repository, navigate to the Actions tab.
- Search for
node.jsaction workflow. - Click on the Configure button.
This will generate a .github/workflows directory to store all our application’s workflows. It will also create a .yml file within this directory where we can define our specific workflow configurations.
Replace the generated .yml file content with the commands below:
name: Node.js CI/CD

on:
  push:
    branches: [ "main" ]

jobs:
  build:
    runs-on: self-hosted
    strategy:
      matrix:
        node-version: [18.x]
        # See supported Node.js release schedule at https://nodejs.org/en/about/releases/
    steps:
    - uses: actions/checkout@v3
    - name: Use Node.js ${{ matrix.node-version }}
      uses: actions/setup-node@v3
      with:
        node-version: ${{ matrix.node-version }}
        cache: 'npm'
    - run: npm ci
    - run: npm test
    - run: pm2 restart backendserver
In the YAML file above:
- Our workflow is named “Node.js CI/CD”.
- It triggers when there is a
pushevent to the main branch. - The
buildjob is defined to run on a self-hosted runner. A self-hosted runner is a computing environment that allows us to run GitHub Actions workflows on our own infrastructure instead of using GitHub’s shared runners. With a self-hosted runner, we have more control over the environment in which our workflows are executed. - The
stepssection lists individual tasks to be executed in sequence. actions/checkout@v3fetches the source code of our repository into the runner environment.actions/setup-node@v3simplifies Node.js setup on the runner environment for our workflow.npm ciinstalls project dependencies. This command performs a clean installation, ensuring consistency for our CI server.npm testruns tests for our application.pm2 restart backendserverrestarts our server using the PM2 library, which acts as a production process manager. PM2 ensures our Express application runs as a background service and automatically restarts in case of failures or crashes.
The above workflow performs both Continuous Integration (CI) tasks (clean installation, caching, building, testing) and Continuous Deployment (CD) tasks (restarting the server using PM2).
Now, Click the Commit changes button. This will save the modified YAML file to our repository.
Next, return back to the Actions tab on GitHub. Here, we can monitor the workflow in real time and observe logs as each step is been executed on the server.
However, it’s important to note that the above workflow job will fail because we haven’t connected our AWS EC2 instance to the Git repository.
To use our GitHub Actions workflow with an AWS EC2 instance, we must establish a connection between the GitHub repository and the AWS EC2 instance. This connection can be achieved by setting up Git Action Runner on the AWS EC2 instance. This Runner acts as a link between the repository and the instance, enabling direct workflow execution.
To resolve the failed workflow, we’ll connect to our EC2 instance via SSH, locally download and configure the Git Action Runner, and then set up our Node.js application environment on the EC2 instance.
Connect to AWS EC2 Instance via SSH
To install and configure Git Action Runner on our AWS EC2 instance, we start by establishing a local connection to the EC2 instance using the .pem key we previously downloaded. The .pem key serves as the authentication mechanism for securely accessing the EC2 instance through SSH.
Here are the steps to connect to an EC2 instance via SSH:
- Open a terminal or command prompt on your local machine.
- Ensure you are in the correct directory where the
.pemfile is located. - Next, head to AWS Management Console and open the newly created instance. Click on the Connect button.
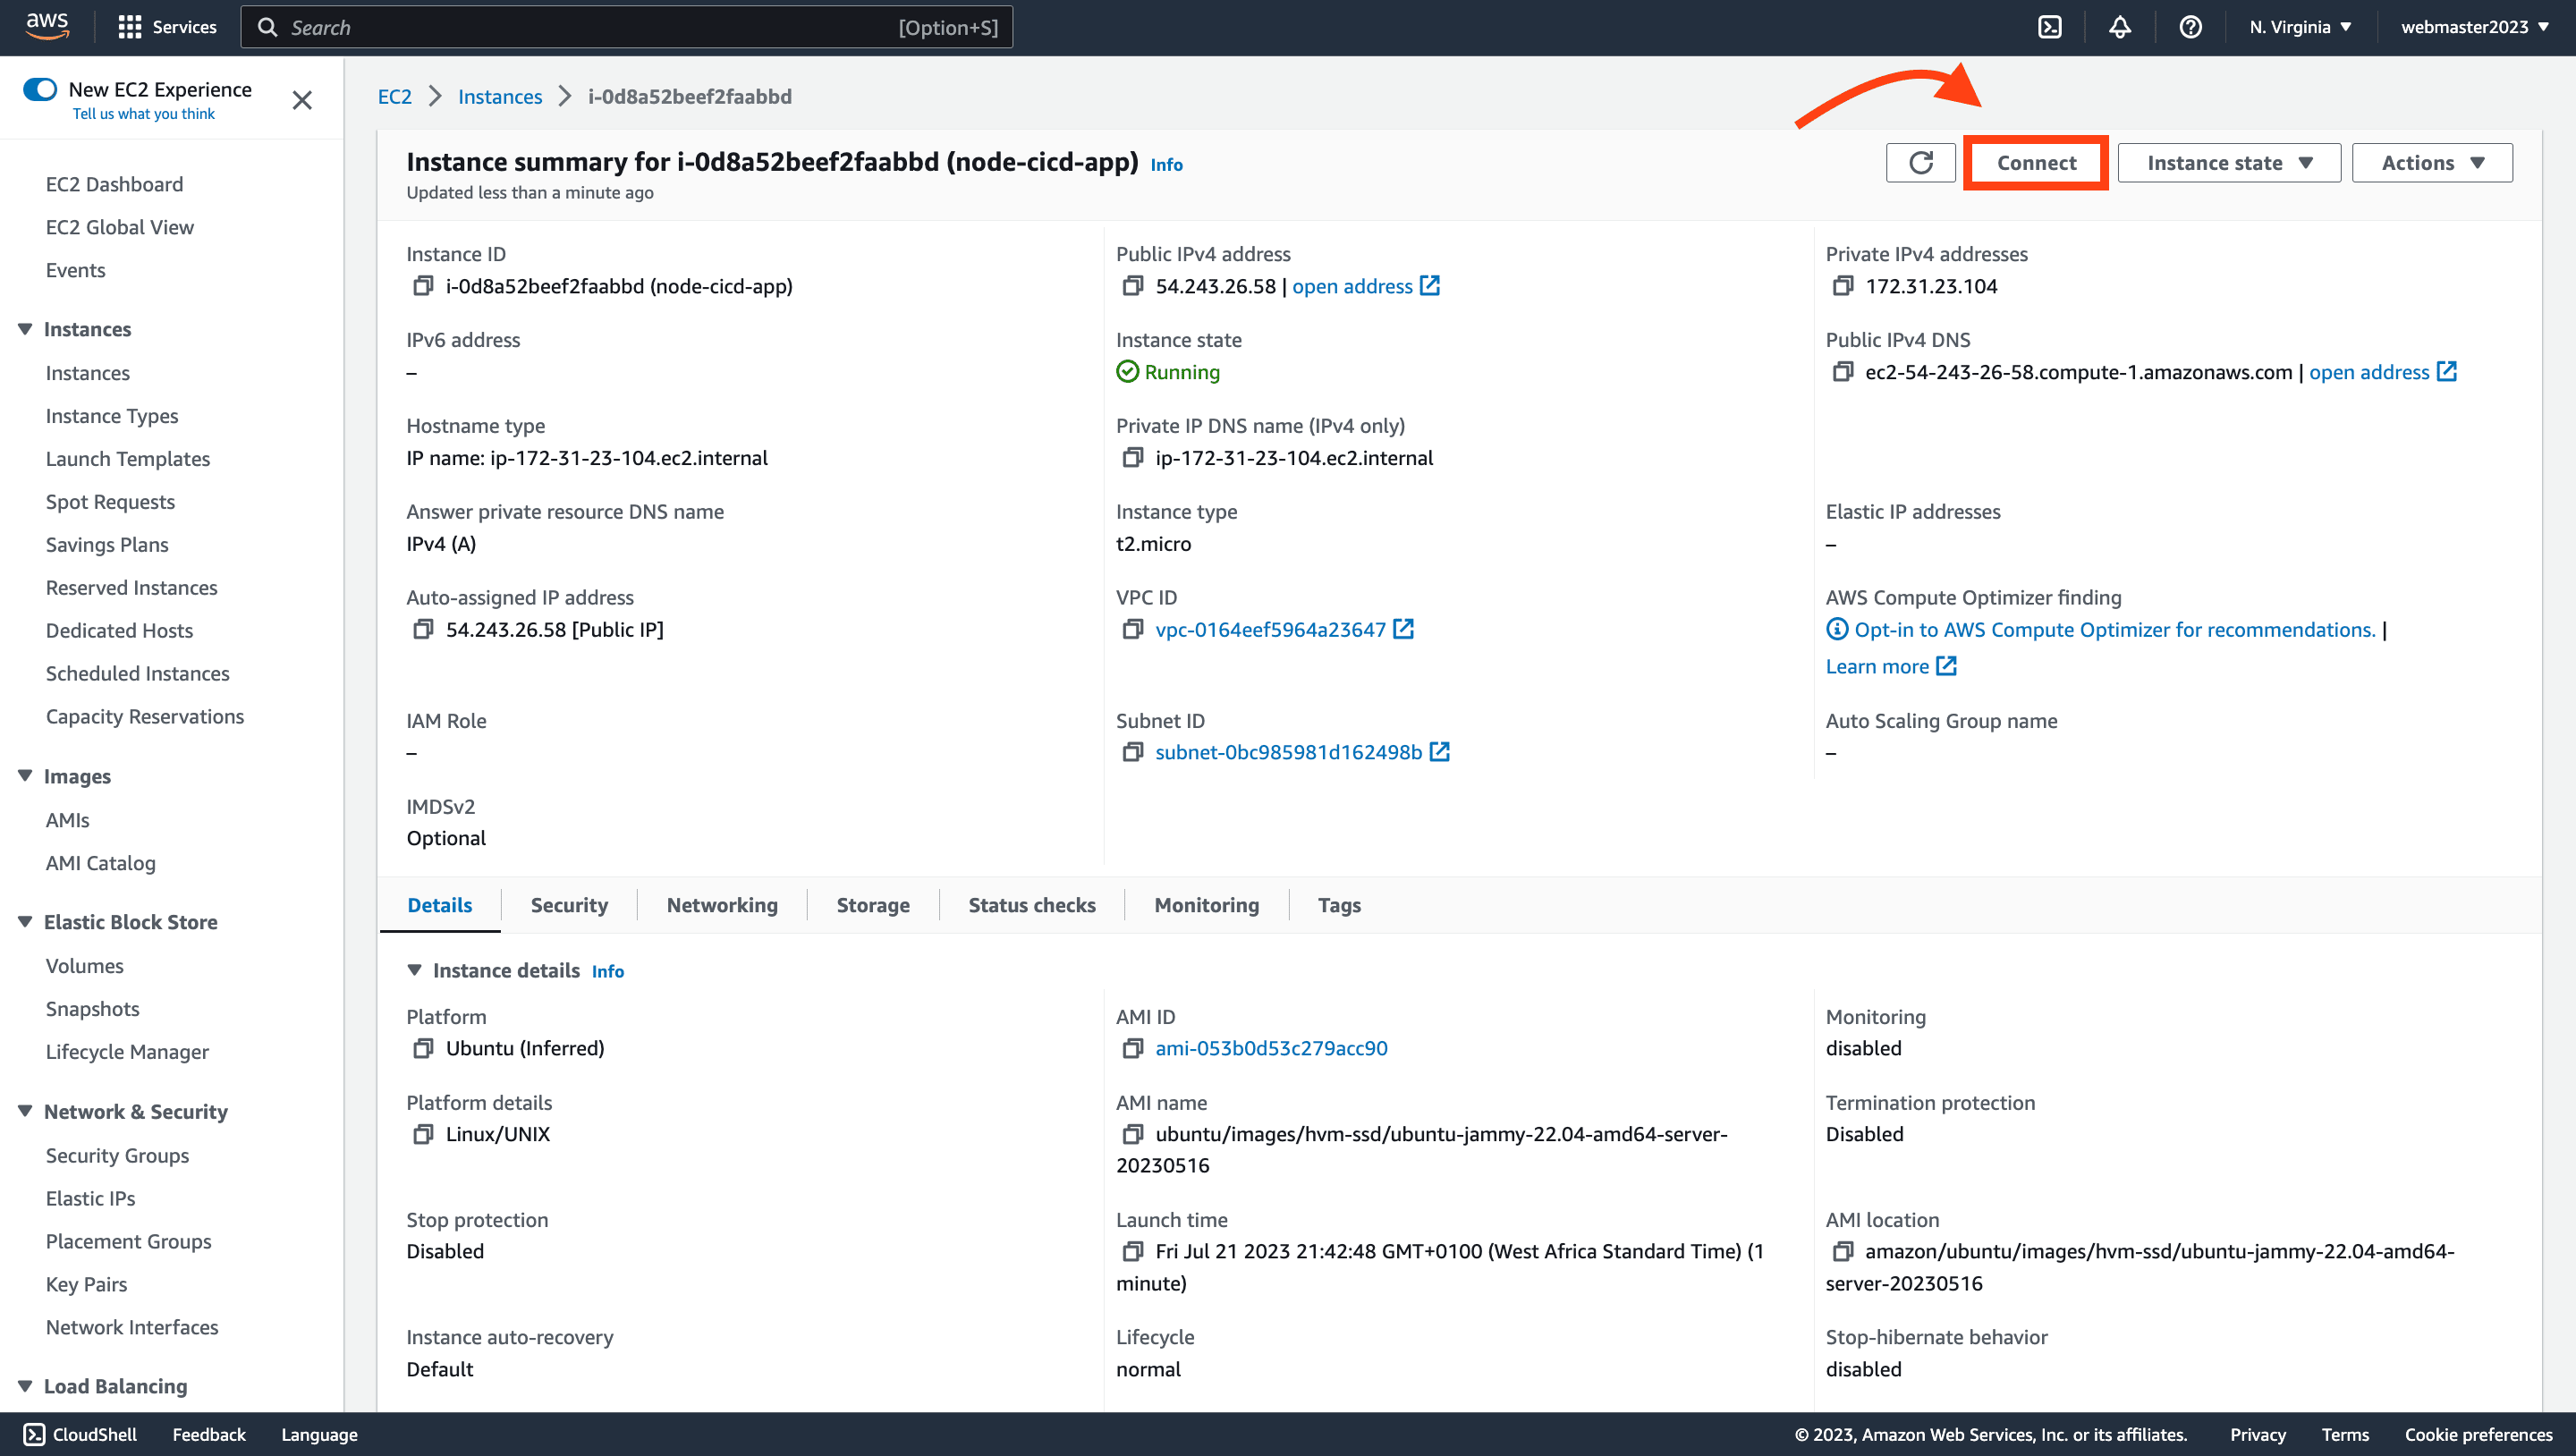
- Next copy and run the
chmodcommand in A in the terminal to confirm if the.pemfile is accessible from our terminal

- Run the command in B to connect to the EC2 instance by SSH.
Once we run this command, the terminal will prompt us to accept the authenticity of the host. Type yes and press the Enter button to proceed.
Using SSH, we are now securely connected to our EC2 instance. This secure connection enables us to remotely manage and communicate with our server.
Download and Configure Git Action Runner
Git Action Runner acts as a link between our GitHub repository and the EC2 instance. This integration allows direct interaction between the two and enables automated build, test, and deployment processes.
To download and configure a Git Action Runner on our EC2 instance:
- Go to the GitHub repository and click on Settings.
- On the left-hand sidebar, click on Actions then select Runners.
- In the Runners page click on the New self-hosted runner button.
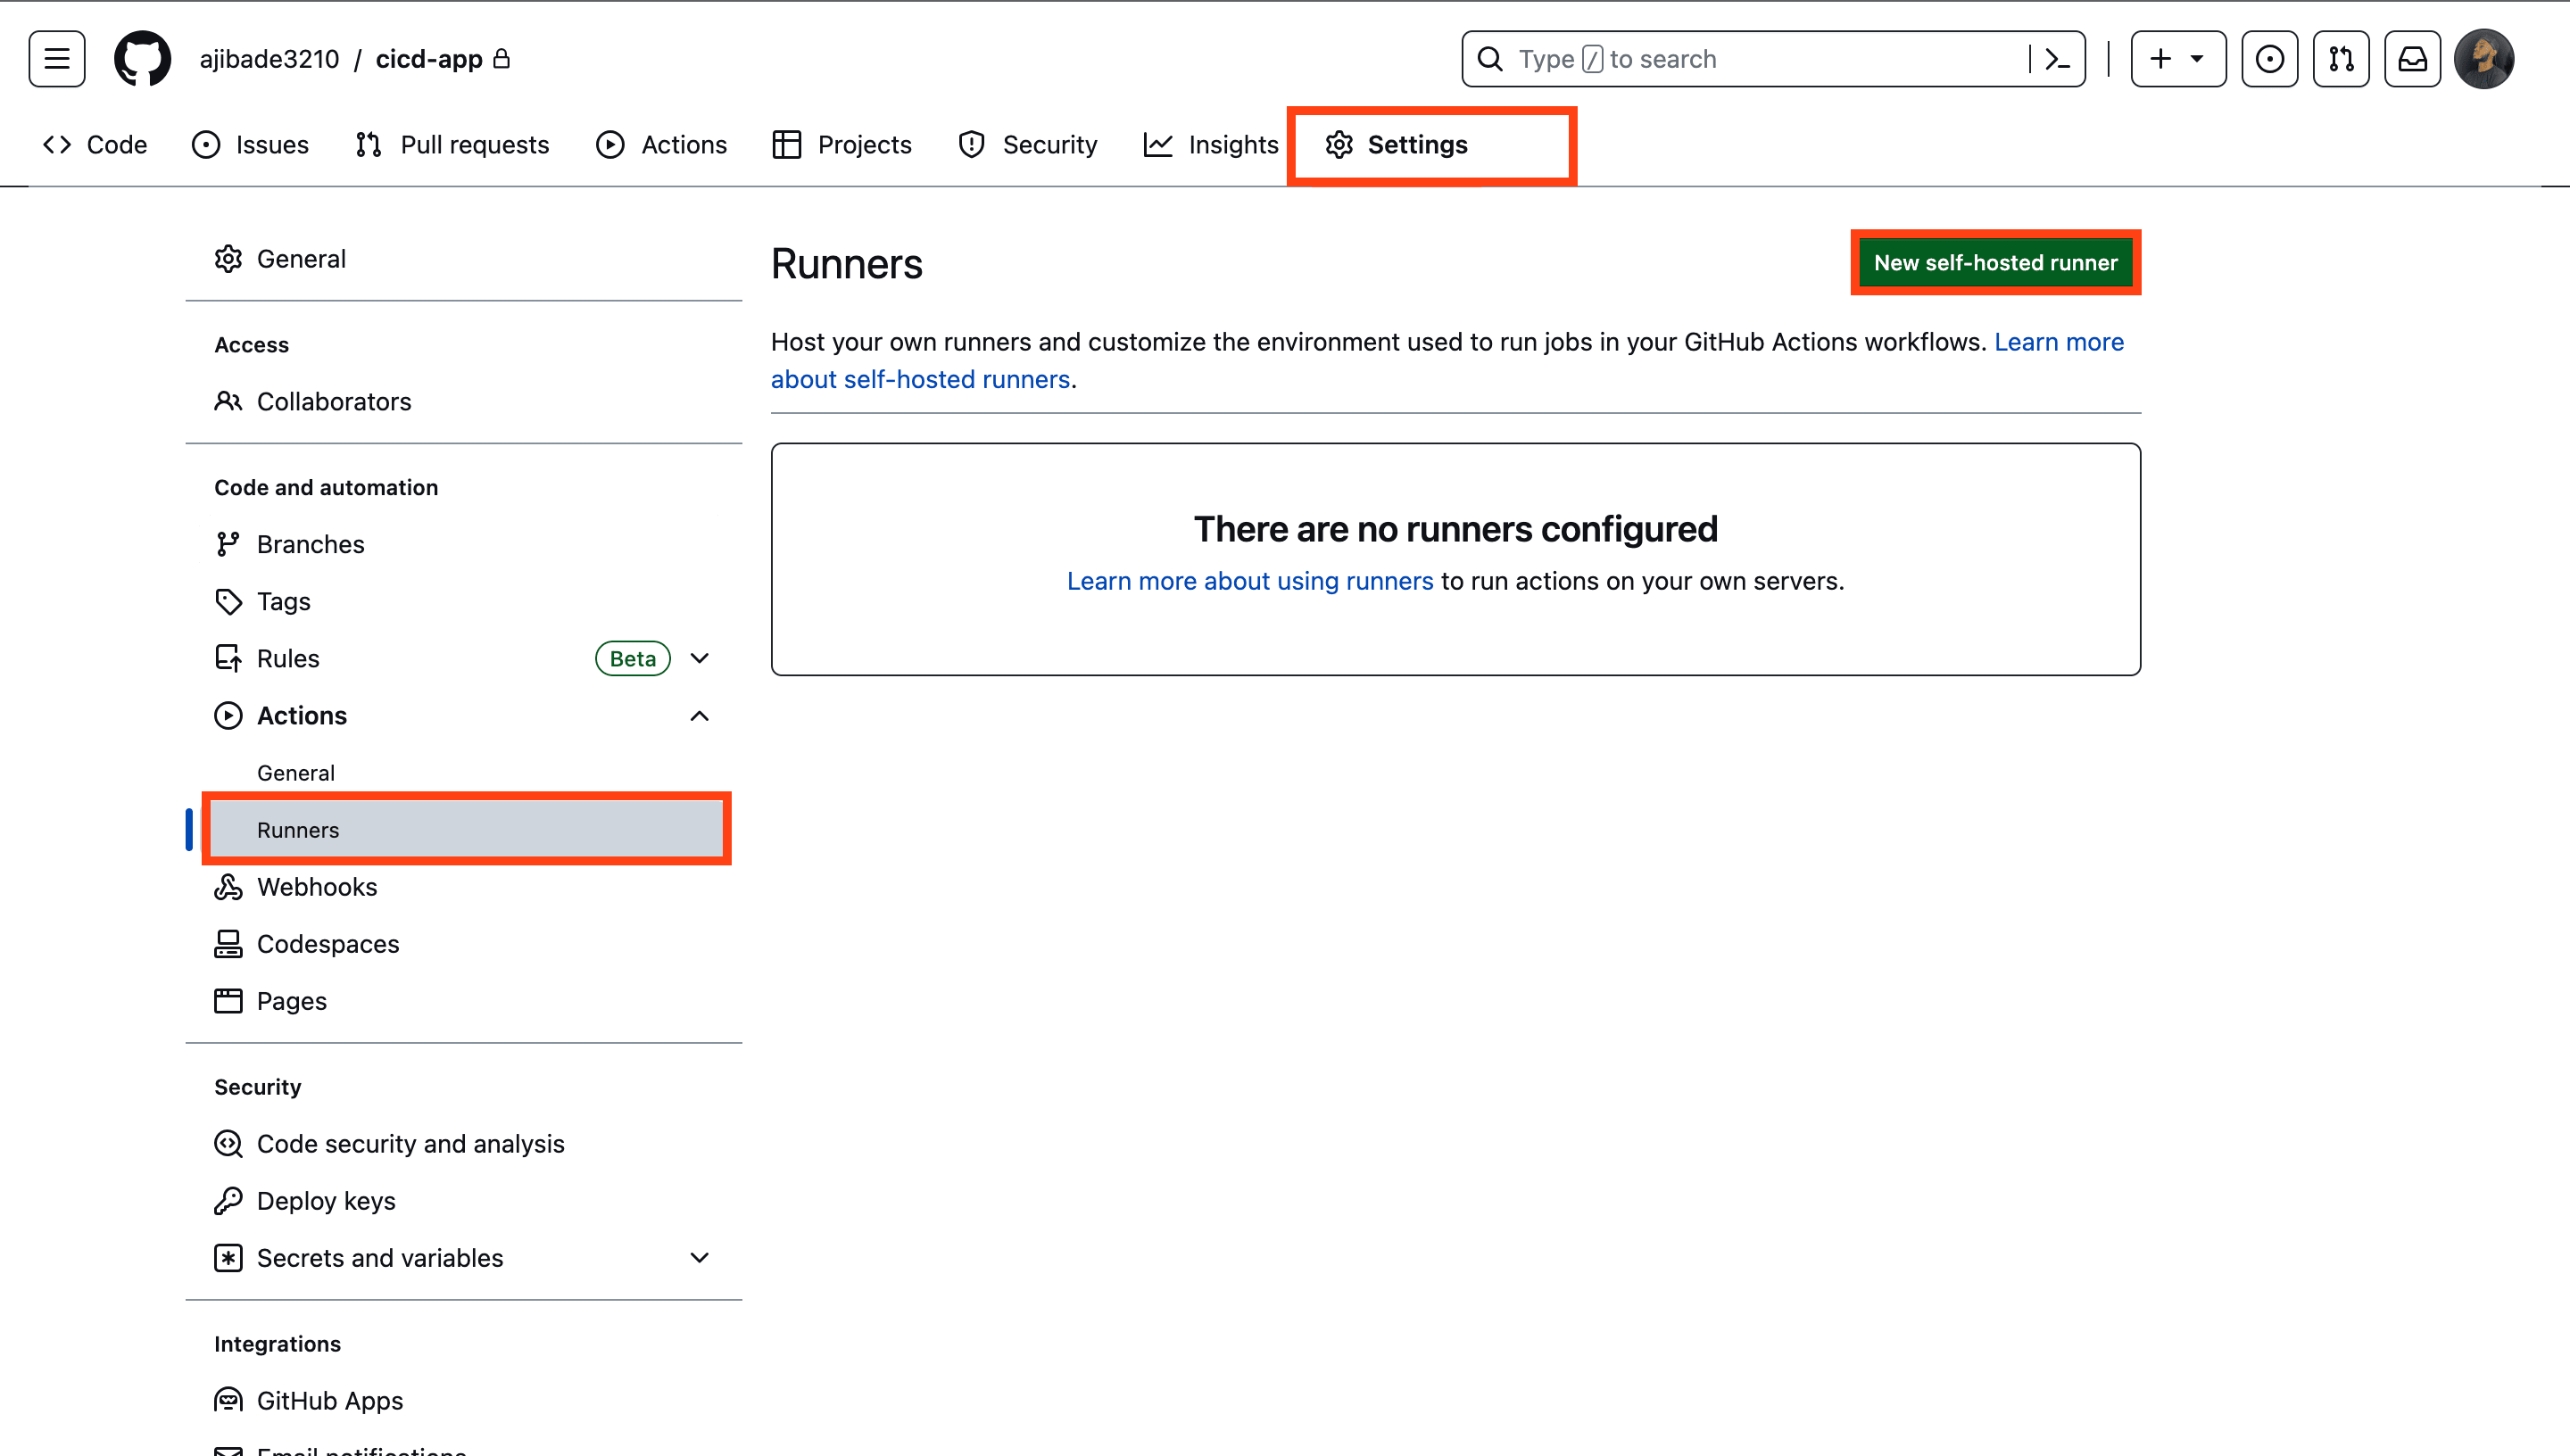
Here, we will choose the self-hosted runner image for our Ubuntu EC2 instance with the operating system set as Linux and architecture as x64.
Then step by step, run the following commands in the local SSH terminal:
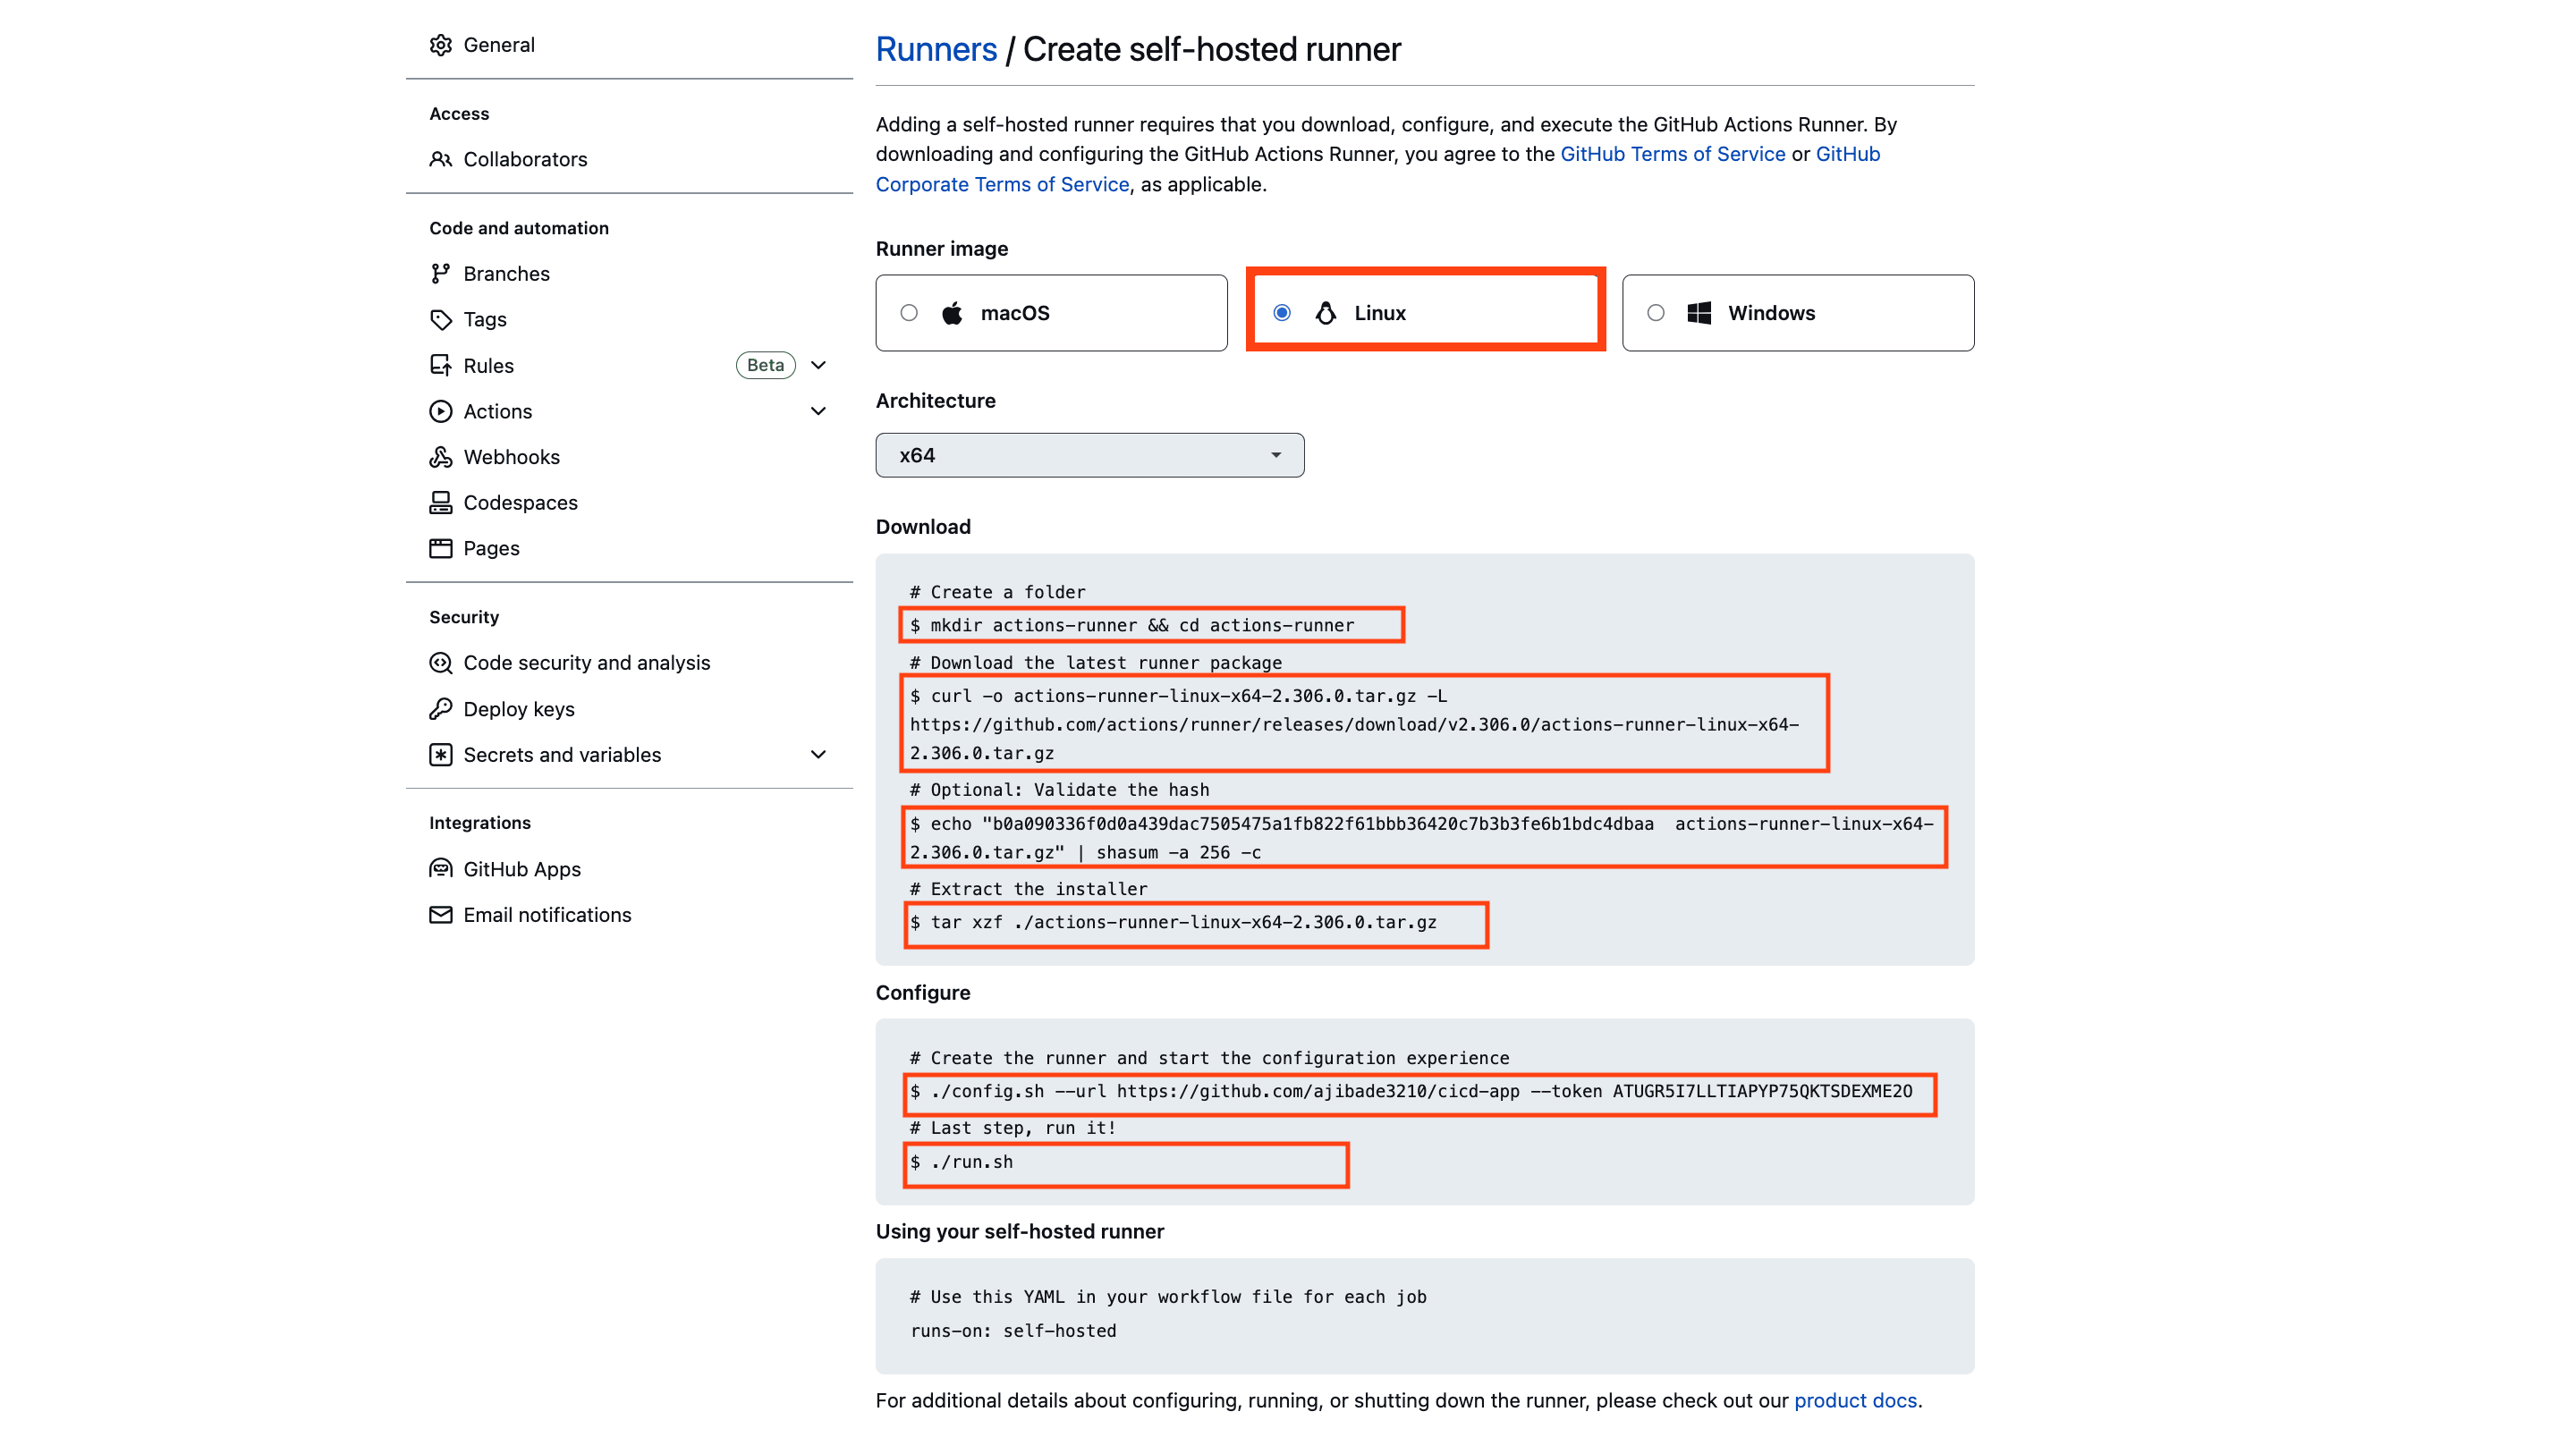
Note: While running the command, it may prompt some setup questions, we can simply press Enter to skip to the default options.
After running the ./run.sh command, If the agent returns a ✅ Connected to GitHub message, it indicates a successful installation.
Next, we’ll install a service to run our runner agent in the background:
sudo ./svc.sh install
sudo ./svc.sh start
The above code will start our runner service in the background, making it ready to execute workflows whenever triggered.
Setting up a Node.Js Application Environment on an AWS EC2 Instance
We have successfully integrated our application on GitHub with the EC2 instance server using GitHub Actions Runner.
To ensure the smooth execution and operation of our Node.js application on the EC2 machine, we need to install essential libraries and dependencies for our application such as Node.js, NPM, and PM2.
To install NPM and Node.js, run the following command in the local SSH terminal:
sudo apt update
curl -sL https://deb.nodesource.com/setup_lts.x | sudo -E bash -
sudo apt-get install -y nodejs
To install PM2, run the following command:
sudo npm install -g pm2
PM2 offers various useful commands for monitoring our application server. For more information about PM2, check out their documentation.
Our application is now fully set up and ready to go!
To start our application’s server, we need to navigate into the application’s folder in the EC2 instance.
To do this run the following command on the local SSH terminal
cd ~
cd /home/ubuntu/actions-runner/_work/cicd-app/cicd-app
Once we are inside the application’s folder, we can start the server in the background using pm2:
pm2 start src/index.js --name=backendserver
Using pm2 to start the server with a specified --name enables our Node.js server to be managed as a background service. This means our server will continue running even after we exit the SSH session. Additionally, pm2 provides continuous monitoring and ensures our application remains active and responsive at all times.
This is very handy in production environments where we want our program to be available at all times.
Our Node.js application is now successfully up and running on the EC2 instance, and our CI/CD workflow has been configured.
The application will now be running and listening on the specified port 3000.
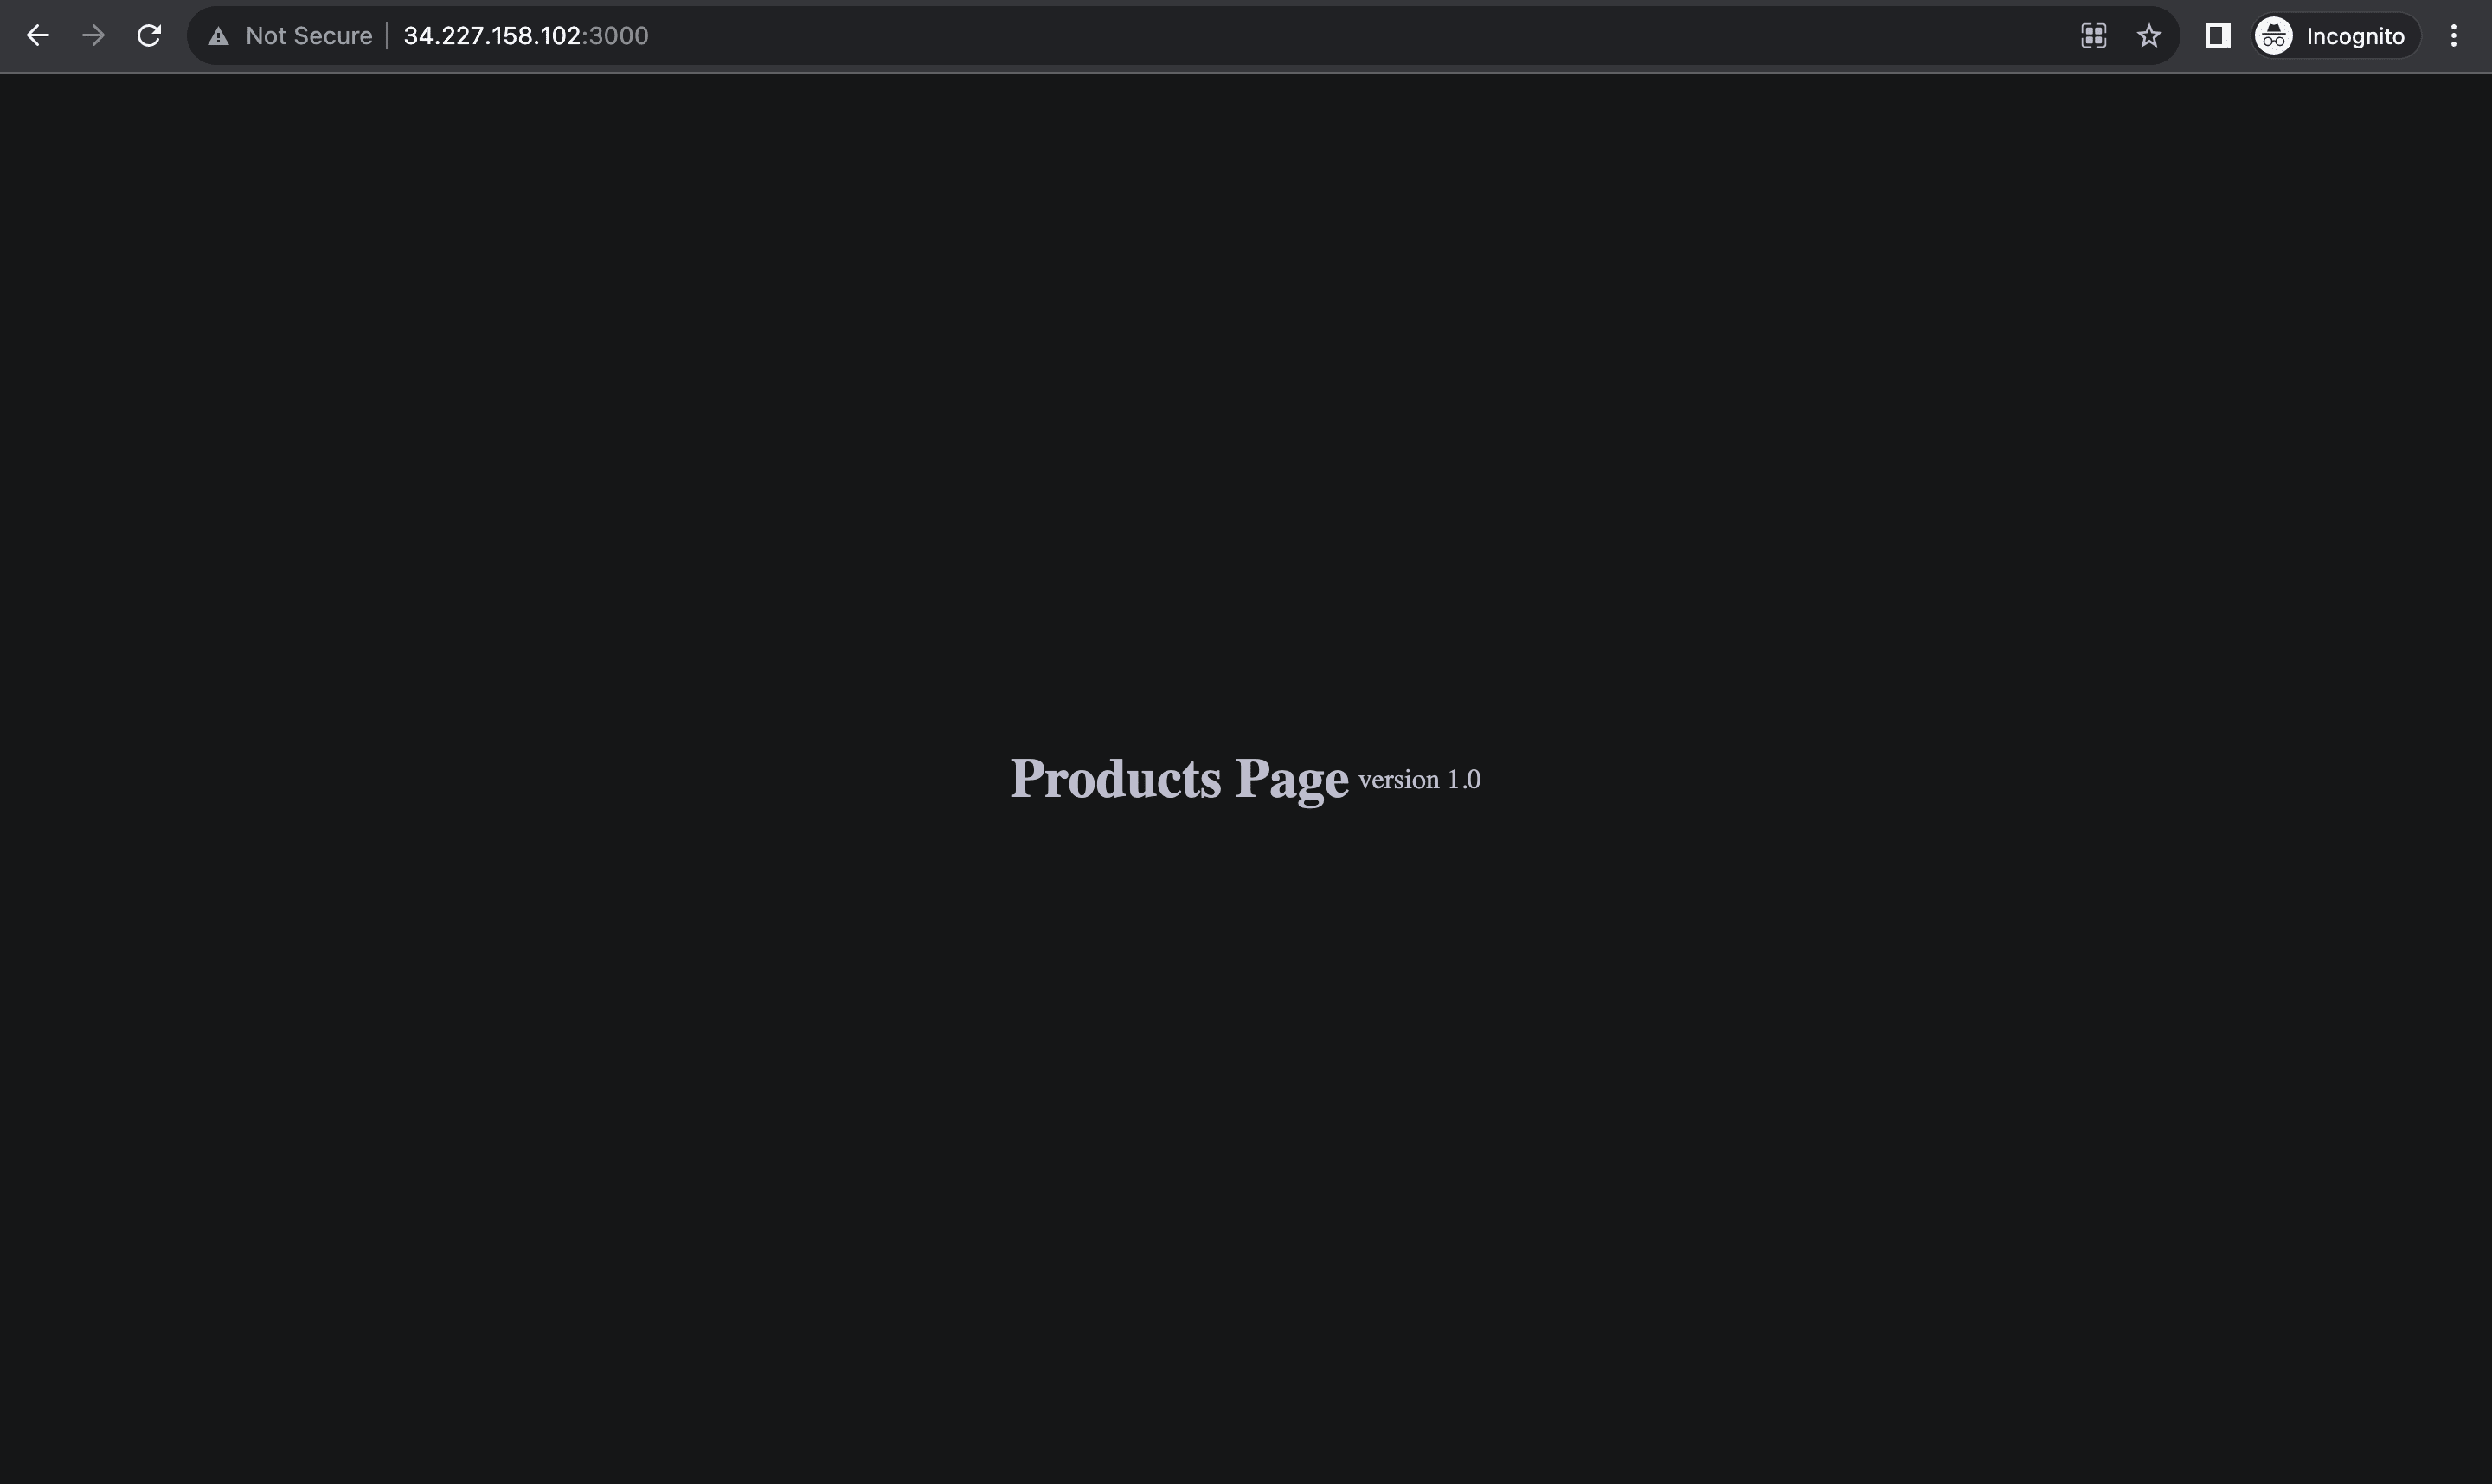
To ensure that the server is functioning correctly, we can easily check it through a web browser. Simply enter the server’s URL or IP address followed by the specified port.
For example, if our server’s IP address is 34.227.158.102, we would enter 34.227.158.102:3000 in the browser’s address bar.
If all configurations are correct, we’ll be greeted with the Products Page version 1.0 of our demo application.
Finally, we can proceed to test our CI/CD pipeline process. We will create an event that will act as a trigger to initiate a new workflow.
To do this, we will make a simple change to our HTML page. Specifically, we’ll update it from version 1 to version 2. Once this change has been made, we will push the updated code to the GitHub repository where our CI/CD workflow is defined. As soon as the push event is detected, our CI/CD pipeline will automatically kick off and execute the necessary steps to build, test, and deploy our updated application.
Conclusion
By implementing this approach, we can automate our entire operation. CI/CD process, will improve our development workflow, making it efficient, reliable, and scalable. It enables us to confidently build new features, collaborate with the team, and deploy high-quality applications with more speed and ease
You can refer to all the source code used in the article on Github.