Provisioning infrastructure resources has always been a time-consuming manual process. Infrastructure has now moved away from physical hardware in data centers to software-defined infrastructure using virtualization technology and cloud computing.
All the cloud providers provide services for the creation and modification of infrastructure resources through code like AWS Cloudformation and Azure Resource Manager. Terraform provides a common language for creating infrastructure for multiple cloud providers thereby becoming a key enabler for multi-cloud computing.
In this post, we will look at the capabilities of Terraform with examples of creating resources in the AWS cloud.
Check Out the Book!
This article gives only a first impression of what you can do with AWS.
If you want to go deeper and learn how to deploy a Spring Boot application to the AWS cloud and how to connect it to cloud services like RDS, Cognito, and SQS, make sure to check out the book Stratospheric - From Zero to Production with Spring Boot and AWS!
Example Code
This article is accompanied by a working code example on GitHub.Infrastructure as Code with Terraform
Infrastructure as Code (IaC) is the managing and provisioning of infrastructure through code instead of a manual process. From the website of Terraform:
“Terraform is an open-source infrastructure as code software tool that provides a consistent CLI workflow to manage hundreds of cloud services.”
For defining resources with Terraform, we specify the provider in a configuration file and add configurations for the resources in one or more files.
Terraform is logically split into two main parts:
- Terraform Core
- Terraform plugins
Terraform Core is a binary written in Go and provides the Terraform command-line interface(CLI).
A Terraform plugin is an executable binary also written in Go and exposes an implementation for a specific service, like AWS or Azure, or a provisioner, like bash.
All providers and provisioners used in Terraform configurations are plugins. Terraform Core communicates with plugins using remote procedure calls (RPC) and does resource state management and constructs the resource tree.
The Terraform AWS provider is a plugin for Terraform that allows for the full lifecycle management of AWS resources.
Terraform Setup
For running our examples, let us download a binary distribution for our specific operating system for local installation. We will use this to install the Terraform command-line interface (CLI) where we will execute different Terraform commands. We can check for successful installation by running the below command:
terraform -v
This gives the below output on my Mac OS showing the version of Terraform that is installed:
Terraform v0.15.0
on darwin_amd64
We can view the list of all Terraform commands by running the terraform command without any arguments:
terraform
...
...
Main commands:
  init          Prepare your working directory for other commands
  validate      Check whether the configuration is valid
  plan          Show changes required by the current configuration
  apply         Create or update infrastructure
  destroy       Destroy previously-created infrastructure

All other commands:
  console       Try Terraform expressions at an interactive command prompt
  fmt
...
...
We will use the main commands init, plan, and apply throughout this post.
Since we will be creating resources in AWS, we will also set up the AWS CLI by running the below command:
aws configure
When prompted, we will provide AWS access key id and secret access key and choose a default region and output format:
AWS Access Key ID [****************2345]: ....
AWS Secret Access Key [****************2345]: ...
Default region name [us-east-1]:
Default output format [json]:
We are using us-east-1 as the region and JSON as the output format.
For more details about the AWS CLI, have a look at our CloudFormation article.
Terraform Concepts with a Simple Workflow
For a basic workflow in Terraform, we first design the infrastructure resources in a configuration file. We call this activity defining our “desired state”. We then use this configuration to create the actual infrastructure.
The configuration is defined in Terraform language using a JSON-like syntax called Hashicorp Configuration Language (HCL) that tells Terraform how to manage a collection of infrastructure resources. A configuration can consist of one or more files and directories.
The Terraform Development Loop
We start with our “desired state” which is the collection of infrastructure resources we wish to create. When we run the plan command, Terraform pulls the actual resource information from the provider and compares it with the “desired state”. It then outputs a report containing the changes which will happen when the configuration is applied (during the apply stage).
The main steps for any basic task with Terraform are:
- Configure the “desired state” in Terraform files (
*.tf). - Initialize the workspace using the command
terraform init. - Create the plan using
terraform plan. - Apply the plan using
terraform apply. - Destroy the provisioned resources with
terraform destroy, when we want to dispose of the infrastructure.
Let us go through each of these steps.
Configuring the Desired State
Let us define our Terraform configuration in the Terraform language in a file main.tf:
terraform {
  required_providers {
    aws = {
      source  = "hashicorp/aws"
      version = "~> 3.27"
    }
  }
}

provider "aws" {
  profile = "default"
  region  = "us-west-2"
}

resource "aws_instance" "vm-web" {
  ami           = "ami-830c94e3"
  instance_type = "t2.micro"

  tags = {
    Name = "server for web"
    Env = "dev"
  }
}
Here we are creating an AWS EC2 instance named “vm-web” of type t2.micro using an AMI (Amazon Machine Image) ami-830c94e3. We also associate two tags with the names Name and Env with the EC2 instance.
We can also see the three main parts of configuration :
-
Resource: We define our infrastructure in terms of resources. Each resource block in the configuration file describes one or more infrastructure objects. S3 bucket, Lambda function, or their equivalents from other Cloud platforms are some examples of different resource types.
-
Provider: Terraform uses
providersto connect to remote systems. Each resource type is implemented by a provider. Most providers configure a specific infrastructure platform (either cloud or self-hosted). Providers can also offer local utilities for tasks like generating random numbers for generating unique resource names. -
Terraform Settings: We configure some behaviors of Terraform like the minimum Terraform version in the terraform block. Here we also specify all of the providers, each with a source address and a version constraint required by the current module using the
required_providersblock.
Initializing the Working Directory
We run Terraform commands from a working directory that contains one or more configuration files. Terraform reads configuration content from this directory, and also uses this directory to store settings, caches for plugins and modules, and sometimes state data.
This working directory must be initialized before Terraform can perform any operations like provisioning infrastructure or modifying state.
Let us now create a working directory and save under it the configuration file that we created in the previous step. We will now initialize our working directory by running the terraform init command.
After running this command, we get this output:
Initializing the backend...

Initializing provider plugins...
- Checking for available provider plugins...
- Downloading plugin for provider "aws" (hashicorp/aws) 3.36.0...

Terraform has been successfully initialized!
...
From the output, we can see initialization messages for the backend and provider plugins.
The backend is used to store state information. Here we are using the default local backend, which requires no configuration.
In real-life situations, a remote backend should be used where state information can be persisted. This is required in projects where multiple individuals work with the same infrastructure.
The first run of this command will download the plugins required for the configured provider.
Our working directory contents after running the terraform init command look like this:
├── .terraform
│   └── plugins
│       └── darwin_amd64
│           ├── lock.json
│           └── terraform-provider-aws_v3.36.0_x5
└── main.tf
The plugin for the configured provider AWS is downloaded and stored as terraform-provider-aws_v3.36.0_x5.
Creating the Plan
We can generate an execution plan by running the terraform plan command. Terraform first performs a refresh and then determines the actions required to achieve the desired state specified in the configuration files.
This command is a convenient way to check whether the execution plan for a set of changes matches our expectations without making any changes to real resources.
Let us run the terraform plan command to generate an execution plan:
terraform plan -out aws-app-stack-plan
We specify the optional -out argument to save the generated plan to a file aws-app-stack-plan for later execution with terraform apply, which can be useful when running terraform in automation environments.
Running the terraform plan command gives the following output:
Refreshing Terraform state in-memory prior to plan...
The refreshed state will be used to calculate this plan, but will not be
persisted to local or remote state storage.


------------------------------------------------------------------------

An execution plan has been generated and is shown below.
Resource actions are indicated with the following symbols:
  + create

Terraform will perform the following actions:

  # aws_instance.vm-web will be created
  + resource "aws_instance" "vm-web" {
      + ami                          = "ami-830c94e3"
      + arn                          = (known after apply)

...
...

Plan: 1 to add, 0 to change, 0 to destroy.

------------------------------------------------------------------------

This plan was saved to file `aws-app-stack-plan`

To perform exactly these actions, run the following command to apply:
    terraform apply "aws-app-stack-plan"
From the output, we can see that one resource will be added (the EC2 instance), zero changed and zero destroyed. No actual changes to the infrastructure have taken place yet. The plan is saved in the file specified in the output.
Applying the Plan
We use the terraform apply command to apply our changes and create or modify the changes. By default, apply scans the current directory for the configuration and applies the changes appropriately. However, we can give the path to a file that was previously created by running terraform plan.
Let us now run the terraform apply command to create or update the resources using the plan file we created in the previous step:
terraform apply "aws-app-stack-plan"
After running this command, we can see the resources getting created in the output log:
aws_instance.vm-web: Creating...
aws_instance.vm-web: Still creating... [10s elapsed]
aws_instance.vm-web: Still creating... [20s elapsed]
aws_instance.vm-web: Still creating... [30s elapsed]
aws_instance.vm-web: Creation complete after 35s [id=i-0f07186f0c1481df4]

Apply complete! Resources: 1 added, 0 changed, 0 destroyed.

The state of your infrastructure has been saved to the path
below. This state is required to modify and destroy your
infrastructure, so keep it safe. To inspect the complete state
use the `terraform show` command.

State path: terraform.tfstate
Here we come across the important concept of terraform state. After applying our changes to the infrastructure, the state of the infrastructure is stored locally in a file terraform.tfstate.
If we do not give a plan file on the command line, running terraform apply creates a new plan automatically and then prompts for approval to apply it. If the created plan does not include any changes to resources or root module output values then running terraform apply exits immediately, without prompting.
Destroy
At last, we destroy our infrastructure by running the terraform destroy command.
Running the destroy command first asks for a confirmation and proceeds to delete the infrastructure on receiving a yes answer:
Plan: 0 to add, 0 to change, 1 to destroy.

Do you really want to destroy all resources?
  Terraform will destroy all your managed infrastructure, as shown above.
  There is no undo. Only 'yes' will be accepted to confirm.

  Enter a value: yes

aws_instance.vm-web: Destroying... [id=i-0f07186f0c1481df4]
...
aws_instance.vm-web: Destruction complete after 48s

Destroy complete! Resources: 1 destroyed.
The output log states the number of resources destroyed: one EC2 instance in this case.
Parameterizing the Configuration with Input Variables
In our last example, instead of putting the values of ami, tag, and instance type directly in the configuration file, we can use variables to allow these aspects of our configuration to be modified without changing the source code. We can receive their values when applying the configuration.
Let us modify the configuration file (main.tf) created earlier with variables for instance type:
resource "aws_instance" "vm-web" {
  ami           = "ami-830c94e3"
  instance_type = var.ec2_instance_type

  tags = {
    Name = "server for web"
    Env = "dev"
  }
As we can see here, we have introduced a variable by the name ec2_instance_type in our resource configuration. We have declared our variable in a file variables.tf in a variable block as shown here:
variable "ec2_instance_type" {
  description = "AWS EC2 instance type."
  type        = string
}
This is a variable of type string with an appropriate description. We can similarly declare variables of types number and bool and complex types like list, map, set and tuple. Some additional arguments we can specify for a variable are default, validation, and sensitive.
When we run the plan, it prompts for the value of the variable:
terraform plan
var.ec2_instance_type
  AWS EC2 instance type.
  Enter a value: t2.micro
We supply a value t2.micro to allow Terraform to create our desired ec2 instance.
Apart from this method of setting variable values, we can define the values in a variable definition file ending in .tfvars and specify the file on the command line.
Organizing and Reusing Configurations with Modules
In our previous example, we represented our architecture by directly creating an EC2 instance. In real-life situations, our application stack will have many more resources with dependencies between them.
We might also like to reuse certain constructs for the consistency and compactness of our configuration code. Functions fulfill this need in programming languages. Terraform has a similar concept called modules. Similar to functions, a module has an input, output, and a body.
Modules are the main way to package and reuse resource configurations with Terraform. It is most often a grouping of one or more resources that are used to represent a logical component in the architecture. For example, we might create our infrastructure with two logical constructs (modules) a module for the application composed of EC2 instances and ELB and another module for storage composed of S3 and RDS.
Every Terraform configuration has at least one module called the root module that has the resources defined in the .tf files in the main working directory. A module can call other modules.
Let us create two modules for our application stack, one for creating an EC2 instance and another for creating an S3 bucket. Our directory structure now looks like this:
├── main.tf
└── modules
    ├── application
    │   ├── main.tf
    │   ├── outputs.tf
    │   └── variables.tf
    └── storage
        ├── main.tf
        ├── outputs.tf
        └── variables.tf

```text
Here we have defined two child modules named `application` and `storage` under the `modules` folder which will be invoked from the root module.
Each of these modules has a configuration file `main.tf` (it can also be any other name) and input variables in `variables.tf` and output variables in `outputs.tf`.

```hcl
resource "aws_instance" "vm-web" {
  ami           = var.ami
  instance_type = var.ec2_instance_type
  tags = var.tags
}
Here we define the resource with variables declared in variables.tf:
variable "ec2_instance_type" {
  description = "Instance type"
  type        = string
}

variable "ami" {
  description = "ami id"
  type = string
}

variable "tags" {
  description = "Tags to set on the bucket."
  type        = map(string)
  default     = {Name = "server for web"
                 Env = "dev"}
}
We are declaring three variables: ec2_instance_type and ami are of type string and the variable tags is of type map with a default value.
Our main configuration now invokes these modules instead of the directly declaring the resources:
terraform {
  required_providers {
    aws = {
      source  = "hashicorp/aws"
      version = "~> 3.27"
    }
  }
}

provider "aws" {
  profile = "default"
  region  = "us-west-2"
}

module "app_server" {
  source = "./modules/application"

  ec2_instance_type    = "t2.micro"
  ami = "ami-830c94e3"
  tags = {
    Name = "server for web"
    Env = "dev"
  }
}

module "app_storage" {
  source = "./modules/storage"

  bucket_name     = "io.pratik.tf-example-bucket"
  env = "dev"
}
During invocation of the child modules, we are using the module construct with a source argument containing the path of the child modules application and storage. Here we are using the local directory to store our modules.
Other than the local path, we can also use different source types like a terraform registry, GitHub, s3, etc to reuse modules published by other individuals or teams. When using remote sources, terraform will download these modules when we run terraform init and store them in the local directory.
Terraform Cloud and Terraform Enterprise
We ran Terraform using Terraform CLI which performed operations on the workstation where it is invoked and stored state in a local working directory. This is called the “local workflow”.
However, we will need a remote workflow when using Terraform in a team which will require the state to be shared and Terraform to run in a remote environment.
Terraform has two more variants Terraform Cloud and Terraform Enterprise for using Terraform in a team environment:
-
Terraform Cloud is a hosted service at https://app.terraform.io where Terraform runs on disposable virtual machines in its cloud infrastructure.
-
Terraform Enterprise is available for hosting in a private data center which might be an option preferred by large enterprises.
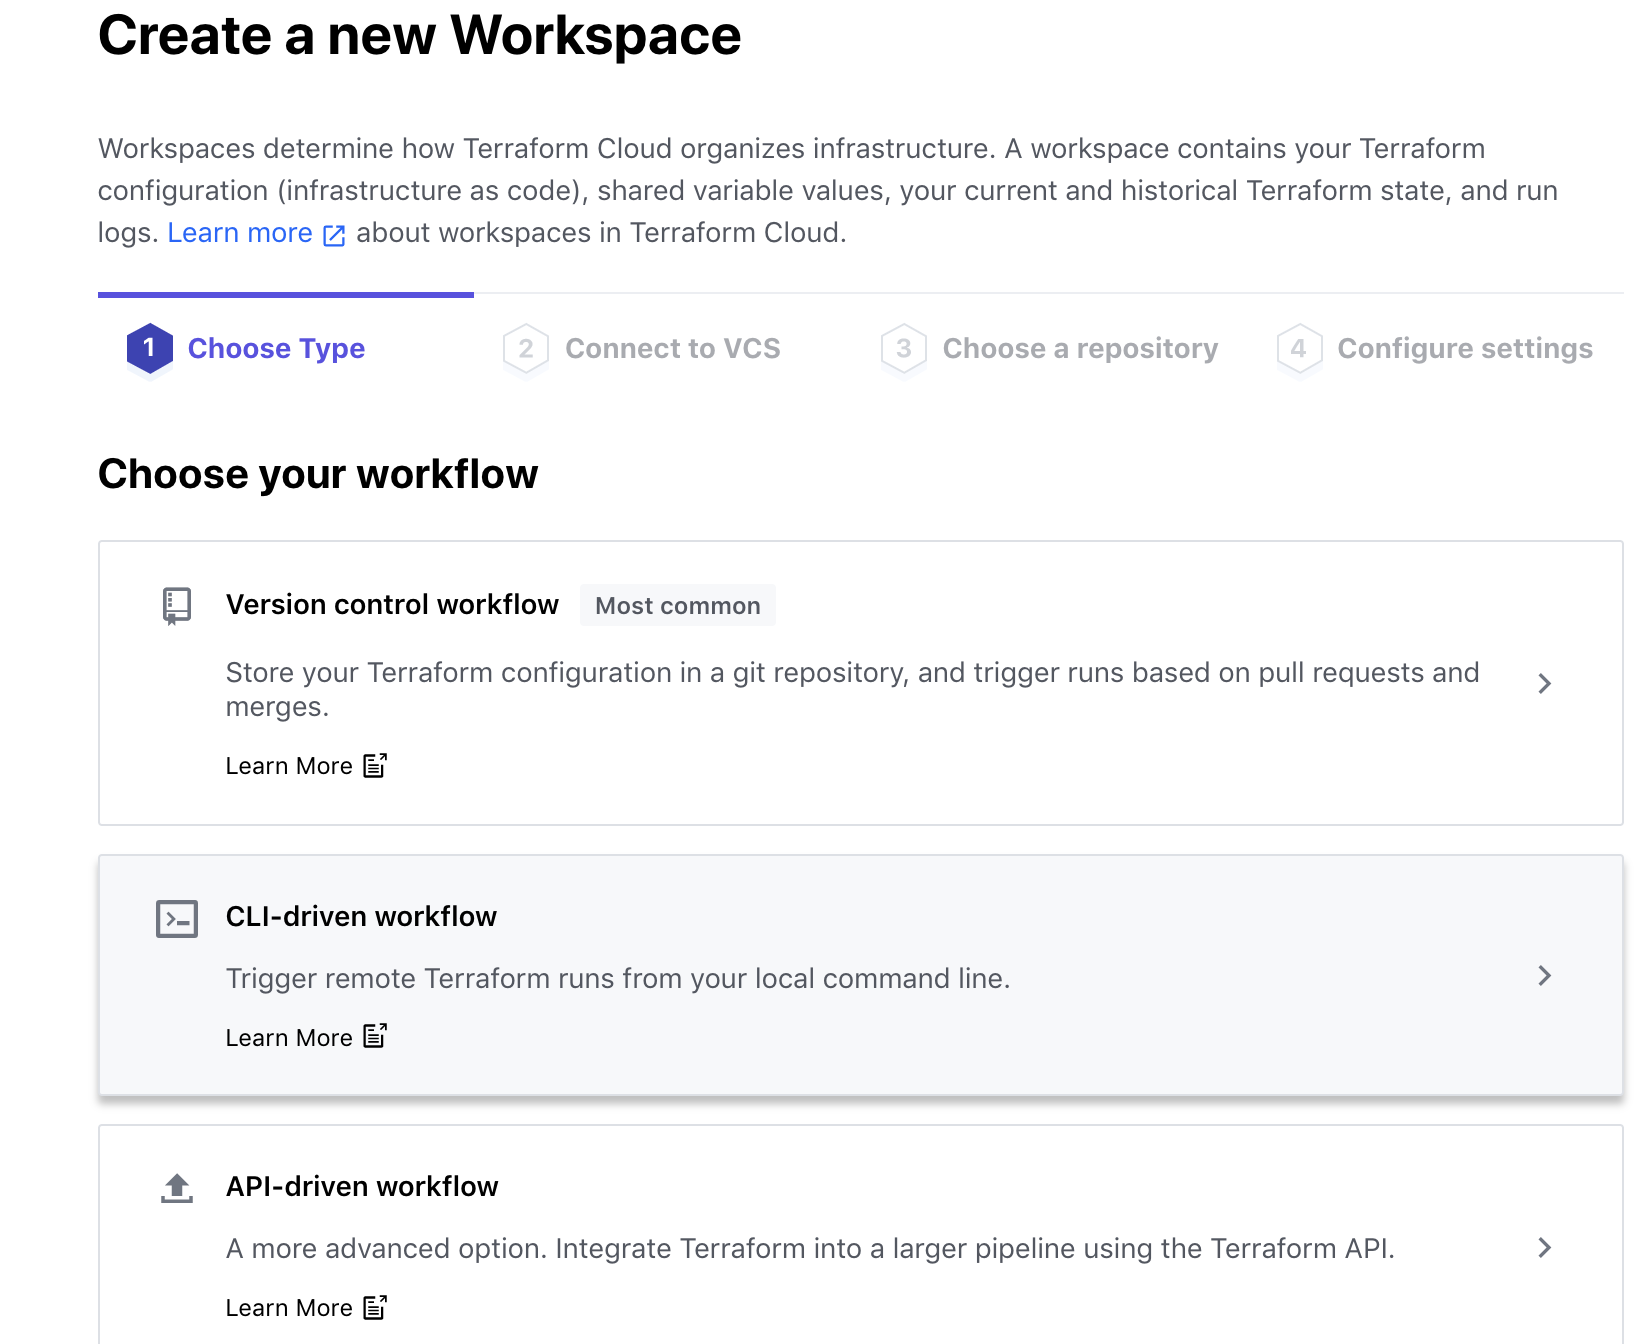
Let us run remote plans in Terraform Cloud from our local command line, also called the “CLI workflow”. First, we need to log in to https://app.terraform.io after creating an account with our email address. Similar to our working directory in the CLI, we will create a workspace with a “CLI driven workflow” as shown here:
We will modify our configuration to add a backend block to configure our remote backend as shown here:
terraform {

  backend "remote" {
    hostname = "app.terraform.io"
    organization = "pratikorg"
    token = "pj7p5*************************************************czt62p1bs"
    workspaces {
      name = "my-tf-workspace"
    }
  }
  required_providers {
    aws = {
      source  = "hashicorp/aws"
      version = "~> 3.36"
    }
  }
}
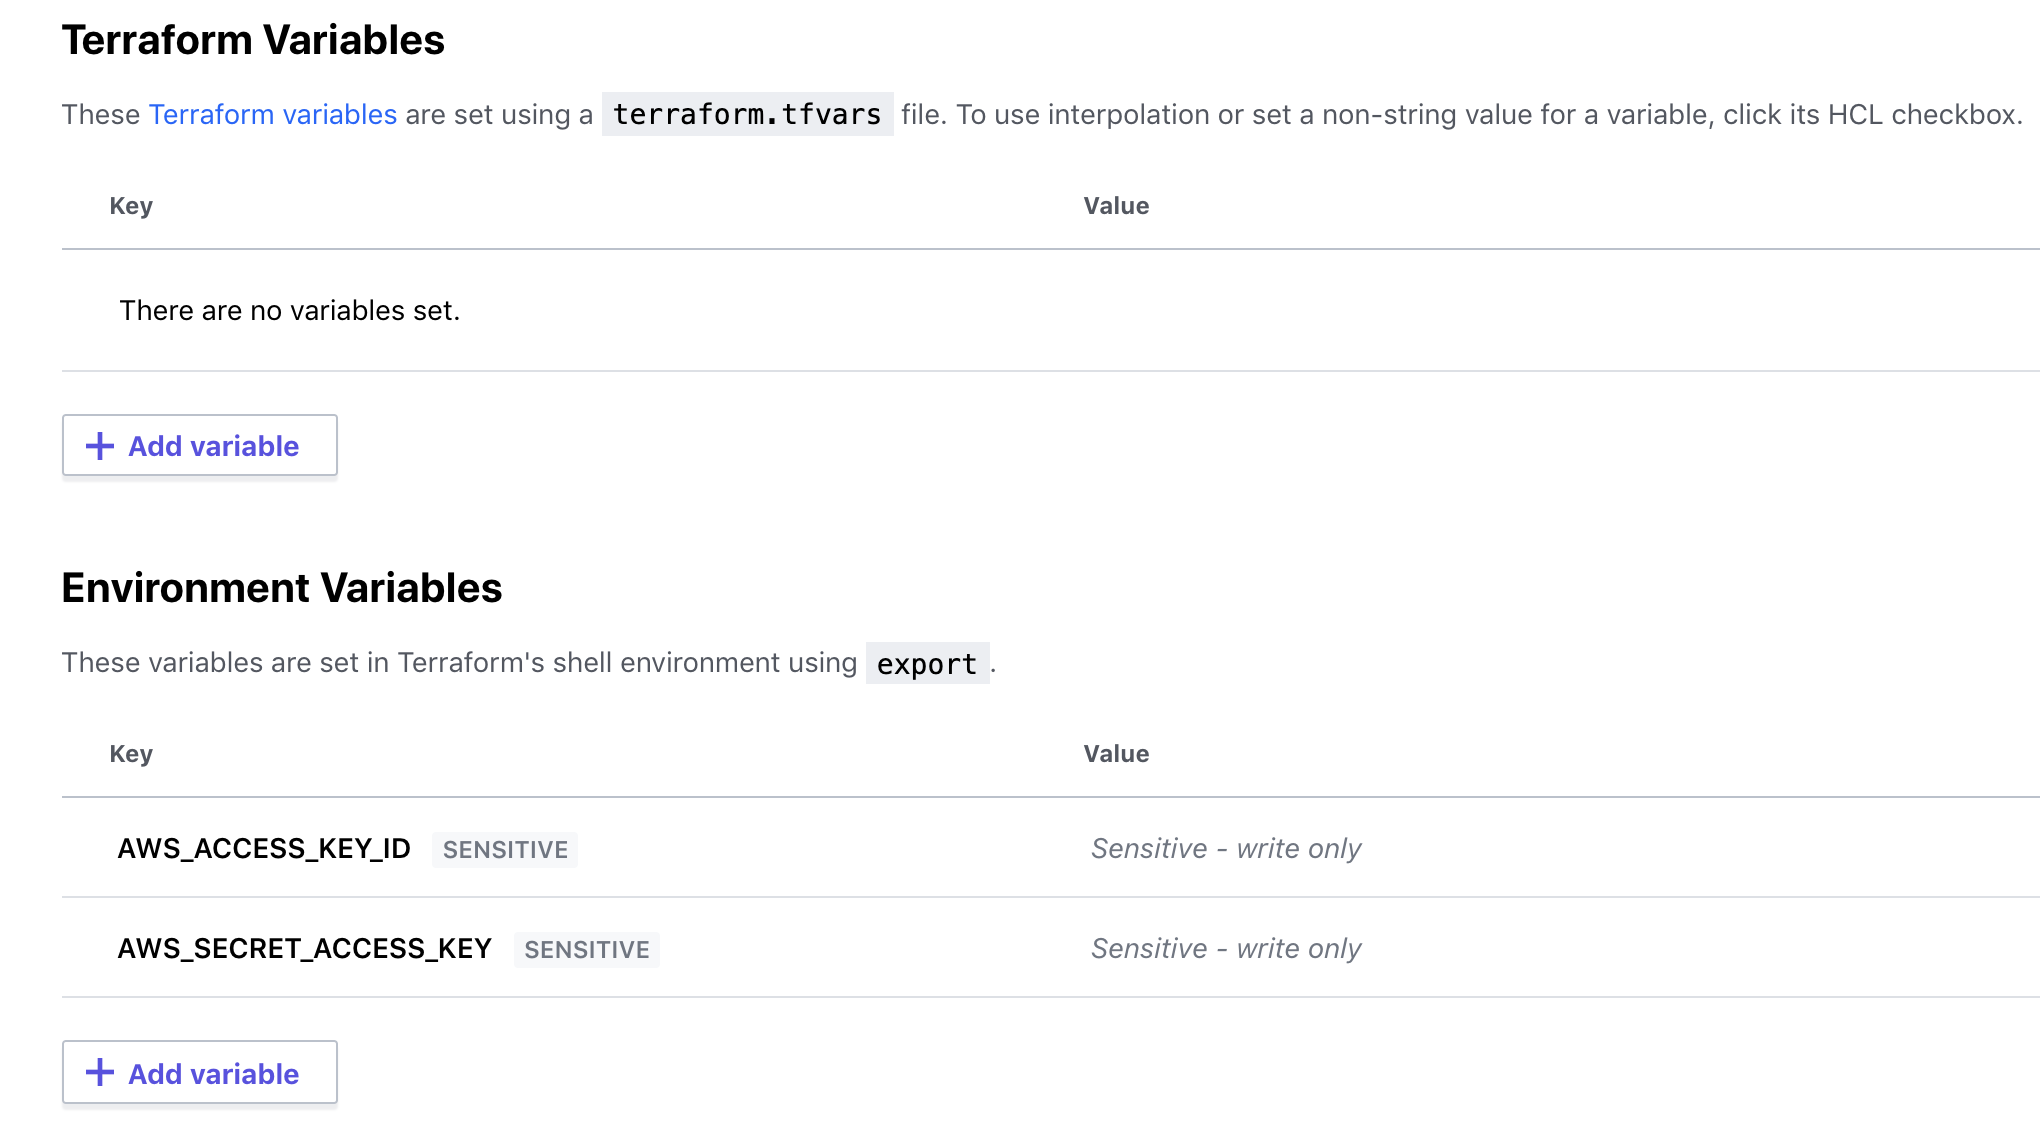
We configure AWS credentials by adding two environment variables for access token and secret key:
Running the terraform plan command will start a remote run in the configured Terraform Cloud workspace. Running terraform plan will output the following log:
Running plan in the remote backend. Output will stream here. Pressing Ctrl-C
will stop streaming the logs, but will not stop the plan running remotely.

Preparing the remote plan...

To view this run in a browser, visit:
https://app.terraform.io/app/pratikorg/my-tf-workspace/runs/run-Q2PMW9pCRtqXiKqh

Waiting for the plan to start...

Terraform v0.15.0
on linux_amd64
Configuring remote state backend...
Initializing Terraform configuration...
Terraform Configuration with Version Control Systems for Continuous Integration
Apart from the CLI workflow, Terraform Cloud/Enterprise has two more types of workflow targeted for continuous integration.
Here the Terraform workspace is connected to a repository on one of the supported version control systems which provides Terraform configurations for that workspace. Terraform Cloud monitors new commits and pull requests to the repository using webhooks. After any commit to a branch, a Terraform Cloud workspace based on that branch will run Terraform.
We can find elaborate documentation for configuring Terraform for specific VCS providers by following their respective links.
Conclusion
In this post, we introduced the following concepts of Terraform with examples of creating resources in AWS Cloud:
- A resource is the basic building block of creating infrastructure with Terraform.
- Plugins as executable Go binaries which expose implementation for a specific service, like AWS or Azure.
- Terraform resources are defined in a configuration file ending with
.tfand written in Terraform language using HCL syntax. - Modules are used for organizing and grouping resources to create logical abstractions.
- Basic workflow is composed of
init-plan-applycycle. - Terraform backend is configured as local or remote where state information is stored.
- Terraform Cloud and Terraform Enterprise use remote backends and are suitable for use in team environments.
These concepts should help you to get started with Terraform and inspire you to explore more advanced features like automation, extending its features, and integration capabilities.
You can refer to all the source code used in the article on Github.
Check Out the Book!
This article gives only a first impression of what you can do with AWS.
If you want to go deeper and learn how to deploy a Spring Boot application to the AWS cloud and how to connect it to cloud services like RDS, Cognito, and SQS, make sure to check out the book Stratospheric - From Zero to Production with Spring Boot and AWS!