One of the most convincing justifications for using the Spring Framework is its extensive transaction support. For transaction management, the Spring Framework offers a stable abstraction. But before we deep-dive into the concepts of transaction management, let’s quickly understand the basic concept of a transaction.
In terms of Database Management Systems (DBMS), a transaction is a logical processing unit that reads and updates database content. This transaction might consist of a single command, a group of commands, or any other database actions. Any DBMS supporting transactions must guarantee ACID qualities to retain the integrity of the data. ACID stands for Atomicity, Consistency, Isolation, and Durability.
- Atomicity - Since the transaction is handled as a single unit of activity, it should either be completed in its whole or not at all. No partial execution is allowed. This is referred to as an “all or nothing” feature.
- Consistency - A database needs to maintain consistency once the transaction is finished. This depicts the accuracy of the database.
- Isolation - Transactions execute in isolation from other transactions. Other concurrent transactions won’t be able to see incomplete transactions.
- Durability - Even if the system crashes or restarts, a successful transaction should be permanently recorded in the database.
Before we understand what Spring offers out-of-the-box to manage transactions, we must understand how a plain JDBC transaction works. A plain standard JDBC transaction management code looks something like the below:
Connection connection = dataSource.getConnection();

try (connection) {
    connection.setAutoCommit(false);
    // execute some SQL queries...
    connection.commit();
} catch (SQLException e) {
    connection.rollback();
}
Let’s understand what this does! Firstly, the getConnection() method would connect to the database to start with the transactions. Ideally in an enterprise, there will be a data source already configured and we can re-use the existing connection.
setAutoCommit() starts a typical transaction. It’s the only way to start a database transaction in Java. setAutoCommit(true) makes sure that every single SQL statement automatically gets wrapped in its transaction and setAutoCommit(false) is the exact opposite. One thing to note is that the autoCommit flag is valid for the whole time when the connection is open. Thus, we just need to call this method once and not repeatedly.
Finally, the commit() method will commit the transaction. In case of any SQL exception, rollback() will roll back any changes or queries being executed. That’s all that a Spring transaction does under the hood, too!
Different Types of Transaction Management
Spring supports two types of transaction management:
- Programmatic Transaction Management - This implies that you must use programming to manage the transaction as we did in the example above. Although it provides you with great flexibility, it is challenging to keep up.
- Declarative Transaction Management - This implies that we keep business code and transaction management separate. To manage the transactions, only XML-based settings or annotations are used.
Let’s take a look into each of these transaction management types in Spring.
Programmatic Transaction Management
Firstly, we will try to understand programmatic transaction management. The Spring Framework provides two means of programmatic transaction management:
- Using
TransactionTemplate. - Implementing
TransactionManagerdirectly.
The TransactionTemplate and other Spring templates, such as the JdbcTemplate, follow a similar methodology. It makes use of the callback method and produces code that is intention driven, meaning that it focuses only on what you want to do.
@Service
public class EntityService {

    @Autowired
    private TransactionTemplate template;

    public Long registerEntity(Entity entity) {
        Long id = template.execute(status ->  {
            // execute some SQL statements like
            // inserting an entity into the db
            // and return the autogenerated id
            return id;
        });
    }
}
If we compare this with the simple JDBC transaction that we discussed earlier, we don’t have to deal with the opening and closing database connections ourselves. Spring would also convert the SQL exceptions into runtime exceptions. As far as the integration with Spring goes, TransactionTemplate will use a TransactionManager internally which will again use a data source. Since all of these are beans in our Spring context configuration, we don’t have to worry about it.
If we use TransactionManager, Spring provides PlatformTransactionManager for imperative and ReactiveTransactionManager for reactive transactions. We can simply initiate, commit, or roll back transactions using these transaction managers.
Declarative Transaction Management
Contrary to the programmatic approach, Spring’s declarative transaction management enables configuration-based transaction management. Declarative transactions allow transactions and business code to be separated. Therefore, we can use XML settings or an annotation-based approach to manage transactions.
Transactions could be configured directly via XML when XML configuration for Spring applications was the standard. The @Transactional annotation, which is considerably easier, has mostly replaced this method today, except for a few older business applications.
Although we won’t go into great length about XML setup in this manual, we may use this example as a jumping-off point to learn more about it. We will take the AOP approach here:
<tx:advice id="txAdvice" transaction-manager="txManager">
    <!-- the transactional semantics... -->
    <tx:attributes>
        <!-- all methods starting with 'get' are read-only -->
        <tx:method name="get*" read-only="true"/>
        <!-- other methods use the default transaction settings -->
        <tx:method name="*"/>
    </tx:attributes>
</tx:advice>
Firstly, we need to make use of the tag <tx: advice /> for creating a transaction-handling advice. Next, we need to define a pointcut that matches all methods we wish to wrap into a transaction and pass it to the bean:
<aop:config>
    <aop:pointcut id="entityServiceOperation" expression="execution(* x.y.service.EntityService.*(..))"/>
    <aop:advisor advice-ref="txAdvice" pointcut-ref="entityServiceOperation"/>
</aop:config>

<bean id="entityService" class="x.y.service.EntityService"/>
Finally, we can define a method in the service layer to add our business logic.
public class EntityService {

    public Long registerEntity(Entity entity) {
       // execute some SQL statements like
       // inserting an entity into the db
       // and return the autogenerated id
       return id;
    }
}
This looks like configuring a lot of complicated, verbose XML, with the pointcut and advisor configurations. Since the annotation-based configuration is the core discussion of this article, let’s look into it in much detail.
Spring’s @Transactional Annotation
Now let’s have a look at what modern Spring transaction management usually looks like. Spring at its core is an IoC container. Thus it has an advantage. It instantiates an EntityService for us and makes sure to auto wire it into any other bean that needs it.
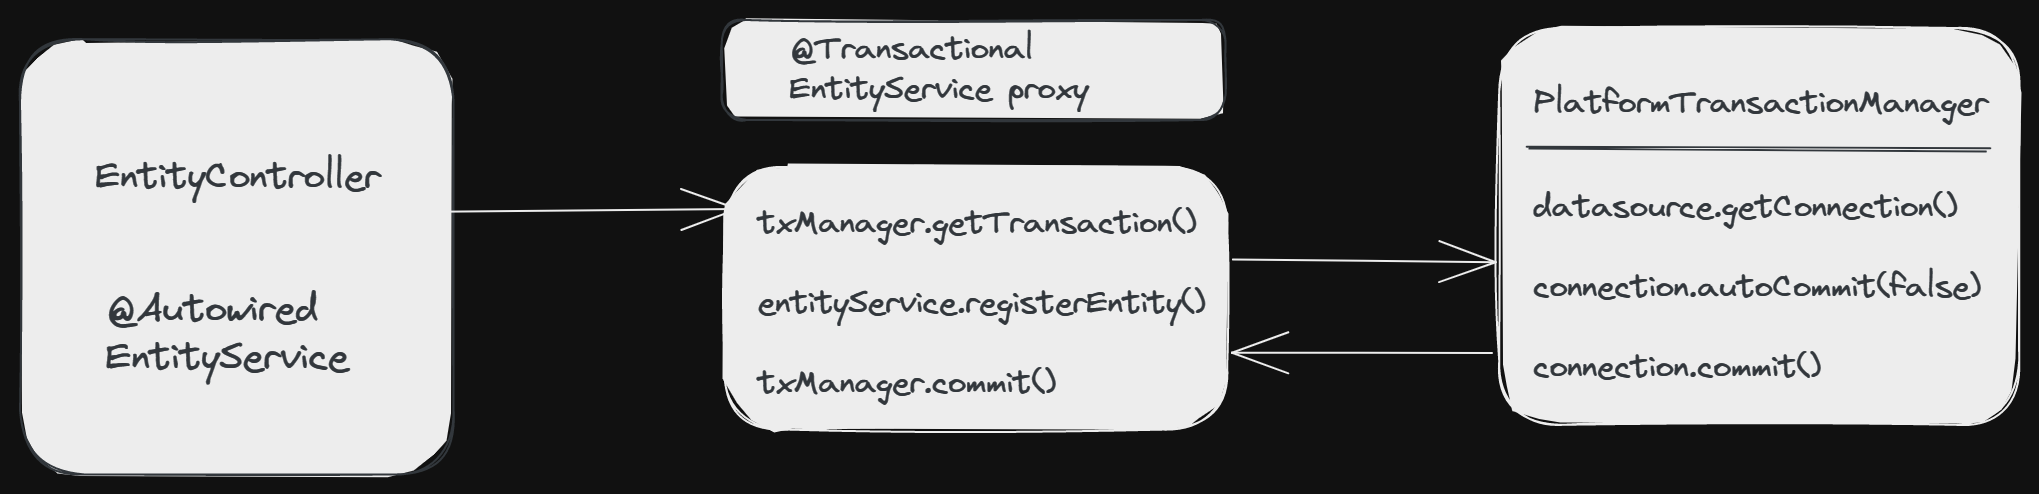
Now whenever we use the @Transactional annotation on a bean, Spring uses a tiny trick. It doesn’t just instantiate the EntityService but it also creates a transactional proxy of the same bean:

As we can see from the above diagram, the proxy has two jobs:
- Opening and closing database connections/transactions.
- And then delegating to the original
EntityService.
Other beans, like our EntityController in the diagram above, will never know that they are talking to a proxy, and not the real bean.
If we get inside in more detail, then we would find that our EntityService gets proxied on the fly, but it is not the proxy that handles the transactional states (open, commit, close, rollback). Instead the proxy delegates the job to a transaction manager.
Spring offers a PlatformTransactionManager/TransactionManager interface, which, by default, comes with a couple of handy implementations. One of them is the datasource transaction manager. Now all transaction managers have methods like doBegin() or doCommit() that takes care of the connectivity and final execution.
To put all of the above discussion in a gist:
- If Spring detects
@Transactionalannotation on a bean, it creates a dynamic proxy of the bean. - The proxy will then have access to a transaction manager which will open and close transactions/connections.
- Finally, the transaction manager will simply do what we did as part of our plain old JDBC connection implementation.
Configuring a TransactionManager
Spring recommends defining @EnableTransactionManagement annotation in a @Configuration class to enable transactional support.
@Configuration
@EnableTransactionManagement
public class JPAConfig{

   @Bean
   public LocalContainerEntityManagerFactoryBean entityManagerFactory() {
       //...
   }

   @Bean
   public PlatformTransactionManager transactionManager() {
      JpaTransactionManager transactionManager = new JpaTransactionManager();
      transactionManager.setEntityManagerFactory(entityManagerFactory().getObject());
      return transactionManager;
   }
}
However, if we use a Spring Boot project and have defined “spring-data-*” or “spring-tx” dependencies on the classpath, then the transaction management would be enabled by default.
Usage of @Transactional Annotation
We can use the annotation on definitions of interfaces, classes, or directly on methods. They take precedence over one another according to the priority order from lowest to highest like interface, superclass, class, interface method, superclass method, and finally class method.
One thing to note is that, if we apply this annotation over a class, then this will be applied to all the public methods in it which have not been annotated with the @Transactional annotation.
However, if we put the annotation on a private or protected method, Spring will ignore it without an error.
Let’s consider that if we have an interface defined with the annotation over it:
@Transactional
public interface PaymentService {
    void pay(String source, String destination, double val);
}
Next, we can put the same annotation on a class to override the transaction setting of interface:
@Service
@Transactional
public class PaymentServiceImpl implements PaymentService {
    @Override
    public void pay(String source, String destination, double val) {
        // ...
    }
}
Finally, we can override all of this by setting the annotation directly on the method:
@Transactional
public void pay(String source, String destination, double val) {
    // ...
}
Propagation Levels in Spring Transactions
As the name suggests, propagation in a Spring transaction indicates if any service would like to participate or not in the transaction. It would also decide the behavior of a component or service depending on whether or not a transaction has already been generated by the calling component or service.
First, we will take two scenarios. In the first scenario, we will have the registerEntity() defined that we saw above annotated with transaction propagation:
@Service
public class EntityService {

    @Transactional(propagation = Propagation.REQUIRED)
    public Long registerEntity(Entity entity) {
        // execute some SQL statements like
        // inserting an entity into the db
        // and return the autogenerated id
        return id;
    }
}
In the other scenario, consider that this registerEntity() method is being called by another service OrganizationService, then that class will be annotated as follows:
@Service
@Transactional(propagation=Propagation.REQUIRED)
public class OrganizationService {

    @Autowired
    EntityService entityService;

    public void organize() {
        // ...
        entityService.registerEntity(entity);
        // ...
    }
}
Let’s understand each of these propagation strategies using the above scenarios:
- REQUIRED - This is the default propagation. If the
registerEntity()method is called directly, it creates a new transaction. Whereas if this method is called fromOrganizationService, since that service is annotated with@Transactionalthen the transaction would make use of the existing transaction called at the service layer rather than the one defined onregisterEntity(). If the calling service didn’t have the transaction defined, it will create a new transaction. - SUPPORTS - In this case, if the
registerEntity()method is called directly, it doesn’t create a new transaction. If the method is called fromOrganizationService, then it will make use of the existing transaction defined as part of that class, else, it won’t create a new transaction. - NOT_SUPPORTED - In this case, if the
registerEntity()method is called directly, it doesn’t create a new transaction. If the method is called fromOrganizationService, then it doesn’t make use of the existing transaction neither it creates its own transaction. It runs without a transaction. - REQUIRES_NEW - If the
registerEntity()method is called directly, it creates a new transaction. Whereas if this method is called fromOrganizationService, then the transaction would not make use of the existing transaction called at the service layer instead it would create its own new transaction. If the calling service didn’t have the transaction defined, it will still create a new transaction. - NEVER - If the
registerEntity()method is called directly, it doesn’t creates a new transaction. Whereas if this method is called fromOrganizationService, then the method would throw an exception. If the calling service didn’t have the transaction defined, it will not create a new transaction and run without a transaction. - MANDATORY - If the
registerEntity()method is called directly, it will throw an exception. In case, the method is called fromOrganizationService, then the method makes use of its existing transaction. Else, it will throw an exception. - NESTED - If a transaction is present, Spring verifies it and marks a save point. This indicates that the transaction rolls back to this save point if our business logic execution encounters an issue. It operates similarly to REQUIRED if there are no ongoing transactions. In the case of
NESTED, only JDBC connections are supported inJPATransactionManager. However, if our JDBC driver supports save points, setting thenestedTransactionAllowedvalue to true also makes the JDBC access code in the JPA transactions function.
Isolation Levels in Spring Transactions
When two transactions act concurrently on the same database entity, then that database state is defined as transaction isolation. It involves the locking of database records. In other words, it specifies how the database would behave or what happens when one transaction is being processed on a database entity and another concurrent transaction would like to access or update the same database entity at the same time.
One of the ACID (Atomicity, Consistency, Isolation, Durability) characteristics is isolation. Therefore, the transaction isolation level is not a feature exclusive to the Spring Framework. We can adjust the isolation level with Spring to match our business logic. We can set the isolation level of a transaction by the annotation:
@Transactional(isolation = Isolation.READ_UNCOMMITTED)
It has these five enumerations in Spring:
-
DEFAULT - The default isolation level in Spring is
DEFAULTwhich means when Spring creates a new transaction, the isolation level will be the default isolation of our RDBMS. Therefore, we should be careful when we change the database. -
READ_UNCOMMITTED - If two transactions are running simultaneously, the second transaction can update both new and existing records before the first transaction is committed. The newly added and altered records are reflected in the first transaction, which is still in progress even though the second transaction is not yet committed.
Note: PostgreSQL does not support
READ_UNCOMMITTEDisolation and falls back toREAD_COMMITEDinstead. Also, Oracle does not support or allowREAD_UNCOMMITTED. -
READ_COMMITTED - If two transactions are running simultaneously, the second transaction can update both new and existing records before the first transaction is committed. The newly added and altered records are reflected in the first transaction, which is not yet committed after the second transaction is committed.
Note:
READ_COMMITTEDis the default level with Postgres, SQL Server, and Oracle. -
REPEATABLE_READ - If two transactions are running simultaneously, the second transaction cannot update any existing records until the first transaction has been committed, but it can add new records. The newly added records are reflected in the first transaction, which is not yet committed, once the second transaction is committed.
Note:
REPEATABLE_READis the default level in MySQL. Oracle does not supportREPEATABLE_READ. -
SERIALIZABLE - When two transactions are running simultaneously, it appears as though they are running sequentially, with the first transaction being committed before the second is carried out. This is the highest level of isolation and is considered total isolation. An ongoing transaction is thus invulnerable to the effects of other transactions. But because of the poor performance and potential for deadlock, this could be problematic.
Error handling with @Transactional
The @Transactional annotation makes use of the attributes rollbackFor or rollbackForClassName to rollback the transactions, and the attributes noRollbackFor or noRollbackForClassName to avoid rollback on listed exceptions.
According to the Spring documentation:
In its default configuration, the Spring Framework’s transaction infrastructure code marks a transaction for rollback only in the case of runtime, unchecked exceptions. That is, when the thrown exception is an instance or subclass of
RuntimeException. (Errorinstances also, by default, result in a rollback). Checked exceptions that are thrown from a transactional method do not result in rollback in the default configuration.
Thus, the default rollback behavior in the declarative approach will rollback on runtime exceptions. So when a checked exception is thrown from our code and we don’t explicitly tell Spring that it should rollback the transaction, then it gets committed.
Rollback on Runtime Exception
Let’s look at the case where the code is expected to rollback on runtime exception:
@Transactional
public void rollbackOnRuntimeException() {
    jdbcTemplate.execute("insert into sample_table values('abc')");
    throw new RuntimeException("Rollback as we have a Runtime Exception!");
}
Spring will rollback when it comes across this exception.
No Rollback for Checked Exception
If we declare a normal Exception and we don’t declare rollback strategy, then the data will be inserted and committed.
@Transactional
public void noRollbackOnCheckedException() throws Exception {
    jdbcTemplate.execute("insert into sample_table values('abc')");
    throw new Exception("Generic exception occurred");
}
Rollback on Checked Exception
If we pass rollbackFor strategy to roll back its changes for a custom checked exception, then it will roll back when the exception is thrown:
@Transactional(rollbackFor = CustomCheckedException.class)
public void rollbackOnDeclaredException() throws CustomCheckedException {
    jdbcTemplate.execute("insert into sample_table values('abc')");
    throw new CustomCheckedException("rollback on checked exception");
}
It will also rollback if any runtime exception is thrown as part of the above code.
No Rollback on RuntimeException
If we define Spring noRollbackFor in case of runtime exception, then the code will commit the transaction even though if there is any runtime exception in the code:
@Transactional(noRollbackFor = RuntimeException.class)
public void noRollbackOnRuntimeException() {
    jdbcTemplate.execute("insert into sample_table values('abc')");
    throw new IllegalStateException("Exception");
}
Conclusion
In this article, we looked at the basic configuration and usage of transactions in the Spring ecosystem. We also explored the propagation and isolation properties of @Transactional in detail. We also learned about the various side effects and pitfalls of the concurrency of @Transactional annotation.