Email is a convenient way to communicate different kinds of events from applications to interested parties.
Amazon Simple Email Service (SES) is an email platform that provides an easy and cost-effective way to send and receive emails.
Spring Cloud for Amazon Web Services (AWS) is a sub-project of Spring Cloud which makes it easy to integrate with AWS services using Spring idioms and APIs familiar to Spring developers.
In this article, we will look at using Spring Cloud AWS for interacting with AWS Simple Email Service (SES) to send emails with the help of some code examples.
Check Out the Book!
This article gives only a first impression of what you can do with AWS.
If you want to go deeper and learn how to deploy a Spring Boot application to the AWS cloud and how to connect it to cloud services like RDS, Cognito, and SQS, make sure to check out the book Stratospheric - From Zero to Production with Spring Boot and AWS!
Example Code
This article is accompanied by a working code example on GitHub.How Does SES Send Email?
When we ask SES to send an email, the request is processed in multiple stages:
- The email sender (either an application or email client) requests Amazon SES to send an email to one or more recipients.
- SES first validates the request and if successful, creates an email message with the request parameters. This email message is compliant with the Internet Message Format specification (RFC 5322) and consists of header, body, and envelope.
- SES also scans the message for malicious content and then sends it over the Internet using Simple Mail Transfer Protocol (SMTP) to the recipient’s receiver ISP.
After this the following outcomes are possible:
- Successful Delivery: The email is accepted by the Internet service provider (ISP) which delivers the email to the recipient.
- Hard Bounce: The email is rejected by the ISP because the recipient’s address is invalid. The ISP sends the hard bounce notification back to Amazon SES, which notifies the sender through email or by publishing it to an Amazon Simple Notification Service (Amazon SNS) topic set up to receive this notification.
- Soft Bounce: The ISP cannot deliver the email to the recipient due to reasons like the recipient’s mailbox is full, the domain does not exist, or due to any temporary condition, such as the ISP being too busy to handle the request. The ISP sends a soft bounce notification to SES and retries the email up to a specified period of time. If SES cannot deliver the email within that time, it sends a hard bounce notification through email or by publishing the event to an SNS topic.
- Complaint: The recipient marks the email as spam in his or her email client. If Amazon SES has a feedback loop set up with the ISP, then a complaint notification is sent to Amazon SES, which forwards the complaint notification to the sender.
- Auto response: The receiver ISP sends an automatic response such as an out-of-office message to Amazon SES, which forwards the auto-response notification to the sender.
When delivery fails, Amazon SES will respond to the sender with an error and will drop the email.
Sending Mails With SES
When we send an email with SES, we are using SES as our outbound email server. We can also use any other email server and configure it to send outgoing emails through SES. We can send emails with SES in multiple ways:
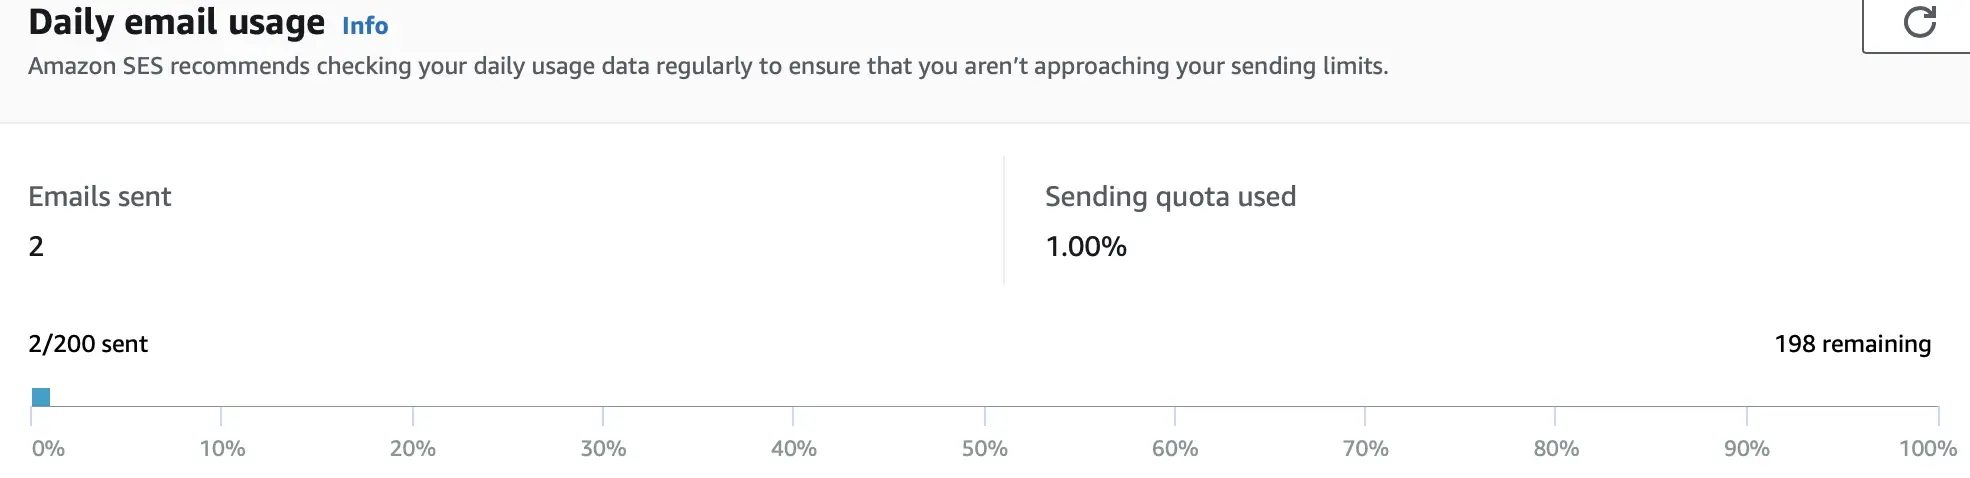
Sending Mails From the SES Console
We can use the SES console to send emails with minimal setup. However, it is mainly used to monitor our sending activity. We can view the number of emails that we have sent along with the number of bounces and complaints as shown here:
Sending Mails Using SMTP
Simple mail transfer protocol (SMTP) is the communication protocol for sending emails, receiving emails, and relaying outgoing mail between email senders and receivers. When we send an email, the SMTP server processes our email, decides which server to send the message to, and relays the message to that server.
We can access Amazon SES through the SMTP in two ways :
- by sending emails to SES from an SMTP enabled software
- from an SMTP compatible programming language like Java by using the Java Mail API
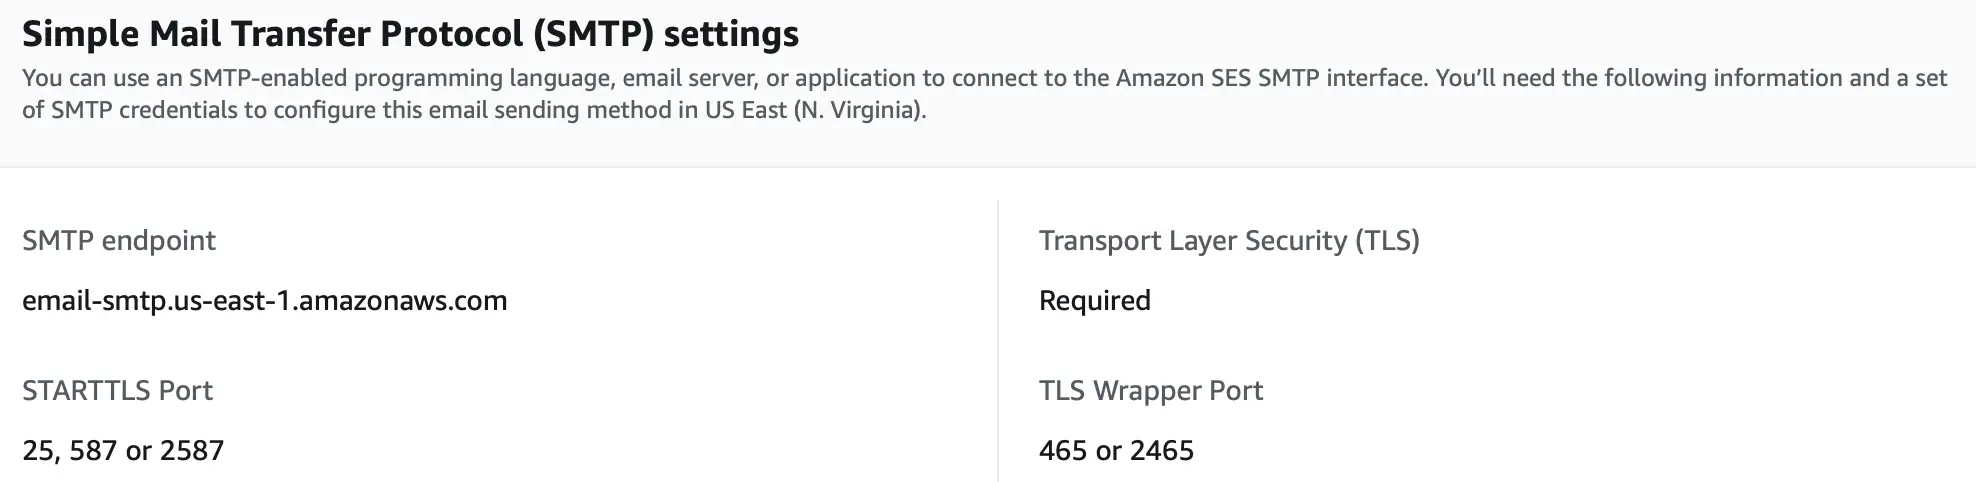
We can find the information for connecting to the SMTP endpoint from the SES console:
Sending Mails Using the SES API
We can send emails by calling the SES Query API with any REST client or by using the AWS SDK. We can send both formatted email or emails in plain text.
We’re going to look at this in the upcoming section.
Sending Mails with Amazon SES using Spring Cloud AWS
Spring Cloud AWS includes a module for SES called spring-cloud-aws-ses which simplifies working with Amazon SES. This module for SES contains two classes: SimpleEmailServiceMailSender and SimpleEmailServiceJavaMailSender. The class hierarchy containing these classes is shown in this diagram:
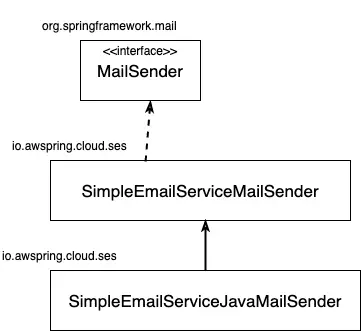
This class diagram shows that the SimpleEmailServiceJavaMailSender class inherits from the SimpleEmailServiceMailSender which implements the MailSender interface. The MailSender interface is part of Spring’s mail abstraction that contains the send() method for sending emails.
The SimpleEmailServiceMailSender class sends E-Mails with the Amazon Simple Email Service. This implementation has no dependencies on the Java Mail API. It can be used to send simple mail messages that do not have any attachments.
The SimpleEmailServiceJavaMailSender class allows sending emails with attachments and other mime parts inside mail messages
Setting Up the SES Sandbox Environment
The Amazon SES provides a sandbox environment to test the capabilities of Amazon SES. By default, our account is in sandbox mode.
We can only send emails to verified identities when our account is in sandbox mode. A verified identity is a domain or email address that we use to send email. Before we can send an email using SES in sandbox mode, we must create and verify each identity that we want to use as a From, To, Source, Sender, or Return-Path address. Verifying an identity with Amazon SES confirms our ownership and helps to prevent it’s unauthorized use.
There are also limits to the volume of email we can send each day, and on the number of messages, we can send per second.
We will need a few email addresses to test our examples. Let us verify these first by following the steps in the SES documentation. The figure below outlines some of the steps we need to perform in the AWS SES console:
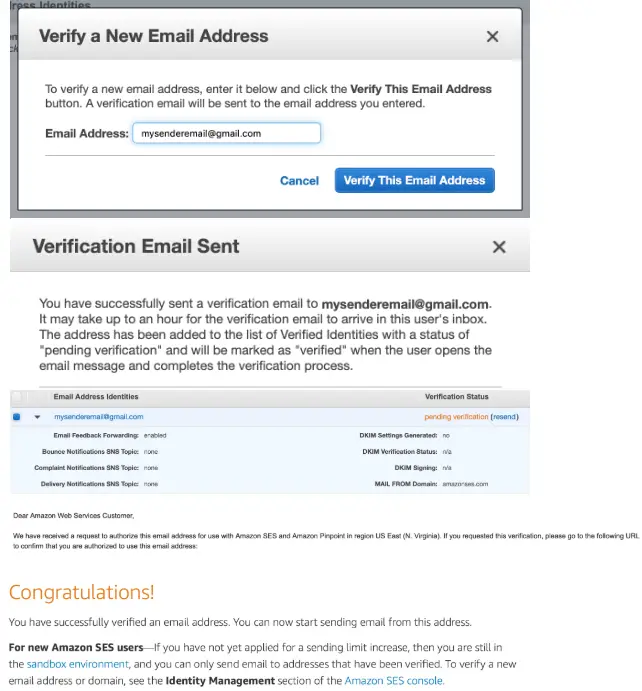
As we can see in this figure, we first add our email in SES which triggers a verification email which the owner of the email needs to verify by visiting the link in the verification email.
Sending Emails in Spring Boot
With our emails verified, let us now create a Spring Boot project with the help of the Spring boot Initializr, and then open the project in our favorite IDE.
Adding the Dependencies
We will first add all the dependencies of Spring Cloud AWS and SES.
For Spring Cloud AWS, we will add a separate Spring Cloud AWS BOM in our pom.xml file using this dependencyManagement block :
  <dependencyManagement>
    <dependencies>
      <dependency>
        <groupId>io.awspring.cloud</groupId>
        <artifactId>spring-cloud-aws-dependencies</artifactId>
        <version>2.3.0</version>
        <type>pom</type>
        <scope>import</scope>
      </dependency>
    </dependencies>
  </dependencyManagement>
For adding the support for SES, we need to include the module dependency which is available as a starter modulespring-cloud-starter-aws-ses:
    <dependency>
      <groupId>io.awspring.cloud</groupId>
      <artifactId>spring-cloud-starter-aws-ses</artifactId>
    </dependency>
spring-cloud-starter-aws-ses includes the transitive dependencies for spring-cloud-starter-aws, and spring-cloud-aws-ses.
Configuring the Mail Sender Beans
Spring Cloud AWS provides SimpleEmailServiceMailSender which is an implementation of the MailSender interface from Spring’s mail abstraction.
SimpleEmailServiceMailSender sends emails with Amazon SES using the AWS SDK for Java. It can be used to send simple email messages in plain text without any attachments. A configuration with the necessary elements will look like this:
@Configuration
public class MailConfig {
    @Bean
    public AmazonSimpleEmailService amazonSimpleEmailService() {

      return AmazonSimpleEmailServiceClientBuilder.standard()
          .withCredentials(new ProfileCredentialsProvider("pratikpoc"))
          .withRegion(Regions.US_EAST_1)
          .build();
    }

    @Bean
    public MailSender mailSender(
                AmazonSimpleEmailService amazonSimpleEmailService) {
      return new SimpleEmailServiceMailSender(amazonSimpleEmailService);
    }
}
Here we are setting up the AmazonSimpleEmailService bean with credentials for our AWS account using the ProfileCredentialsProvider. After that, we are using this AmazonSimpleEmailService bean for creating the SimpleEmailServiceMailSender bean.
Sending Simple Email
We will now inject the SimpleEmailServiceMailSender bean in our service class from where we will send an email in text format without any attachments:
@Service
public class NotificationService {

    @Autowired
    private MailSender mailSender;

    @Autowired
    private JavaMailSender javaMailSender;

    public void sendMailMessage(
           final SimpleMailMessage simpleMailMessage) {

        this.mailSender.send(simpleMailMessage);
    }
}
Here we are calling the send method on the mailSender reference to send our email. The method takes SimpleMailMessage as parameter which is a container for email attributes like from address, to address and email text which we will send from our test class below.
We test this set up by calling this method from a test class :
@SpringBootTest
class NotificationServiceTest {

  @Autowired
  private NotificationService notificationService;

  @Test
  void testSendMail() {
      SimpleMailMessage simpleMailMessage = new SimpleMailMessage();
      simpleMailMessage.setFrom("pratikd2000@gmail.com");
      simpleMailMessage.setTo("pratikd2027@gmail.com");
      simpleMailMessage.setSubject("test subject");
      simpleMailMessage.setText("test text");

      notificationService.sendMailMessage(simpleMailMessage);
  }


}
Here we are using two test emails as our from and to email addresses which we verified earlier from the SES console. We are setting these emails along with the subject and contents of the email in the SimpleMailMessage class. As explained before, we are using a sandbox environment that will only work with verified email addresses.
Sending Email with Attachments
We will now send an email with an attachment for which we will use the SimpleEmailServiceJavaMailSender class.
Let us update our configuration by setting up the bean for SimpleEmailServiceJavaMailSender:
@Configuration
public class MailConfig {
    @Bean
    public AmazonSimpleEmailService amazonSimpleEmailService() {

      return AmazonSimpleEmailServiceClientBuilder.standard()
          .withCredentials(new ProfileCredentialsProvider("pratikpoc"))
          .withRegion(Regions.US_EAST_1)
          .build();
    }

    @Bean
    public JavaMailSender javaMailSender(
               AmazonSimpleEmailService amazonSimpleEmailService) {
      return new
        SimpleEmailServiceJavaMailSender(amazonSimpleEmailService);
    }
}
Here we follow similar steps as we did for configuring the SimpleEmailServiceMailSender earlier.
We will now inject the SimpleEmailServiceJavaMailSender through the JavaMailSender interface in our service class. The JavaMailSender interface is part of Spring’s mail abstraction which adds specialized JavaMail features like MIME message support. JavaMailSender also provides a callback interface for the preparation of JavaMail MIME messages, called MimeMessagePreparator.
@Service
public class NotificationService {

     @Autowired
     private MailSender mailSender;

     @Autowired
     private JavaMailSender javaMailSender;

     public void sendMailMessageWithAttachments() {

        this.javaMailSender.send(new MimeMessagePreparator() {

            @Override
            public void prepare(MimeMessage mimeMessage)
                   throws Exception {
                  MimeMessageHelper helper =
                    new MimeMessageHelper(mimeMessage, true, "UTF-8");
                  helper.addTo("foo@bar.com");
                  helper.setFrom("bar@baz.com");

                  InputStreamSource data =
                           new ByteArrayResource("".getBytes());

                  helper.addAttachment("test.txt", data );
                  helper.setSubject("test subject with attachment");
                  helper.setText("mime body", false);
                }
            });
     }
}
Here we are using the callback interface MimeMessagePreparator to construct the email message by setting the to and from email addresses along with the subject and text of the email.
Enabling Production Access
We finally need to move our account out of the sandbox so that we can send emails to any recipient, irrespective of whether the recipient’s address or domain is verified. But, we still have to verify all identities that we use such as From, Source, Sender, or Return-Path addresses. We need to submit a request for production aceess as shown below:
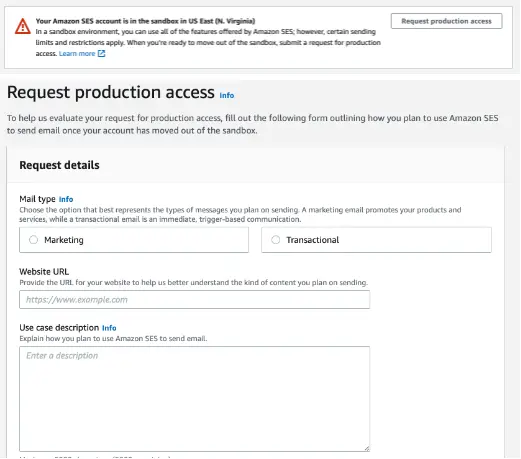
Here We are submiting the production access request from the AWS Management Console.
We can also submit the production access request from the AWS CLI. Submitting the request with the AWS CLI is useful when we want to request production access for a large number of identities (domains or email addresses), or when we want to automate the process of setting up Amazon SES.
Conclusion
In this article, we looked at the important concepts of Amazon Simple Email Service (SES) and the libraries provided by Spring Cloud AWS to interact with it. We also developed a Spring Boot application with a REST API that can send email using the SES module of Spring Cloud AWS.
I hope this post has given you a good introduction to Amazon Simple Email Service (SES) and how we can use this service to send emails.
You can refer to all the source code used in the article on Github.
Check Out the Book!
This article gives only a first impression of what you can do with AWS.
If you want to go deeper and learn how to deploy a Spring Boot application to the AWS cloud and how to connect it to cloud services like RDS, Cognito, and SQS, make sure to check out the book Stratospheric - From Zero to Production with Spring Boot and AWS!