ElastiCache is a fully managed caching service available in AWS Cloud.
Spring Cloud AWS helps us to simplify the communication of Spring Boot application with AWS services. From taking care of security to auto-configuring the beans required for the communication, it takes care of a lot of essential steps.
In this article, we will look at how we can use it to connect our application to AWS ElastiCache for Redis.
Check Out the Book!
This article gives only a first impression of what you can do with AWS.
If you want to go deeper and learn how to deploy a Spring Boot application to the AWS cloud and how to connect it to cloud services like RDS, Cognito, and SQS, make sure to check out the book Stratospheric - From Zero to Production with Spring Boot and AWS!
Example Code
This article is accompanied by a working code example on GitHub.Why Caching?
Caching is a common technique of temporarily storing a copy of data or result of a computation in memory for quick and frequent access. We use caching primarily to:
- Improve the throughput of the application.
- Prevent overwhelming the application or services the application is calling with redundant requests.
We can either implement caching in our application by using an in-memory Map based data structure, or we can use a full-blown caching solution such as Redis.
What is ElastiCache?
ElastiCache is a fully managed in-memory caching service in AWS Cloud. It currently supports two caching engines: Memcached and Redis.
ElastiCache for Redis
Redis is a popular in-memory data structure store. It is open-source and widely used in the industry for caching. It stores the data as key-value pairs and supports many varieties of data structures like string, hash, list, set, sorted set with range queries, bitmap, hyperloglog, geospatial index, and streams.
In AWS, one of the ways of using Redis for caching is by using the ElastiCache service.
ElastiCache hosts the Redis caching engine and provides High Availability, Scalability, and Resiliency to it. It also takes care of all the networking and security requirements under the shared responsibility model.
The basic building block of ElastiCache is the cluster. A cluster can have one or more nodes. Each node runs an instance of the Redis cache engine software. Please refer AWS ElastiCache User Guide for more details.
Spring Cloud AWS For Caching
Spring supports a unified caching abstraction by providing the Cache and CacheManager interfaces to unify different caching technologies.
It also supports JCache (JSR-107) annotations to allow us to leverage a variety of caching technologies.
Spring Cloud AWS integrates the Amazon ElastiCache service into the Spring unified caching abstraction by providing an implementation of CacheManager based on the Memcached and Redis protocols. The caching support for Spring Cloud AWS provides an implementation of Memcached for ElastiCache and uses Spring Data Redis for Redis caches.
Configuring Dependencies for Spring Cloud AWS
To use Spring Cloud AWS, first, we need to add Spring Cloud AWS BOM (Bill of material). BOM will help us to manage our dependency versions:
dependencyManagement {
  imports {
    mavenBom 'io.awspring.cloud:spring-cloud-aws-dependencies:2.3.1'
  }
}
Next, we need to add the following dependencies:
implementation 'org.springframework.boot:spring-boot-starter-data-redis'
implementation 'io.awspring.cloud:spring-cloud-starter-aws'
implementation 'com.amazonaws:aws-java-sdk-elasticache'
Let’s talk a bit about these dependencies:
spring-cloud-starter-awsprovides core AWS Cloud dependencies such asspring-cloud-aws-contextandspring-cloud-aws-autoconfiguration.- Out of the box
spring-cloud-aws-contextprovides support for Memcached but for Redis, it needs the Spring Data Redis dependency. - Spring Data Redis gives us access to Spring Cache abstraction, and also Lettuce which is a popular Redis client.
spring-cloud-aws-autoconfiguration glues everything together and configures a CacheManager which is required by the Spring Cache abstraction to provide caching services to the application.
Spring Cloud AWS does all the heavy lifting of configuring the caches for us. All we need to do is to provide the name of the cache. Let’s look at how we can do that.
Caching with Spring Boot
The easiest way to implement caching in a Spring Boot application is by using Spring Boot’s Cache Abstraction. Please read our article on Implementing Cache in a Spring Application to dive deeper into the topic.
In this section, we will only understand the configuration required for the integration of Spring Cloud AWS with ElastiCache.
The first thing we need to do is to enable caching in our application using @EnableCaching annotation:
@Configuration
@EnableCaching
public class EnableCache {
  //...
}
Here we have used a separate configuration class to enable caching.
Next, we need to identify the methods that we need to cache. In our example application we have decided to cache methods of two services ProductService and UserService:
@Service
@AllArgsConstructor
@CacheConfig(cacheNames = "product-cache")
public class ProductService {
  private final ProductRepository repository;

  @Cacheable
  public Product getProduct(String id) {
    return repository.findById(id).orElseThrow(()->
      new RuntimeException("No such product found with id"));
  }
  //....
}

@Service
@AllArgsConstructor
@CacheConfig(cacheNames = "user-cache")
public class UserService {

  private final UserRepository repository;

  @Cacheable
  public User getUser(String id){
    return repository.findById(id).orElseThrow(()->
      new RuntimeException("No such user found with id"));
  }
}
Here we have decorated the getProduct() and getUser() methods with @Cacheable annotation to cache their responses.
Both the methods will retrieve entities from the database when called for the first time. Subsequent calls to these methods with the same value of parameter id will return the response from the cache instead of the database.
One important requirement of the @Cacheable annotation is that the cache name is provided via the @CacheConfig annotation.
@CacheConfig is used when we have used multiple Spring Cache annotations in the class and all of them share a common configuration.
In our case, the common configuration is the cache name.
Now, Spring Cloud AWS provides us two ways to connect to ElastiCache:
- Cluster Name Approach
- Stack Name Approach
Cluster Name Approach
Spring Cloud AWS requires clusters of the same name as the cache name to exist in the ElastiCache:
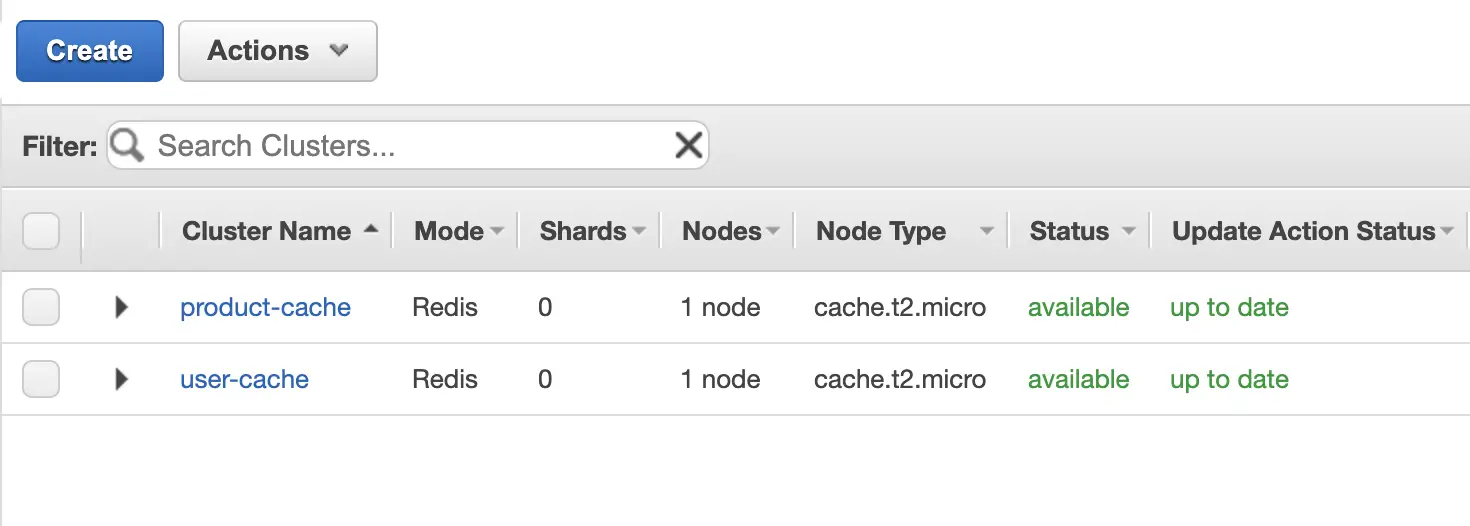
Technically, Spring Cloud AWS looks for nodes with the same name but since these are Single Node clusters the name of the node is the same as the cluster name.
We also need to define cluster names in the application.yml. Spring Cloud AWS will use this to scan the ElastiCache to find the clusters:
cloud:
  aws:
    elasticache:
        clusters:
          - name: product-cache
            expiration: 100
          - name: user-cache
            expiration: 6000
Here, we can provide a list of clusters. Since we have used two caches in our application we have to specify both product-cache and user-cache. We have also provided different
Time-To-Live (expiration) in seconds for both caches. In case we want a common expiration time for all the caches we can do so using cloud.aws.elasticache.default-expiration
property.
Stack Name Approach
If we are using CloudFormation to deploy our application stack in the AWS then one more approach exists for us.
Instead of giving cluster names, we only need to provide the stack name. Say the stack name is example-stack:
cloud:
  aws:
    stack:
      name: example-stack
Spring Cloud AWS retrieves all the cache clusters from our stack and builds CacheManager with
the names of the resources as cache names instead of the actual cluster names. The correct terminology here is the Logical Name which is the
name of the resource in the Cloudformation script and Physical Name which is the name of the cache cluster.
We need to specify the Logical Name of the cache cluster as cache names in our configuration:
@CacheConfig(cacheNames = "ProductCache")
public class ProductService {
  //...
}

@CacheConfig(cacheNames = "UserCache")
public class UserService {
  //...
}
We also need to make sure to add the following dependency when using the stack name approach:
implementation 'com.amazonaws:aws-java-sdk-cloudformation'
Spring Cloud AWS uses this dependency to retrieve the Cloudformation stack details at the time of application startup.
How Does Spring Cloud AWS Configure the CacheManager?
In this section, we will dive a bit deeper into the inner workings of Spring Cloud AWS and see how it autoconfigures the cache for us.
As we know that for caching to work in a Spring application we need a CacheManager bean. The job of Spring Cloud AWS is to essentially create that bean for us.
Let’s look at the steps it performs along with the classes involved in building CacheManager:
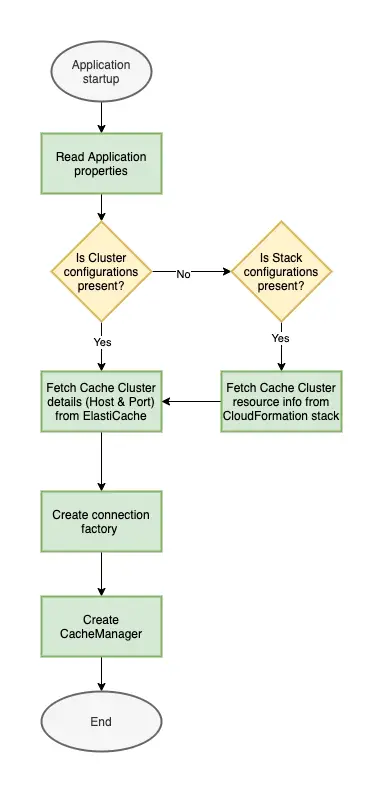
- When our application starts in the AWS environment,
ElastiCacheAutoConfigurationreads cluster names from theapplication.ymlor stack name if cluster configuration is not provided. ElastiCacheAutoConfigurationthen passes the Cache Cluster names toElastiCacheCacheConfigurerobject.- In the case of Stack configuration it first retrieves all the ElastiCache Cluster details from the Cloudformation stack.
- Then
ElastiCacheCacheConfigurercreates theCacheManagerwith the help ofElastiCacheFactoryBeanclass. ElastiCacheFactoryBeanscans the ElastiCache in the same availability zone and retrieves the host and port names of the nodes.- To allow our service to scan ElastiCache we need to provide
AmazonElastiCacheReadOnlyAccesspermission to our service and alsoAWSCloudFormationReadOnlyAccessif we are using the stack name approach. ElastiCacheFactoryBeanpasses this host and port toRedisCacheFactorywhich then uses Redis clients such as Lettuce to create the connection object which then actually establishes a connection with the nodes and performs the required operations.
Conclusion
While ElastiCache is already making our life easier by managing our Redis Clusters, Spring Cloud AWS further simplifies our lives by simplifying the configurations required for communicating with it.
In this article, we saw those configurations and also how to apply them. Hope this was helpful!
Thank you for reading! You can find the working code at GitHub.
Check Out the Book!
This article gives only a first impression of what you can do with AWS.
If you want to go deeper and learn how to deploy a Spring Boot application to the AWS cloud and how to connect it to cloud services like RDS, Cognito, and SQS, make sure to check out the book Stratospheric - From Zero to Production with Spring Boot and AWS!