Amazon Relational Database Service (AWS RDS) is a relational database service available in AWS Cloud. The Spring Framework always had good support for database access technologies built on top of JDBC. Spring Cloud AWS uses the same principles to provide integration with AWS RDS service through the Spring Cloud AWS JDBC module.
In this tutorial, we will look at using the Spring Cloud AWS JDBC module of Spring Cloud AWS to integrate with the AWS RDS service with the help of some basic concepts of AWS RDS along with code examples.
Check Out the Book!
This article gives only a first impression of what you can do with AWS.
If you want to go deeper and learn how to deploy a Spring Boot application to the AWS cloud and how to connect it to cloud services like RDS, Cognito, and SQS, make sure to check out the book Stratospheric - From Zero to Production with Spring Boot and AWS!
Example Code
This article is accompanied by a working code example on GitHub.AWS RDS Concepts
Amazon Relational Database Service (AWS RDS) is a managed service for a set of supported relational databases. As of today, the supported databases are Amazon Aurora, PostgreSQL, MySQL, MariaDB, Oracle Database, and SQL Server.
Apart from providing reliable infrastructure and scalable capacity, AWS takes care of all the database administration tasks like taking backups and applying database patches while leaving us free to focus on building our applications.
DB Instance
An RDS DB instance is the basic building block of Amazon RDS. It is an isolated database environment in the cloud and is accessed using the same database-specific client tools used to access on-premise databases.
Each DB instance has a DB instance identifier used to uniquely identify the DB instance when interacting with the Amazon RDS service using the API or AWS CLI commands.
DB Instance Class
The DB instance class is used to specify the compute and storage capacity of the AWS RDS DB instance. RDS supports three types of instance classes:
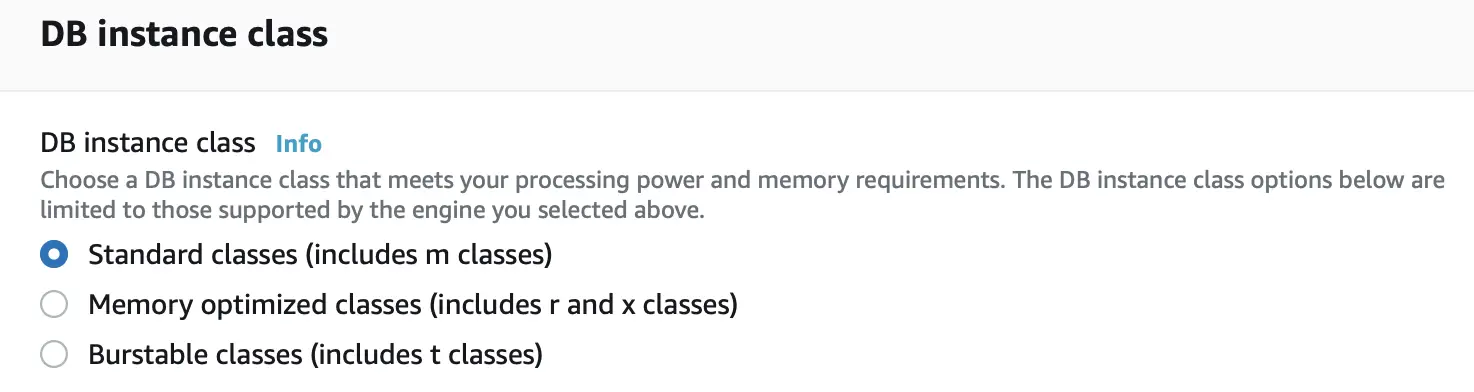
Standard: These are general-purpose instance classes that deliver balanced compute, memory, and networking for a broad range of general-purpose workloads.
Memory Optimized: This class of instances is optimized for memory-intensive applications offering both high compute capacity and a high memory footprint.
Burstable Performance: These instances provide a baseline performance level, with the ability to burst to full CPU usage.
Storage Types
DB instances for AWS RDS use AWS Elastic Block Store (Amazon EBS) volumes for database and log storage. AWS RDS provides three types of storage: General Purpose SSD (also known as gp2), Provisioned IOPS SSD (also known as io1), and magnetic (also known as standard) which differ in performance characteristics and price:
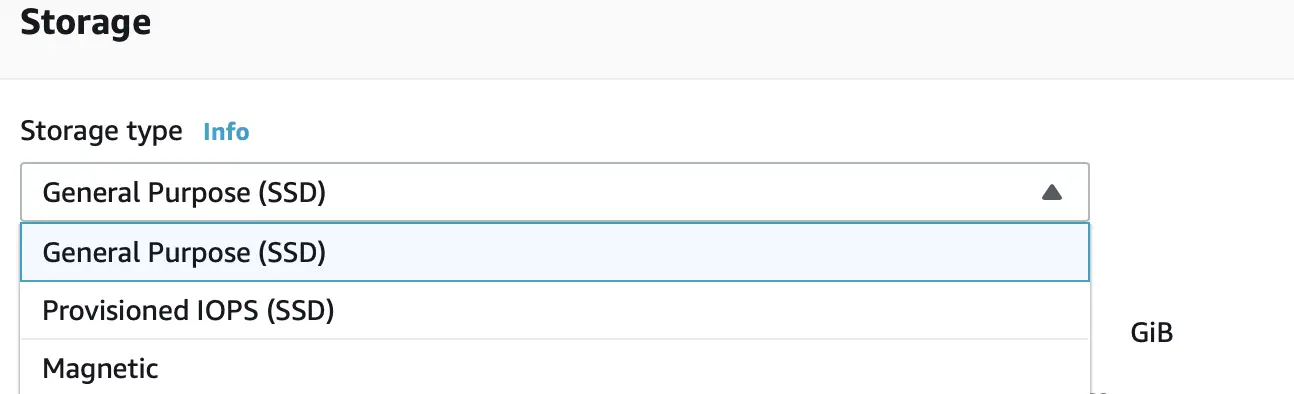
General Purpose SSD volumes offer cost-effective storage that is ideal for a broad range of workloads.
Provisioned IOPS storage is designed to meet the needs of I/O-intensive workloads, particularly database workloads, that require low I/O latency and consistent I/O throughput.
The magnetic storage type is still supported for backward compatibility and is not used for any new storage needs.
Features of Spring Cloud AWS JDBC
Spring Cloud AWS JDBC module enables our Java applications to access databases created in AWS RDS with standard JDBC protocol using a declarative configuration. Some of the main features provided by this module are:
- Data source configuration by the creation of an Amazon RDS backed data source to other beans as a
javax.sql.DataSource - Detection of a read-replica instance and sending requests to the read-replica for read-only transactions to increase overall throughput.
- Retry-support to send failed database requests to a secondary instance in a different Availability Zone.
Setting Up the Environment
After a basic understanding of AWS RDS and Spring Cloud AWS JDBC, we will now get down to using these concepts in an example.
Let us first create a Spring Boot project with the help of the Spring boot Initializr with the required dependencies (Spring Web, and Lombok), and then open the project in our favorite IDE.
For configuring Spring Cloud AWS, let us add a separate Spring Cloud AWS BOM in our pom.xml file using this dependencyManagement block :
  <dependencyManagement>
    <dependencies>
      <dependency>
        <groupId>io.awspring.cloud</groupId>
        <artifactId>spring-cloud-aws-dependencies</artifactId>
        <version>2.3.0</version>
        <type>pom</type>
        <scope>import</scope>
      </dependency>
    </dependencies>
  </dependencyManagement>
Creating the AWS RDS Instance
Let us create a DB instance using the AWS Management Console:
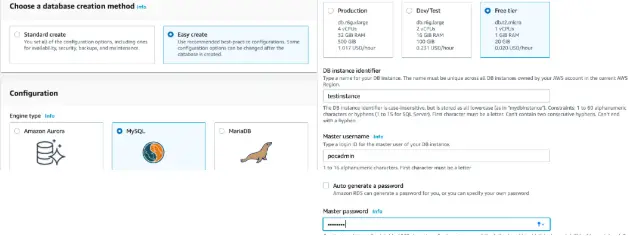
Here we have chosen to create the DB instance using the Easy Create option which sets default values for most of the properties. We have chosen MySQL as our database engine and specified the database identifier, user name, and password.
We also need to enable public access and allow access from our host if we wish to access this instance from the public network over the internet. Read this article to learn how to deploy an RDS instance into a private subnet with CloudFormation, so that it is not publicly accessible.
Connecting to the RDS Instance
After the DB instance is available, we have to connect to it from our development environment to run our database operations. For this, let us retrieve its endpoint from the DB instance connectivity description in the AWS Management Console :
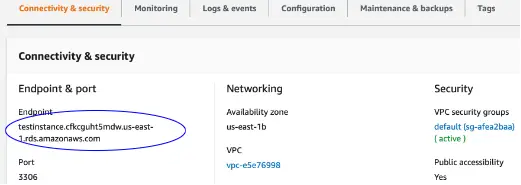
We can see the endpoint of our DB instance that we created in the previous step as testinstance.cfkcguht5mdw.us-east-1.rds.amazonaws.com.
We can also retrieve the endpoint with the DescribeDBInstances API or by running the describe-db-instances command in AWS CLI.
We use this endpoint to construct the connection string required to connect with our DB instance from our favorite database tool or programming language.
Since we have chosen MySQL as our database engine when creating our DB instance, we will use a MySQL client to connect to it. MySQL Shell is a command-line shell for MySQL database where we can run SQL statements and scripts written in JavaScript and Python.
Let us download the MySQL Shell installer for our operating system and install it in our environment. We will be able to run the MySQL commands in the shell.
But before that, let us connect to our DB instance in AWS RDS which we created earlier with the endpoint of the DB instance using the below command:
mysqlsh -h testinstance.cfkcguht5mdw.us-east-1.rds.amazonaws.com -P 3306 -u pocadmin
We have specified the port and user, apart from specifying the endpoint of our DB instance in the connection string.
We also need to ensure that the AWS RDS instance is reachable from our network where MySQL Shell is running. If we are accessing AWS RDS from a public network over the internet, we need to enable the public access property of our DB instance and associate a security group to accept connections from our host IP.
With our connection established, we can run MySQL commands in the shell as shown below:
 MySQL  testinstance.cfkcguht5mdw.us-east-1.rds SQL > SHOW DATABASES;
+--------------------+
| Database           |
+--------------------+
| information_schema |
| mysql              |
| performance_schema |
+--------------------+
3 rows in set (0.1955 sec)
 MySQL  testinstance.cfkcguht5mdw.us-east-1.rds SQL > USE mysql;
Default schema set to `mysql`.
Fetching table and column names from `mysql` for auto-completion... Press ^C to stop.
 MySQL  testinstance.cfkcguht5mdw.us-east-1 mysql  SQL > SELECT CURRENT_DATE FROM DUAL;
+--------------+
| CURRENT_DATE |
+--------------+
| 2021-05-11   |
+--------------+
1 row in set (0.1967 sec)
Here we list the default set of databases in MySQL and then select a database named mysql before running a simple SQL command to fetch the current date.
We will use the same database in our application. We have to specify this database name in the configuration of our data source in our Spring Boot application which we will cover in the next section.
Configuring the Data Source
A datasource is a factory for obtaining connections to a physical data source. Let’s include the module dependency for Spring Cloud AWS JDBC into our Maven configuration. If we were to use the JDBC module of Spring we would have added a module dependency on spring-boot-starter-jdbc for configuring our datasource:
    <dependency>
      <groupId>org.springframework.boot</groupId>
      <artifactId>spring-boot-starter-jdbc</artifactId>
    </dependency>
We will not need this now, since we are using AWS RDS with Spring cloud. We will instead add a dependency on spring-cloud-starter-aws-jdbc module for configuring database source for AWS RDS:
    <dependency>
      <groupId>io.awspring.cloud</groupId>
      <artifactId>spring-cloud-starter-aws-jdbc</artifactId>
    </dependency>
At runtime, Spring Cloud AWS will pull all the required metadata from the AWS RDS DB instance and create a Tomcat JDBC pool with default properties. We will further configure this data source by configuring two sets of properties in our resource file named application.properties:
cloud.aws.credentials.profile-name=pratikpoc
cloud.aws.region.auto=false
cloud.aws.region.static=us-east-1

cloud.aws.rds.instances[0].db-instance-identifier=testinstance
cloud.aws.rds.instances[0].username=pocadmin
cloud.aws.rds.instances[0].password=pocadmin
cloud.aws.rds.instances[0].databaseName=mysql
The first set of three properties are used to specify the security credentials for connecting to AWS and the region as us-east-1. The next set of four properties are used to specify the AWS RDS instance name, user name, password, and database name.
We had specified the AWS RDS instance name when we created our DB instance in RDS along with the user name and password. RDS instances are referred to by instances[0] for the first instance, instances[1] for the second instance, and so on.
The database name is the name of the database we selected in the MySQL Shell in the previous section - in our case mysql.
Configuring the Data Source Pool
With the configuration done so far, Spring Cloud AWS creates the Tomcat JDBC pool with the default properties.We can configure the pool further inside our configuration class using RdsInstanceConfigurer class for instantiating a DataSourceFactory class with custom pool attributes as shown here:
@Configuration
public class ApplicationConfiguration {
  @Bean
  public RdsInstanceConfigurer instanceConfigurer() {
    return ()-> {
        TomcatJdbcDataSourceFactory dataSourceFactory =
                      new TomcatJdbcDataSourceFactory();
        dataSourceFactory.setInitialSize(10);
        dataSourceFactory.setValidationQuery("SELECT 1 FROM DUAL");
        return dataSourceFactory;
    };
  }
}
Here we are overriding the validation query and the initial size during instantiation of dataSourceFactory.
Injecting the Data Source
This data source can now be injected into any Spring Bean like our repository class in our example as shown here:
@Service
public class SystemRepository {

  private final JdbcTemplate jdbcTemplate;

  @Autowired
  public SystemRepository(DataSource dataSource) {
    this.jdbcTemplate = new JdbcTemplate(dataSource);
  }

  public String getCurrentDate() {
    String result = jdbcTemplate.queryForObject(
      "SELECT CURRENT_DATE FROM DUAL", new RowMapper<String>(){

      @Override
      public String mapRow(ResultSet rs, int rowNum)
          throws SQLException {
              return rs.getString(1);
      }
    });
    return result;
  }

}
As we can see here, it is completely decoupled from the database configuration. We can easily change the database configuration or the database itself (to MySQL or PostgreSQL, or Oracle) in RDS without any change to the code.
If we work with multiple data source configurations inside one application context, we need to qualify the data source injection point with a @Qualifier annotation.
Running the Example
With our data source set up and injected in a repository class, let us now run this example with a JUnit test:
@SpringBootTest
class SpringcloudrdsApplicationTests {

  @Autowired
  private SystemRepository systemRepository;

  @Test
  void testCurrentDate() {
    String currentDate = systemRepository.getCurrentDate();
    System.out.println("currentDate "+currentDate);
  }
}
Once again, there is nothing specific to Spring Cloud here. All the magic happens in the configuration.
In this JUnit test, we are invoking our repository class method to print the current date. The output log after running the test is shown below:
 :: Spring Boot ::                (v2.4.5)

... : Starting SpringcloudrdsApplicationTests using Java 14.0.1
...
...
Loading class `com.mysql.jdbc.Driver'. This is deprecated. \
The new driver class is `com.mysql.cj.jdbc.Driver'...
currentDate 2021-05-12
... : Shutting down ExecutorService 'applicationTaskExecutor'
We can see a warning in the log for using a deprecated driver class which is safe to be ignored. We have not specified any driver class here. The driver class com.mysql.jdbc.Driver is registered based on the metadata read from the database connection to AWS RDS.
Configuring the Read-Replica for Increasing Throughput
Replication is a process by which we can copy data from one database server (also known as source database) to be copied to one or more database servers (known as replicas). It is a feature of the database engines of MariaDB, Microsoft SQL Server, MySQL, Oracle, and PostgreSQL DB which can be configured with AWS RDS.
Amazon RDS uses this built-in replication feature of these databases to create a special type of DB instance called a read replica from a source DB instance.
The source DB instance plays the role of the primary DB instance and updates made to the primary DB instance are asynchronously copied to the read replica.
This way we can increase the overall throughput of the database by reducing the load on our primary DB instance by routing read queries from your applications to the read replica.
Let us create a read-replica of the DB instance from the RDS console:
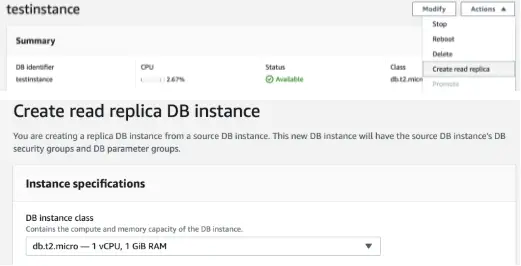
Here we are creating a replica of the DB instance we created earlier.
Spring Cloud AWS supports the use of read-replicas with the help of Spring Framework’s declarative transaction support with read-only transactions. We do this by enabling read-replica support in our data source configuration.
When read-replica is enabled, any read-only transaction will be routed to a read-replica instance and the primary database will be used only for write operations.
We enable read-replica support by setting a property readReplicaSupport. Our application.properties with this property set looks like this:
cloud.aws.credentials.profile-name=pratikpoc
cloud.aws.region.auto=false
cloud.aws.region.static=us-east-1

cloud.aws.rds.instances[0].db-instance-identifier=testinstance
cloud.aws.rds.instances[0].username=pocadmin
cloud.aws.rds.instances[0].password=pocadmin
cloud.aws.rds.instances[0].databaseName=mysql

cloud.aws.rds.instances[0].readReplicaSupport=true
Here we have set the readReplicaSupport to true to enable read-replica support.
Our service class with a read-only method looks like this:
@Service
public class SystemRepository {

   private final JdbcTemplate jdbcTemplate;

   @Autowired
   public SystemRepository(DataSource dataSource) {
     this.jdbcTemplate = new JdbcTemplate(dataSource);
   }


  @Transactional(readOnly = true)
  public List<String> getUsers(){
    List<String> result = jdbcTemplate.query("SELECT USER() FROM DUAL", new RowMapper<String>(){

      @Override
      public String mapRow(ResultSet rs, int rowNum) throws SQLException {
        return rs.getString(1);
      }

    });
    return result;
  }

}
Here we have decorated the method getUsers() with Transactional(readOnly = true). At runtime, all the invocations of this method will be sent to the read-replica.
We can also see that we have not created any separate data source for the read-replica of our DB instance. With the read-replica support, Spring Cloud AWS JDBC searches for any read-replica that is created for the master DB instance and routes the read-only transactions to one of the available read-replicas.
Configuring Fail-Over for High Availability
A high availability environment in AWS RDS is provided by creating the DB instance in multiple Availability Zones. This type of deployment also called Multi-AZ deployment provides failover support for the DB instances if one availability zone is not available due to an outage of the primary instance.
This replication is synchronous as compared to the read-replica described in the previous section.
Spring Cloud AWS JDBC module supports the Multi-AZ failover with a retry interceptor which can be associated with a method to retry any failed transactions during a Multi-AZ failover. The configuration of our retry interceptor is shown below:
<?xml version="1.0" encoding="UTF-8"?>
<beans xmlns:xsi="http://www.w3.org/2001/XMLSchema-instance" ...>

  <jdbc:retry-interceptor
    db-instance-identifier="testinstance"
    id="interceptor"
    max-number-of-retries="3"
    amazon-rds="customRdsClient"/>

    <bean id="customRdsClient" class="io.pratik.springcloudrds.SystemRepository" >
         <constructor-arg value="com.amazonaws.services.rds.AmazonRDS"/>
    </bean>
</beans>
The retry-interceptor tag in the XML configuration creates an AOP Interceptor which can be used to retry any database operations which failed due to a temporary error like connectivity loss due to failover to a DB instance in a secondary availability zone.
However, it is better to provide direct feedback to a user in online transactions instead of frequent retries. So the fail-over support is mainly useful for batch applications where the responsiveness of a service call is not important.
Conclusion
We saw how to use the Spring Cloud AWS JDBC module for accessing the database of our application with the AWS RDS service. Here is a summary of the things we covered:
- A DB instance is the foundational block that needs to be created when working with AWS Relational Database Service (RDS). It is the container for multiple databases.
- A DB instance is configured with a storage class and DB instance class based on our storage and processing requirements. These need to be specified when creating a DB instance in AWS Relational Data Service.
- The data source backed by a DB instance in AWS RDS, is created in the application at runtime.
- Read-replica feature of RDS is used to increase throughput and is can be enabled in Spring Cloud JDBC by setting a property and decorating a method with
Transaction read onlyannotation. - Failover support is provided with the help of retry interceptors.
I hope this will help you to get started with building applications using Spring Cloud AWS using AWS RDS as the data source.
You can also read an article published earlier on using Spring Cloud AWS Messaging for accessing Amazon Simple Queue Service (SQS) since a majority of real-life applications need to use a mix of database persistence and message queuing for performing a wide variety of business functions.
You can refer to all the source code used in the article on Github.
Check Out the Book!
This article gives only a first impression of what you can do with AWS.
If you want to go deeper and learn how to deploy a Spring Boot application to the AWS cloud and how to connect it to cloud services like RDS, Cognito, and SQS, make sure to check out the book Stratospheric - From Zero to Production with Spring Boot and AWS!