Internationalization is the process of making an application adaptable to multiple languages and regions without major changes in the source code.
In this tutorial, we will understand the concepts of internationalization, and illustrate how to internationalize a Spring Boot application.
Example Code
This article is accompanied by a working code example on GitHub.Internationalization (i18n) vs. Localization (l10n)
Internationalization is a mechanism to create multilingual software that can be adapted to different languages and regions.
An internationalized application has the following characteristics:
- The application can be adapted to run in multiple regions by adding region or language-specific configuration data.
- Text elements like information messages and the user interface labels, are stored outside the source code and retrieved at runtime.
- Supporting new languages does not require code changes.
- Culturally-dependent data like dates and currencies are displayed in formats of the end user’s region and language.
Internationalization is also abbreviated as i18n because there is a total of 18 characters between the first letter i and the last letter n.
The following figures illustrate a website supporting internationalization.
Amazon e-commerce site in German language from www.amazon.de:

Amazon e-commerce site in French language from www.amazon.fr:
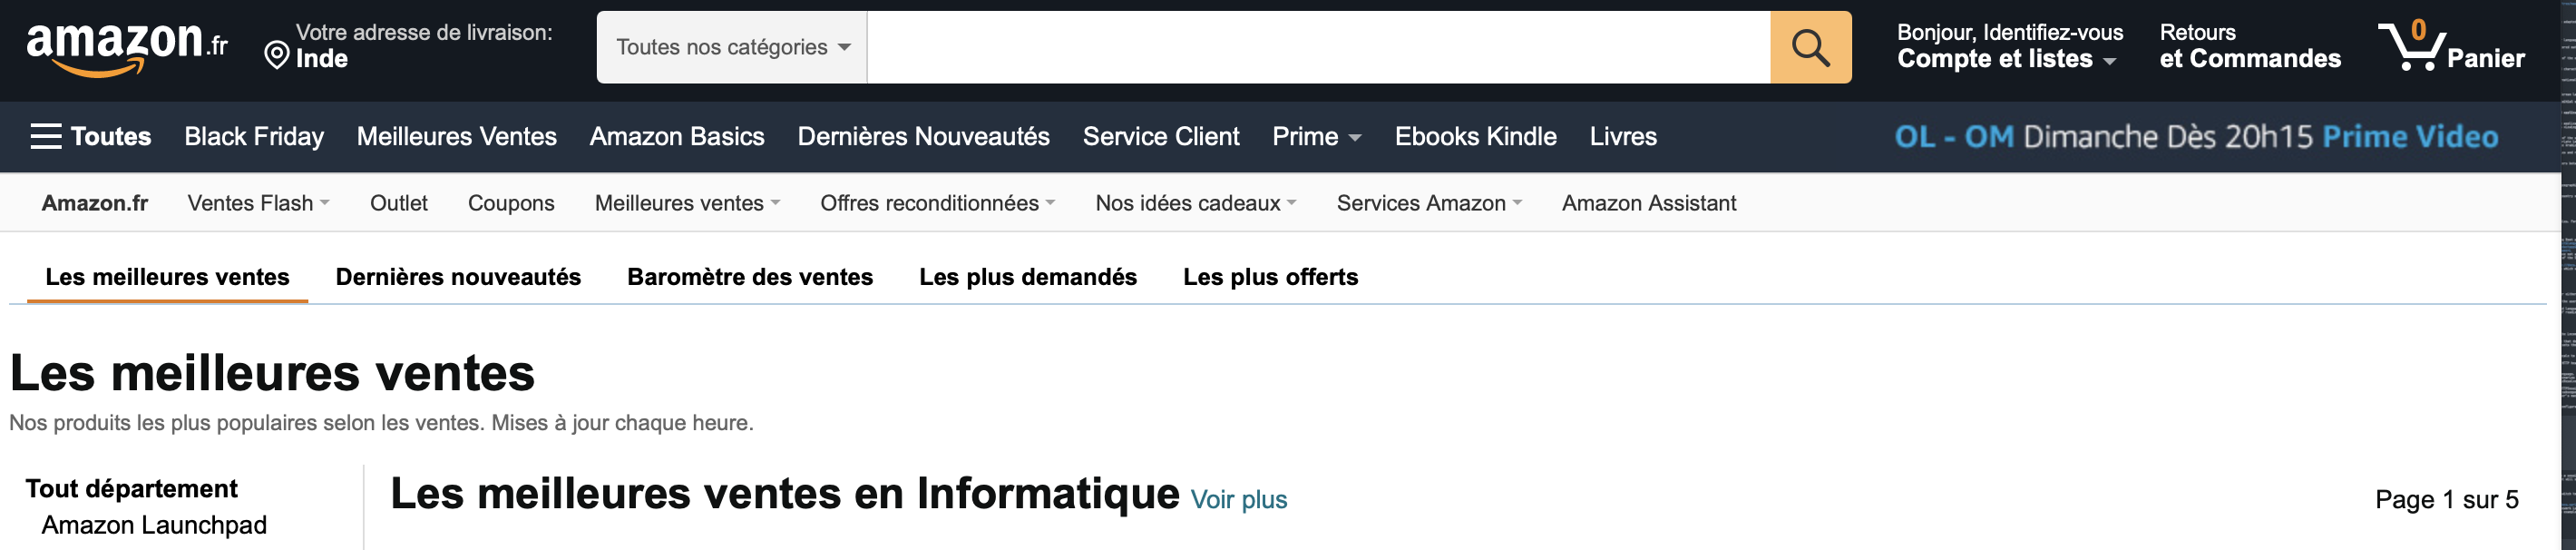
In these screenshots, we can observe that the content of the Amazon website is being rendered in the French and German languages depending on whether the HTTP URL used in the browser ends with .fr or .de.
Internationalization is most often a one-time process undertaken during the initial stages of design and development.
A related term: Localization is the process of adapting the internationalized application to a specific language and region by adding region-specific text and components.
For example, when we add support for the French language, we are localizing the application for French. Without localization, the text will be shown in the default English language to the user who is viewing the website from a non-English region.
Localization is usually conducted by translators on the user-facing components of the software. It also refers to localizing the time and date differences, currency, culturally appropriate images, symbols, spelling, and other locale-specific components (including the right-to-left (RTL) languages like Arabic).
Unlike internationalization, localization is the process of adding language files and region-specific content every time we add support for a new language.
Localization is also abbreviated as l10n because there is a total of 10 characters between the first letter l and the last letter n.
Introducing the Locale
A locale is a fundamental concept in internationalization. It represents a user’s language, geographical region, and any specific variant like dialect.
We use the locale of a user to tailor the information displayed to the user according to the user’s language or region. These operations are called locale-sensitive. For example, we can display a date formatted according to the locale of the user as dd/MM/yy or MM/dd/yy or display a number with a locale-specific decimal separator like a comma (3,14 in French) or dot (3.14 in the US).
Java provides the Locale class for working with internationalization use cases. The Locale class is used by many classes in Java containing locale-sensitive functions like the NumberFormat class used for formatting numbers.
We will see the use of locale to perform various kinds of locale-sensitive operations in the following sections using classes provided by Java as well as the helper classes like resolvers and interceptors in the Spring framework.
Creating the Spring Boot Application for Internationalization
To work with some examples of internationalization, let us first create a Spring Boot project with the help of the Spring boot Initializr, and then open the project in our favorite IDE. We don’t need to add any extra dependencies to the Maven pom.xml since the internationalization support is part of the core module of the Spring framework.
We will next create a web application with this project using Spring Web MVC framework which will render an HTML page in different languages depending on the user’s language selection.
Steps for Internationalization
Internationalization of applications broadly follows the below steps:
- Resolving the user’s preferred locale from the incoming request from the user either in the form of a request parameter, cookies, or a request header.
- Intercepting the change of locale in the incoming request and storing it in the user’s session or cookies.
- Defining locale-specific resources, for example, language files for supported languages.
- Mapping the region and language-sensitive elements in the view (HTML page, mobile app UI, etc) to elements capable of reading content at runtime based on the user’s language and region.
Let us look at these steps in detail in the following sections.
Resolving the Locale with LocaleResolver
This is invariably the first step for internationalization: identify the locale of a user.
We use the LocaleResolver interface for resolving the locale of a user from the incoming request.
Spring provides the following implementations of the LocaleResolver interface that determine the current locale based on the session, cookies, the Accept-Language header, or sets the locale to a fixed value:
FixedLocaleResolver: mostly used for debugging purposes. It resolves the locale to a fixed language mentioned in theapplication. properties.AcceptHeaderLocaleResolver: resolves the locale using anaccept-languageHTTP header retrieved from an HTTP request.
Sometimes web applications provide options to the users to select a preferred language. After a user selects a language, it is remembered for subsequent user interactions.
These scenarios of remembering a locale selected by a user are handled with the following implementations of LocaleResolver:
SessionLocaleResolver: stores the locale selected by a user in an attribute of HTTPSession of the user and resolves the locale by reading that attribute from the HTTPSession for all subsequent requests from the same user.CookieLocaleResolver: stores the locale selected by a user in a cookie on the user’s machine and resolves the locale by reading that cookie for all subsequent requests from the same user.
Let us update our application by adding a LocaleResolver bean to our Spring configuration class:
@Configuration
public class MessageConfig implements WebMvcConfigurer{


  @Bean
  public LocaleResolver localeResolver() {
      SessionLocaleResolver slr = new SessionLocaleResolver();
      slr.setDefaultLocale(Locale.US);
      slr.setLocaleAttributeName("session.current.locale");
      slr.setTimeZoneAttributeName("session.current.timezone");
      return slr;
  }

}
Here we have configured a SessionLocaleResolver that will store the locale in a session. The default locale is set to US. We have also set the names of the session attributes that will store the current locale and time zone.
Intercepting the Locale Change with LocaleChangeInterceptor
Next, our application will need to detect any change in the user’s locale and then switch to the new locale.
This function is performed with the help of the LocaleChangeInterceptor class.
The LocaleChangeInterceptor class is a specialization of the HandlerInterceptor component of the Spring MVC framework which is used for changing the current locale on every request, via a configurable request parameter (default parameter name: locale).
Let’s add a LocaleChangeInterceptor bean to our Spring configuration class:
@Configuration
public class MessageConfig implements WebMvcConfigurer{

  ...

  @Bean
  public LocaleChangeInterceptor localeChangeInterceptor() {
      LocaleChangeInterceptor localeChangeInterceptor
                      = new LocaleChangeInterceptor();
      localeChangeInterceptor.setParamName("language");
      return localeChangeInterceptor;
  }

  @Override
  public void addInterceptors(InterceptorRegistry registry) {
      registry.addInterceptor(localeChangeInterceptor());
  }

}
Here we have defined the LocaleChangeInterceptor bean in a Spring configuration class: MessageConfig that will switch to a new locale based on the value of the language parameter appended to an HTTP request URL.
For example, the application will use a German locale when the HTTP URL of the web application is http://localhost:8080/index?language=de based on the value of the request parameter language as de. Similarly, the application will switch to a French locale, when the HTTP URL of the web application is http://localhost:8080/index?language=fr.
We have also added this interceptor bean to the InterceptorRegistry.
The MessageConfig configuration class in this example, also implements the WebMvcConfigurer interface which defines the callback methods to customize the default Java-based configuration for Spring MVC.
Configuring the Resource Bundles
Now, we will create the resource bundles for defining various texts for the corresponding locales that we want to support in our application.
A resource bundle in the Java platform is a set of properties files with the same base name and a language-specific suffix.
For example, if we create messages_en.properties and messages_de.properties, they together form a resource bundle with a base name of messages.
The resource bundle should also have a default properties file with the same name as its base name, that is used as the fallback if a specific locale is not supported.
The following diagram shows the properties files of a resource bundle with a base name of language/messages:
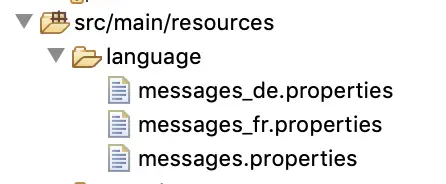
Here, we can see resource bundles for three languages: English, French, and German with English being the default.
Each resource bundle contains the same items, but the items are translated for the locale represented by that resource bundle.
For example, both messages.properties and messages_de.properties have a text with a key: label.title that is used as the title of a page as shown below:
Label in English defined in messages.properties:
label.title = List of Products
Label in German defined in messages_de.properties:
label.title = Produktliste
In messages.properties the text contains ‘List of Products’ and in messages_de.properties it contains the German Translation Produktliste.
Spring provides the ResourceBundleMessageSource class which is an implementation of the MessageSource interface and accesses the Java resource bundles using specified base names.
When configuring the MessageSource we define the path for storing the message files for the supported languages in a Sping configuration class as shown in this code snippet:
@Configuration
public class MessageConfig implements WebMvcConfigurer{

  @Bean("messageSource")
  public MessageSource messageSource() {
      ResourceBundleMessageSource messageSource =
               new ResourceBundleMessageSource();
      messageSource.setBasenames("language/messages");
      messageSource.setDefaultEncoding("UTF-8");
      return messageSource;
  }

  ...

}
Here we have defined the base name of our resource bundle as language/messages.
Alternatively we can configure the MessageSource in our application.properties file:
spring.messages.basename=language/messages
Internationalizing the View
Now it is time to internationalize the view which will render in the language of the user’s chosen locale.
One of the common techniques of internationalizing an application is by using placeholders for text in our user interface code instead of hardcoding the text in a particular language.
During runtime, the placeholder will be replaced by the text corresponding to the language of the user viewing the website. The view in our application will be defined in HTML where we will use Thymeleaf tags for the labels instead of hard coding a fixed text.
Thymeleaf is a Java template engine for processing and creating HTML, XML, JavaScript, CSS, and plain text.
Spring Boot provides auto-configuration for Thymeleaf when we add the thymeleaf starter dependency to Maven’s pom.xml:
    <dependency>
      <groupId>org.springframework.boot</groupId>
      <artifactId>spring-boot-starter-thymeleaf</artifactId>
    </dependency>
Adding the spring-boot-starter-thymeleaf dependency configures the necessary defaults including the path for HTML files for the view. By default, the HTML files are placed in the resources/templates location. We have created an HTML file index.html in the same path.
Here is the Thymeleaf HTML code to display the value associated with the key label.title in our resource bundle configured to a MessageSource bean in the Spring configuration class:
 <html>
  <head>
    <meta http-equiv="Content-Type" content="text/html; charset=utf-8" />
    <title data-th-text="#{label.title}"></title>
  </head>
  <body>
    <h2 data-th-text="#{label.title}"></h2>
    ...
    ...
  </body>
 </html>
In this HTML code snippet, we are using thymeleaf tags for the text for the HTML page title and header. The data-th-text=”#{key from properties file}” tag attribute is used to display values from property files configured as a MessageSource bean in the Spring configuration class in the previous section.
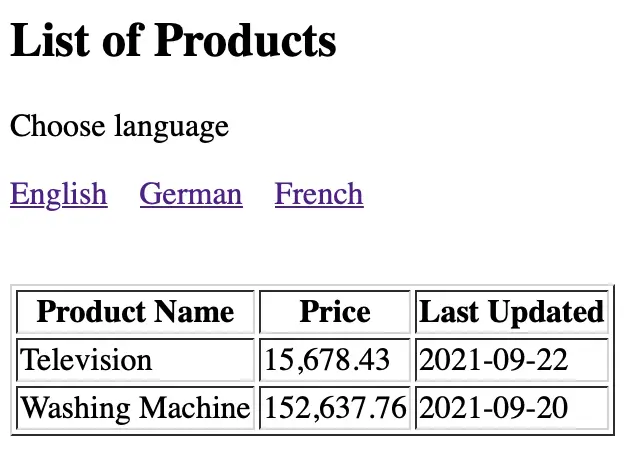
The values of the text for the key label.title for different locales are in the resource bundles for three languages: English, French, and German with English being the default:
Label in English defined in messages.properties:
label.title = List of Products
Label in French defined in messages_fr.properties:
label.title = Liste des produits
Label in German defined in messages_de.properties:
label.title = Produktliste
In messages.properties, we have assigned ‘List of Products’ as the value of the key label.title and the french and German translations of ‘List of Products’ text in messages_fr.properties and messages_de.properties for the same key.
We can similarly define the remaining HTML labels in the resource bundles:
The text for the English language are defined in the default message file messages.properties:
label.product.name = Product Name
label.product.price = Price
label.product.lastUpdated = Last Updated
label.title = List of Products
label.chooseLang = Choose language
...
Similarly the text for the French language are defined in messages_fr.properties :
label.product.name = Nom du produit
label.product.price = Prix
label.product.lastUpdated = Dernière mise à jour

label.title = Liste des produits
label.chooseLang = Choisissez la langue
...
As we can see from these resource bundles for the French and English (used as default), the keys for the values that will be localized are the same in every file.
If a key does not exist in a requested locale, then the application will fall back to the value of the key defined in the default locale. For example, if we do not define a key in the French language, then the text will be displayed in English language.
Adding the Spring MVC Components
At last, we will add the controller class for Spring MVC by annotating it with the @Controller annotation. This will mark the class as a Spring Controller which will contain the endpoints:
@Controller
public class ProductsController {

  @GetMapping("/index")
  public ModelAndView index() {

    ModelAndView modelAndView = new ModelAndView();
    modelAndView.setViewName("index");

    List<Product> products = fetchProducts();
    modelAndView.addObject("products", products);

    return modelAndView;
  }

  /**
   * Dummy method to simulate fetching products from a data source.
   *
   * @return
   */
  private List<Product> fetchProducts() {
    Locale locale = LocaleContextHolder.getLocale();

    List<Product> products = new ArrayList<Product>();

    Product product = new Product();
    product.setName("television");
    product.setPrice(localizePrice(locale, 15678.43));
    product.setLastUpdated(localizeDate(locale,
      LocalDate.of(2021, Month.SEPTEMBER, 22)));
    products.add(product);

    product = new Product();
    product.setName("washingmachine");

    product.setPrice(localizePrice(locale, 152637.76));
    product.setLastUpdated(localizeDate(locale,
      LocalDate.of(2021, Month.SEPTEMBER, 20)));
    products.add(product);
    return products;
  }

  private String localizeDate(final Locale locale, final LocalDate date ) {
    String localizedDate = DateTimeFormatter.ISO_LOCAL_DATE.format(date);
    return localizedDate;
  }


  private String localizePrice(final Locale locale, final Double price ) {
    NumberFormat numberFormat=NumberFormat.getInstance(locale);
    String localizedPrice = numberFormat.format(price);
    return localizedPrice;
  }
}
Here we have added ProductsController as the controller class. We have added the index method where we are populating the model for a collection of products. The view name is set to index which maps to the view index.html.
<!DOCTYPE html>
<html>
  <head>
    <meta http-equiv="Content-Type" content="text/html; charset=utf-8" />
    <title data-th-text="#{label.title}"></title>
  </head>
  <body>
...
...
    <table border="1">
 ...
 ...
      <tr th:each="product: ${products}">
        <td data-th-text="#{__${product.name}__}"></td>
        <td data-th-text="${product.price}" />
        <td data-th-text="${product.lastUpdated}" />
      </tr>
    </table>
  </body>
</html>
In this index.html, we have used the data-th-text to read the values from our resource bundles based on the user’s locale.
Running the Internationalized Application
Next, we run the application and open the URL: http://localhost:8080/index in the browser. The website is rendered in the default locale with the links for changing the language of the page to English, French, or German.
When we click on the links, the page is refreshed with the text elements rendered in the language selected by the user by a click on the link:
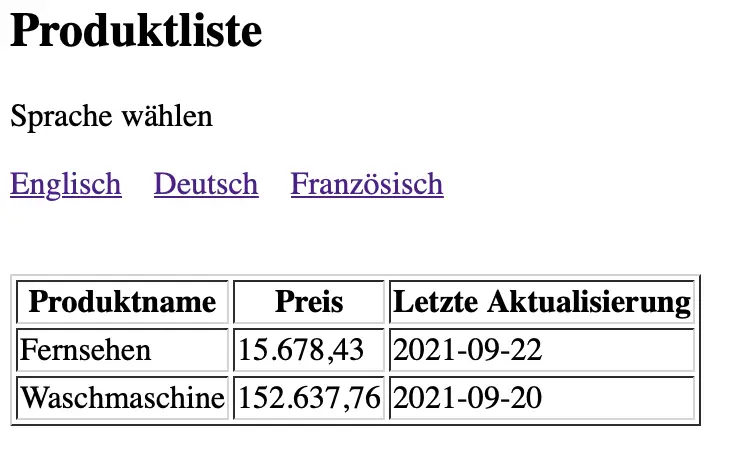
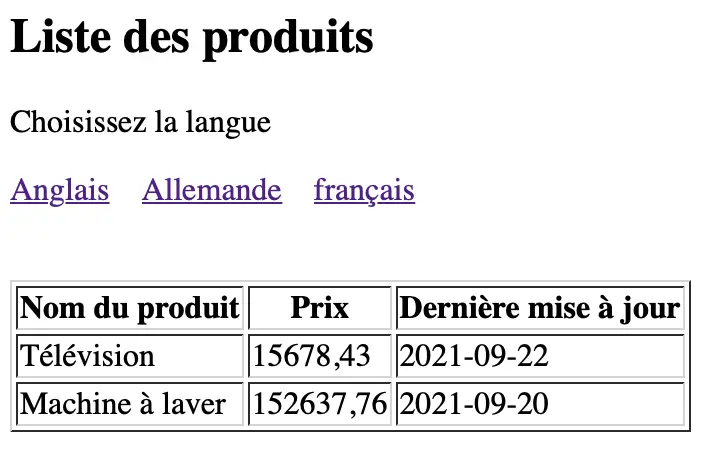
The links are formed with the URL appended with a parameter: language. The locale is switched with the help of LocaleChangeInterceptor defined in our Spring configuration class: MessageConfig that switches to a new locale based on the value of the language parameter appended to an HTTP request URL like http://localhost:8080/index?language=de, as explained in a previous section.
Conclusion
Here is a list of the major points for a quick reference:
- Internationalization is a mechanism to create multilingual software that can be adapted to different languages and regions.
- A related term: Localization is the process of adapting the internationalized application to a specific language and region by adding region-specific text and components.
- A locale in the context of internationalization represents a user’s language, geographical region, and any specific variant like dialect.
- Language-specific text is defined in a resource bundle which is a set of properties files with the same base name and a language-specific suffix.
- Spring Boot uses the
ResourceBundleMessageSourceto access the Java resource bundles using specified base names. - The user’s locale is resolved from the incoming request through the
LocaleResolverclass and change in the locale is intercepted by theLocaleChangeInterceptorclasses.
You can refer to all the source code used in the article on Github.