In the good old days, we implemented web applications with a server-side web framework. The browser sends a request to the server, the server processes the request and answers with HTML, the browser renders that HTML.
Nowadays, every application frontend seems to be a single page application (SPA) that loads a bunch of Javascript at the start and then uses Javascript-based templating to render the frontend.
What if we combine the two? This article shows a way of combining Vue.js components with a Thymeleaf-based server-side web application.
I’m using this method in blogtrack.io, a blog tracking service going into beta soon, and I’m very happy with it.
Example Code
This article is accompanied by a working code example on GitHub.The Problems of SPAs
While SPAs allow for building more interactive, desktop-like applications, they also introduce new problems:
- we need a mechanism to load only the Javascript resources we need on a certain page,
- we might need to render part of the page on the server so that the user doesn’t see a blank page (time to first content),
- we have to handle page refreshs and the back-button,
- we have to handle analytics ourselves because analytics providers usually only count when a page is loaded,
- … and a whole bunch of other problems I don’t pretend to understand.
Solutions to many of these problems exist, but they add new problems (like the “time to interactive” metric) and complexity to the SPA frameworks, making them harder to use and understand. This leads to SPA fatigue.
But building applications with only old-school server-side web frameworks is not a solution, either. We want modern, interactive frontends, for which we need Javascript.
So, what if we use a server-side web framework to render HTML that includes some Javascript components here and there, to add this interactivity?
Reusable Javascript Components
The goal is to create narrowly scoped, potentially re-usable Javascript components that we can place into the HTML rendered by our server-side web framework using <script> tags.
However, we don’t want to simply hack some untested Javascript that adds some JQuery here and there (it’s not the 90s anymore!) but take advantage of the rich feature set that today’s SPA frameworks bring to the table.
We want:
- to preview the Javascript components without starting the server-side application,
- to write and run tests for these Javascript components,
- to include selected Javascript components in a server-rendered HTML page without loading all of them,
- to minify the Javascript, and
- to integrate the build of the Javascript components with the build of the server-side application.
Let’s see how we can achieve this by using client-side Vue.js components in HTML pages generated with the server-side templating engine Thymeleaf.
The Sample Project
For this article, imagine we’re building a dashboard application that displays some charts. We want to integrate the Chart.js library to create those charts. But instead of just adding hand-rolled, untested Javascript to our server-side HTML templates, we want to wrap those charts in components built with Vue.js.
We’re using server-generated HTML to render the layout and all the static and dynamic content that doesn’t require Javascript and only use Vue.js components for the interactive Javascript components.
In our project directory, we create a folder for the server-side Spring Boot application and another for the client-side Javascript components:
thymeleaf-vue
├── server
└── client
Let’s fill these folders with live!
Setting up the Server-Side Web Application with Spring Boot & Thymeleaf
We start by building a Spring Boot application that serves a page generated with the Thymeleaf templating engine.
We can let Spring Boot Initializr generate a ZIP file for us and extract the contents into the server folder (actually, we need to move the Gradle files back into the main folder - see the example project on Github for the final folder structure.
Next, we create the page template src/main/resources/templates/hello-vue.html:
<html>
  <body>
  <h1 th:text="${title}">This title will be replaced</h1>
  <p> Here comes a Vue component!</p>
  </body>
</html>
This is just a simple “Hello World”-style page that displays a title that is defined by the backend. We’re going to add a Vue.js component to it later.
Also, we add a controller that serves this page:
@Controller
class HelloVueController {

  @GetMapping("/")
  ModelAndView showHelloPage() {
  Map<String, Object> model = new HashMap<>();
  model.put("title", "Hello Vue!");
  return new ModelAndView("hello-vue.html", model);
  }

}
If we start the application with ./gradlew bootrun and go to http://localhost:8080/, we should see this page:

We now have a working server-side web application driven by a Thymeleaf template. Time to create some Javascript components.
Building a Javascript Chart Component with Vue.js
For the client-side Javascript components, we’ll use Vue.js, which is a framework we can use to create SPAs, but which specifically supports exporting components to be consumed outside of a SPA.
We’ll need Node.js installed on our machine to support the Vue development environment.
When Node is installed, we can install the Vue CLI:
npm install -g @vue/cli
This brings us the vue command, which we use to create our Vue project. From the parent folder of our project (thymeleaf-vue), we run
vue create client
to create the client subfolder and fill it with a default Vue application. We end up with a file structure like this:
thymeleaf-vue
├── server
└── client
  ├── src
  |   ├── assets
  |   └── components
  └── package.json
I omitted some files for clarity.
Now, we want to create a Vue component that displays a chart. Let’s say the chart shall take 7 numbers as input, one for each day in the week, and display them in a bar chart.
Note that the chart is just an example. We can create any simple or complex client-side Javascript component with our without Vue.js and use it in a server-side template.
First, we add the dependency to chart.js to our package.json file:
npm install --save chart.js
Next, we create our WeekChart component as a single file component:
<template>
  <div class="chart-container">
  <canvas ref="chart"></canvas>
  </div>
</template>

<script>
import Chart from "chart.js";

export default {
  name: "WeekChart",

  props: {
    chartData: {
      type: Array,
      required: true,
    },
  },

  mounted: function() {
    const config = {
      type: "bar",
      data: {
        labels: [
          "Monday",
          "Tuesday",
          "Wednesday",
          "Thursday",
          "Friday",
          "Saturday",
          "Sunday"],
        datasets: [
          {
          data: this.chartData
          },
        ]
      },
  };

  new Chart(this.$refs.chart, config);
  }
};
</script>

<style scoped>
.chart-container {
  position: relative;
  height: 100%;
  width: 100%;
}
</style>
This component bundles the HTML markup, some Javascript, and some CSS into a self-sufficient UI component. Note that we’re importing the Chart object from the chart.js library. The component has a single input parameter (or “prop” in JS lingo) called chartData, which takes an array of values - one value for each day of the week.
Within the mounted function, we’re creating a chart configuration according to the chart.js docs, pass the chartData input parameter into this config, and finally bind this config to the <canvas> element in the template section via the ref=chart attribute.
In package.json, we change the build script so that it builds our component as a library instead of a SPA:
{
  ...
  "scripts": {
    ...
    "build": "vue-cli-service build --target lib --dest dist/WeekChart --name WeekChart src/components/WeekChart.vue",
  },
  ...
}
If we run npm run build now, the Vue CLI will create several different versions of our WeekChart component in the dist folder. The one we’re interested in is WeekChart.umd.min.js, which is a self-sufficient Javascript file containing all dependencies (except for Vue itself) that we can include in any HTML page.
Previewing the Vue Component with Storybook
Now that we’ve built a chart component, we want to see if it works without having to embed it into our application. For this, we’ll use Storybook.
Integrating Storybook with Vue is surprisingly simple, we merely have to execute this command in our client folder:
npx -p @storybook/cli sb init --type vue
This adds a storybook script and all required dependencies to our package.json and creates a folder stories, which now contains some sample “stories”.
We’ll add a story to the storybook by creating the file stories/WeekChart.stories.js with this content:
import WeekChart from '../src/components/WeekChart.vue';

export default {
  title: 'WeekChart',
  component: WeekChart,
};

export const DefaultState = () => ({
  components: {
  chart: WeekChart
  },
  template: `<chart v-bind:chartData="[1,2,3,4,5,6,7]" />`
});
This file creates an instance of our WeekChart component with the name DefaultState and exports it so that Storybook can pick it up and include it in its GUI.
Running npm run storybook will start a local web server and serve the stories in a nice UI when we open http://localhost:6006 in a browser:
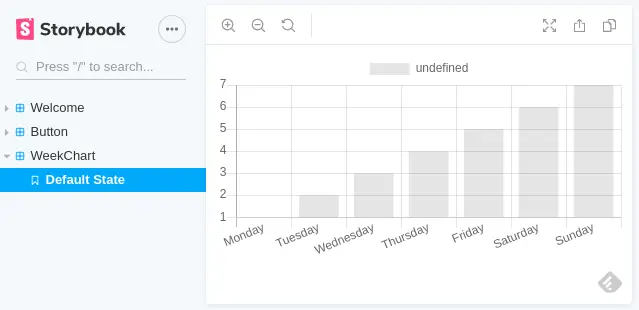
We know that our bar chart component is working now. Storybook is nice to use during development to make sure that our changes have the desired effect. But if we do a refactoring to any of our components and forget to check it in Storybook, we may still break our components. So, let’s add an automated test that runs during the build.
Adding a Unit Test for the Vue Component
We want to create tests for each of our Vue components that run during the CI build to make sure that errors in a component will break the build. For this, we rely on Jest, a popular Javascript testing framework that integrates well with Vue.js.
To set up Jest in our project, we add the following entries to our package.json file:
{
  ...
  "scripts": {
    ...
    "test": "vue-cli-service test:unit"
  },
  "devDependencies": {
    ...
    "@vue/cli-plugin-unit-jest": "^4.4.0",
    "@vue/test-utils": "^1.0.3"
  }
}
This adds the dependencies needed to work with Jest in Vue, and it adds a script to execute the tests. Don’t forget to run npm install after modifying the dependencies in package.json.
Also, we create the file jest.config.js to configure Jest to work with *.vue files:
module.exports = {
  preset: "@vue/cli-plugin-unit-jest",
  collectCoverage: true,
  collectCoverageFrom: ["src/**/*.{js,vue}", "!**/node_modules/**"],
  coverageReporters: ["html", "text-summary"]
};
Next, we create a test for our WeekChart component in src/tests/unit/WeekChart.spec.js:
import { shallowMount } from "@vue/test-utils";
import WeekChart from "../../components/WeekChart.vue";

describe("WeekChart", () => {
  it("renders without error", () => {
    const wrapper = shallowMount(WeekChart, {
      propsData: {
      chartData: [1, 2, 3, 4, 5, 6, 7],
      },
    });

    const chart = wrapper.findComponent({ name: "WeekChart" });
    expect(chart.exists()).toBe(true);
  });

});
We can run the test with npm run test.
The test will pass, but it will show some error output on the console:
Error: Not implemented: HTMLCanvasElement.prototype.getContext
  (without installing the canvas npm package)
This is because our chart component relies on a canvas element, which is not supported in the Jest runtime environment. But we want the test to fail in this case! So, we configure the Jest runtime to throw an error when it encounters this error log. For this, we create the file jest/console-error-to-exception.setup.js:
import { format } from "util";

beforeEach(() => {
  const { error } = global.console;

  global.console.error = (...args) => {
    for (let i = 0; i < args.length; i += 1) {
      const arg = args[i];

      // add patterns here that should fail a test
      if (typeof arg === "string" &&
           (arg.includes("Vue warn") || arg.includes("Not implemented"))) {
        throw new Error(format(...args));
      }
    }
    error(...args);
  };
});
This will intercept calls to console.error() and re-throw them as an error if they match a certain pattern. The patterns include the “not implemented” error we encountered before and Vue warnings.
We now need to tell Jest to run this code before every test by adding the file to jest.config.js:
module.exports = {
  ...
  setupFilesAfterEnv: [
    "./jest/console-error-to-exception.setup.js"
  ]
};
If we run the test again, it will now fail with the same error message as above. Here’s the source where I got this idea.
To fix the underlying problem of the unavailable canvas element, we add a mock canvas to our development dependencies in package.json:
npm install --save-dev jest-canvas-mock
Also, we add another Jest setup file in /jest/mock-canvas.setup.js with a single import statement:
import 'jest-canvas-mock';
and add this file to jest.config.js to be executed for all tests:
module.exports = {
  ...
  setupFilesAfterEnv: [
    ...
    "./jest/mock-canvas.setup.js"
 ]
};
Now, the tests will have access to a mock Canvas element and the test will be green.
The test will now tell us when we broke something.
Integrating the Vue Build into the Spring Boot Build
We have a Spring Boot application that’s being built with a Gradle process (you can probably also do it with Maven, but I’m a Gradle fanboy) and a Vue component that is built with NPM. We want to include our Vue component in the Spring Boot application so it can serve the Javascript together with the HTML. How do we do that?
The solution I went for is to wrap the Javascript build within Gradle. When the Gradle build starts, it triggers the NPM build, creating ready-for-use Javascript files that we can include in our HTML pages. All we need to do then is to copy those Javascript files to a location where they will be picked up when the Spring Boot application is packaged.
The first step is to make our client folder a module in the Gradle build. For this, we create a file build.gradle in this folder:
plugins {
  id "com.github.node-gradle.node" version "2.2.4"
}

apply plugin: 'java'

task npmBuild(type: NpmTask) {
	inputs.dir("src")
	outputs.dir("dist")
	args = ['run', 'build']
}

task npmClean(type: NpmTask) {
	args = ['run', 'clean']
}

jar {
	into '/static', {
		from 'dist'
		include '**/*.umd.min.js'
	}
}

jar.dependsOn('npmBuild')
clean.dependsOn('npmClean')
We include the Gradle Node Plugin which enables us to call NPM tasks from within our Gradle build.
We also apply the Java plugin, which allows us to create a JAR file as an output of the build.
We create the tasks npmBuild and npmClean which call npm run build and npm run clean, respectively.
Then, we configure the jar task so that the resulting JAR file will contain a folder static with all files from the dist folder. Finally, with dependsOn, we configure that the npmBuild task will run before the jar task, because the npmBuild task will create the files that the jar task needs.
The static folder has a special meaning in Thymeleaf: it’s content will be served by the web server, so that it can be accessed from the browser. This is important in our case, since we want the browser to load the Javascript files with our Vue components.
Since with the server and the client folders we now have a multi-module Gradle build, we need to create a settings.gradle file in the parent directory that lists all the modules:
rootProject.name = 'thymeleaf-vue'

include 'client'
include 'server'
And finally, in the build.gradle file of the server module, we need to add the dependency to the client project:
dependencies {
  implementation project(':client')
  ...
}
Using the Vue Component in a Thymeleaf Template
If we build the project now with ./gradlew build, we get a Spring Boot application that carries the file WeekChart.umd.min.js in its belly. That means we can use it in our Thymeleaf template hello-vue.html that we have created at the start of this article:
<html>
  <body>
  <h1 th:text="${title}">This title will be replaced</h1>
  <p> Here comes a Vue component!</p>

  <div id="chart">
    <chart th:v-bind:chart-data="${chartData}"></chart>
  </div>

  <script src="https://unpkg.com/vue"></script>
  <script th:src="@{/WeekChart/WeekChart.umd.min.js}"></script>
  <script>
    (function() {
      new Vue({
        components: {
          chart: WeekChart
        }
      }).$mount('#chart')
    })();
  </script>

  </body>
</html>
We’ve added a <div> with the id chart that contains an instance of our WeekChart component.
We want to provide the data to the chart from the server, so we add a th: (for “thymeleaf”) in front of the attribute v-bind:chart-data that is expected by vue to pass an array prop into the component. This will let Thymeleaf know that we want this attribute populated with the value of the chartData variable.
Also, we added <script> tags to load Vue.js and our chart component (which will be served from out of the JAR file of the client module). And another <script> tag to instantiate the Vue component and bind it to the <chart> tag within the chart div.
Finally, we need to modify our server-side controller so that it populates the chartData variable:
@Controller
class HelloVueController {

  @GetMapping("/")
  ModelAndView showHelloPage() {
    Map<String, Object> model = new HashMap<>();
    model.put("title", "Hello Vue!");
    model.put("chartData", Arrays.asList(7,6,5,4,3,2,1));
    return new ModelAndView("hello-vue.html", model);
  }

}
Running ./gradlew bootrun and opening http://localhost:8080/ in a browser will now proudly show our Vue chart component on the page, populated with data from the server.
Conclusion
We have created a Spring Boot application with the server-side template engine Thymeleaf and a Javascript component library that provides a Javascript component built with NPM and Vue. The result is a hybrid application that allows the server-side template engine to create static HTML pages while including Javascript components that allow more interactivity.
We have established a proper development environment for both, the server-side Java part, and the client-side Javascript part.
There’s certainly more tweaking necessary to get this integration of Vue.js and Thymeleaf customized to a specific project (sharing CSS between client and server, bundling Javascript components together or not, …) but this article has laid the foundation.
I’m using this method in my service at blogtrack.io and might report about its evolution in the future.
A working example including all the bits and pieces that this article glossed over is available on Github.


