Whenever we deploy a new version of an application, we may break things or the users may not like the changes. To reduce the risk, we can hide our changes behind feature flags to activate them for more and more users over time. If things don’t work out, we can just deactivate the feature flag again without redeploying.
But we can also use feature flags for certain administrative use cases as we’ll see in this article.
Example Code
This article is accompanied by a working code example on GitHub.Use-cases of Feature Flags
Feature flags are commonly used for these use cases:
- Increase deployment success rate by reducing the number of rollbacks caused by errors during deployment.
- Progressively roll out new features to more and more users.
- Minimize the risk of a release by first releasing something like a beta version to a limited group of users.
- Test various kinds of user acceptance.
A less common use case for feature flags is to perform administrative tasks that change the application behavior at runtime. These admin tasks can be one of the following, for example:
- Changing the log level: We can set the application log level as a feature flag, then load it during server bootstrap or listen to its changing events and update it dynamically in the backend.
- Manage batch job size: Usually batch processing applications are configured with a default batch size which needs to be tuned depending on usage. If we set the batch size as a feature flag, we can dynamically load it and change the batch size on-demand.
- Manage rate limits: If an application provides an API, we often want to rate limit the customers' access to that API. Some customers may need a higher rate limit than others. If we set the rate limit as a feature flag, we can dynamically change the rate limit for each customer.
- Maintain a list of IPs: Applications or websites may want to restrict access to certain IPs or geolocations only. Setting those IPs as a feature flag, we can change it on-demand while the application is running.
- Update cron job schedules: Usually, scheduled jobs are configured with a hard-coded cron expression. We can make that cron expression dynamic by setting it as a feature flag.
- Gathering of metrics: We can define rules to gather system metrics. These rules can be modified using feature flags dynamically whenever we need to perform any kind of maintenance.
- Show or hide Personally Identifiable Information (PII) in logs: Sometimes, we need certain data in logs to help investigate a support case. But we don’t want to log this data all the time. With a feature flag, we can enable certain log data on-demand.
Of course, we can build all these things into our application. But to quickly modify those admin settings on-demand, a feature management platform like LaunchDarkly can do the work for us.
In this article, we’ll take a look at how to implement some of the above use cases with LaunchDarkly and Node.js. The concepts also apply to any other feature flagging solution and programming language, however.
Introducing LaunchDarkly
LaunchDarkly is a feature management service that takes care of all the feature flagging concepts. The name is derived from the concept of a “dark launch”, which deploys a feature in a deactivated state and activates it when the time is right.

LaunchDarkly is a cloud-based service and provides a UI to manage everything about our feature flags. For each flag, we need to define one or more variations. The variation can be a boolean, an arbitrary number, a string value, or a JSON snippet.
We can define targeting rules to define which variation a feature flag will show to its user. By default, a targeting rule for a feature flag is deactivated. The simplest targeting rule is “show variation X for all users”. A more complex targeting rule is “show variation A for all users with attribute X, variation B for all users with attribute Y, and variation C for all other users”.
We can use the LaunchDarkly SDK in our code to access the feature flag variations. It provides a persistent connection to LaunchDarkly’s streaming infrastructure to receive server-sent-events (SSE) whenever there is a change in a feature flag. If the connection fails for some reason, it falls back to default values.
Initial Setup in Node.js
LaunchDarkly supports lots of clients in different programming languages. For Node.js, they have created the launchdarkly-node-server-sdk library. We will use this library as a dependency in our code.
To create our backend service, we need to first initiate the repo by executing:
npm init
Then we can try installing all the packages at once by executing the following command:
npm install launchdarkly-node-server-sdk express
We are going to use launchdarkly-node-server-sdk to connect to the LaunchDarkly server to fetch the feature flag variations. We’re also going to create an express server that will listen to a particular port and host our application’s API.
Next, we need to create an account with LaunchDarkly. You can sign up for a free trial here. After signing up, you are assigned an SDK Key under the default project and default environment:
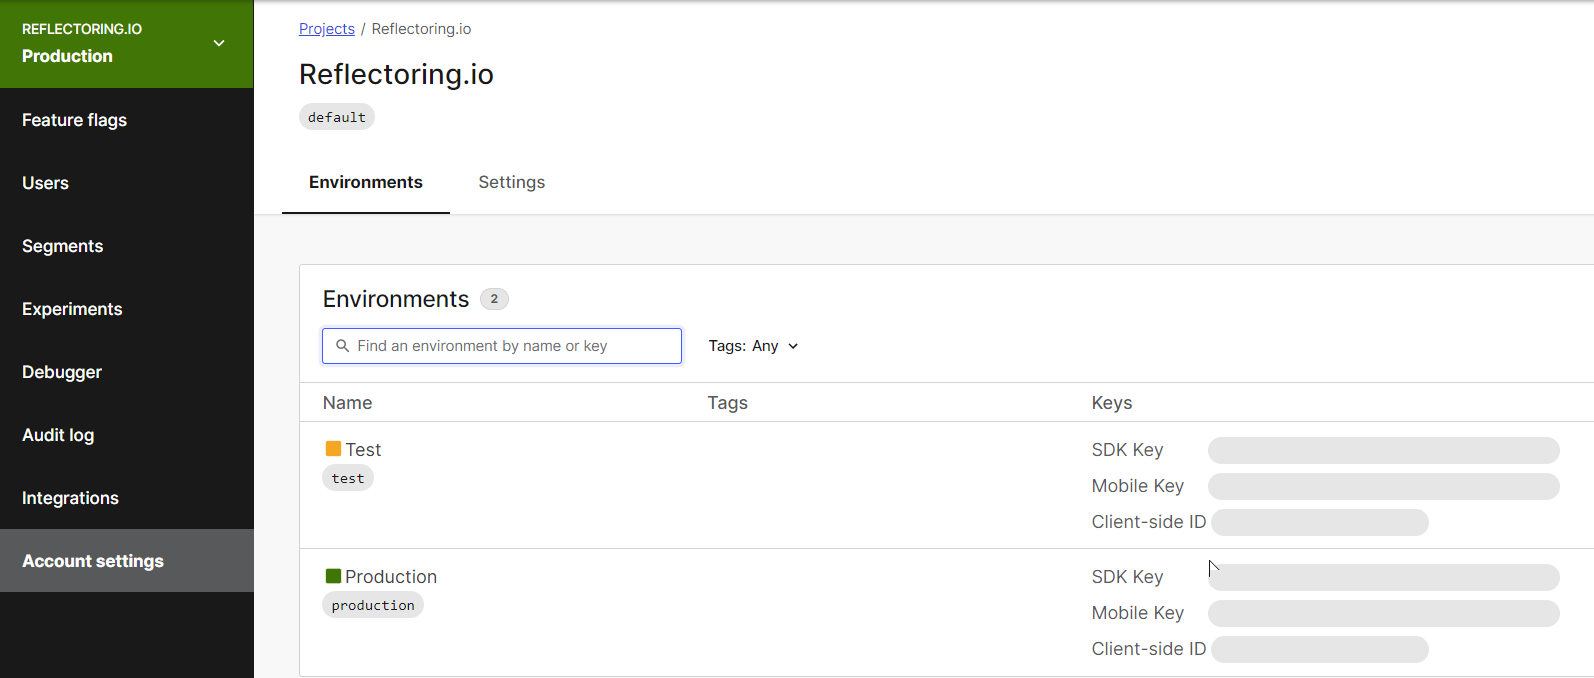
We will use this SDK key in our code to authenticate with the LaunchDarkly server.
Server-side Bootstrapping with LaunchDarkly
First, we’ll try a very simple use case where we can fetch a feature flag from LaunchDarkly and use it as part of our server-side bootstrap code and subscribe to it before the server starts serving requests. Let’s first add some libraries like date-fns and lodash to design a custom logger:
npm install date-fns lodash
Then we will create a Logger class which will have a constructor and some static and normal methods defined for each log level:
import { format } from 'date-fns';
import padEnd from 'lodash/padEnd.js';
import capitalize from 'lodash/capitalize.js';

const LEVELS = { debug: 10, log: 20, warn: 30, error: 40 };
let currentLogLevel = LEVELS['debug'];

class Logger {
  constructor(module) {
    this.module = module ? module : '';

    this.debug = this.debug.bind(this);
    this.log = this.log.bind(this);
    this.warn = this.warn.bind(this);
    this.error = this.error.bind(this);
    this.writeToConsole = this.writeToConsole.bind(this);
  }

  static setLogLevel(level) {
    currentLogLevel = LEVELS[level];
  }

  static get(module) {
    return new Logger(module);
  }

  writeToConsole(level, message, context = '') {
    if (LEVELS[level] >= currentLogLevel) {
      const dateTime = format(new Date(), 'MM-dd-yyyy HH:mm:ss:SSS');
      const formattedLevel = padEnd(capitalize(level), 5);
      const formattedMessage = `${dateTime} ${formattedLevel} [${
        this.module
      }] ${message}`;
      console[level](formattedMessage, context);
    }
  }

  debug(message, context) {
    this.writeToConsole('debug', message, context);
  }

  log(message, context) {
    this.writeToConsole('log', message, context);
  }

  warn(message, context) {
    this.writeToConsole('warn', message, context);
  }

  error(message, context) {
    this.writeToConsole('error', message, context);
  }
}

export default Logger;
Then we will define a flag in LaunchDarkly with the name backend-log-level where we can add a default variation as debug. The goal is that we can change the log level in LaunchDarkly any time we need to:
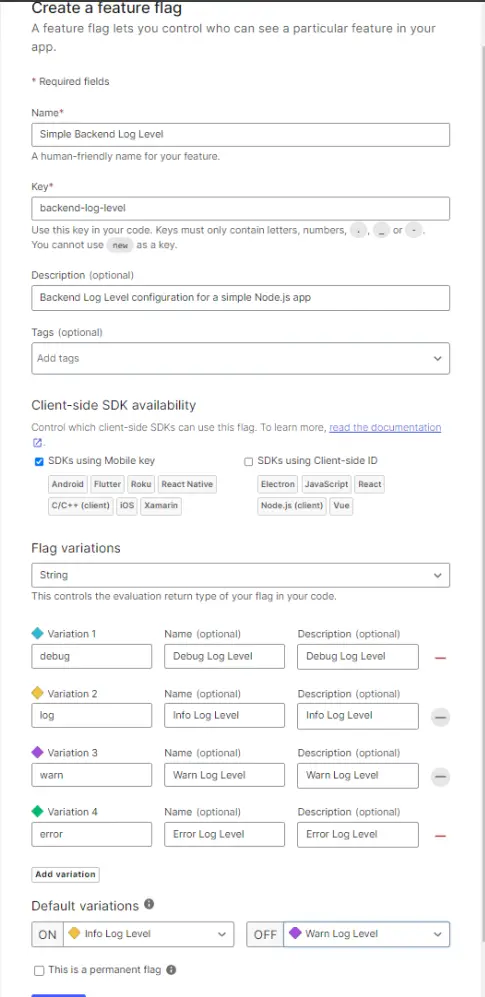
Next, we will create a file named bootstrap.js that subscribes to the log level flag before we initiate the express app to serve our APIs:
import util from 'util';
import express from 'express';
import LaunchDarkly from 'launchdarkly-node-server-sdk';
import Logger from './logger.js';

const PORT = 5000;
const app = express();
const simpleLogger = new Logger('SimpleLogging');

const LD_SDK_KEY = 'sdk-********-****-****-****-************';
const LOG_LEVEL_FLAG_KEY = 'backend-log-level';
const client = LaunchDarkly.init(LD_SDK_KEY);
const asyncGetFlag = util.promisify(client.variation);

client.once('ready', async () => {
  const user = {
    anonymous: true
  };
  const initialLogLevel = await asyncGetFlag(LOG_LEVEL_FLAG_KEY, user, 'debug');
  Logger.setLogLevel(initialLogLevel);

  app.get('/', (req, res) => {
    simpleLogger.debug('detailed debug message');
    simpleLogger.log('simple log message');
    simpleLogger.warn('Warning warning do something');
    simpleLogger.error('ERROR! ERROR!');
    res.sendStatus(200);
  });

  app.listen(PORT, () => {
    simpleLogger.log(`Server listening on port ${PORT}`);
  });
});
Note that in a real application the SDK key should be provided via an environment variable and shouldn’t be hardcoded.
To execute code only when the LaunchDarkly client is ready, we have two mechanisms: an event or a promise.
With client.once('ready', ...), we subscribe to the ready event which will fire once the LaunchDarkly client has received the state of all feature flags from the server.
For the promise mechanism, the SDK supports two methods: waitUntilReady() and waitForInitialization(). The behavior of waitUntilReady() is equivalent to the ready event. The promise resolves when the client receives its initial flag data. As with all promises, you can either use .then() to provide a callback, or use await if you are writing asynchronous code. The other method that returns a promise, waitForInitialization(), is similar to waitUntilReady() except that it also tells you if initialization fails by rejecting the promise.
Next, we can define the bootstrap script as part of package.json:
{
	"scripts": {
    	"bootstrap": "node bootstrap.js"
  	}
}
Then we can execute the following command to run our app:
npm run bootstrap
Finally, when we hit the API with the endpoint http://localhost:5000 we get to see the following log message being printed (assuming the feature flag is set to debug):
info: [LaunchDarkly] Initializing stream processor to receive feature flag updates
info: [LaunchDarkly] Opened LaunchDarkly stream connection
07-26-2022 11:54:58:193 Debug [Backend] detailed debug message
07-26-2022 11:54:58:195 Log   [Backend] simple log message
07-26-2022 11:54:58:196 Warn  [Backend] Warning warning do something
07-26-2022 11:54:58:197 Error [Backend] ERROR! ERROR!
Performing Admin Operations with Feature Flags
LaunchDarkly supports something named “multivariate” flags apart from the simple boolean, String or JSON values. A multivariate feature flag could be a list of different strings, numbers or booleans. We have already seen a multivariate flag that controls the log level. Let’s look at a few different use cases in which long-lived multivariate flags can control our application dynamically.
Changing the Log Level Without Restarting the Server
The first flag type we can start with is to use the same log-level concept that we saw earlier. In the above section, we just retrieved the log level flag and started our server. But if we need to change the log level, we would need to restart our server for the changes to take effect. Let’s try to make the log level change dynamically without server restart.
First of all, we will define a multivariate flag with the following string variations:
debugerrorinfowarn
In the LaunchDarkly UI, it looks like this:
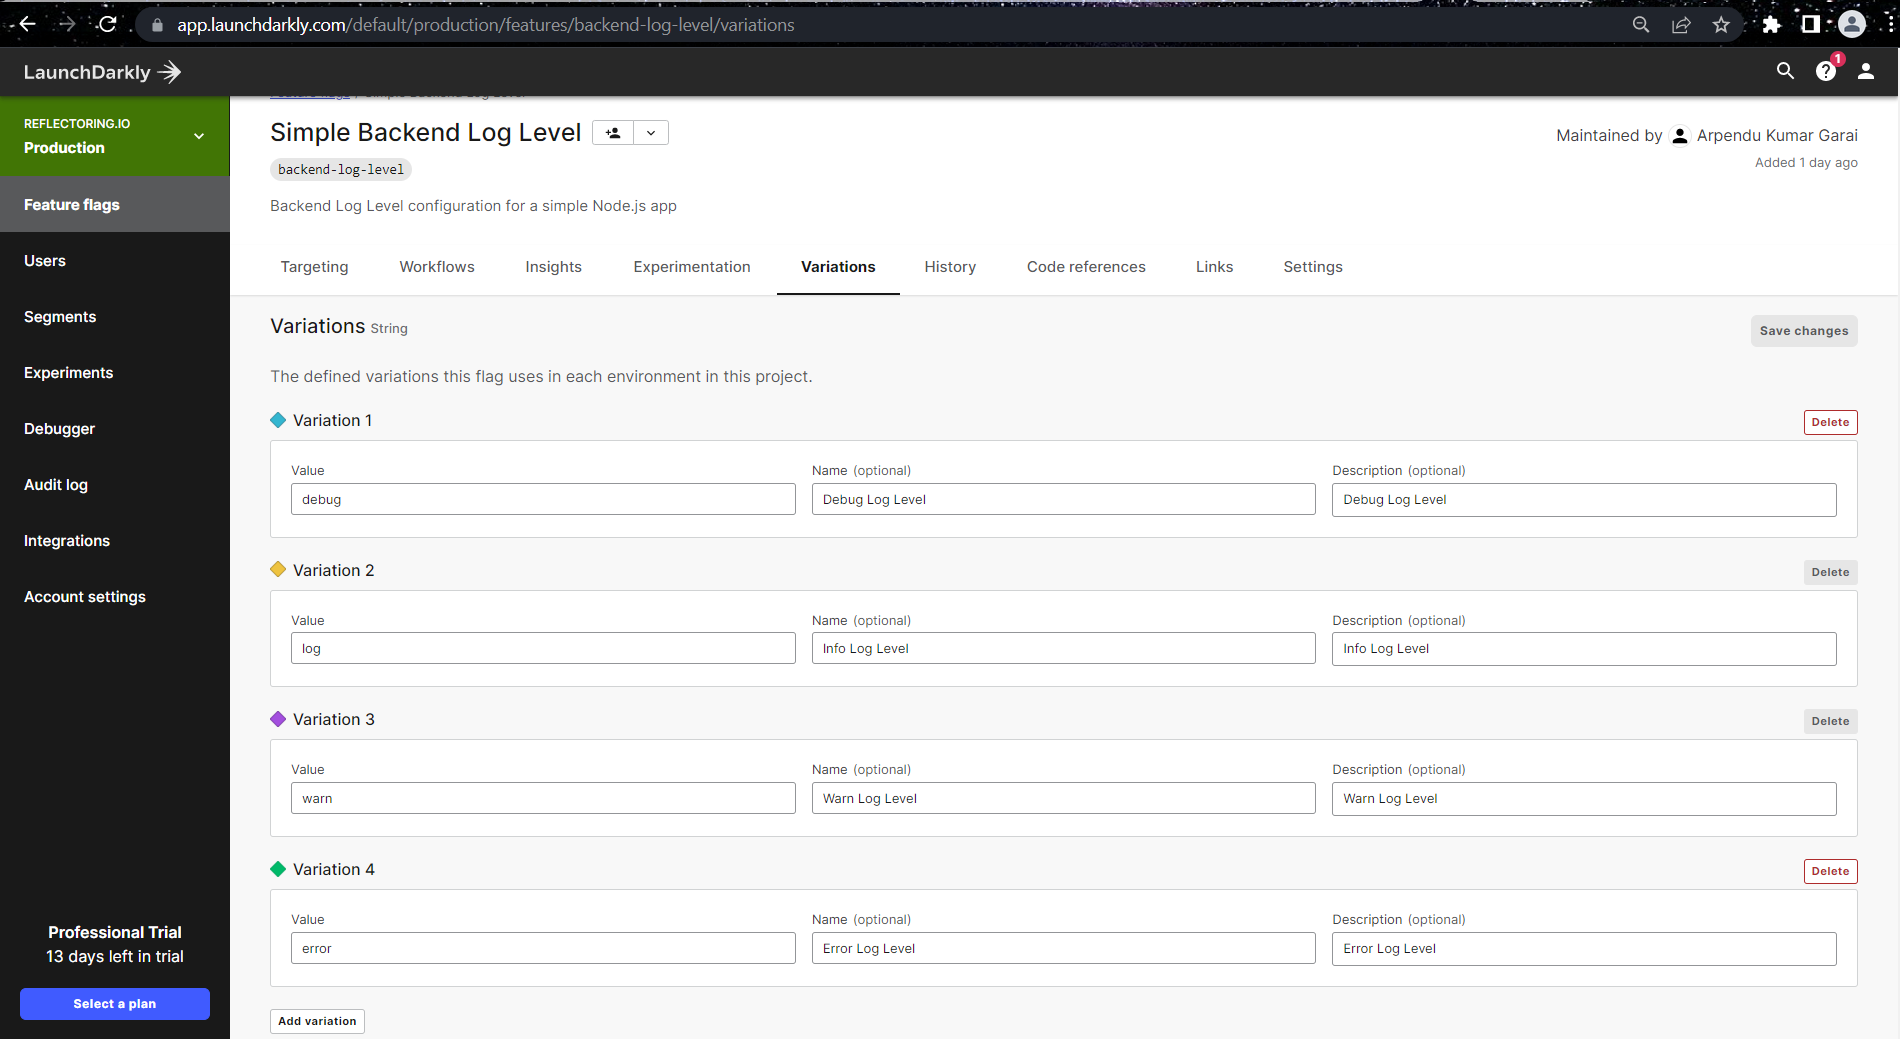
Next, we can define targeting values that would deliver one of the multivariate strings defined above:
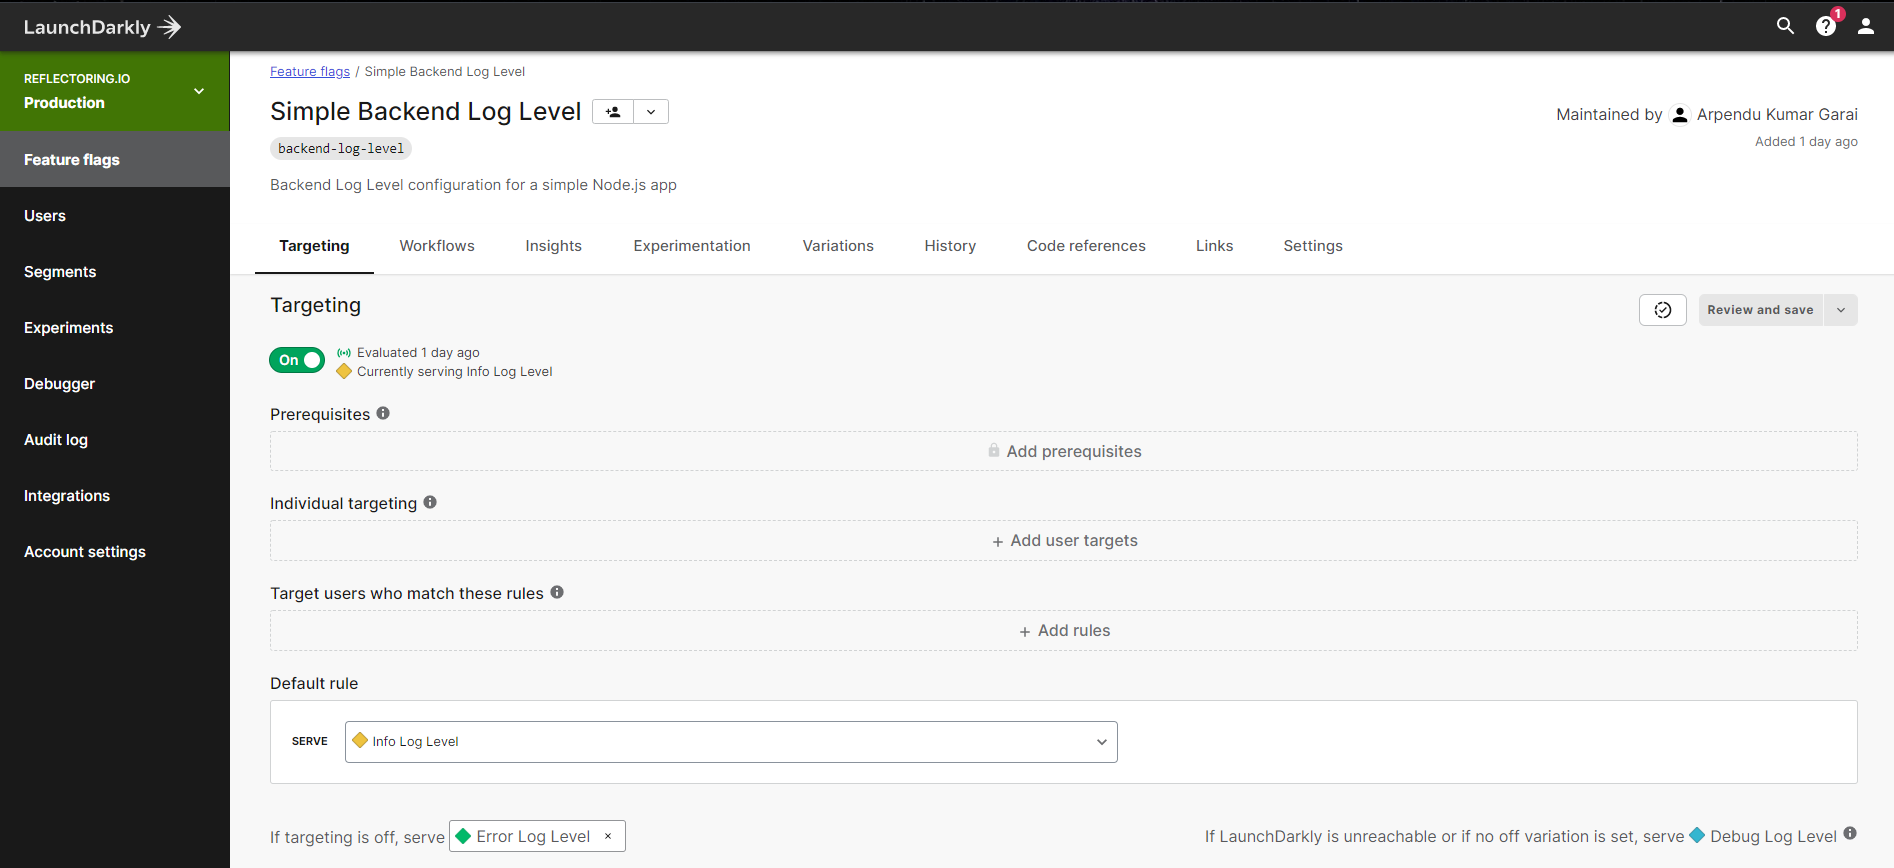
Note that we’re not using targeting rules that target individual users because our log level is a global feature flag that is independent of specific users.
Now that we have our multivariate feature flag defined, we update our existing logger class from above with a few new methods that read the log level from the feature flag variation at runtime and updates in the console messages:
import { format } from 'date-fns';
import padEnd from 'lodash/padEnd.js';
import capitalize from 'lodash/capitalize.js';

class DynamicLogger {
  constructor( module, ldClient, flagKey, user ) {
    this.module = module ? module : '';
    this.ldClient = ldClient;
	  this.flagKey = flagKey;
	  this.user = user;
	  this.previousLevel = null;
  }

  writeToConsole(level, message) {
      const dateTime = format(new Date(), 'MM-dd-yyyy HH:mm:ss:SSS');
      const formattedLevel = padEnd(capitalize(level), 5);
      const formattedMessage = `${dateTime} ${formattedLevel} [${
        this.module
      }] ${message}`;
      console[level](formattedMessage, '');
  }

  async debug( message ) {
    if ( await this._presentLog( 'debug' ) ) {
        this.writeToConsole('debug', message);
    }
  }

  async error( message ) {
    if ( await this._presentLog( 'error' ) ) {
        this.writeToConsole('error', message);
    }
  }

  async info( message ) {
    if ( await this._presentLog( 'info' ) ) {
        this.writeToConsole('info', message);
    }
  }

  async warn( message ) {
    if ( await this._presentLog( 'warn' ) ) {
        this.writeToConsole('warn', message);
    }
  }

  async _presentLog( level ) {

    const minLogLevel = await this.ldClient.variation(
        this.flagKey,
        {
           key: this.user
        },
        'debug' // Default/fall-back value if LaunchDarkly unavailable.
    );

    if ( minLogLevel !== this.previousLevel ) {
       console.log( `Present log-level: ${ minLogLevel }` );
    }

    switch ( this.previousLevel = minLogLevel ) {
        case 'error':
            return level === 'error';
        case 'warn':
            return level === 'error' ||	level === 'warn';
        case 'info':
            return level === 'error' || level === 'warn' || level === 'info';
        default:
            return true;
        }
    }
}

export default DynamicLogger;
Next we will define the logic to subscribe to this log-level and execute some operations in a loop. For this testing, we can simply define a method that will print various log messages and run them in a loop at an interval of 1 second:
import chalk from 'chalk';
import LaunchDarkly from 'launchdarkly-node-server-sdk';
import DynamicLogger from './dynamic_logger.js';

const LD_SDK_KEY = 'sdk-********-****-****-****-************';
const flagKey = 'backend-log-level';
const userName = 'admin';
const launchDarklyClient = LaunchDarkly.init( LD_SDK_KEY );
let logger;
let loop = 0;

launchDarklyClient.once('ready', async () => {
		setTimeout( executeLoop, 1000 );
	}
);

async function executeLoop () {
	logger = new DynamicLogger( 'DynamicLogging', launchDarklyClient, flagKey, userName );
	console.log( chalk.dim.italic( `Loop ${ ++loop }` ) );
	logger.debug( 'Executing loop.' );
	logger.debug('This is a debug log.');
	logger.info('This is an info log.');
	logger.warn('This is a warn log.');
	logger.error('This is a error log.');
	setTimeout( executeLoop, 1000 );
}
Note that we’re passing the static user admin to LaunchDarkly so that LaunchDarkly evaluates the feature flag for this user. This is not a real user. The feature flag is meant as a global feature flag, so targeting different users with different values doesn’t make sense.
Next, we can define the script as part of package.json:
{
	"scripts": {
    	"dynamic": "node dynamic_logging.js"
  	}
}
Then we can execute the following command to run our app:
npm run dynamic
Finally, when we run the above command it will print something like below:
info: [LaunchDarkly] Initializing stream processor to receive feature flag updates
info: [LaunchDarkly] Opened LaunchDarkly stream connection
Loop 1
Present log-level: debug
08-20-2022 21:11:40:251 Debug [DynamicLogging] Executing loop.
08-20-2022 21:11:40:264 Debug [DynamicLogging] This is a debug log.
08-20-2022 21:11:40:264 Info  [DynamicLogging] This is an info log.
08-20-2022 21:11:40:265 Warn  [DynamicLogging] This is a warn log.
08-20-2022 21:11:40:267 Error [DynamicLogging] This is a error log.
Loop 2
08-20-2022 21:11:40:268 Debug [DynamicLogging] Executing loop.
08-20-2022 21:11:40:269 Debug [DynamicLogging] This is a debug log.
08-20-2022 21:11:40:270 Info  [DynamicLogging] This is an info log.
08-20-2022 21:11:40:271 Warn  [DynamicLogging] This is a warn log.
08-20-2022 21:11:40:272 Error [DynamicLogging] This is a error log.
Loop 3
Present log-level: info
08-20-2022 21:11:40:274 Info  [DynamicLogging] This is an info log.
Modifying Rate Limits Dynamically
Rate Limiting is a technique used for regulating the volume of incoming or outgoing traffic within a network. In this context, network refers to the line of communication between a client (e.g., a web browser) and our server (e.g., an API).
For instance, we might wish to set a daily cap of 100 queries for a public API from an unsubscribed user. If the user goes over that threshold, we can ignore the request and throw an error to let people know they’ve gone over their limit.
We don’t want to implement the rate limiter ourselves, so we will use the express-rate-limit library (you can find it here):
npm install express-rate-limit
First, we will define a simple express app to host a server:
import bodyParser from 'body-parser';
import express from 'express';
import cors from 'cors';
import rateLimit from 'express-rate-limit';
import LaunchDarkly from 'launchdarkly-node-server-sdk';
import LdLogger from './ld_logger.js';

// Initiating LaunchDarkly Client
const LD_SDK_KEY = 'sdk-********-****-****-****-************';
const userName = 'admin';
const launchDarklyClient = LaunchDarkly.init( LD_SDK_KEY );

// Initiating the Logger
const flagKey = 'backend-log-level';
let logger;
launchDarklyClient.once('ready', async () => {
    logger = new LdLogger( launchDarklyClient, flagKey, userName );
    serverInit();
  }
);

const serverInit = async () => {
    // Essential globals
    const app = express();

    // Initialize API
    app.get('/hello', function (req, res) {
        return res.send('Hello World')
    });

    // Initialize server
    app.listen(5000, () => {
        logger.info('Starting server on  port 5000');
    });
};
Now we will look at the JSON type flags as these feature flag values are pretty open-ended. LaunchDarkly supports a JSON type right out of the box. This allows us to pass Object and Array data structures to our application which can then be used to implement lightweight administrative and operational functionality in our web application. In this case, we will define a feature flag that will take the rate limit config and pass it to our rate limiter.
The feature flag looks like this in LaunchDarkly:
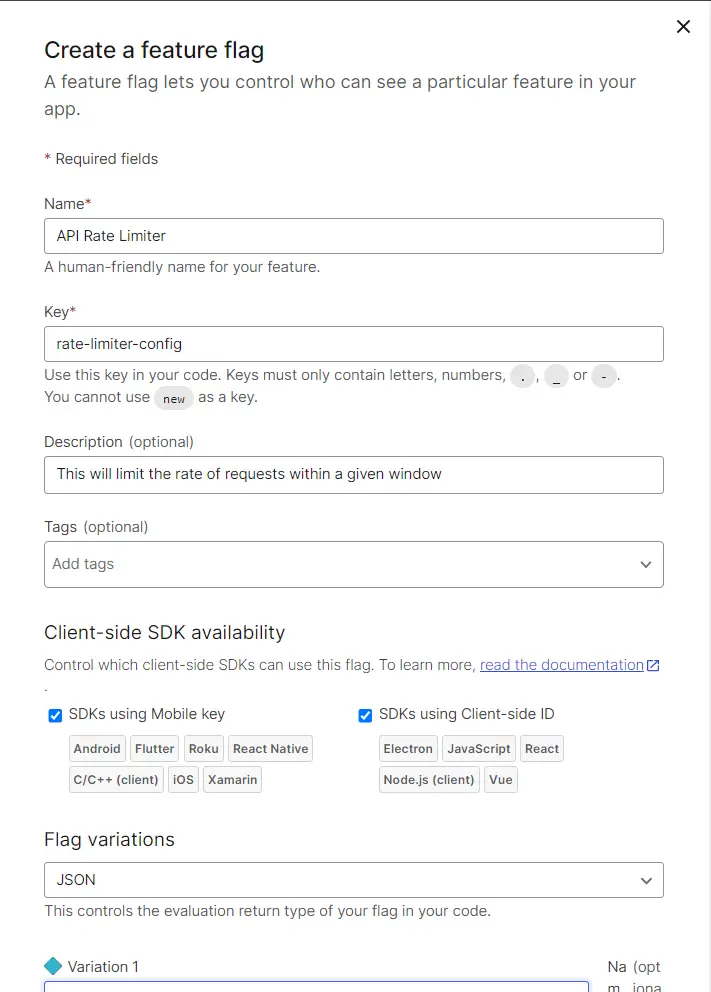
And the variations look like this:
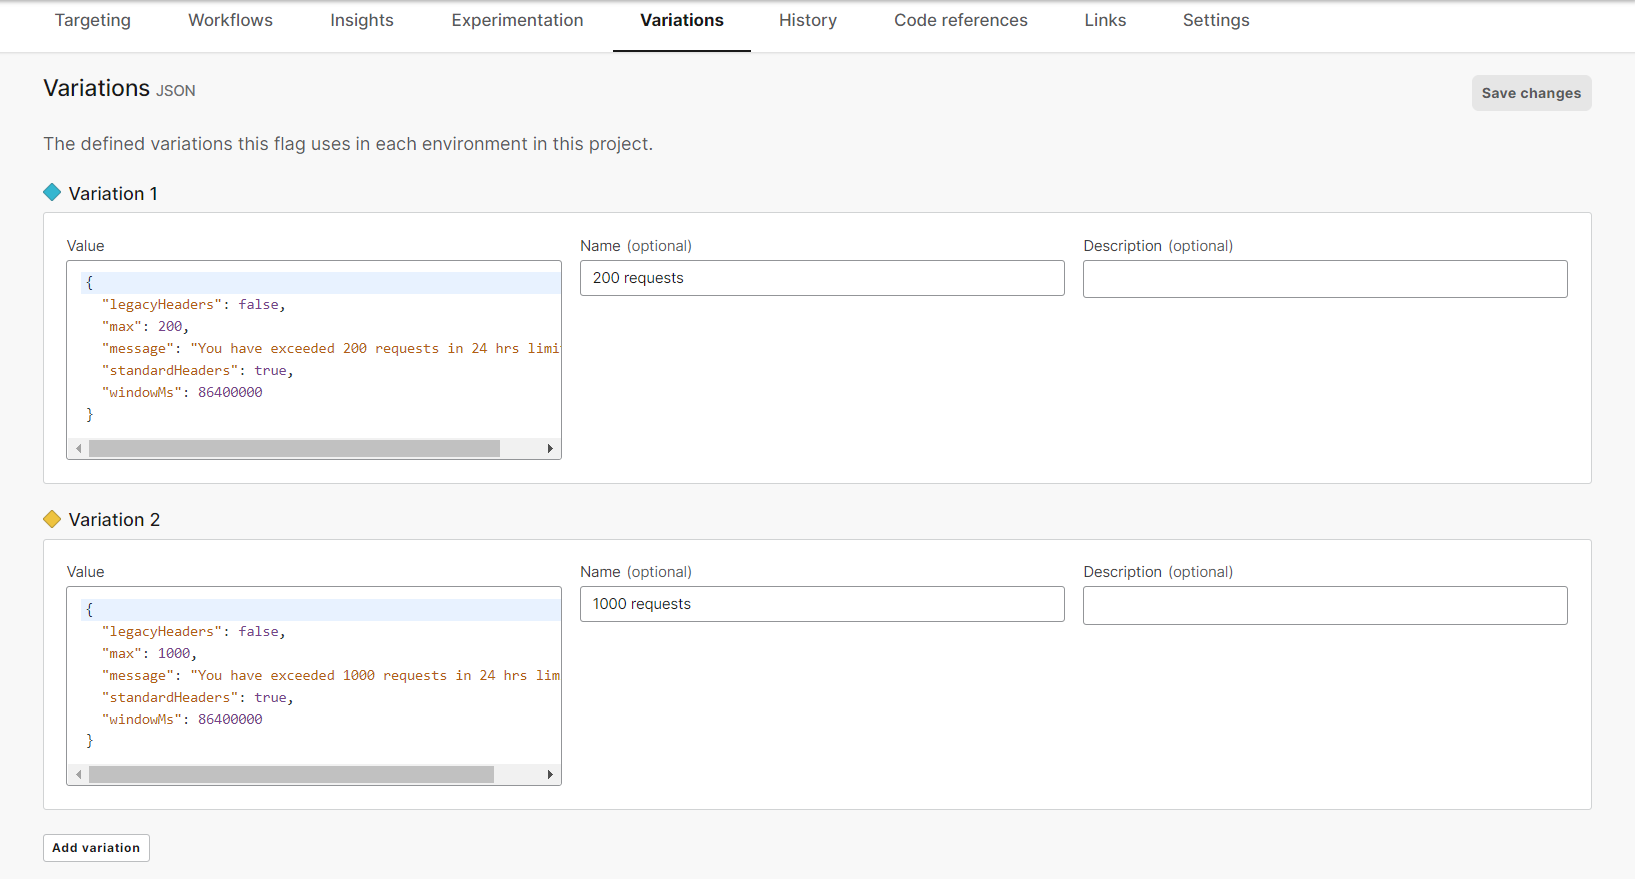
Next, we will define an express middleware and pass it to the express app before starting the server:
// Initialize Rate Limit Middleware
const rateLimiterConfig = await launchDarklyClient.variation(
    'rate-limiter-config',
    {
        // The static "user" for this task.
        key: userName
    },
    {
    	  // default rate limit config for fallback
        windowMs: 24 * 60 * 60 * 1000,
        max: 100,
        message: 'You have exceeded 100 requests in 24 hrs limit!',
        standardHeaders: true,
        legacyHeaders: false,
     }
);
app.use(rateLimit(rateLimiterConfig));
As the default configuration, we create a ratelimit of 100 requests per 24 hours. We can now override this config by changing the JSON in the LaunchDarkly feature flag.
Next, we can define the script as part of package.json:
{
	"scripts": {
    	"rateLimiter": "node rate_limiter.js"
  	}
}
Then we can execute the following command to run our app:
npm run rateLimiter
Note that using a feature flag for complex JSON configuration can be risky, because you don’t get immediate feedback if the JSON you provided is valid or not (unless you look into the logs). So if you do this, be very careful not to provide invalid JSON in the feature flag variation.
Schedule Cron Jobs Dynamically
Sometimes system admins need to schedule cron jobs to perform various tasks like gathering system metrics, generate reports, clearing or archiving logs, taking a backup, etc. Usually, these cron jobs are scheduled using cronTime expressions which are understood by cron executors. If there is a sudden need to change the cronTime expression of a particular job, then we can define it as a feature flag (whose value we can change on demand) and use it whenever the cron runs.
For this, first we will run:
npm install cron
Then, we will define a variation in LaunchDarkly with string parameters which will take different cronTime expressions as values:
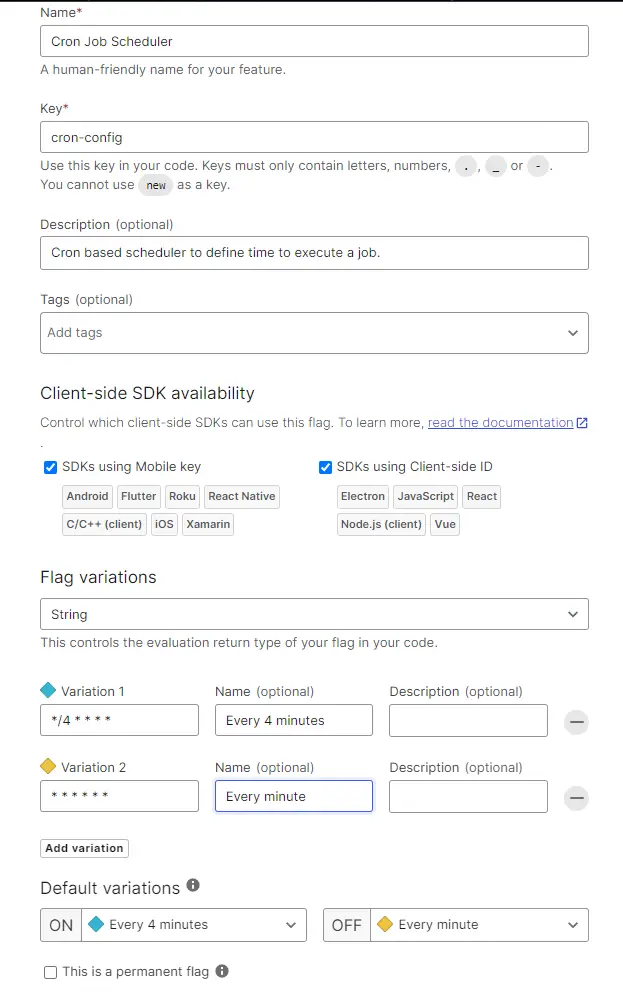
Next, we will define our cron job code which will retrieve the config from Launchdarkly and schedule the cron:
import cron from 'cron';
import LaunchDarkly from 'launchdarkly-node-server-sdk';

const CronJob = cron.CronJob;
const CronTime = cron.CronTime;

// Initiating LaunchDarkly Client
const LD_SDK_KEY = 'sdk-********-****-****-****-************';
const userName = 'admin';
const launchDarklyClient = LaunchDarkly.init( LD_SDK_KEY );

launchDarklyClient.once('ready', async () => {
    const cronConfig = await launchDarklyClient.variation(
      'cron-config',
      {
          key: userName
      },
      '*/4 * * * *' // Default fall-back variation value.
    );

    const job = new CronJob(cronConfig, function() {
      run();
    }, null, false)

    let run = () => {
      console.log('scheduled task called');
    }

    let scheduler = () => {
      console.log('CRON JOB STARTED WILL RUN AS PER LAUNCHDARKLY CONFIG');
      job.start();
    }

    let schedulerStop = () => {
      job.stop();
      console.log('scheduler stopped');
    }

    let schedulerStatus = () => {
      console.log('cron status ---->>>', job.running);
    }

    let changeTime = (input) => {
      job.setTime(new CronTime(input));
      console.log('changed to every 1 second');
    }

    scheduler();
    setTimeout(() => {schedulerStatus()}, 1000);
    setTimeout(() => {schedulerStop()}, 9000);
    setTimeout(() => {schedulerStatus()}, 10000);
    setTimeout(() => {changeTime('* * * * * *')}, 11000);
    setTimeout(() => {scheduler()}, 12000);
    setTimeout(() => {schedulerStop()}, 16000);
  }
);
First we initiated the cron job using scheduler() and then we checked the status after a second by calling schedulerStatus(). Next, we stop the scheduler using schedulerStop() after 9 seconds and again check the status at the 10th second. Then, we change the cron time dynamically by calling the changeTime('* * * * * *') method to run this cron every second. This value can also be set by defining another flag in LaunchDarkly and passing on to this function. After that we schedule the cron job again by calling scheduler() and then stop it after few seconds. So in this way, we can schedule and dynamically re-schedule the cron as per our convenience.
Next, we can define the script as part of package.json:
{
	"scripts": {
    	"cron": "node cron_job.js"
  	}
}
Then, we can execute the following command to run our app:
npm run cron
Retrieving All Feature Flags
Lastly, for debugging reasons, we might want to see the values of all our admin feature flags in the application. For this, we can retrieve all the flags from the LaunchDarkly server in an index.js file:
import LaunchDarkly from 'launchdarkly-node-server-sdk';
import express from 'express';

const app = express();

app.get("/", async (req, res) => {
  const flags = await init();
  res.send(flags);
});
app.listen(8080);

const LD_SDK_KEY = 'sdk-********-****-****-****-************';
const userName = 'admin';
let client;

async function init() {
  if (!client) {
    client = LaunchDarkly.init(LD_SDK_KEY);
    await client.waitForInitialization();
  }

  const user = {
    key: userName
  };
  const allFlagsState = await client.allFlagsState(user);
  const flags = allFlagsState.allValues();
  return flags;
}
We can simply initiate a client using LaunchDarkly.init(sdkKey) and wait until it’s ready with client.waitForInitialization(). After that, we can call the allFlagsState() function that captures the state of all feature flag variations for a specific user. This includes their values as well as other metadata.
Finally, we can bind all of this to an API using app.get() method so that it would get printed as a response whenever we hit the API with the endpoint http://localhost:8080.
Next we can define the script as part of package.json:
{
	"scripts": {
    	"start": "node index.js"
  	}
}
Then we can execute the following command to run our app:
npm run start
When we hit the endpoint we can see the following output:
{
  "backend-log-level": "debug",
  "cron-config": "* * * * * *",
  "rate-limiter-config": {
    "message": "You have exceeded 200 requests in 24 hrs limit!",
    "standardHeaders": true,
    "windowMs": 86400000,
    "legacyHeaders": false,
    "max": 200
  }
}
In the example above we’re always printing out the feature flags for the static admin user. We could also think about adding a parameter username to our endpoint and then print the feature flag state for any other user! This can be very handy for investigating customer support requests!
Conclusion
A feature flag platform allows us to dynamically change the runtime behavior of our application. We can roll out or roll back new features as per our convenience.
We can also use a feature flag platform as a store for configuration data, so we can rapidly iterate on our application without having to build a custom configuration management.
You can refer to all the source code used in the article on Github.