How to design a URL shortening service like tinyurl.com is a frequently asked question in system design interviews. URL shortener services convert long URLs into significantly shorter URL links.
In this article, we will walk through the architecture of designing a URL shortening service, looking at both basic and advanced requirements, then we will explore how to create a Basic URL shortener using Node.js, React.js and MongoDB.
On our Node.js server, we will create REST API endpoints for the URL shortener and integrate them into React.js frontend applications, while storing all our URL data in a MongoDB database.
Example Code
This article is accompanied by a working code example on GitHub.How Do Url Shorteners Work?
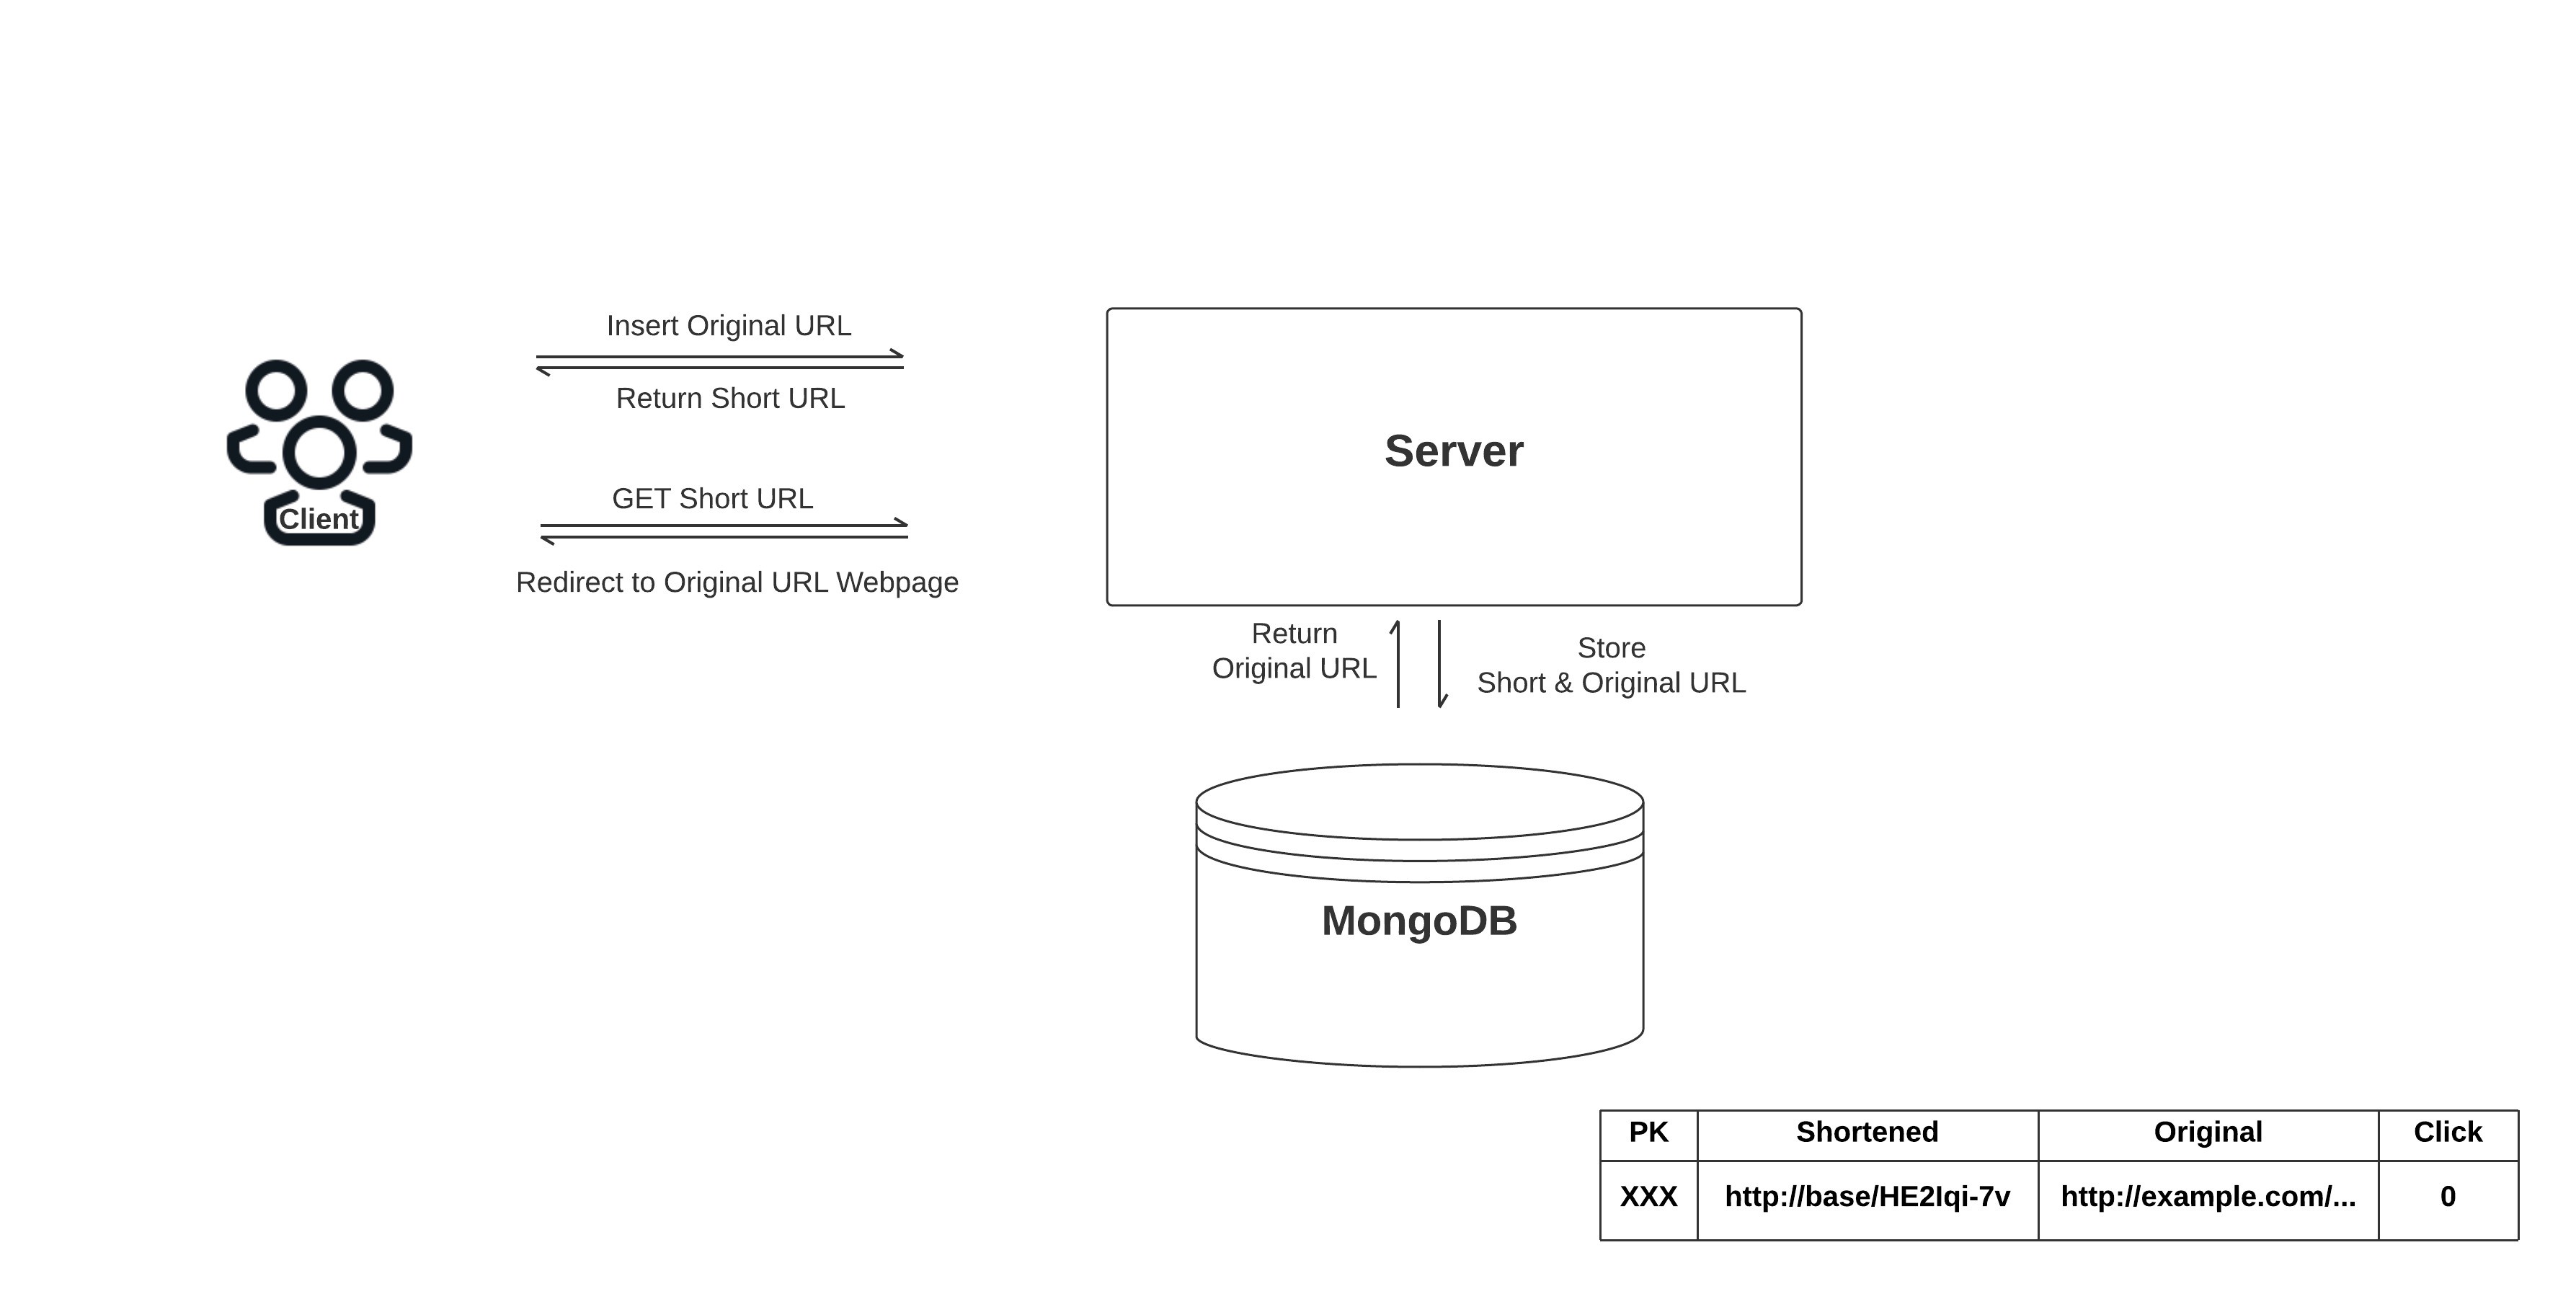
A URL shortening service selects a short domain name as a placeholder. Examples are tinyurl.com or bit.ly. When a client submits a long URL to be shortened by the service the URL shortening service generates and returns a short URL, by using some function (cryptographic hash function, iterating through IDs, random IDs, or some combination) to generate a token like XQ6953. This URL returned to the client consists of the selected domain name plus the generated ID token appended to the end, for example https://bit.ly/XQ6953.
The URL shortening service stores both the short and long URLs in the database mapped to each other. When a call is made to the short URL, the database is looked up for the associated longer URL and redirects the web request; to the long URL’s web page. This is how a basic URL shortening service works.
For scalability and durability, a URL shortener service can employ the following features.
Advanced Architecture
High Availability
The system should be highly available. This is necessary because if our service goes down, all URL redirections would fail. URL redirection and response time should happen in real time with minimal latency.
SQL or NoSQL Database?
What kind of database is to be used? A NoSQL database like DynamoDB, MongoDB or Cassandra is a better option since we expect to store billions of rows and don’t need to employ associations between items. A NoSQL option can horizontally scale up performance over numerous servers.
They are inherently designed for large data (and for scale). Data in a NoSQL database can be distributed across multiple machines or workstations. NoSQL documents can be located on various servers without worrying about joining rows, which is a concern in relational databases.
Caching for Improved Latency
We can improve this architecture by adding a caching layer to our service. Every time a user clicks on a short URL, the server access the database in order to retrieve the long URL mapped to it in the database.
Database calls can be time-consuming and costly. We can improve the response time of our server by caching frequently accessed short URLs or the top 10% of daily lookups. So, when we receive a request for a short URL, our servers first check to see if the data is available in the cache; if it is, it is retrieved from the cache; otherwise, it is retrieved from the database.
Validation
What characters are allowed in the shortened URL? This encoding could be base36 ([a-z ,0-9]) or base62 ([A-Z, a-z, 0-9]) and if we add ‘+’ and ‘/’ we can use Base64 encoding.
How long should the randomly generated ID be? The length of the random string should be such that it is not so long that it defeats the purpose of having a shortened URL, nor too small either. Because the longer the generated id the more unique our ids will be. The shortened links must be unique and random (not predictable).
Load balancing
A load balancer, as the name suggests, balances the load by distributing requests across our servers. We cannot have multiple servers and expose them as endpoints to users.
A load balancer determines which server is available to handle which request. There are various types of load balancers, each type has a unique method of how they handle load distribution.
The load balancer also serves as a single point of contact for all of our users, removing the need for them to know the specific server IP addresses of our server instances. All the user requests land on the load balancer and the load balancer is responsible for re-routing these requests to a specific server instance.
Example Use Case
- Shortened URL links are entered by the user.
- The URL is validated. Check to see if the user provided the right URL address.
- The load balancer receives the URL and sends the request to the web servers.
- If the shortened URL is already in the cache, it returns the long URL right away.
- If the shortened URL is not in the cache, the service will have to search the database for it.
- The long URL will be returned to the user.
In the next section, we will build a basic URL shortening application that accepts URLs, then we’ll validate the URL string using a helper function to guarantee that users do not make mistakes while entering the URLs. After receiving the long URL, our URL service will generate a short random Id using the previously installed shortId dependency. Which is then concatenated with the domain name of our application.
Both URL (short and long) links are saved in a MongoDB database. Finally, all URL endpoints from the server are integrated into our React.js application.
Setting up the Node.Js Application
To begin, we navigate to a new root directory where we want our application to live.
Here, we’ll create a new folder urlbackend and navigate into it. By entering the following command in the terminal:
mkdir urlbackend
&&
cd urlbackend
Then, again in the terminal, we run the following command to initialize our Node.js application.
npm init -y
Open the Node.js application in your preferred IDE.
Then, run the following command to install the required dependencies for our application.
npm install cors dotenv express mongoose shortid
Here, we’re installing the dependencies we need for our application’s server, which include:
cors: Cross-origin resource sharing (CORS) allows AJAX requests to skip the Same-origin policy and access resources from remote hosts. Comes in handy while connecting the Node.js server to the Client (frontend) side.dotenv: This loads environment variables from a.envfile intoprocess.env.express: A Node.js framework that provides broad features for building web and mobile applications.mongoose: An object modeling tool that aids in connecting and querying the MongoDB database.shortid: Generates non-sequential short unique ids
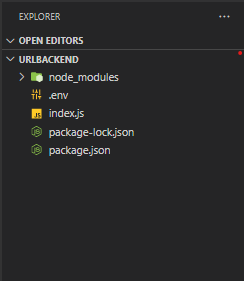
Next, create an index.js file to start our Node.js server and a .env file to store all of our application’s confidential information as environment variables.
Our application should be structured like this now:
To create a simple Node.Js server, paste the code below In the index.js file:
const express = require('express');
const app = express();

// Server Setup
const PORT = process.env.PORT || 3333;
app.listen(PORT, () => {
  console.log(`Server is running at PORT: ${PORT}`);
});
In the code above, we created a server by importing and instantiating the express package. Making it listen on our custom PORT 3333.
To start the application server, Run node index.js in the terminal and we’ll get the following output:
Server is running at PORT: 3333
Our URLs will be stored in a MongoDB database. Following, we’ll go through how to use and configure the MongoDB database in our application.
Working with the MongoDB Database
MongoDB is a schema-less NoSQL database, which means it stores data objects in collections and documents rather than the tables and rows used in typical relational databases. Collections are sets of documents, which are equivalent to tables in a relational database. Documents consist of key-value pairs, which are the basic unit of data in MongoDB.
We can choose to install a local version of MongoDB Compass for our application. But we’ll have to switch this during production to connect to a live MongoDB server.
However, we have another option of connecting to a live MongoDB database, where we won’t have to configure the database connection again during deployment. We can achieve this using MongoDB Altas Cluster.
MongoDB Atlas cluster is a simple and quick solution to integrating MongoDB with our application. The MongoDB Atlas cluster is a fully-managed cloud database that handles all of the complexities of deploying, administering and repairing our installations on the cloud service provider of our choosing (AWS , Azure and GCP). The best approach to deploy, run and scale MongoDB in the cloud is with MongoDB Atlas. We can build faster and spend less time managing our database by leveraging MongoDB’s rich ecosystem of drivers, integrations and tools.
To get started with MongoDB Atlas in our project, we’ll need to Create an Atlas Account and deploy a Free Tier Cluster. To create and deploy a MongoDB Altas cluster, follow these steps:
- Go here to sign up for a new MongoDB Atlas account.
- Fill in the registration form with your information and click Sign up.
- Click on Deploy a shared cloud database for
Free - Click on Create a Shared Cluster
- Click on Database access on the sidebar and Add New Database User
- Select Password then enter in a username and password detail for your user.
Built-in RoleselectAtlas Admin- Click the Add User button to create your new user
- Click on Network Access on the sidebar. To Allow Access From All IP Addresses
- Click on Add IP Address button
- Select
ALLOW ACCESS FROM ANYWHERE - Click the Confirm button.
- Click on Database on the sidebar
- Click the Connect button for your cluster
- In the popup modal, click on Connect your application.
- Copy the URI on the clipboard
- Lastly, all you need to do is replace the
<password>field with the password you created previously.
Our MongoDB atlas is all set and ready for use. Otherwise, click here for a more in-depth guide on how to set up a MongoDB cluster.
To secure and keep our MongoDB Atlas URI confidential, we will store the copied URI link in the .env file we created above.
Copy and Paste the following code into our .env file:
MONGO_URI= mongodb+srv://<username>:<password>@cluster0.oq1hdin.mongodb.net/?retryWrites=true&w=majority
DOMAIN_URL=http://localhost:3333
Here, we are storing MongoDB_URI and DOMAIN_URL as environment variables in the .env file. Replace the MongoDB_URI link with the one you generated in MongoDB Altas and remember to input your username and password. While DOMAIN_URL is our server’s localhost address, which can readily be changed during production.
MongoDB is schema-less, which means that it pushes database architecture and schema creation to the application level, where they can be handled more flexibly. For schema creation, query and connecting to MongoDB database we will use the Mongoose dependency.
Mongoose manages relationships between data. It is used to create schema and define how data is stored and structured in MongoDB. It remains one of the most popular ODM tools for MongoDB. If you are coming from a SQL background then using Mongoose will make the transition into a NoSQL environment much easier.
Creating Mongoose Schema
In this section, we will use Mongoose to create a URL schema. This will define how URL data will be structured and stored in our database. Each schema maps to a MongoDB collection.
To create our URL schema, create a Url.js file in the urlbackend folder.
Paste the following code in the Url.js file:
const mongoose = require("mongoose");

const UrlSchema = new mongoose.Schema({
  urlId: {
    type: String,
    required: true,
  },
  origUrl: {
    type: String,
    required: true,
  },
  shortUrl: {
    type: String,
    required: true,
  },
  clicks: {
    type: Number,
    required: true,
    default: 0,
  },
  date: {
    type: String,
    default: Date.now,
  },
});

module.exports = mongoose.model("Url", UrlSchema);
In the above code we use mongoose to create a schema this will structure how Urls are saved in our MongoDB database. To use schema definition, we converted our UrlSchema into a Model. Bypassing it into
mongoose.model(modelName, schema)
a mongoose model provides an interface to the database for creating, querying, updating, deleting records, etc.
Create a Helper Function To Validate Url Links
We now have a schema in place that allows us to receive and store URLs in our database. However, URLs entered into the application must be validated. To do this, we will write a helper function to assist us in validating any URL submitted by users.
Our helper function will be created in a new folder. Create a Util folder in the application’s root directory, within that folder, we will create a util.js file.
Add the following code to the Util/util.js file.
function validateUrl(value) {
  var urlPattern = new RegExp('^(https?:\\/\\/)?'+ // validate protocol
	    '((([a-z\\d]([a-z\\d-]*[a-z\\d])*)\\.)+[a-z]{2,}|'+ // validate domain name
	    '((\\d{1,3}\\.){3}\\d{1,3}))'+ // validate OR ip (v4) address
	    '(\\:\\d+)?(\\/[-a-z\\d%_.~+]*)*'+ // validate port and path
	    '(\\?[;&a-z\\d%_.~+=-]*)?'+ // validate query string
	    '(\\#[-a-z\\d_]*)?$','i');

      return !!urlPattern.test(value);
}

module.exports = { validateUrl };
The code above uses RegExp to examine and validate any URL passed into our application. Checking if the URL entered is following HTTP protocol if the syntax of a URL domain name and IP address is valid etc.
Using mongoose schema and our helper function, we can now validate all URLs entered into our application as well as the way they are structured in our database.
Connecting to Database and Creating Endpoints
In this section, using mongoose, we will connect the Node js application to our MongoDB cluster database.
We will be using the mongoose.connect() method to create a connection with MongoDB. To avoid the mongoose DeprecationWarning, we pass the necessary parameters to mongoose.connect() such as useNewUrlParser: true etc.
Next, we will create the following endpoints for our application:
GETAll URLs: This endpoint will be used to retrieve all stored URLs inJSONformat from our database.POSTShorten URLs: All URLs entered into the application will be sent to this endpoint as payload, where they will be validated using theutil.jshelper function we previously created. Then a randomidis generated using theshortIdlibrary. To create a new URL, we will concatenate the newly generated random id with our application’s domain name. Finally, our database stores both the entered URL and the newly created URL.GETRedirect: With the help of this endpoint, we can switch from the short URL stored in our database to the long or original URL. while also monitoring the number of clicks on the short URL.
In the index.js file, paste the following code:
const  dotenv = require("dotenv");
const  express = require("express");
const  cors = require("cors");
const  mongoose = require("mongoose");
const  shortid = require("shortid");
const  Url = require("./Url");
const  utils = require("./Util/util");

// configure dotenv
dotenv.config();
const app = express();

// cors for cross-origin requests to the frontend application
app.use(cors());
// parse requests of content-type - application/json
app.use(express.json());

// Database connection
mongoose
  .connect(process.env.MONGO_URI, {
    useNewUrlParser: true,
    useUnifiedTopology: true,
  })
  .then(() => {
    console.log(`Db Connected`);
  })
  .catch((err) => {
    console.log(err.message);
  });

// get all saved URLs
app.get("/all", async (req, res) => {
  Url.find((error, data) => {
    if (error) {
      return next(error);
    } else {
      res.json(data);
    }
  });
})

// URL shortener endpoint
app.post("/short", async (req, res) => {
  console.log("HERE",req.body.url);
  const { origUrl } = req.body;
  const base = `http://localhost:3333`;

  const urlId = shortid.generate();
  if (utils.validateUrl(origUrl)) {
    try {
      let url = await Url.findOne({ origUrl });
      if (url) {
        res.json(url);
      } else {
        const shortUrl = `${base}/${urlId}`;

        url = new Url({
          origUrl,
          shortUrl,
          urlId,
          date: new Date(),
        });

        await url.save();
        res.json(url);
      }
    } catch (err) {
      console.log(err);
      res.status(500).json('Server Error');
    }
  } else {
    res.status(400).json('Invalid Original Url');
  }
});

// redirect endpoint
app.get("/:urlId", async (req, res) => {
  try {
    const url = await Url.findOne({ urlId: req.params.urlId });
    console.log(url)
    if (url) {
      url.clicks++;
      url.save();
      return res.redirect(url.origUrl);
    } else res.status(404).json("Not found");
  } catch (err) {
    console.log(err);
    res.status(500).json("Server Error");
  }
});

// Port Listenning on 3333
const PORT = process.env.PORT || 3333;
app.listen(PORT, () => {
  console.log(`Server is running at PORT ${PORT}`);
});
In the above code, we created our database connection using mongoose, as well as all of the endpoints required for our URL shortening service application.
To Start our application server, Run node index.js in the terminal and we’ll get the following output:
Server is running at PORT 3333
Db Connected
Our endpoints and database are now operational. Next, we will configure our React.js application and test our endpoints:
Setting Up a React.js Application
We are using React framework for our URL shortener frontend, React is a free and open-source front-end JavaScript library for building user interfaces based on UI components. It designs simple views for each state in our application and React efficiently updates and renders just the right components when our data changes. To get started using React, see the React documentation.
Let’s begin building our react application. Change the directory to the project’s Root folder by entering the following command into the terminal:
cd..
We’ll take full advantage of the rich React ecosystem by using create-react-app and npx to swiftly setup our React.js application. npx is an npm package runner that can execute any package we want from the npm registry without even installing it, whereas create-react-app sets up our React.js development environment so we can get right into building our application right away.
Run the following command in the terminal to create a React application named urlfrontend:
npx create-react-app urlfrontend
After executing the above code, a React.js application named urlfrontend will be generated. To change the directory into it, Run the:
cd urlfrontend
To install the required dependencies for our React.js application, Run:
npm install axios bootstrap
In the above command, we installed:
- axios: is a promised-based HTTP client for JavaScript. It has the ability to make HTTP requests from the browser and handle the transformation of request and response data.
- bootstrap: a powerful, feature-packed frontend toolkit for styling our application and helps create an elegant responsive layout.
Open the React.js application in your preferred IDE.
To effectively use the React framework, we first have to create components for our application. Next, we will be looking at what components are and how to create them in our application.
Creating React.js Components
React components renders our application view, they are independent and reusable bits of code, they let us split our applications UI into independent, reusable pieces. They serve the same purpose as JavaScript functions but return HTML.
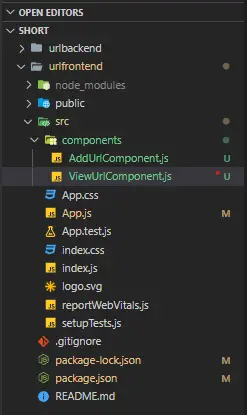
To begin creating components for our application, create a new folder in the src folder of the application name components.
In the new components folder, add two new files: AddUrlComponent.js and ViewUrlComponent.js.
This is the current structure of our project:
In the AddUrlComponent.js component, we will create a simple form that accepts input URLs and sends them as a ‘POST’ request to our urlbackend server endpoint using axios dependencies.
Also, we’ll be utilizing React’s useState hook to store state changes in this component and we are also using bootstrap dependency classes for styling the component.
Copy and paste the ‘AddUrlComponent’ code:
import React, { useState } from 'react'
import axios from "axios";

const AddUrlComponent = () => {
    const [url, setUrl] = useState("");


    const onSubmit = (e)=> {
        e.preventDefault();

        if (!url) {
          alert("please enter something");
          return;
        }

        axios
          .post("http://localhost:3333/short", {origUrl: url})
          .then(res => {
            console.log(res.data);
          })
          .catch(err => {
            console.log(err.message);
          });

        setUrl("")
    }
    console.log(url)

  return (
    <div>
      <main>
        <section className="w-100 d-flex flex-column justify-content-center align-items-center">
          <h1 className="mb-2 fs-1">URL Shortener</h1>
          <form className="w-50" onSubmit={onSubmit}>
            <input
              className="w-100 border border-primary p-2 mb-2 fs-3 h-25"
              type="text"
              placeholder="http://samplesite.com"
              value={url}
              onChange={e => setUrl(e.target.value)}
            />
            <div class="d-grid gap-2 col-6 mx-auto">
            <button type="submit" className="btn btn-danger m-5">
              Shorten!
            </button>
            </div>
          </form>
        </section>
      </main>
    </div>
  );
}

export default AddUrlComponent;
In ourViewUrlComponent component. The axios dependency is used with a useEffect hook to make GETAll URLs request to our urlbackend server. This fetches all URLs saved in our database.
The ReactuseEffect hook helps reload our page view when URL states are changed meaning when a URL is added or removed from the database React’s useEffect hook automatically updates the ViewUrlComponent component.
All states and fetched URL data in the ViewUrlComponent component are managed and stored using React’s useState hook.
Paste the following in the ViewUrlComponent.js file:
import React, { useEffect, useState } from 'react'
import axios from "axios"

const ViewUrlComponent= () => {
    const [urls, setUrls] = useState([]);

    useEffect(() => {
      const fetchUrlAndSetUrl = async () => {
        const result = await axios.get("http://localhost:3333/all");
        setUrls(result.data);
      };
      fetchUrlAndSetUrl();
    }, [urls]);

  return (
    <div>
      <table className="table">
        <thead className="table-dark">
          <tr>
            <th>Original Url</th>
            <th>Short Url</th>
            <th>Click Count</th>
          </tr>
        </thead>
        <tbody>
          {urls.map((url, idx) => (
            <tr key={idx}>
              <td>{url.origUrl}</td>
              <td>
                <a href={`${url.shortUrl}`}>{url.shortUrl}</a>
              </td>
              <td>{url.clicks}</td>
            </tr>
          ))}
        </tbody>
      </table>
    </div>
  );
}

export default ViewUrlComponent;
To use the above components in our application, use similar syntax as normal HTML: <AddUrlComponent />, <ViewUrlComponent /> .
We will be rendering all our URL components in the src/App.js file. We will import all our application’s components and also import the bootstrap CSS dependency link for our application styling.
In the src/App.js file add the following code snippet:
import "bootstrap/dist/css/bootstrap.min.css";
import AddUrlComponent from "./components/AddUrlComponent";
import ViewUrlComponent from "./components/ViewUrlCommpnent";

function App() {
  return (
    <div className="App container mt-5">
      <AddUrlComponent />
      <ViewUrlComponent />
    </div>
  );
}

export default App;
In the code above, we simply included our bootstrap styling, the AddUrlComponent and ViewUrlComponent components in the App component.
## Start React Application
This is the final but most important step in successfully launching our Node.js and React.js applications. First ensure that the Node server is up and **listening on PORT: 3333**

Finally, run the following command to start the React app.
```bash
npm start
Our urlfrontend application should be up and running on port 3000:
Conclusion
In this article we looked at the basic architecture and advanced requirements of a URL shortener, then we created a URL shortening service API from scratch using React.js, Node.js and MongoDB. I hope you enjoyed reading this article and learned something new. The complete source code can be found here.