Endpoints or APIs that perform complex computations and handle large amounts of data face several performance and responsiveness challenges. This occurs because each request initiates a computation or data retrieval process from scratch, which can take time. As a result, users and services that use our application might experience slower performance. An effective solution to this problem is to implement a caching mechanism.
Caching is a popularly used technique for improving application performance. It can mean the difference between a frustrating or enjoyable user experience.
Caching allows us to temporarily store frequently used data rather than repeatedly computing it. This enables quick retrieval without rerunning computations or database searches, significantly improving application performance.
In this article, we’ll look at what caching is, when do we need it in our application, and how to incorporate it into a Node.js application using the Redis database.
Prerequisites
To follow along with this article, you will require:
- Some experience with JavaScript and Node.js.
- Nodejs version 18 or newer installed on your computer.
- Redis installed on your computer.
Example Code
This article is accompanied by a working code example on GitHub.Cache
A cache serves as a temporary storage where copies of response data are stored to expedite loading times and enhance an application’s responsiveness. Every stored data in a cache is organized using key-value pairs, each piece of data is linked to a unique key.
A cache unique key can be generated using various components from the client’s request, such as the URL, query parameters, request body, headers, method, etc.
By using relevant request components as our cache key, we guarantee that our cached data can be distinguished based on the specifics of each request. This approach prevents the delivery of inaccurate or outdated data from the cache, ensuring that our cached responses are tailored to fulfill the specific requirements of each request.
When Do We Need to Cache?
Deciding when and how to use caching in an application can be hard because it depends on many things like data access patterns, performance requirements, and how big we want our application to grow. Various strategies exist for storing and using cache within an application. Let us briefly explore a few commonly used types and their use cases.
Client-side Caching
Client-side caching means storing data on the user’s device. Developers employ storage mechanisms such as the browser’s cache, local storage, session storage, IndexedDB, or third-party solutions for this purpose.
Client-side caching lends itself well to the following scenarios:
- Frequent Page Visits: Use client-side caching for frequently accessed data or resources to speed up page loading for returning visitors by serving cached content, avoiding repeated server requests. This includes storing web pages, images, stylesheets, and scripts on the user’s device.
- Reduce Server Calls: Employ client-side caching to minimize the time between client and server interactions, resulting in faster response times and reduced backend server load. This improves scalability and lowers server traffic.
- Non-Sensitive Data: Consider the sensitivity of the cached data; avoid caching sensitive or confidential information on the front end to mitigate security risks associated with less secure client devices.
- Offline Access: Utilize browser storage for offline access to cached data, enabling uninterrupted usage of the application even without a network connection. This provides seamless offline experiences without relying on constant connectivity.
- Reduced Server Load: Cache resources like images, videos, and static files on the client side to lighten the server’s load.
- Bandwidth Conservation: Conserve bandwidth by caching resources on the client side, reducing the need for repeated content downloads from the server. This is particularly advantageous for mobile users or those with limited data plans, minimizing data usage and accelerating content loading.
- Enhanced User Experience: Enhance user experience by leveraging client-side caching to achieve faster page loads and reduced latency. Users perceive the application as more responsive and reliable, leading to higher satisfaction and engagement.
- Personalization and Customization: Store user-specific data, preferences, and settings locally on the user’s device with client-side caching. This enables a personalized experience where users can access their customized settings without server requests each time.
Server-Side Caching
Server-side caching temporarily saves frequently accessed data on the server, this speeds up client load time. It involves caching database queries, web pages, API responses, and other frequently used data. This caching is typically performed within the application or web server, utilizing methods such as in-memory caching, file-based caching, or third-party systems like Redis.
Server-side caching is beneficial in the following scenarios:
- Processing Location: Use server-side caching when most data processing occurs on the server, reducing the load on backend servers.
- Resource Intensive: Employ server-side caching for resource-intensive tasks or complex computations, centralizing caching and easing backend server loads.
- Scalability: Opt for server-side caching to manage caches centrally and scale horizontally by adding more database nodes. Utilize features like expiration time and pub/sub mechanisms for cache invalidation.
- Sensitive Data: Assess the sensitivity of cached data. Server-side caching offers greater security. If caching sensitive data is necessary, consider implementing encryption and access controls to secure the data stored in the cache database, regardless of regardless of caching location.
- Frequently Accessed Data: Improve performance by caching frequently accessed data or computation results on the server, enhancing application responsiveness.
- Database Query Results: Cache database query results on the server to lighten the database server load and speed up subsequent requests.
- Session Data: Enhance session management by caching session data on the server, reducing database or external storage access overhead.
- Personalization and User Data: Cache personalized and user-specific content on the server to boost application responsiveness for authenticated users.
- High Traffic Peaks: Use server-side caching during traffic spikes to serve cached content directly, relieving application servers and ensuring scalability while averting performance degradation or downtime.
CDNs (Content Delivery Networks)
CDNs are networks of servers distributed across multiple locations throughout the world, known as points of presence (PoPs). Their primary responsibility is to store and distribute content to users from servers near their geographic location.
CDNs cache static and dynamic content, such as web pages, photos, videos, scripts, and API answers. CDNs increase website speed, reduce delays, and improve the overall user experience by storing material on strategically positioned servers throughout the world.
CDNs work well in the following scenarios:
- Global Audience: Use CDNs if our website or app is used by people in different parts of the world. CDNs speed up content delivery and reduce delays for users in different regions.
- High Traffic Peaks: CDNs are useful during busy times like product launches or events. They distribute content efficiently and ease the load on your main servers.
- Static Content Delivery: CDNs are great for delivering static content like images, videos, and scripts. By using CDN servers, you lighten the load on your main server and improve site performance.
- Dynamic Content Acceleration: Some CDNs speed up dynamic content like personalized pages and API responses. This boosts performance for dynamic websites and apps.
- Improved Website Performance: CDNs use techniques like caching and optimized routing to deliver content faster. This reduces page load times and improves user experience.
- Redundancy and Failover: CDNs spread content across multiple servers and data centers, ensuring availability even if some servers fail.
- Security: CDNs offer security features like DDoS protection and encryption. They can protect your site from cyber attacks by routing traffic through their servers.
- Streaming Media Delivery: CDNs are ideal for streaming media like live video and audio. They cache and distribute content to edge servers for smooth streaming.
- SEO Benefits: Faster websites rank better in search engines. CDNs can improve your site’s speed, potentially attracting more organic traffic.
In summary, it is vital to assess these factors and pick the approach that fits our application’s needs and structure.
To further understand how to use cache in an application, we’ll look at how to implement server-side caching in our application.
Server-Side Caching with Node.js
In this section, we will configure server-side caching with Node.js and a Redis database. Before we do this, let’s first understand Redis and how to efficiently store and retrieve data for caching using Redis.
Redis
Redis (Remote Dictionary Server) is an open-source, in-memory data structure store, used as a distributed, in-memory key-value database, cache, and message broker, with optional durability. Redis employs a key-value pair structure to organize and manage data, where each piece of data is associated with a unique key for retrieval or manipulation. It supports various abstract data structures like strings, lists, maps, sets, sorted sets, HyperLogLogs, bitmaps, streams, and spatial indexes.
Redis is ideal for scenarios requiring fast data retrieval and delivery. It excels in caching, session storage, message brokering, event streaming, real-time features, and more.
How to Store and Retrieve Cache Data in Redis
Redis provides us with various data types for storing and retrieving data like Strings, JSON, Lists, Sets, and Hashes.
We will concentrate on the Redis string data type. It is the go-to choice for caching, providing a versatile solution for various use cases. Redis strings provide strong caching capabilities, ranging from simple key-value caching to more complex cases that need expiration, atomic operations, and persistence.
To store a string in Redis, use the set() method:
// Set a string value for the key
redis.set('key', 'Value');

// Set the value of the key with options
redis.set('key', 'value', { EX: 10, NX: true });
To retrieve stored string data, use the GET method:
redis.get('key', function (err, value) {
  console.log(value); // value
});
To delete a stored string data, use the DEL method:
// Removes the specified keys
redis.del('key', function (err, value) {
  console.log(value); // value
});
Redis Strings are the fundamental Redis data type, used for storing sequences of bytes such as text, serialized JSON objects, HTML snippets, and binary arrays. They support Time To Live (TTL), enabling us to set an expiration time for each key-value pair. This makes them ideal for implementing time-based caching strategies, automatically invalidating cached data after a certain period.
Below is an example demonstrating how to store and retrieve a JSON string using Redis strings, suitable for caching API responses:
  const bikeData = JSON.stringify({ id: 1, color: "red" });
  await redisClient.set("bike:1", bikeData, {EX: 10});

  const value = await redisClient.get("bike:1");

  console.log(JSON.parse(value)); // { id: 1, color: "red" }
In the above code snippet, we first stringify the JSON data before saving it as a string, ensuring our JSON data is stored in the correct format. When retrieving the data, we parse it back into its original JSON format.
Setting up Caching with Redis in a Node.Js Application
Next, let’s proceed to set up caching with Redis in a Node.js application.
To begin open a terminal in a directory of your choice. Then run the following command. This will create a new folder for our demo application and initialize Node.js:
mkdir nodecache-app
cd nodecache-app
npm init -y
Next, to generate the necessary folders and files for our application, run:
mkdir controllers middlewares && \
  touch controllers/product.js middlewares/redis.js index.js
Our server setup will reside in the index.js file, while our Redis caching configuration will be implemented as middleware in our application.
Middleware in Node.js refers to a series of functions executed sequentially during HTTP request processing. These functions have access to the request and response objects, along with a special next function that passes control to the subsequent middleware.
Middleware commonly handles tasks like authentication, logging, data validation, caching, and rate limiting.
By utilizing Redis for caching and encapsulating caching logic in a middleware function, we gain control over which routes to cache easily. This enables us to leverage caching benefits without over-engineering our codebase.
Our cache configuration resides in the redis.js file, provided as a middleware.
Once defined, we can apply this middleware selectively to frequently accessed, read-heavy, or computation-intensive routes.
Next, execute the following command to install the required dependencies for our application:
npm install express object-hash Redis
Here’s a brief overview of each dependency:
-
express: This library facilitates the creation of REST APIs and route management in our application. -
redis: Redis is utilized as an in-memory data structure store, serving as a database for our cache. -
object-hash: This library generates consistent and reliable hashes from objects and values. We’ll use object-hash to create our cache key.
Here’s how our project directory will look so far:
├── controllers/
│    └── product.js
├── middlewares/
│    └── redis.js
├── node_modules/
├── index.js
├── package-lock.json
├── package.json
To begin developing our application logic, we’ll create a product controller for the application.
Copy and paste the following code into the controllers/product.js file:
const productController = {
  getproducts: async (req, res) => {
    // emulating data store delay time to retrieve product data
    await new Promise(resolve => setTimeout(resolve, 750));

    const products = [
      { id: 1, name: "Desk Bed", price: 854.44 },
      { id: 2, name: "Shelf Table", price: 357.08 },
      { id: 3, name: "Couch Lamp", price: 594.53 },
      { id: 4, name: "Bed Couch", price: 309.62 },
      { id: 5, name: "Desk Shelf", price: 116.39 },
      { id: 6, name: "Couch Lamp", price: 405.03 },
      { id: 7, name: "Rug Chair", price: 47.77 },
      { id: 8, name: "Sofa Shelf", price: 359.85 },
      { id: 9, name: "Desk Table", price: 823.21 },
      { id: 10, name: "Table Shelf", price: 758.91 },
    ];

    res.json({ products });
  },
};

module.exports = { productController };
In the code above, we’ve defined a controller named productController with a single method getProducts(), responsible for handling requests to retrieve all available product data.
We also included a simulated delay of 750 milliseconds using setTimeout(). This delay mirrors the time it takes to retrieve our product list from the application’s data store replicating the delay time of a database query or heavy computation while retrieving all products.
Each time this controller is invoked, we’ll consistently experience a delayed response due to the retrieval process delay time.
Now, let’s proceed with setting up our caching process, which will allow us to bypass the delay, ensuring users don’t have to wait for too long every time the product controller route is called.
To integrate caching into our application we have to initialize Redis Client into our application and then create our caching helper middleware.
To do this, copy and paste the following code in the middlewares/redis.js file,
const { createClient } = require("redis");
const hash = require("object-hash");
let redisClient;

async function initializeRedisClient() {
  try {
    redisClient = createClient();
    await redisClient.connect();
    console.log("Redis Connected Successfully");
  } catch (e) {
    console.error(`Redis connection failed with error:`);
    console.error(e);
  }
}

function generateCacheKey(req, method = "GET") {
  let type = method.toUpperCase()
  // build a custom object to use as a part of our Redis key
  const reqDataToHash = {
    query: req.query,
  };
  return `${type}-${req.path}/${hash.sha1(reqDataToHash)}`;
}

function cacheMiddleware(
  options = {
    EX: 10800, // 3h
  },
) {
  return async (req, res, next) => {
    if (redisClient?.isOpen) {
      const key = generateCacheKey(req, req.method);

      //if cached data is found retrieve it
      const cachedValue = await redisClient.get(key);

      if (cachedValue) {
        return res.json(JSON.parse(cachedValue));
      } else {
        const oldSend = res.send;

        // When the middleware function redisCachingMiddleware is executed, it replaces the res.send function with a custom function.
        res.send = async function saveCache(data) {
          res.send = oldSend;

          // cache the response only if it is successful
          if (res.statusCode >= 200 && res.statusCode < 300) {
            await redisClient.set(key, data, options);
          }

          return res.send(data);
        };

        // continue to the controller function
        next();
      }
    } else {
      next();
    }
  };
}

function invalidateCacheMiddleware(req, res, next) {
  // Invalidate the cache for the cache key
  const key = generateCacheKey(req);
  redisClient.del(key);
  next();
}

module.exports = {
  initializeRedisClient,
  cacheMiddleware,
  invalidateCacheMiddleware,
};
The code snippet above contains the following methods:
-
initializeRedisClient(): Responsible for setting up our Redis client. We are initializing the Redis client by creating a client instance and connecting to the Redis server. -
generateCacheKey(): This method generates a unique cache key based on our request object and HTTP method. Using theobject-hashlibrary it hashes ourrequest queryparameters, this will come in handy if our query parameters change or are rearranged regularly. -
cacheMiddleware(): OurcacheMiddleware()function is declared to accept an optionaloptionsobject, which defaults to{ EX: 10800 }(indicating a cache expiration time of 3 hours). This function returns another function that acts as middleware.Inside the middleware function,
req,res, andnextare directly passed as parameters by theExpress.jsframework when the middleware is invoked.These parameters represent the request object
req, the response objectres, andnextto continue to the next middleware in the chain.Within the middleware function, our logic for caching response data is implemented. We first check if the Redis client (redisClient) is available and open. If Redis is not available or open, we simply call
next()to continue to the next middleware in the chain without performing caching.If Redis is available, we generate a cache key based on the request. If cached data is available for the key generated, the cached value is retrieved using
redisClient.get(key)and the cached value is immediately sent back to the client usingres.json(), and the middleware is exited.If no cached data is found, the res.send function is replaced with a custom function
saveCache. This will intercept the response data before sending it to the client. This is achieved by temporarily overridingres.sendwith our customsaveCache()implementation. -
invalidateCacheMiddleware(): This middleware function is used for invalidating cache entries. It generates a cache key based on the request and deletes the corresponding cache entry from Redis.There are several ways we can invalidate our cache data, depending on the caching strategy and requirements of our application we can use Time-Based Expiration, Manual Invalidation, Versioning, Event-Driven Invalidation, TTL (Time-to-Live), or a combination of these techniques can be used to achieve optimal cache management.
We can choose the most appropriate cache invalidation strategy based on the requirements and characteristics of our application.
The above functions enable caching functionality within our application. By exporting these functions, they become available for use throughout our application, providing flexibility in caching strategies and management.
Next, we’ll set up our basic application settings and start our application by heading to the index.js file.
Here’s the code to copy and paste:
const express = require("express");
const {
  initializeRedisClient,
  cacheMiddleware,
  invalidateCacheMiddleware,
} = require("./middlewares/redis");
const { productController } = require("./controllers/product");

const app = express();
app.use(express.json());

// connect to Redis
initializeRedisClient();

// register an endpoint
app.get(
  "/api/v1/products",
  cacheMiddleware({
    EX: 3600, // 1h
  }),
  productController.getproducts
);

app.post("/api/v1/products", invalidateCacheMiddleware, (req, res) => {
  // Implement your logic to update data in Application data store
  res.json({ message: "Product data updated successfully" });
});

// start the server
const port = 7000;
app.listen(port, () => {
  console.log(`Server is running on port: http://localhost:${port}`);
});
Here’s what’s happening in the code.
We are setting up a basic Express server and routes.
We called the initializeRedisClient() function to set up and connect to our Redis database. This function initializes the Redis client, allowing our application to interact with Redis for caching purposes.
Then we use the cacheMiddleware() function as a middleware to cache responses for our GET endpoint /api/v1/product. We specify an expiration time of 3600 seconds (1 hour) for our cached data.
The invalidateCacheMiddleware() function is used as middleware to invalidate cached data when the POST endpoint /api/v1/product is called before processing the request. This ensures that stale data is not passed to the client.
Our application is configured to listen on port 7000.
With this setup, our application is ready to cache responses and invalidate cache entries as needed.
Let’s proceed to test our application caches.
Testing
To test the caching system, ensure that your Redis server is started locally. We now have a working application we can start it by running the following command:
node index.js
Our demo server should now be listening at port 7000.
Make a GET HTTP request to http://localhost:7000/api/v1/products. This will trigger our caching logic, and the API response will be stored in the Redis database.
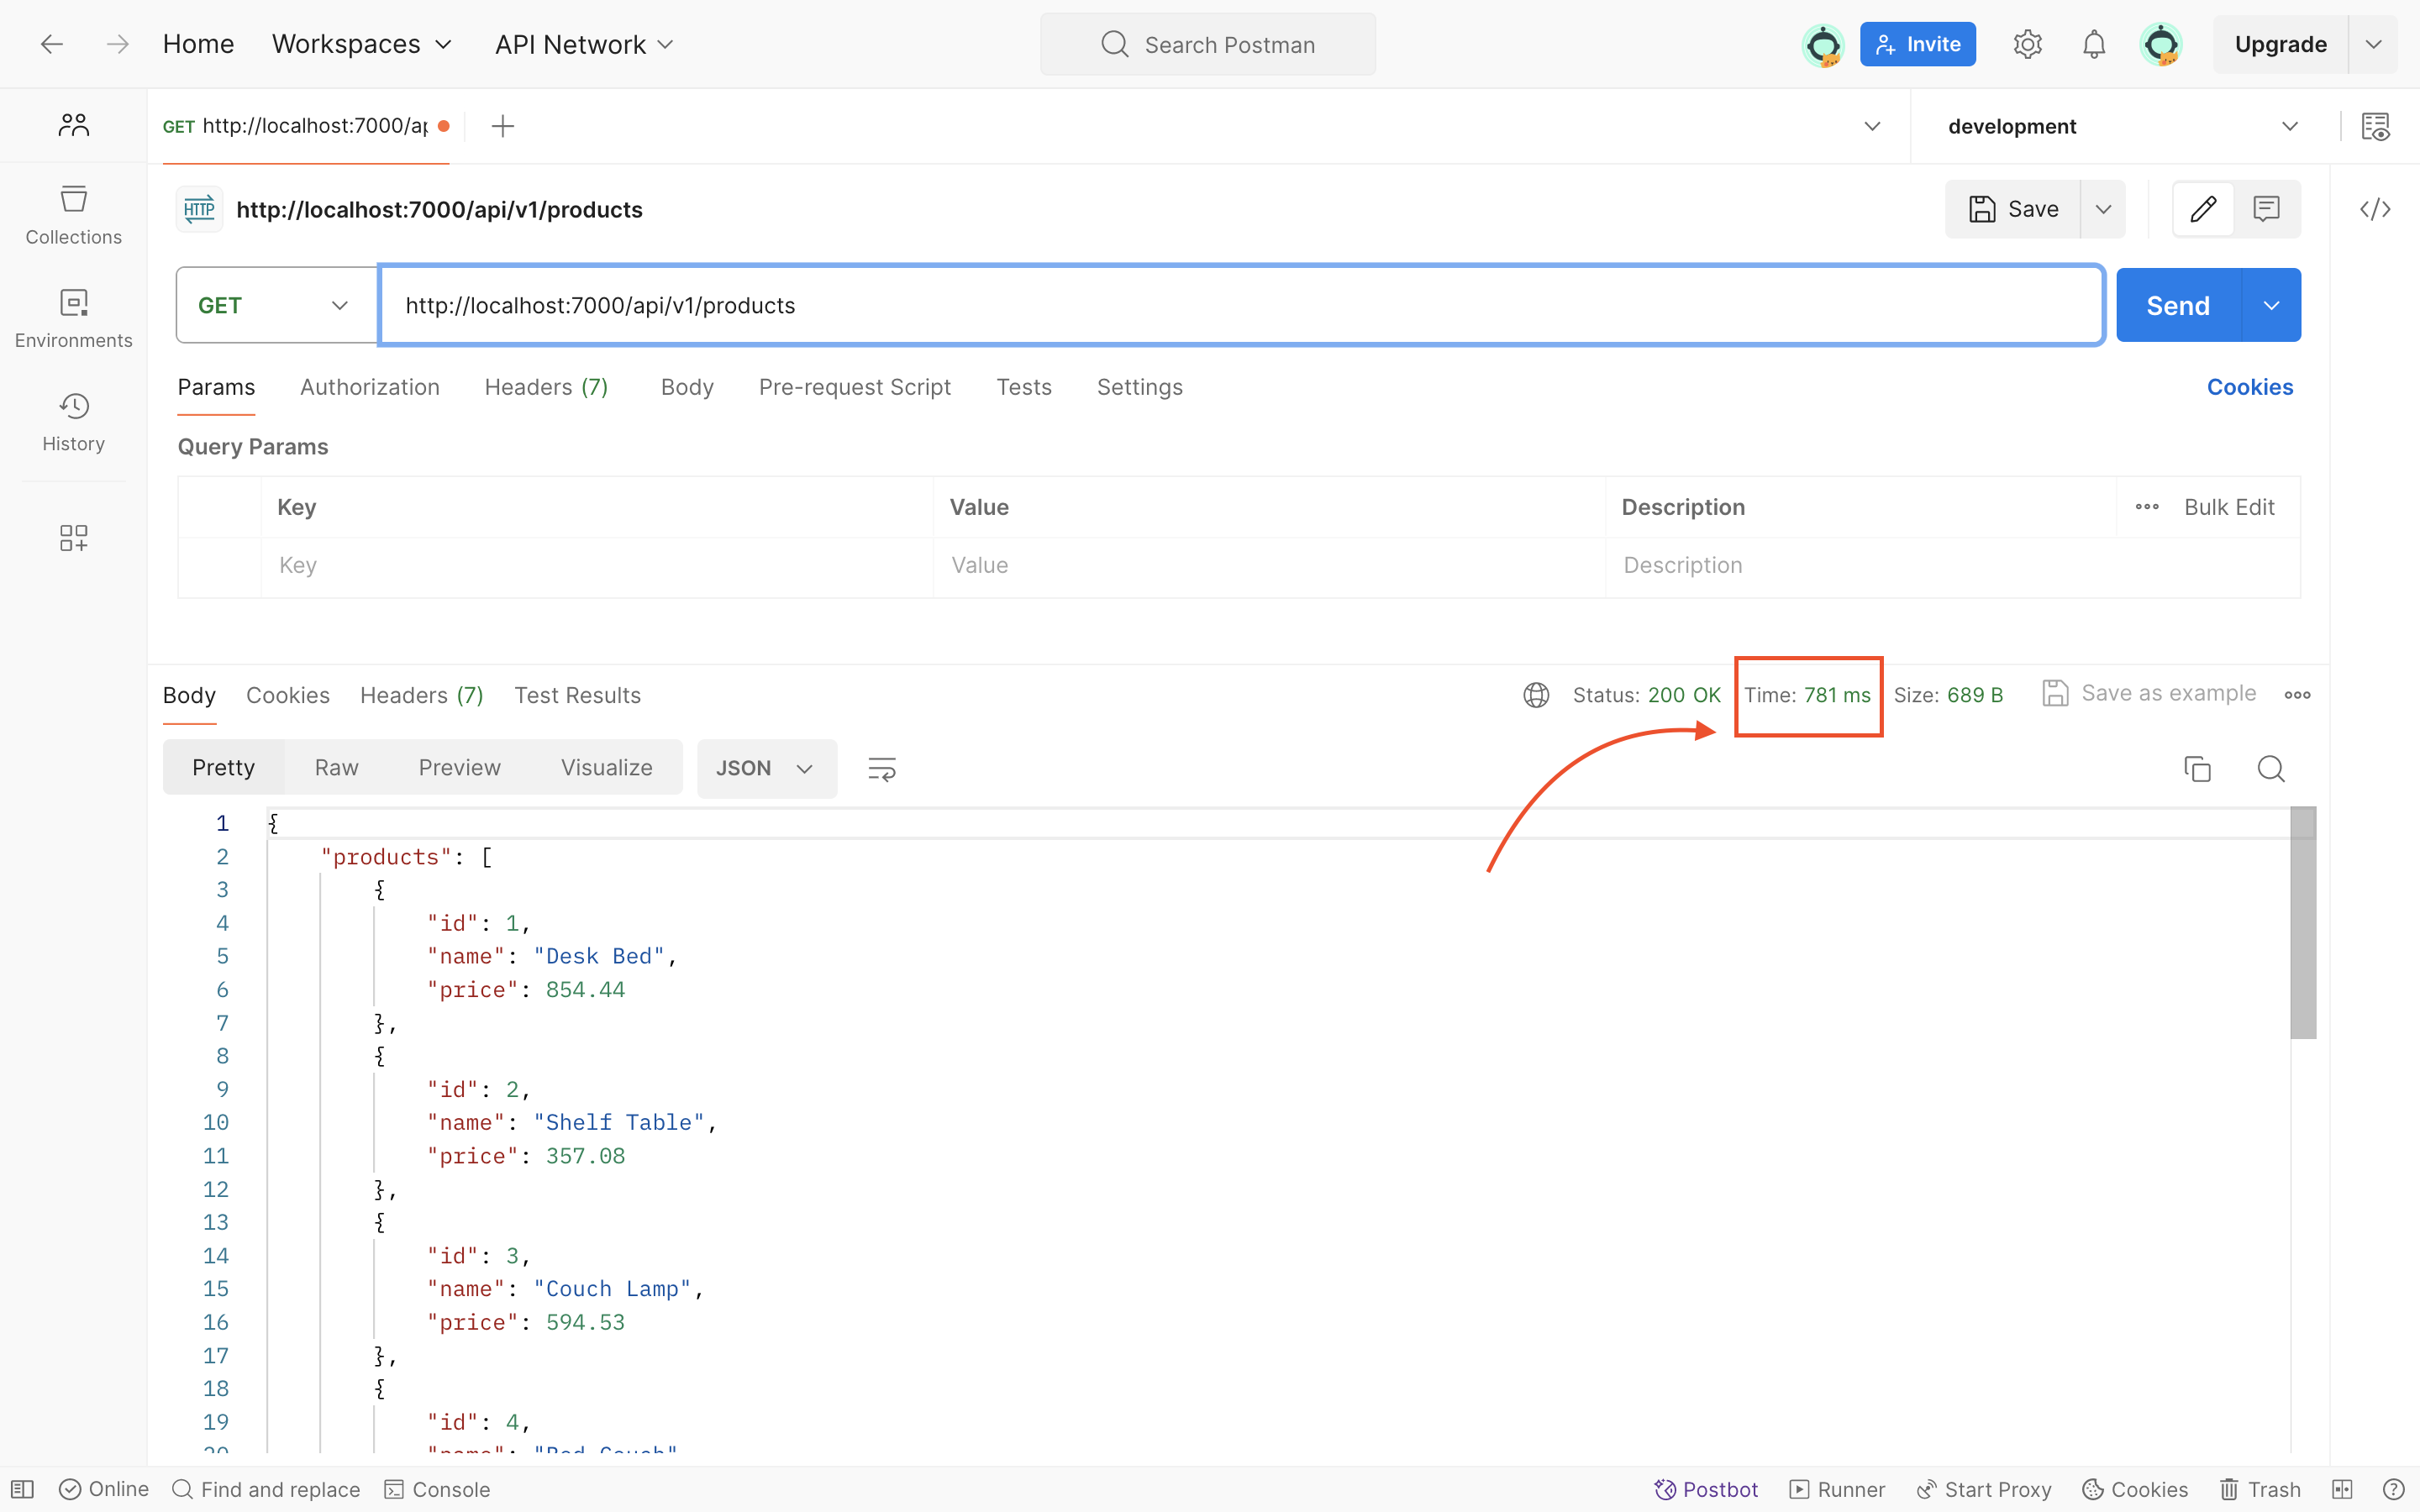
initially, we will notice a delay due to the request processing time. However, subsequent requests to the same endpoint will be significantly faster as the response is retrieved from the cache.
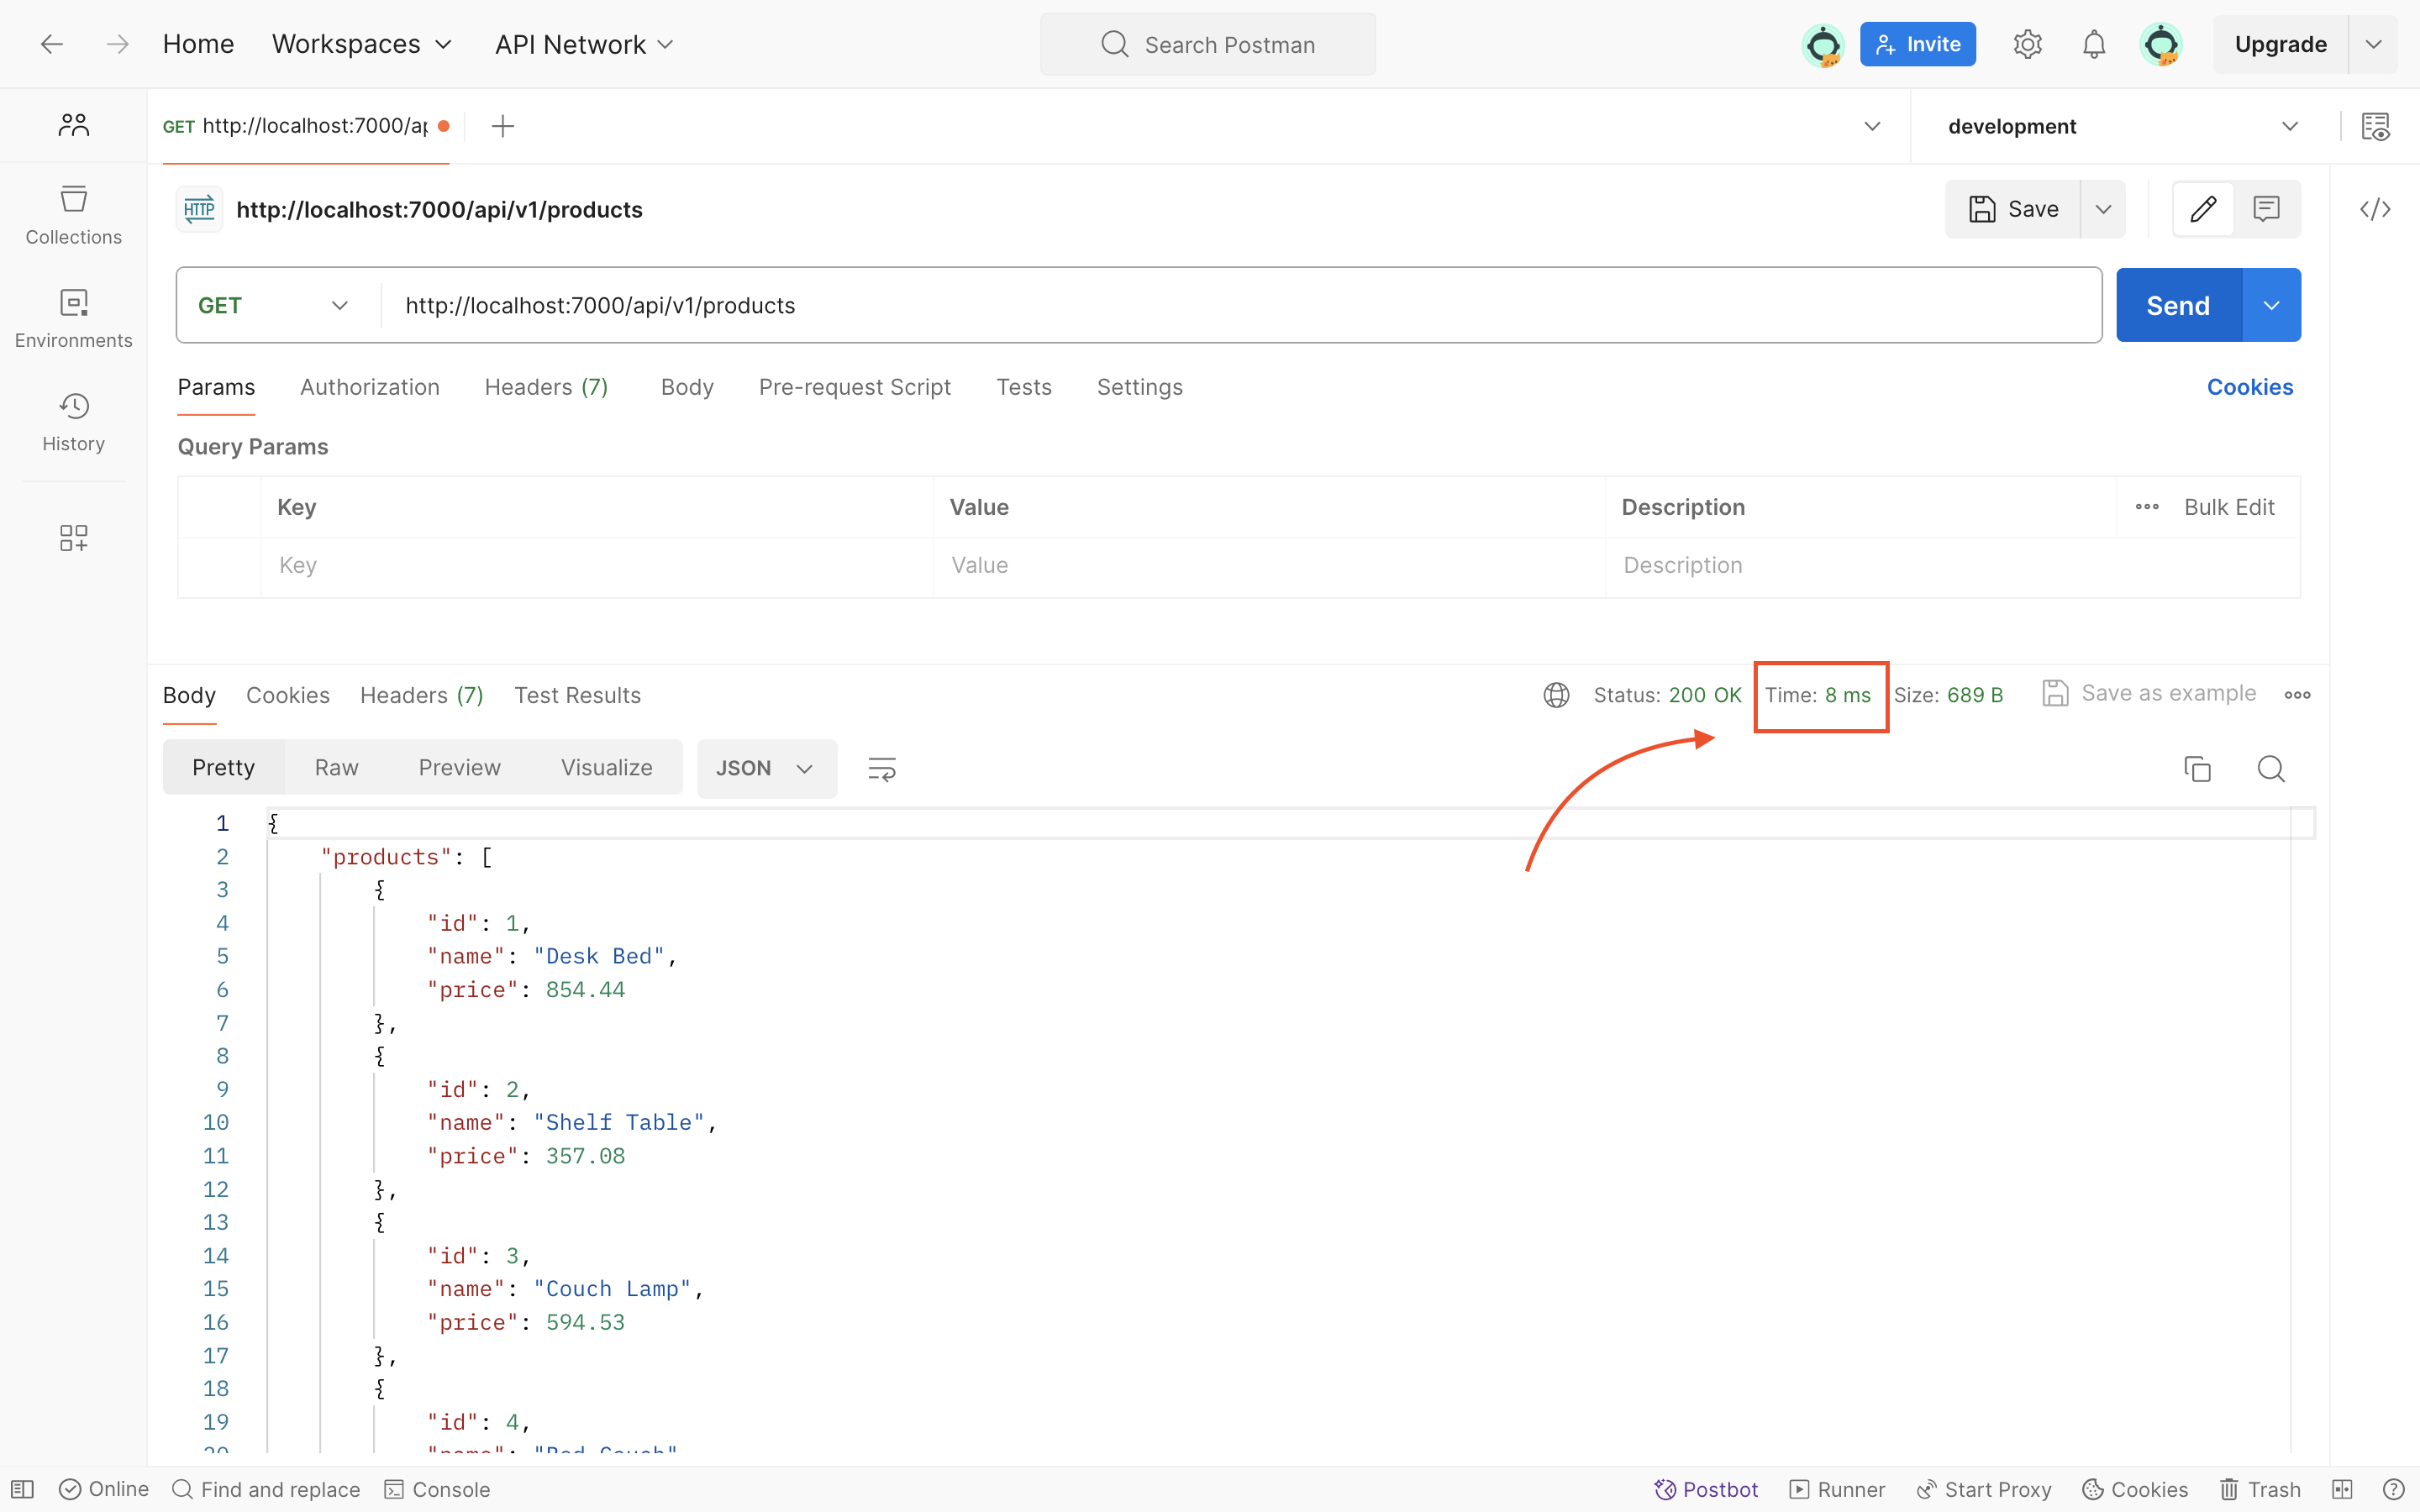
For example, our initial request took 781ms to process, and subsequent requests returned in as little as 8ms, demonstrating the efficiency of caching.
Conclusion
In conclusion, implementing caching in an application is undeniably essential for optimizing performance and delivering a satisfying user experience. However, the journey doesn’t end with merely enabling caching. Choosing the right caching strategy, or even blending multiple strategies, requires careful consideration and expertise.
It is important to perform rigorous load testing on our endpoints to guarantee they can manage expected traffic and scale properly. By constantly assessing and optimizing our caching technique, we can ensure that our application remains performant and responsive, giving users an amazing experience they will value.