Consider the case where someone provides us with a CSV file containing employee details that have been exported from an employee management application. It may also have data to map the employee/manager relationship within the organization to form a tree chart. Our task is to load that data into another application. But that application doesn’t have a CSV import feature, so we’re going to build it. We’re going to build a simple UI and a backend that will import CSV files and store the data in a database:
While building a basic importer is straightforward, there are a multitude of advanced features that should be considered when designing and implementing a CSV importer that’s meant to be used in production settings.
Budgeting maintenance time is also necessary, as teams often spend an additional $75,000 annually on:
- Adaptive Maintenance: The largest maintenance cost tends to be changes to the database schema. Each new field of validation requires updating a CSV importer to add new validations.
- Performance: Naive approaches to improving performance, such as loading, validating, and visualizing all of the spreadsheet data at once in memory, scale drastically as spreadsheets approach thousands (or millions) of rows. At that size, validations need to be done in parallel batches, especially if results will be displayed in a responsive UI.
- Bug fixes / QA: Once implemented, CSVs tend to become a permanent area that teams must QA. Testing a large number of encodings, formats, and file sizes can cost a substantial amount of resources. When data is uploaded in the wrong format, undoing / bulk correcting files requires time as well.
Read the section on “Creating a production-ready CSV importer” to learn more about the differences involved with building a basic importer versus one able to handle more complex workflows, what features can help make the import process seamless for customers, and embeddable CSV importer options such as OneSchema.
Companies often scope one engineering month to build an importer, but end up taking over 3-6 months with a team of 2 engineers to build all the supporting features needed to make the importer usable for their customers. This results in an estimated launch cost of $100,000.
In this article, we’re going to look into what it means to build a CSV importer from scratch. We will look at some general use cases that the CSV format helps us with and then use the tools the Node.js tech stack offers us to build a CSV importer with a basic UI.
Example Code
This article is accompanied by a working code example on GitHub.CSV Use Cases
Before we start building a CSV importer, we need to understand why we use CSV files. Here are some of the most important benefits:
- Easy to read: CSV files contain data in plain text, which makes them human-readable, unlike some alternative data storage formats.
- Lightweight: These files take up little space. The header row and the commas in between each data field are the only extra space they require aside from the actual data.
- Portable and flexible: The CSV format is a widely used standard format which means that it’s easy to import and export CSV files into / out of many different software applications.
The ease of use and popularity of the CSV format makes it suitable for many different use cases. For a more detailed list, refer to the list of CSV use cases published by the W3C.
- Relational Data and Row-Formats - Usually, when data is retrieved from a table, the data can be complete or half-filled which means there could be null or empty values for a few of the columns. But CSV helps to categorically observe the empty or missed values in the form of comma-separated data which makes it easy to point out missing content in the pool of data.
- Publication of Statistics - Often the data extracted for statistics need to be re-used for multiple purposes. The common support of CSV files in different tools increases the reusability of the data.
- Time-series data - Time-related data like weather data is very well suited for a column-based file format. Again, in CSV format this data is easily consumable with a commonly available toolset.
- Importing and exporting data - During mergers or acquisitions, companies often need to export and import data across systems. Given the ubiquitousness of CSV, it’s a common choice to represent this data.
In this article, we are going to explain the use case of exporting and importing hierarchical data between different applications. Hierarchical data is data that contains a hierarchy, like an employee/manager relationship.
Setting Up the Node.js project
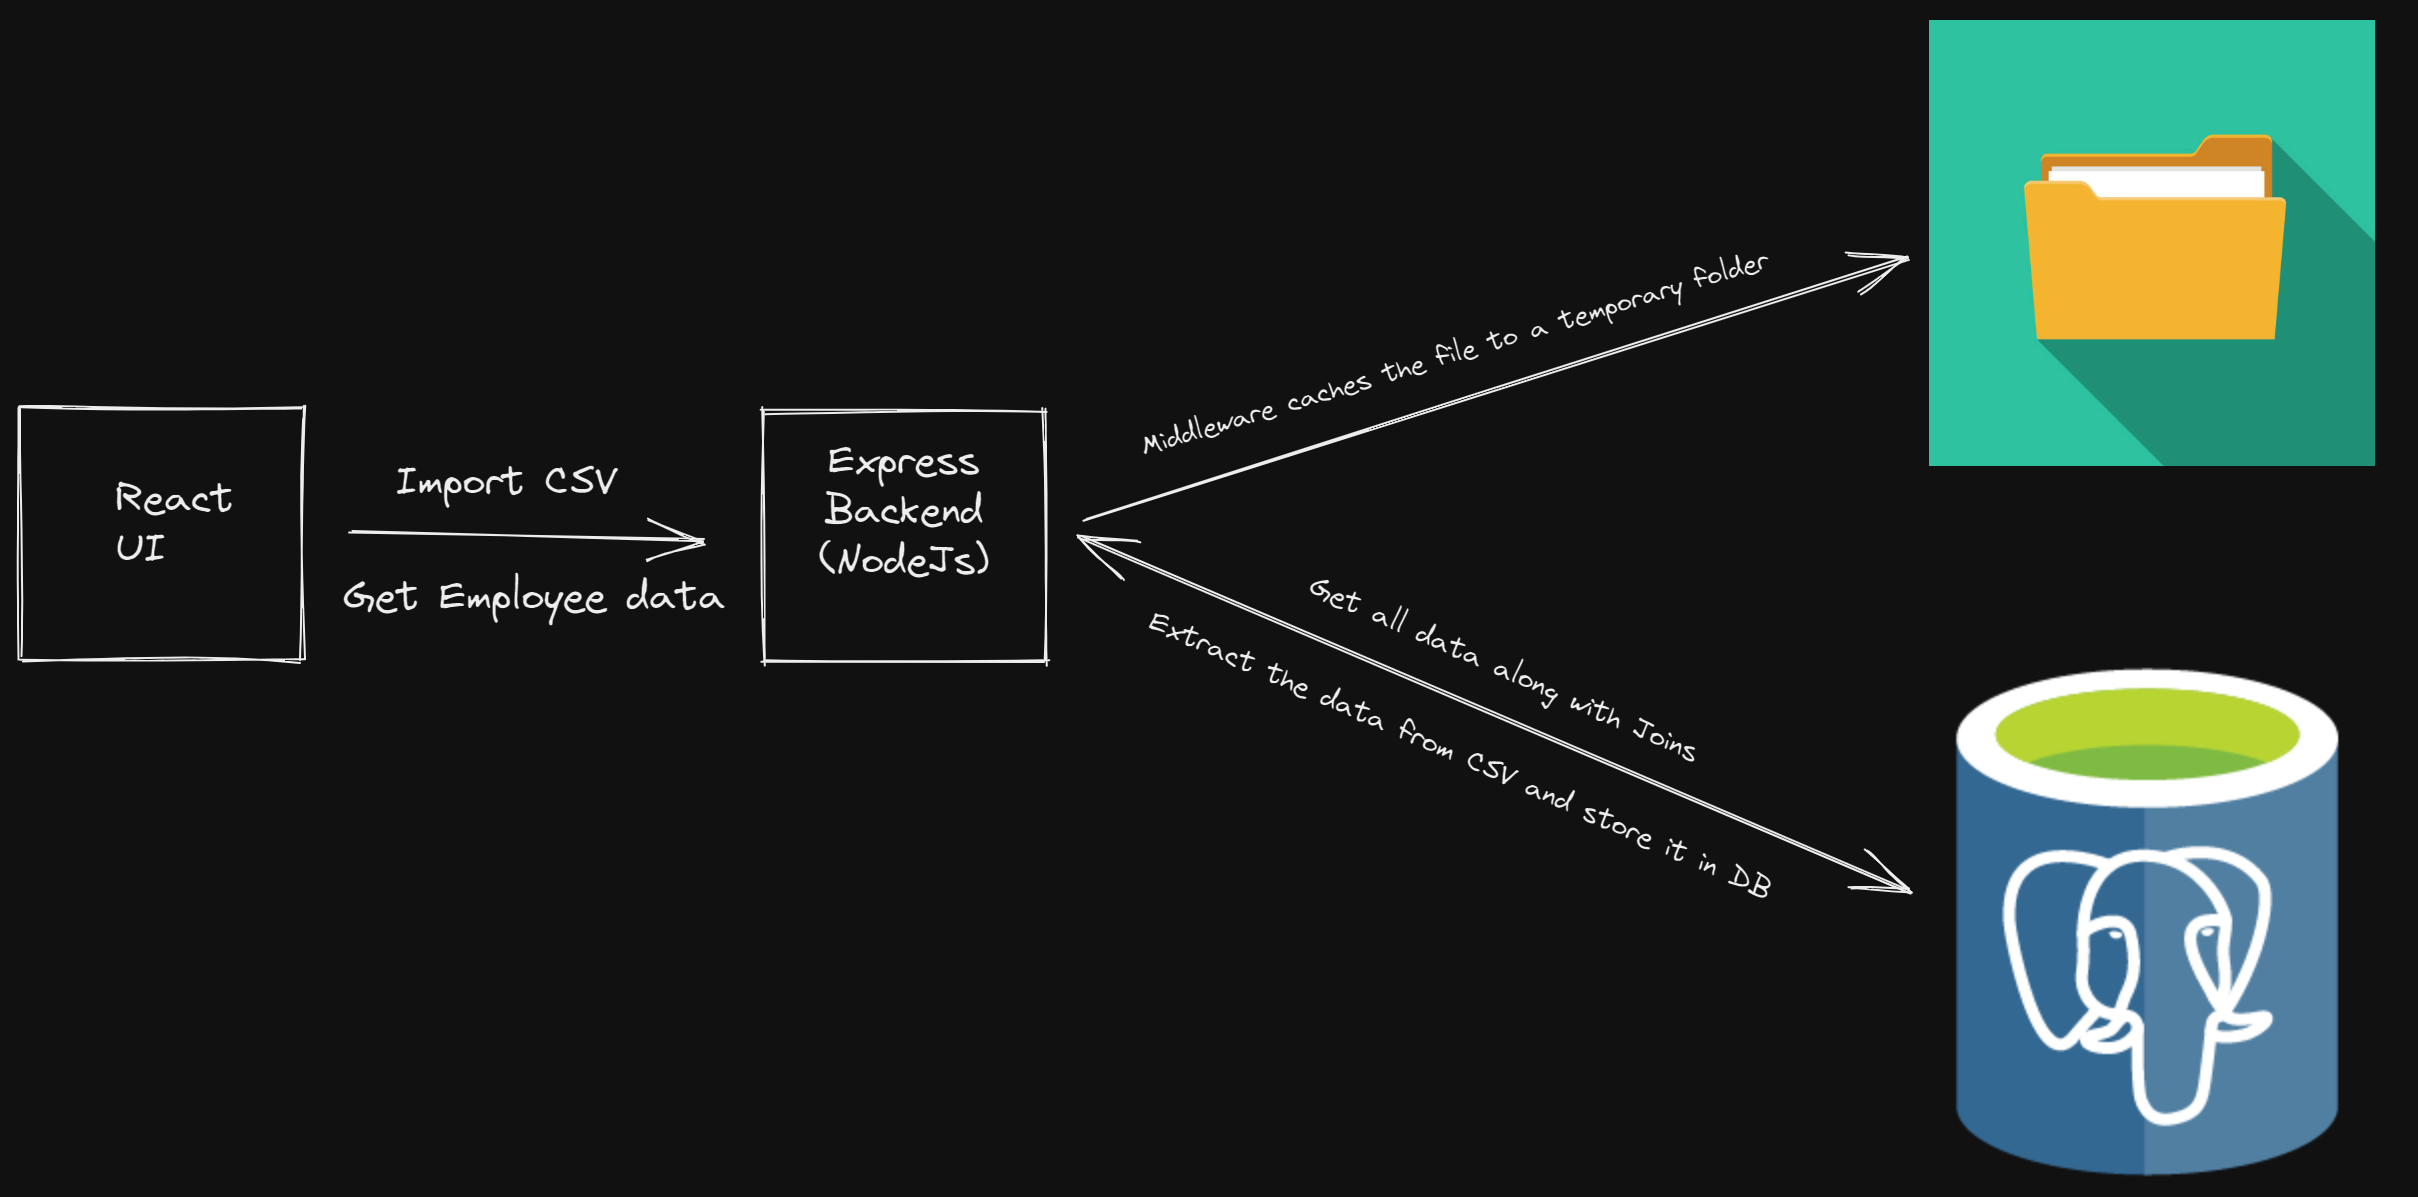
Let’s start with our implementation. As shown in the above diagram, we need to create two components: one for the Express backend and the other for the React UI client.
Let’s create a folder and start with the initialization of a Node.js project:
npm init
Next, we need to install a few libraries as dependencies:
npm install express cors multer pg sequelize fast-csv json2csv
Let’s understand how we’re using each of the installed dependencies:
- Express - We are using Express to provide a REST API for our application.
- Cors - We will use this library for CORS (Cross-Origin Resource Sharing) configuration between the backend and the frontend server.
- Multer - It is a Node.js middleware used for handling
multipart/form-data, which is primarily used for uploading files. - Pg - It is a non-blocking PostgreSQL client for Node.js.
- Sequelize - This is a modern TypeScript and Node.js ORM for various databases like Oracle, Postgres, MySQL, MariaDB, SQLite, and SQL Server.
- Fast-csv - We will use this library for parsing and formatting CSVs or any other delimited value file in Node.js.
- Json2csv - We will use this library to convert JSON into CSV with column titles and proper line endings.
Now, we will create a server folder and add all our code within that directory.
Next, we need to define the frontend React client. So we will create another directory to host our frontend:
npx create-react-app client
This will bootstrap the React code under the client folder. We will first implement the backend part and then we will come back to the frontend side.
Configure a PostgreSQL Database
We have the base setup for our implementation ready. So, let’s host an instance of PostgreSQL and configure our backend server to connect with that DB. We can quickly spin up a PostgreSQL instance by creating a docker-compose.yml file:
version: '3.1'

services:
  db:
    image: postgres
    restart: always
    environment:
      POSTGRES_USER: postgres
      POSTGRES_PASSWORD: Welcome123
      POSTGRES_DB: csvdb
We can run this by executing the following command (assuming you have docker-compose installed):
docker-compose up
This will host a Postgres instance locally. Now we can switch to our code and create the file config/db.config.js within our server directory with these connection details:
const HOST = "localhost";
const USER = "postgres";
const PASSWORD = "Welcome123";
const DB = "csvdb";
const dialect = "postgres";
const pool = {
    max: 5,
    min: 0,
    acquire: 30000,
    idle: 10000
};

export default {
    HOST,
    USER,
    PASSWORD,
    DB,
    dialect,
    pool
};
The first five details are specific to the PostgreSQL driver. We have also defined an optional parameter to configure the connection pool for Sequelize.
Defining the Data Model
Next, we can initialize a data model for Sequelize. Sequelize is an object-relational mapper (ORM) that maps between a data model in the code and the database tables. In this section, we’re going to define the data model in the code. Sequelize will take care of creating the database tables out of that model.
First, we define the Employee data that we want to store in our database. We can create a models folder and in it, the model file employee.model.js:
import Sequelize from 'sequelize';
import { sequelize } from '../database/index.js';

const Employee = sequelize.define("employee", {
    id: {
      type: Sequelize.STRING,
      primaryKey: true
    },
    name: {
      type: Sequelize.STRING
    },
    email: {
      type: Sequelize.STRING
    },
    username: {
      type: Sequelize.STRING
    },
    dob: {
      type: Sequelize.STRING
    },
    company: {
      type: Sequelize.STRING
    },
    address: {
      type: Sequelize.STRING
    },
    location: {
      type: Sequelize.STRING
    },
    salary: {
      type: Sequelize.STRING
    },
    about: {
      type: Sequelize.STRING
    },
    role: {
      type: Sequelize.STRING
    },
    managedBy: {
      type: Sequelize.STRING,
      references: {
          model: 'employees',
          key: 'id'
      }
    },
    createdAt: {
      type: Sequelize.STRING
    },
    updatedAt: {
      type: Sequelize.STRING
    },
    avatar: {
      type: Sequelize.STRING
    }
  });

export default Employee;
As we can see, we have an attribute as id which will contain the primary key for each employee. We also have an attribute as managedBy which denotes the id of the manager who is managing this employee. We need to mark this attribute as a foreign key. In Sequelize, we can define references and map the reference to the other model and key for foreign key definition.
Next, we need to define ORM mapping for the parent-child relationship. We will have a one-to-many relationship which means one manager can have multiple employees reporting to them. Sequelize provides 4 types of associations that should be combined to create ORM mappings for One-To-One, One-To-Many, and Many-To-Many:
hasOne()belongsTo()hasMany()belongsToMany()
In our data model, we use the combination of hasMany() and belongsTo() to model the hierarchical relationship between manager and employee:
Employee.hasMany(Employee, {
    as: 'children',
    foreignKey: 'managedBy',
    sourceKey: 'id',
    useJunctionTable: false
  });
Employee.belongsTo(Employee, {
    foreignKey: "managedBy",
    targetKey: "id",
  });
How do we make sure that our data model is in sync with the database schema? Luckily, Sequelize does that for us. For this, we create another file database/index.js and call sequelize.sync() to tell Sequelize to create or update the database table so that it matches our data model:
import Sequelize from 'sequelize';
import dbConfig from '../config/db.config.js';

export const sequelize =  new Sequelize(dbConfig.DB, dbConfig.USER, dbConfig.PASSWORD, {
    host: dbConfig.HOST,
    dialect: dbConfig.dialect,
    pool: dbConfig.pool,
    logging: console.log
  }
);

sequelize.authenticate()
  .then(() => {
    console.log('Connection has been established successfully.');
    console.log('Creating tables ===================');
    sequelize.sync().then(() => {
        console.log('=============== Tables created per model');
    })
    .catch(err => {
        console.error('Unable to create tables:', err);
    })
  })
  .catch(err => {
    console.error('Unable to connect to the database:', err);
});
This will connect to PostgreSQL and update all the tables as per the models defined.
Caching the Uploaded File
As mentioned earlier, we are using multer as a body parsing middleware that handles content type multipart/form-data which is primarily used for uploading files. That means it parses the raw HTTP request data and makes it more accessible by storing it somewhere for further processing. Without multer, we would have to parse the raw data ourselves to access the file.
So let’s define middleware by creating a middleware folder and adding our logic in upload.js:
import fs from 'fs';
import multer from 'multer';

const storage = multer.diskStorage({
  destination: (_req, file, cb) => {
    console.log(file.originalname);
    const dir = './resources/static/assets/uploads';
    if (!fs.existsSync(dir)) {
        fs.mkdirSync(dir, { recursive: true });
    }
    cb(null, dir);
  },
  filename: (_req, file, cb) => {
    console.log(file.originalname);
    cb(null, `${Date.now()}-${file.originalname}`);
  },
});

const csvFilter = (_req, file, cb) => {
  console.log('Reading file in middleware', file.originalname);
  if (file == undefined) {
    cb('Please upload a file to proceed.', false);
  } else if (file.mimetype.includes('csv')) {
    cb(null, true);
  } else {
    cb('Please upload only csv file as only CSV is supported for now.', false);
  }
};

export default multer({
    storage: storage,
    fileFilter: csvFilter
});
The code above will only allow files ending with .csv and then store them on the disk for later use. We will later include it in the route we define in our Express server that handles the file upload.
Defining the REST APIs
Now, once we have our data model and the required middleware defined, we can move on to write our core implementation for the REST APIs. As part of this article, we will need an API to upload a CSV file and store the content in the PostgreSQL database. We would also need an API to fetch all the employees and their direct children to denote the employees managed by each one of them. Additionally, we will also define an API to download a CSV file to export the data.
These are the API endpoints we want to define:
/api/csv/upload: will accept amultipart/form-datacontent as POST call to import the CSV file./api/csv/download: will be a simple GET call to return raw CSV data as a response./api/employees: will be a GET call to return all the employees and their associations in JSON format.
Import CSV File
So let’s start with the APIs related to CSV import/export as part of our controller directory. In the file csv.controller.js, we will pull the file from the disk where it was stored by our middleware, then parse the data and store it in the database:
import Employee from '../models/employee.model.js';
import { createReadStream } from 'fs';
import { parse } from 'fast-csv';

const upload = async (req, res) => {
  try {
    if (req.file == undefined) {
      return res.status(400).send("Please upload a CSV file!");
    }

    let employees = [];
    let path = "./resources/static/assets/uploads/" + req.file.filename;

    createReadStream(path)
      .pipe(parse({ headers: true }))
      .on("error", (error) => {
        throw error.message;
      })
      .on("data", (row) => {
        employees.push(row);
      })
      .on("end", () => {
        Employee.bulkCreate(employees)
          .then(() => {
            res.status(200).send({
              message: "The file: "
               + req.file.originalname
               + " got uploaded successfully!!",
            });
          })
          .catch((error) => {
            res.status(500).send({
              message: "Couldn't import data into database!",
              error: error.message,
            });
          });
      });
  } catch (error) {
    console.log(error);
    res.status(500).send({
      message: "Failed to upload the file: " + req.file.originalname,
    });
  }
};
Export CSV File
Next, we will define a method to download the data stored in the database as a CSV file in the same csv.controller.js file:
import Employee from '../models/employee.model.js';
import { Parser as CsvParser } from 'json2csv';

const download = (_req, res) => {
  Employee.findAll().then((objs) => {
    let employees = [];

    objs.forEach((obj) => {
      const { id, name, email,
        username, dob, company,
        address, location, salary,
        about, role } = obj;
      employees.push({ id, name, email,
        username, dob, company,
        address, location, salary,
        about, role });
    });

    const csvFields = ['id', 'name', 'email',
                     'username', 'dob', 'company',
                     'address', 'location', 'salary',
                     'about', 'role'];
    const csvParser = new CsvParser({ csvFields });
    const csvData = csvParser.parse(employees);

    res.setHeader('Content-Type', 'text/csv');
    res.setHeader('Content-Disposition', 'attachment; filename=employees.csv');

    res.status(200).end(csvData);
  });
};

export default {
  upload,
  download,
};
Get Employee Data
To test if our upload API works as expected, we’ll introduce another REST API that retrieves the employee data and returns it in plain JSON format.
For this, we will define another controller employee.controller.js to fetch the employees with their child elements:
import Employee from '../models/employee.model.js';

const getEmployees = (_req, res) => {
    Employee.findAll({
        include: [{
            model: Employee,
            as: 'children',
            attributes: ['id', 'name', 'email', 'username', 'avatar'],
            required: true
        }],
        attributes: {
            exclude: ['managedBy']
        }
    })
      .then((data) => {
        res.send(data);
      })
      .catch((err) => {
        res.status(500).send({
          message:
            err.message
             || "Error while retrieving employees from the database.",
        });
      });
  };

export default getEmployees;
While defining the data model we had a field named managedBy which relates the Employee to their manager in the same table. When loading the data from the table, we have to choose between eager loading and lazy loading.
Lazy loading refers to the technique of fetching the related data only when we truly want it. Eager loading, on the other hand, refers to the approach of requesting everything at once, starting from the beginning, with a bigger query. It is a process of simultaneously requesting data from one primary model and one or more associated models. This is a query involving one or more joins at the SQL level. For our use case, we need to opt for the eager-loading concept to map the same model to retrieve child values.
In Sequelize, eager loading is mainly done by using the include option on a model finder query (such as findOne(), findAll(), etc). Thus, we have defined the following option for our include:
include: [{
    model: Employee,
    as: 'children',
    attributes: ['id', 'name', 'email', 'username', 'avatar'],
    required: true
}]
modeldefines the data model that we want to retrieve.asdefines the association column (in our case, the association between employee and manager).attributesdefines the fields to be retrieved for the associated model.requiredcontrols the query. It will create anOUTER JOINiffalseand anINNER JOINiftrue.
Finally, we have also defined exclude to exclude a given attribute from the final result as we don’t want to retrieve managedBy attribute since we have defined a children attribute now in the same employee.controller.js.
attributes: {
    exclude: ['managedBy']
}
Hooking in the Routes
Next, we need to hook in the logic from above to their respective routes. We do this in the file routes/index.js:
import { Router } from 'express';
import csvController from '../controllers/csv.controller.js';
import getEmployees from '../controllers/employee.controller.js';
import uploadFile from '../middleware/upload.js';

const router = Router();

let routes = (app) => {
  // CSV
  router.post('/csv/upload', uploadFile.single('file'), csvController.upload);
  router.get('/csv/download', csvController.download);

  // Employees
  router.get('/employees', getEmployees);

  app.use("/api", router);
};

export default routes;
Setting Up the Express Server
Since we have now defined all the building blocks for the APIs, next we need to set up the Express server and host the APIs. We would also need to define CORS to allow frontend to hit the backend APIs finally in index.js:
import express from 'express';
import path from 'path';
import cors from 'cors';
import initRoutes from './routes/index.js';

global.__basedir = path.resolve() + "/..";

const app = express();

var corsOptions = {
  origin: "http://localhost:3000"
};

app.use(cors(corsOptions));

// parse requests of content-type - application/json
app.use(express.json());

// parse requests of content-type - application/x-www-form-urlencoded
app.use(express.urlencoded({ extended: true }));

initRoutes(app);

// set port, listen for requests
const PORT = process.env.PORT || 8080;
app.listen(PORT, () => {
  console.log(`Server is running on port ${PORT}.`);
});
Finally, we can add the following script to our package.json file:
"scripts": {
    "start": "node server/index.js",
}
and then run the Express server with this command:
npm run start
Once the server starts, it will first create the tables for the defined model and then map the primary key and foreign key for the association:
yarn start
yarn run v1.22.17
$ node server/index.js
Server is running on port 8080.
Executing (default): SELECT 1+1 AS result
Connection has been established successfully.
Creating tables ===================
Executing (default): SELECT table_name FROM information_schema.tables WHERE table_schema = 'public' AND table_name = 'employees'
Executing (default): CREATE TABLE IF NOT EXISTS "employees" ("id" VARCHAR(255) , "name" VARCHAR(255), "email" VARCHAR(255), "username" VARCHAR(255), "dob" VARCHAR(255), "company" VARCHAR(255), "address" VARCHAR(255), "location" VARCHAR(255), "salary" VARCHAR(255), "about" VARCHAR(255), "role" VARCHAR(255), "managedBy" VARCHAR(255) REFERENCES "employees" ("id") ON DELETE CASCADE ON UPDATE CASCADE, "createdAt" VARCHAR(255), "updatedAt" VARCHAR(255), "avatar" VARCHAR(255), PRIMARY
KEY ("id"));
Executing (default): SELECT i.relname AS name, ix.indisprimary AS primary, ix.indisunique AS unique, ix.indkey AS indkey, array_agg(a.attnum) as column_indexes,
array_agg(a.attname) AS column_names, pg_get_indexdef(ix.indexrelid) AS definition FROM pg_class t, pg_class i, pg_index ix, pg_attribute a WHERE t.oid = ix.indrelid AND i.oid = ix.indexrelid AND a.attrelid = t.oid AND t.relkind = 'r' and t.relname = 'employees' GROUP BY i.relname, ix.indexrelid, ix.indisprimary, ix.indisunique, ix.indkey ORDER BY i.relname;
=============== Tables created per model
Now, we can send a cURL to upload a CSV file:
curl -i -X POST \
   -H "Content-Type:multipart/form-data" \
   -F "file=@\"./employee_details.csv\";type=text/csv;filename=\"employee_details.csv\"" \
 'http://localhost:8080/api/csv/upload'
Then we can execute another cURL command to fetch the employees data that we have imported in the previous one:
curl -i -X GET \
 'http://localhost:8080/api/employees'
With this, we have completed the backend implementation. Now we will build the React UI to upload the CSV file and display the data as tabular content.
Building a CSV Importer UI
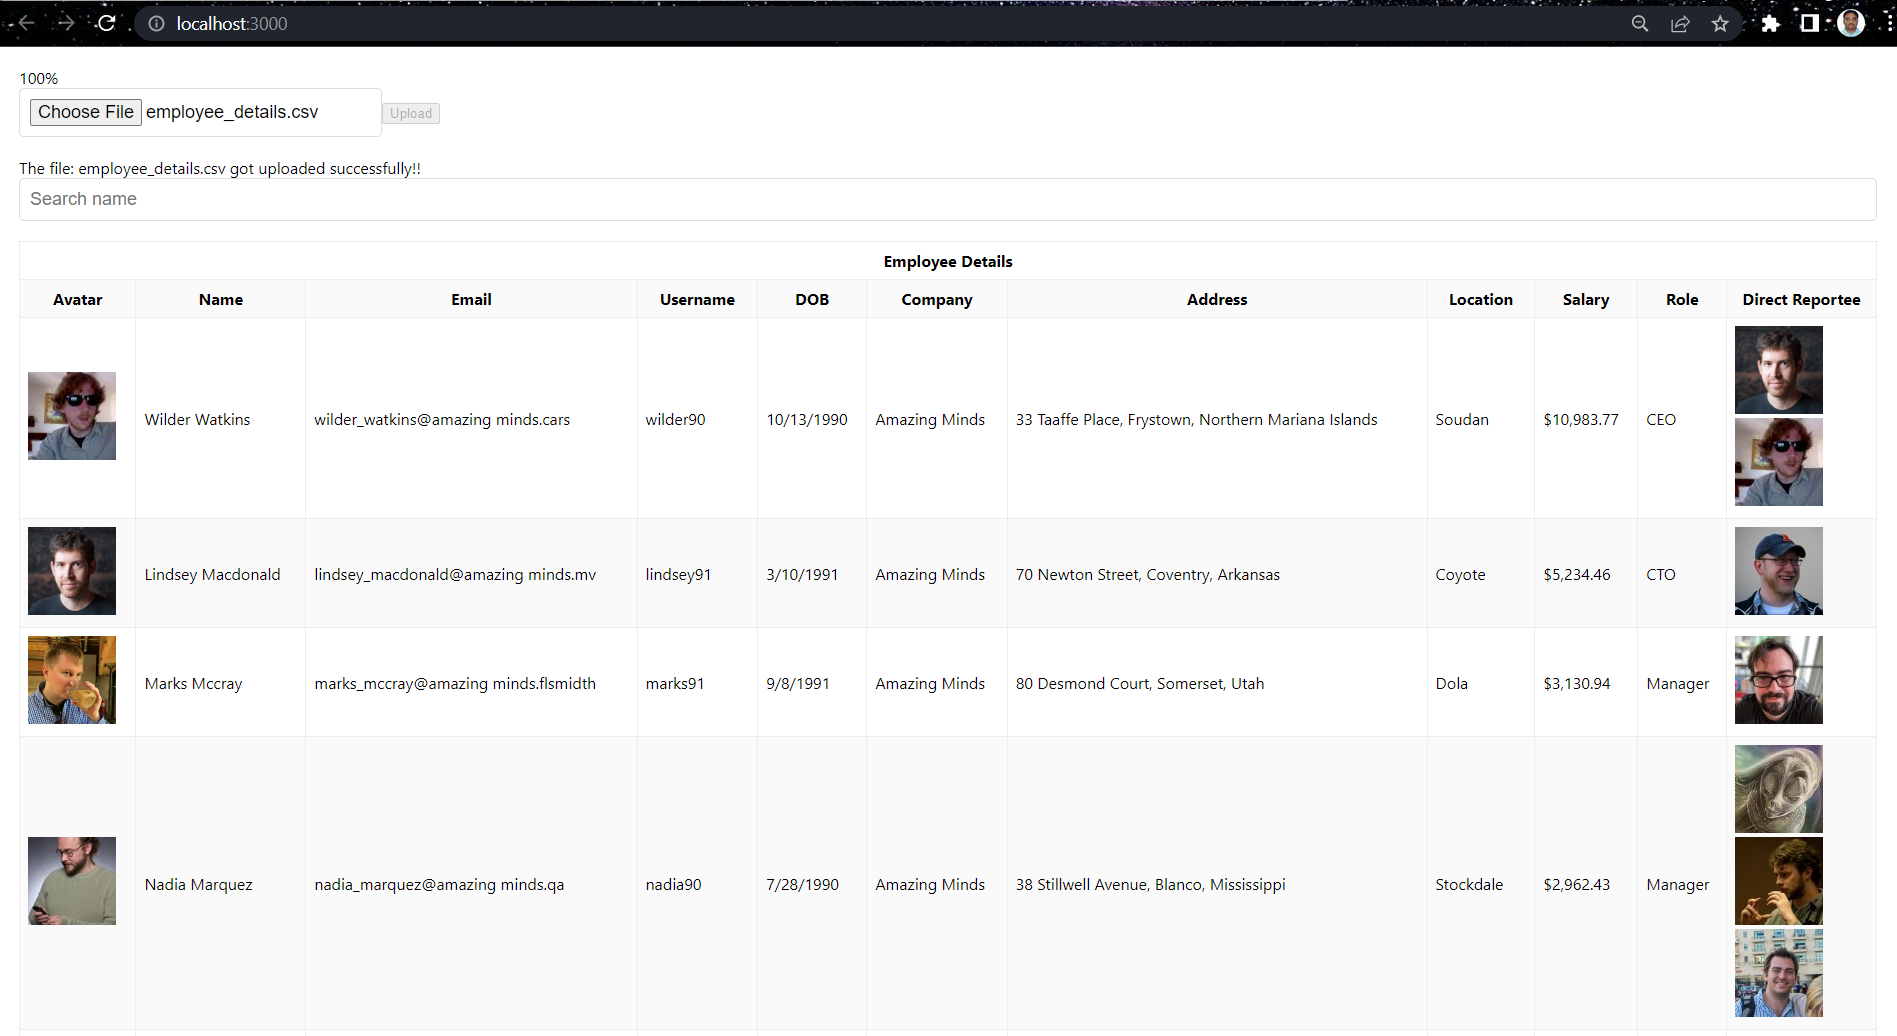
Let’s move on to the frontend part. As initially discussed, we will try to build a simplistic UI that can upload a CSV and store its data in our PostgreSQL database. Then we will retrieve that data from the DB using our /employees endpoint and display it in tabular format. Each row will have some basic information about an employee and the avatar of each employee he/she is managing. The final UI would look something like below:
Initially, while setting up the Node project, we initiated a client folder and created a React app using create-react-app script. We would additionally add axios to call REST APIs and react-table to build the table to display the imported data in tabular format:
npm install axios react-table
Now, we will edit the App.js to add the component to upload the CSV file:
import React, { useMemo, useState, useEffect } from "react";
import axios from "axios";
import './App.css';

const uploadToServer = (file, onUploadProgress) => {
  let formData = new FormData();

  formData.append("file", file);

  return axios.post('http://localhost:8080/api/csv/upload', formData, {
    headers: {
      "Content-Type": "multipart/form-data",
    },
    onUploadProgress,
  });
};

function App() {

  const [data, setData] = useState([]);
  const [selectedFiles, setSelectedFiles] = useState(undefined);
  const [currentFile, setCurrentFile] = useState(undefined);
  const [progress, setProgress] = useState(0);
  const [message, setMessage] = useState("");

  useEffect(() => {
    (async () => {
      const result = await axios("http://localhost:8080/api/employees");
      setData(result.data);
    })();
  }, []);

  const selectFile = (event) => {
    setSelectedFiles(event.target.files);
  };

  const upload = () => {
    let currentFile = selectedFiles[0];

    setProgress(0);
    setCurrentFile(currentFile);

    uploadToServer(currentFile, (event) => {
      setProgress(Math.round((100 * event.loaded) / event.total));
    })
      .then(async (response) => {
        setMessage(response.data.message);
        const result = await axios("http://localhost:8080/api/employees");
        setData(result.data);
      })
      .catch(() => {
        setProgress(0);
        setMessage("Could not upload the file!");
        setCurrentFile(undefined);
      });

    setSelectedFiles(undefined);
  };

  return (
    <div className="App">
      <div>
      {currentFile && (
        <div className="progress">
          <div
            className="progress-bar progress-bar-info progress-bar-striped"
            role="progressbar"
            aria-valuenow={progress}
            aria-valuemin="0"
            aria-valuemax="100"
            style={{ width: progress + "%" }}
          >
            {progress}%
          </div>
        </div>
      )}

      <label className="btn btn-default">
        <input type="file" onChange={selectFile} />
      </label>

      <button
        className="btn btn-success"
        disabled={!selectedFiles}
        onClick={upload}
      >
        Upload
      </button>

      <div className="alert alert-light" role="alert">
        {message}
      </div>
    </div>
  );
}

export default App;
We have defined the uploadToServer() method to upload the CSV file. Then we defined React hooks to set the values for various actions. Finally, we have defined the UI component to display upload, submit button, and progress bar to display the actions related to the upload feature. In the end, once the file is uploaded successfully, it will display a success or error message.
Next, we need to define a component to display the retrieved employee data as a table. So, first, we will define a table component:
import React, { useState } from "react";
import { useTable, useFilters, useSortBy } from "react-table";

export default function Table({ columns, data }) {
  const [filterInput, setFilterInput] = useState("");
  // Use the state and functions returned from useTable to build your UI
  const {
    getTableProps,
    getTableBodyProps,
    headerGroups,
    rows,
    prepareRow,
    setFilter
  } = useTable(
    {
      columns,
      data
    },
    useFilters,
    useSortBy
  );

  const handleFilterChange = e => {
    const value = e.target.value || undefined;
    setFilter("name", value);
    setFilterInput(value);
  };

  // Render the UI for your table
  return (
    <>
      <input
        value={filterInput}
        onChange={handleFilterChange}
        placeholder={"Search name"}
      />
      <table {...getTableProps()}>
        <thead>
          {headerGroups.map(headerGroup => (
            <tr {...headerGroup.getHeaderGroupProps()}>
              {headerGroup.headers.map(column => (
                <th
                  {...column.getHeaderProps(column.getSortByToggleProps())}
                  className={
                    column.isSorted
                      ? column.isSortedDesc
                        ? "sort-desc"
                        : "sort-asc"
                      : ""
                  }
                >
                  {column.render("Header")}
                </th>
              ))}
            </tr>
          ))}
        </thead>
        <tbody {...getTableBodyProps()}>
          {rows.map((row, i) => {
            prepareRow(row);
            return (
              <tr {...row.getRowProps()}>
                {row.cells.map(cell => {
                  return (
                    <td {...cell.getCellProps()}>{cell.render("Cell")}</td>
                  );
                })}
              </tr>
            );
          })}
        </tbody>
      </table>
    </>
  );
}
This has the base logic to render the cells, rows, and columns from the API values. Next, we need to import this in App.js and pass the data to this Table component:
import React, { useMemo, useState, useEffect } from "react";
import axios from "axios";
import Table from "./Table";
import './App.css';

const Children = ({ values }) => {
  return (
    <>
      {values.map((child, idx) => {
        return (
          <div className="image">
            <img
              src={child.avatar}
              alt="Profile"
            />
            </div>
        );
      })}
    </>
  );
};

const Avatar = ({ value }) => {
  return (
    <div className="image">
      <img
        src={value}
        alt="Profile"
      />
      </div>
  );
};

const uploadToServer = (file, onUploadProgress) => {
  let formData = new FormData();

  formData.append("file", file);

  return axios.post('http://localhost:8080/api/csv/upload', formData, {
    headers: {
      "Content-Type": "multipart/form-data",
    },
    onUploadProgress,
  });
};

function App() {

  const [data, setData] = useState([]);
  const [selectedFiles, setSelectedFiles] = useState(undefined);
  const [currentFile, setCurrentFile] = useState(undefined);
  const [progress, setProgress] = useState(0);
  const [message, setMessage] = useState("");

  const columns = useMemo(
    () => [
      {
        Header: "Employee Details",
        columns: [
          {
            Header: "Avatar",
            accessor: "avatar",
            Cell: ({ cell: { value } }) => <Avatar value={value} />
          },
          {
            Header: "Name",
            accessor: "name"
          },
          {
            Header: "Email",
            accessor: "email"
          },
          {
            Header: "Username",
            accessor: "username"
          },
          {
            Header: "DOB",
            accessor: "dob"
          },
          {
            Header: "Company",
            accessor: "company"
          },
          {
            Header: "Address",
            accessor: "address"
          },
          {
            Header: "Location",
            accessor: "location"
          },
          {
            Header: "Salary",
            accessor: "salary"
          },
          {
            Header: "Role",
            accessor: "role"
          },
          {
            Header: "Direct Reportee",
            accessor: "children",
            Cell: ({ cell: { value } }) => <Children values={value} />
          }
        ]
      }
    ],
    []
  );

  useEffect(() => {
    (async () => {
      const result = await axios("http://localhost:8080/api/employees");
      setData(result.data);
    })();
  }, []);

  const selectFile = (event) => {
    setSelectedFiles(event.target.files);
  };

  const upload = () => {
    let currentFile = selectedFiles[0];

    setProgress(0);
    setCurrentFile(currentFile);

    uploadToServer(currentFile, (event) => {
      setProgress(Math.round((100 * event.loaded) / event.total));
    })
      .then(async (response) => {
        setMessage(response.data.message);
        const result = await axios("http://localhost:8080/api/employees");
        setData(result.data);
      })
      .catch(() => {
        setProgress(0);
        setMessage("Could not upload the file!");
        setCurrentFile(undefined);
      });

    setSelectedFiles(undefined);
  };

  return (
    <div className="App">
      <div>
      {currentFile && (
        <div className="progress">
          <div
            className="progress-bar progress-bar-info progress-bar-striped"
            role="progressbar"
            aria-valuenow={progress}
            aria-valuemin="0"
            aria-valuemax="100"
            style={{ width: progress + "%" }}
          >
            {progress}%
          </div>
        </div>
      )}

      <label className="btn btn-default">
        <input type="file" onChange={selectFile} />
      </label>

      <button
        className="btn btn-success"
        disabled={!selectedFiles}
        onClick={upload}
      >
        Upload
      </button>

      <div className="alert alert-light" role="alert">
        {message}
      </div>
    </div>
      <Table columns={columns} data={data} />
    </div>
  );
}

export default App;
We have defined useMemo hook to map the attributes from the incoming API data to columns in react-table component. We have also defined the Children and Avatar component to render the images of employees and their children.
Finally, we can run our app by executing the following command:
cd client/ && npm run start
This will load the UI and we can upload the CSV file and display our employees in the table:
You can find the complete code on GitHub.
Creating a Production-Ready CSV Importer
For most enterprise use cases, a simple CSV importer, while easy to build, will result in issues down the road. Missing key features like lack of clear import error messages and UI for resolving will create challenges for users during the import process. This can result in a major time investment required from support (and technical) teams to assist customers with manually debugging their file imports.
Below are a few examples of advanced features that can be critical for ensuring a seamless import experience for customers (read a full list of features here):
- Data Validation & Autofixes
- In-line error resolution
- Intelligent Mapping
- Exportable Excel Error Summaries
- Custom Columns
Performance on large files should also be considered depending on the data being uploaded, as product speed has a large, measurable impact on import success rates.
“The first self-serve CSV importer built at Affinity led to more support tickets than any other part of our product. And because it was so challenging to display all of the specific errors that could break the import flow, customers would get esoteric error messages like ‘something is amiss’ whenever there was a missing comma, encoding issue, or a myriad of business-specific data formatting problems that led to downstream processing issues. Because of the critical onboarding flow that data importer powered, before long v1.5, v2, and v3 were prioritized, leading to multiple eng-years of work in iterating toward a robust importer experience."
(Rohan Sahai, Director of Engineering at Affinity)
For companies with many priorities, a never-ending CSV import project takes away valuable engineering time that could be spent focusing on the core product. If you need production-ready imports in your product, OneSchema is an embeddable CSV importer that takes less than 30 minutes to get running in your app. They’ve built in features that improve import completion rates which automatically correct customer data, handle edge cases, and enable bulk data editing (demo video here).
Conclusion
For hobbyist or non-customer-facing use cases, investing in a quick, feature-light importer following the steps we’ve outlined here can be a great option. The cost of missing features, failed imports, and bugs is low. If the CSV importer is part of critical workflows like customer onboarding or recurring data syncs, the cost of integrating a product like OneSchema can be much lower than the cost to build the solution entirely in-house.