The Jackson API is one of the best JSON parsers in Java. Spring integrates well with Jackson and with every new Spring release, newer Jackson features get incorporated making the Spring Jackson support more flexible and powerful. In this article, we will discuss one such annotation @JsonView that is supported from Spring version 4.x and above. To know more about Jackson improvements in Spring, refer to this blog post.
Example Code
This article is accompanied by a working code example on GitHub.What is @JsonView
Often we come across situations where we have a model object containing various fields, and we need to expose different views of the same object depending on the caller. Traditionally, we would create different model objects catering to each of the scenarios. @JsonView is an annotation that is inspired by how database views work. It helps hide fields and create different views of the same model object simplifying the process of exposing only the required fields to the caller.
Steps to create Json View
Step 1: Define the view as a class or interface.
Step 2: Use the class or interface with @JsonView annotations in models or DTOs
Step 3: Annotate the controller class methods or @RequestBody params with the view to be used for serializing or deserializing the object.
In the further sections, we will take a look at a few examples to understand its usage.
Use cases for @JsonView
Protect sensitive information being exposed
public class User {

    @JsonView(Views.ExternalView)
    private String name;

    @JsonView(Views.ExternalView)
    private String address;

    @JsonView(Views.ExternalView)
    private String dob;

    @JsonView(Views.InternalView)
    private String loginName;

    @JsonView(Views.InternalView)
    private String loginPassword;

    private String crnNumber;

    /* More code here */
}

public class Views {
    public static interface ExternalView {

    }
    public static interface InternalView extends ExternalView {

    }
}
As seen from the example above, Json Views help segregate confidential information from the basic ones by creating separate views within the same model.
Allows control over the data exposed
public class User {

    @JsonView(Views.UserSummary.class)
    private String firstName;

    @JsonView(Views.UserSummary.class)
    private String lastName;

    @JsonView(Views.UserSummary.class)
    private String address;

    @JsonView(Views.UserSummary.class)
    private String suburb;

    @JsonView(Views.UserSummary.class)
    private String mobileNo;

    @JsonView(Views.UserDetailedSummary.class)
    private String ssnNumber;

    @JsonView(Views.UserDetailedSummary.class)
    private boolean hasBroadband;

    @JsonView(Views.UserDetailedSummary.class)
    private String broadbandConnDate;
}

public class Views {
    public static interface UserSummary {

    }
    public static interface UserDetailedSummary {

    }
}
In this example, we have created hierarchical views to have more control over the data serialized.
Here the view UserSummary provides basic user details. The view UserDetailedSummary gives a more detailed view.
Separate views for HTTP Request Methods
public class User {
    @JsonView(Views.GetView.class)
    private String loginName;

    @JsonView(Views.GetView.class)
    private String firstName;

    @JsonView(Views.GetView.class)
    private String lastName;

    @JsonView(Views.PatchView.class)
    private String mobileNo;
}

public class Views {

    public static interface PatchView {

    }

    public static interface GetView extends PatchView {

    }
}
For the above views to apply to the HTTP methods, we will define our controller methods as below:
@RestController
public class UserController {

   @PostMapping(path = "/userdetails")
   public ResponseEntity<User> post(
           @RequestBody @JsonView(value = Views.GetView.class) User user) {
   return ResponseEntity.status(HttpStatus.CREATED).body(savedUser);
}


   @PatchMapping(path = "/userdetails/{userId}")
   public ResponseEntity<?> patch(
           @RequestBody @JsonView(value = Views.PatchView.class) User user) {
   return ResponseEntity.status(HttpStatus.NO_CONTENT).build();
 }

}
This configuration will allow only the @JsonView mapped fields to be updated in the POST and PATCH requests respectively.
Since the GetView extends PatchView, the PATCH request will update only the PatchView defined fields (other fields will be ignored) while the POST request will update both PatchView and GetView defined fields.
In the further sections, we will look at a sample Spring Boot application to understand how to use @JsonView in the context of the use cases defined above.
What is Serialization and Deserialization
- Serialization is the process of converting an object into a stream of bytes.
- Deserialization is the process of converting the serialized form of an object back to a copy of the original object.
Serialize and Deserialize objects in a Spring Boot Application
Serialization and deserialization form the core of REST APIs.
Spring Boot internally uses Jackson’s ObjectMapper class to perform serialization and deserialization.
Deserialization example:
Serialization example:
Spring Boot defaults for @JsonView configuration
The ObjectMapper class uses MapperFeature.DEFAULT_VIEW_INCLUSION to determine how the JsonView annotation needs to behave.
This configuration will determine whether the properties that are not annotated with @JsonView should be included during serialization and deserialization.
For the sample application, we will use the Spring Boot version 2.7.5 that internally uses Jackson 2.13. By default, the MapperFeature.DEFAULT_VIEW_INCLUSION is set to true which means when enabling a JSON View, non-annotated fields also get serialized.
We can also verify the configuration defaults when the JacksonAutoConfiguration class gets registered using the below test:
@SpringBootTest
public class JacksonAutoConfigTest {

    private AnnotationConfigApplicationContext context;

    @Test
    public void defaultObjectMapperBuilder() throws Exception {
        this.context.register(JacksonAutoConfiguration.class);
        this.context.refresh();
        Jackson2ObjectMapperBuilder builder =
                this.context.getBean(Jackson2ObjectMapperBuilder.class);
        ObjectMapper mapper = builder.build();
        assertTrue(MapperFeature.DEFAULT_VIEW_INCLUSION.enabledByDefault());
        assertFalse(mapper.getDeserializationConfig().isEnabled(
                MapperFeature.DEFAULT_VIEW_INCLUSION));
        assertFalse(mapper.getSerializationConfig().isEnabled(
                MapperFeature.DEFAULT_VIEW_INCLUSION));
    }
}
SerializationConfig and DeserializationConfig classes contain baseline configurations for serialization and deserialization processes respectively.
When the ObjectMapper’s MapperFeature.DEFAULT_VIEW_INCLUSION value is enabled, it automatically applies to both serialization and deserialization process.
We can override this value to apply to either serialization only or deserialization only (if required by enabling or disabling the MapperFeature configuration) using SerializationConfig and DeserializationConfig classes respectively.
We will take a look at its configuration in the further sections.
Difference between @JsonView and @JsonIgnore
@JsonIgnorePropertiesused at the class level is used to ignore multiple fields during both serialization and deserialization process.@JsonIgnorecan be used at getter or setter for a property to ignore the fields during deserialization or serialization respectively.@JsonViewis an enhancement over@JsonIgnoresince we can selectively decide if a field needs to be ignored or not for a particular API.
Using @JsonView with Spring Boot
Let’s look at a sample User application to demonstrate the various ways in which @JsonView annotation can be used. This application is configured to run on port 8083.
mvnw clean verify spring-boot:run (for Windows)
./mvnw clean verify spring-boot:run (for Linux)
Let’s first define the views.
package com.reflectoring.userdetails.persistence;

public class Views {
    // For external user
    public static interface ExternalView {

    }
    // For internal user
    public static interface InternalView extends ExternalView {

    }
    // Basic User Details
    public static interface UserSummary {

    }
    // Additional User Details
    public static interface UserDetailedSummary extends UserSummary {

    }
    // Default fields mapped for GET requests
    public static interface GetView {

    }
    // Allowed fields for PATCH requests
    public static interface PatchView {

    }
}
In the further sections, we will take a look at how to use @JsonView to cater to each of the usecases we previously looked at.
Let us define the model UserData class.
public class UserData {

    @JsonView(value =
            {Views.GetView.class, Views.UserSummary.class, Views.ExternalView.class})
    private long id;

    @JsonView(value =
            {Views.GetView.class, Views.UserSummary.class, Views.ExternalView.class})
    private String firstName;

    @JsonView(value =
            {Views.GetView.class, Views.UserSummary.class, Views.ExternalView.class})
    private String lastName;

    @JsonView(value =
            {Views.GetView.class, Views.UserSummary.class, Views.ExternalView.class})
    private String dob;

    private boolean internalUser;

    private String additionalData;

    @JsonView(value = {Views.GetView.class, Views.InternalView.class})
    private String loginId;

    @JsonView(value = {Views.GetView.class, Views.InternalView.class})
    private String loginPassword;
    @JsonView(value = {Views.GetView.class, Views.InternalView.class})
    private String ssnNumber;

    // More fields here
    // Code for getters and setters
}
As seen above, depending on our use case we have defined fields to have multiple views. Next, let us take a look at how the controller class will use them.
@RestController
@RequestMapping("/internal")
public class InternalUserController {

    @GetMapping("/users")
    @JsonView(Views.GetView.class)
    public ResponseEntity<List<UserData>> getAllUsers(
            @RequestParam(required = false) String loginId) {
        if (Objects.isNull(loginId)) {
            return ResponseEntity.ok().body(userService.getAllUsers(true));
        } else {
            return ResponseEntity.ok().body(List.of(userService.getUser(loginId)));
        }

    }
}
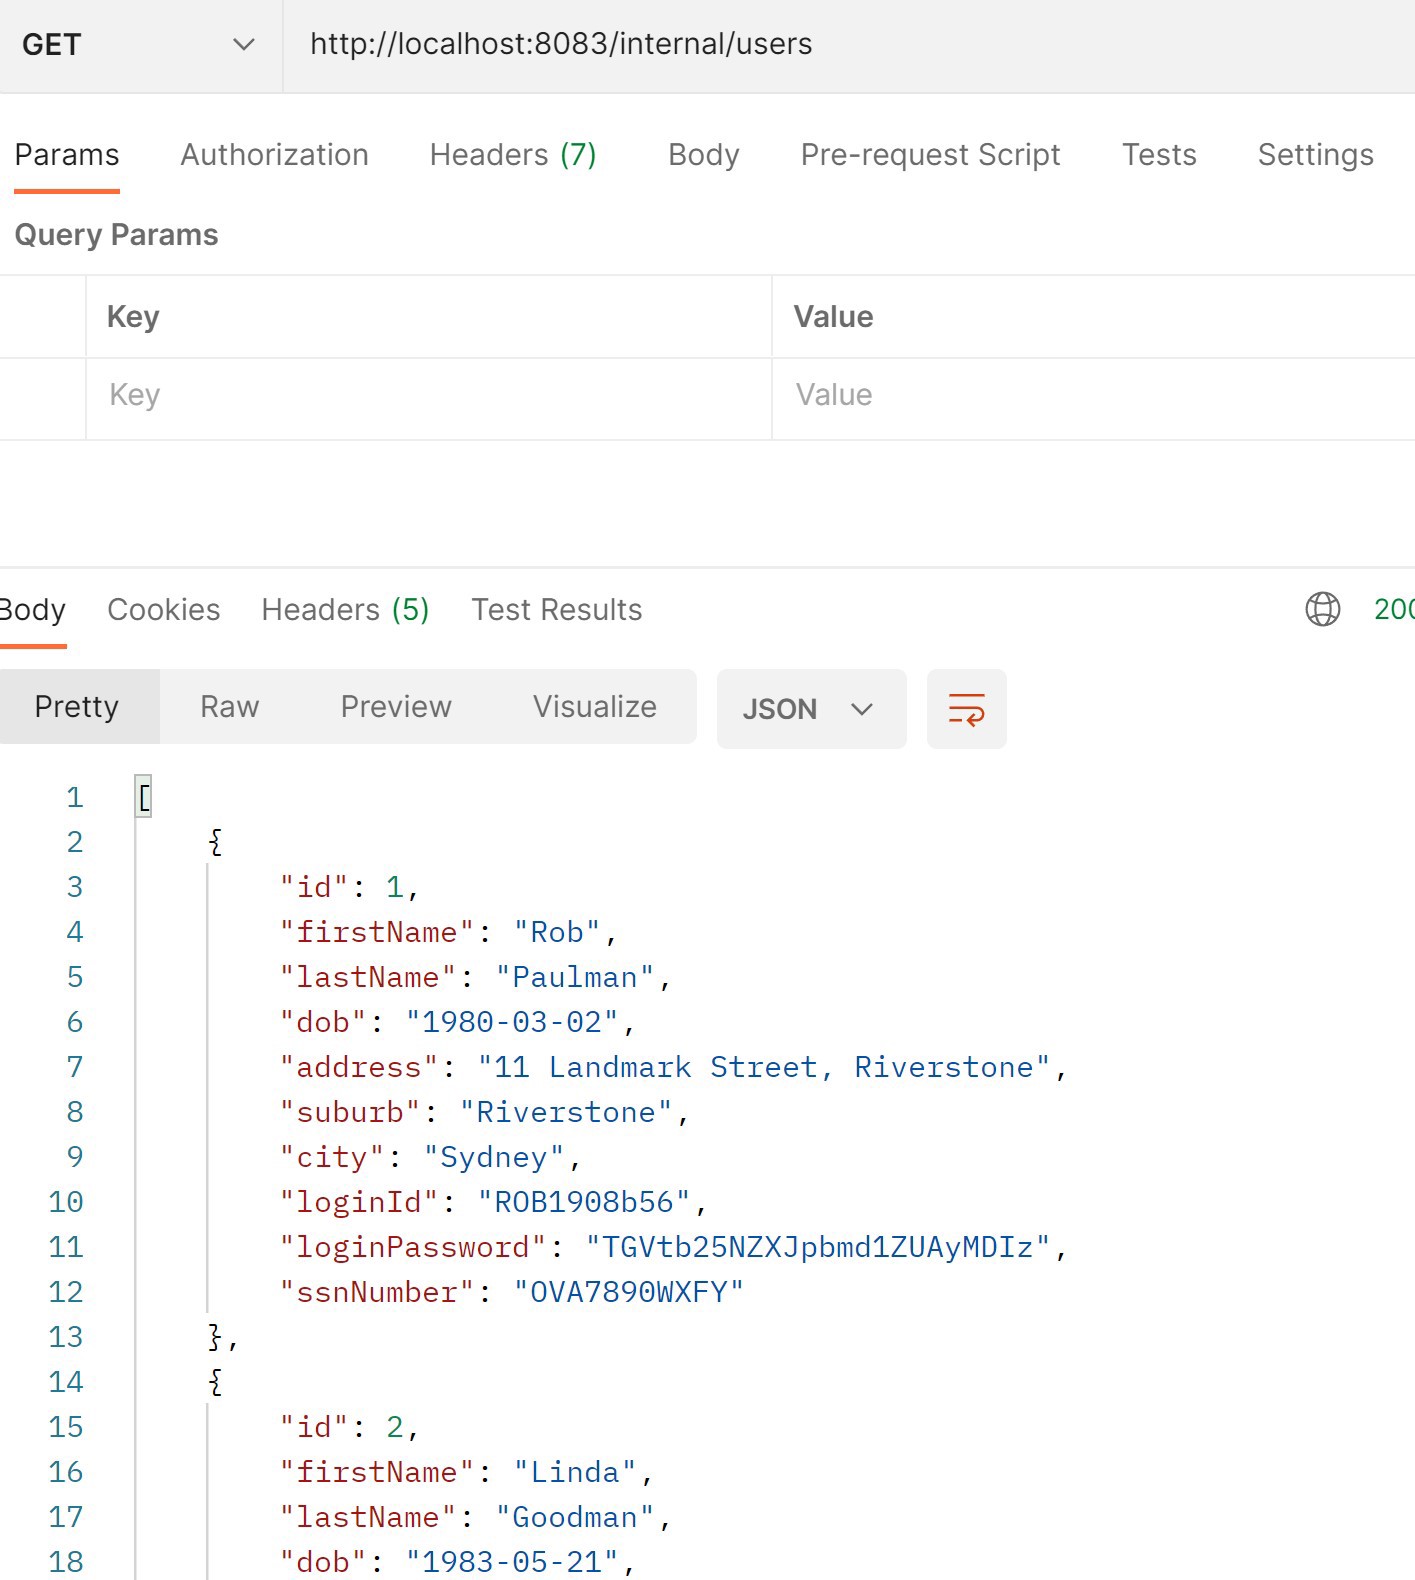
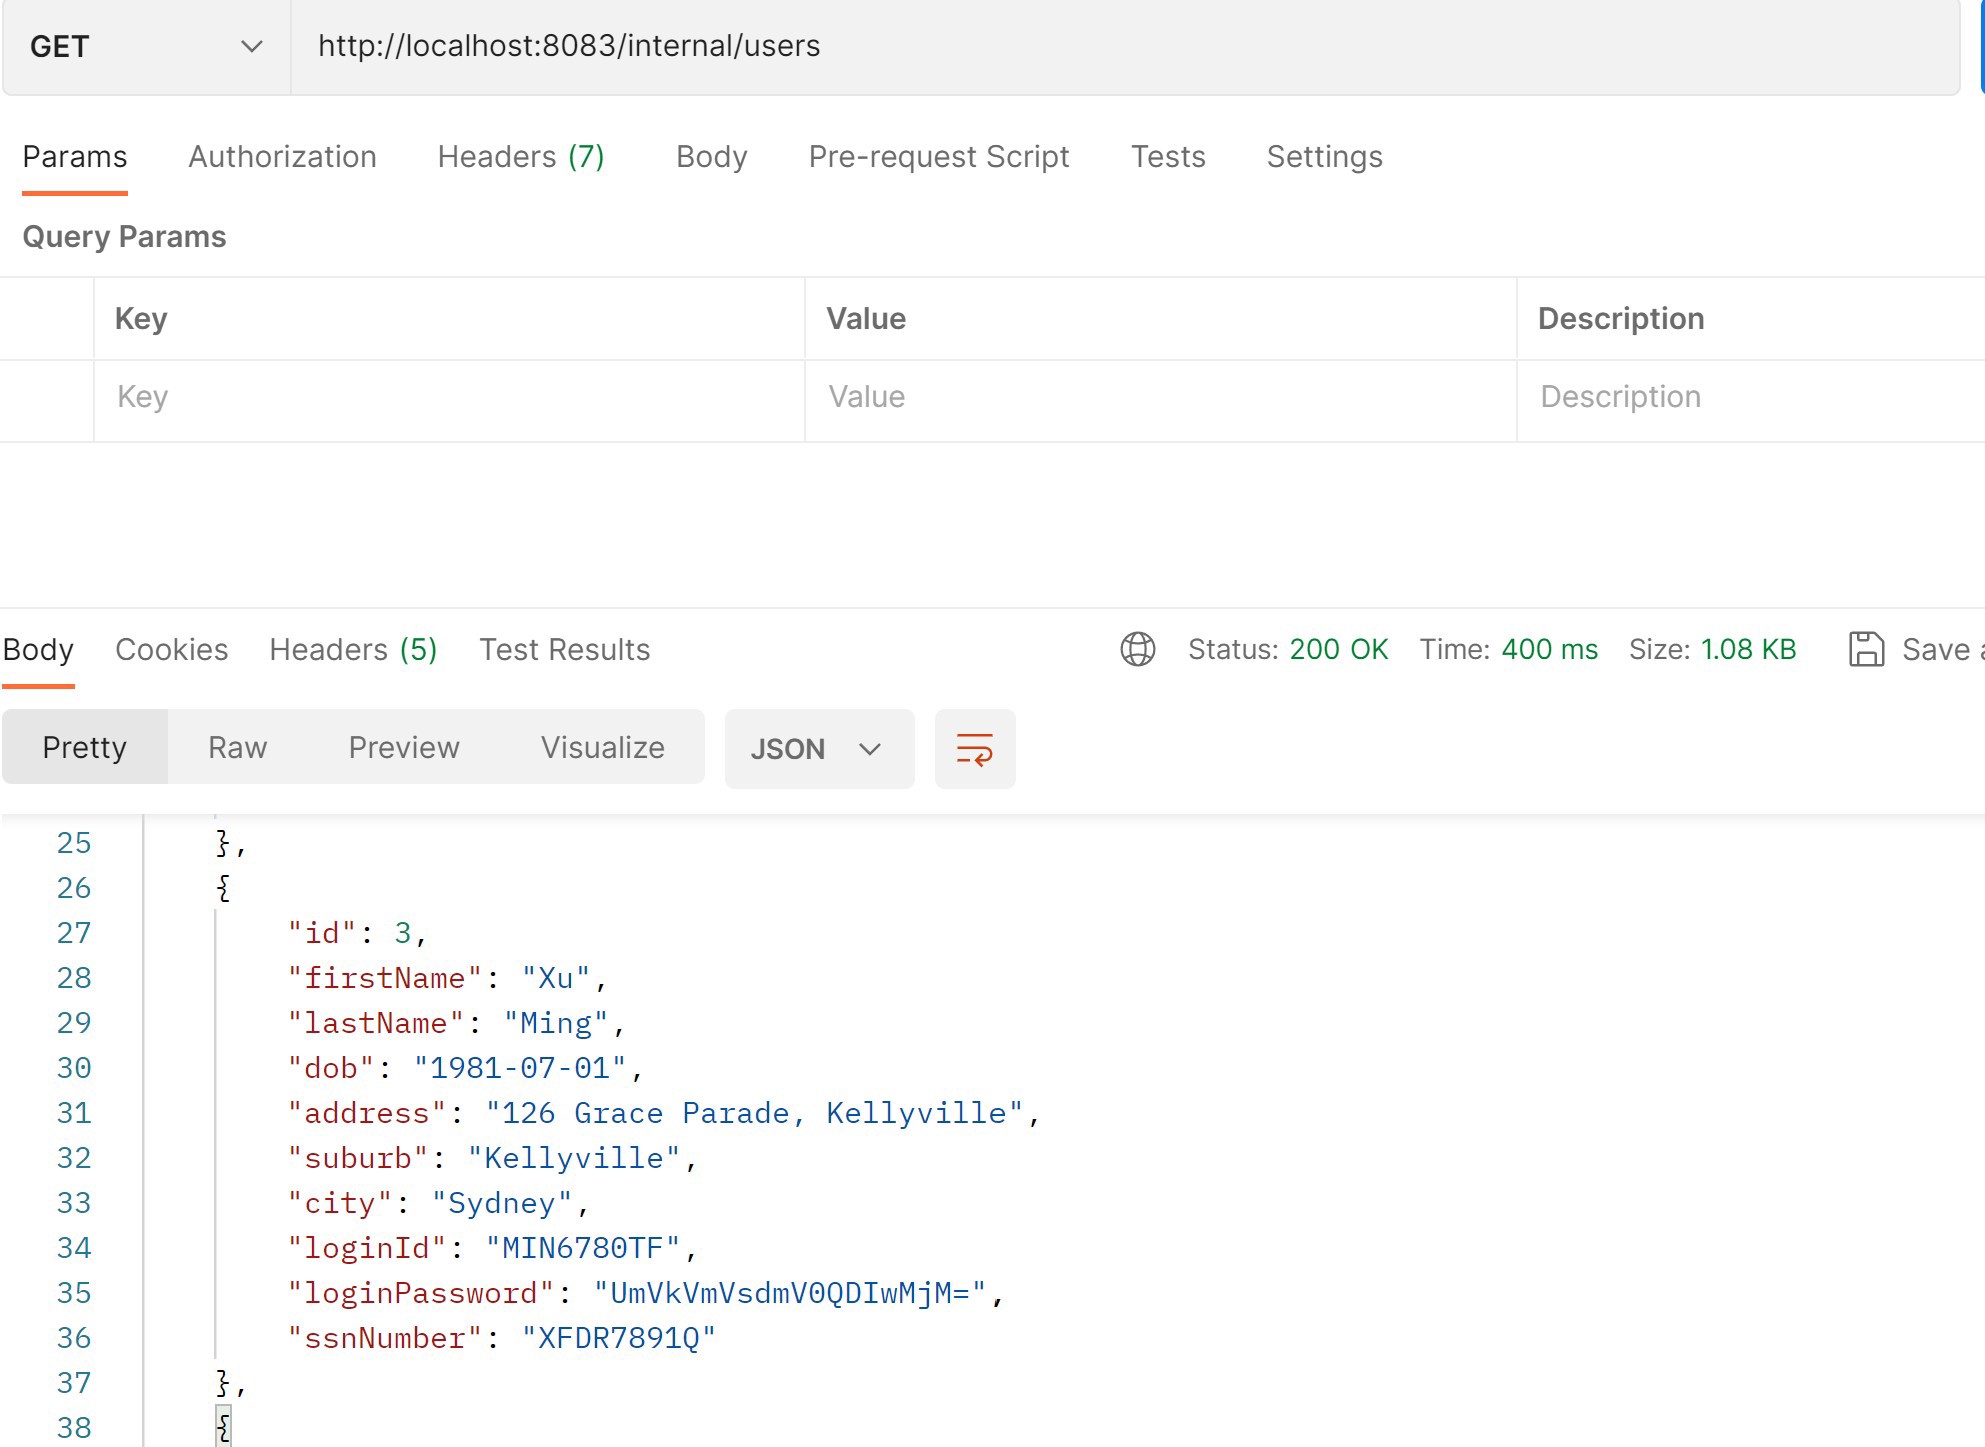
As seen above, the internal/users API uses the GetView class. Here, since we haven’t explicitly autowired the ObjectMapper class, the default configuration will apply, and we get JSON response as below:
As seen from the response, the GetView configured fields and the fields that do not have any @JsonView annotation are included.
private boolean internalUser;

@JsonIgnore
public boolean isInternalUser() {
        return isInternalUser;
}
In this example, we do not see the internalUser field in the JSON response since we have added @JsonIgnore to the field getter.
Now, let us autowire a custom ObjectMapper to explicitly disable MapperFeature.DEFAULT_VIEW_INCLUSION as below:
@Configuration
public class CommonBean {

    @Bean
    public ObjectMapper objectMapper() {
        ObjectMapper mapper = new ObjectMapper();
        mapper.configure(SerializationFeature.WRITE_DATES_AS_TIMESTAMPS, false);
        mapper.registerModule(new JavaTimeModule());
        mapper.disable(MapperFeature.DEFAULT_VIEW_INCLUSION);
        return mapper;
    }
}
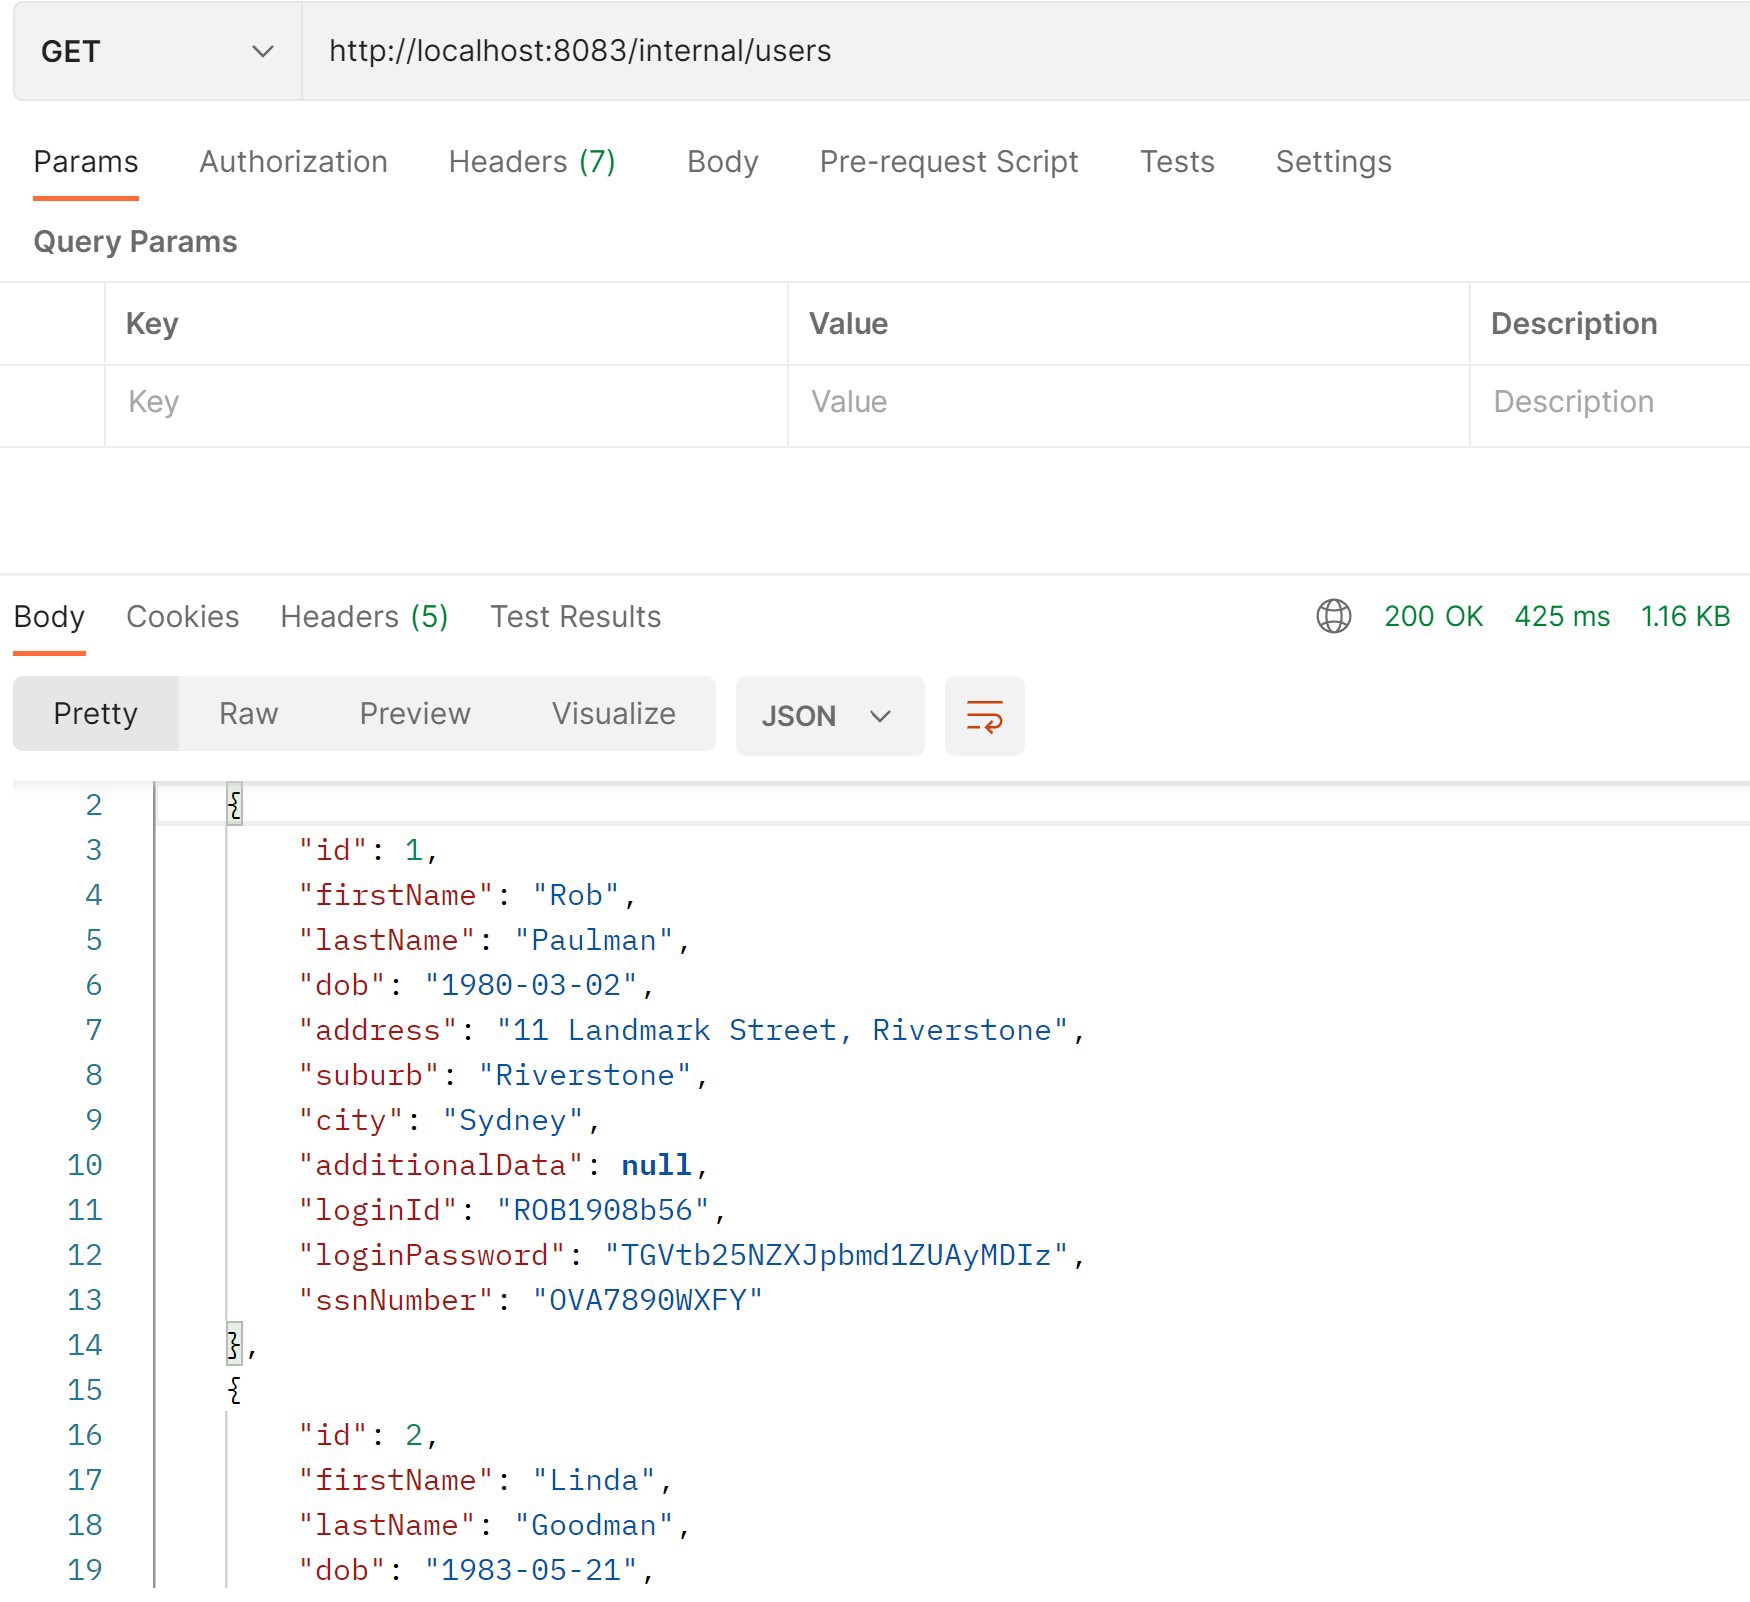
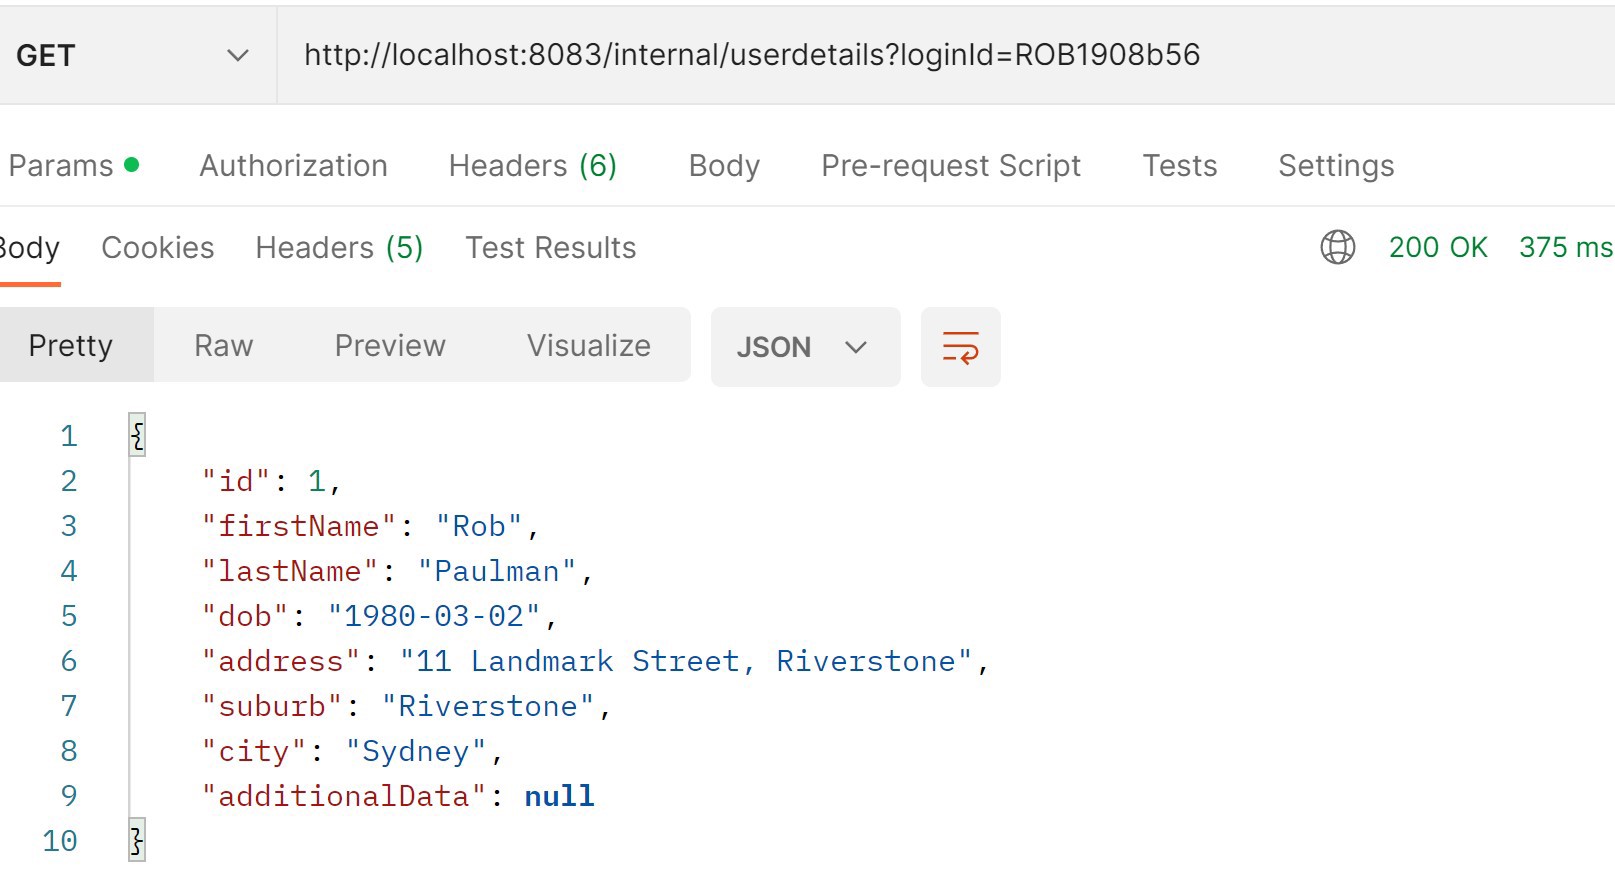
With this configuration, let us execute the same API call again:
Now, we don’t see the additionalData field in the JSON response.
Here, mapper.disable(MapperFeature.DEFAULT_VIEW_INCLUSION) applies to both serialization and deserialization process.
Instead, if we need to include no view annotation fields only in the serialization process, we can apply the following configuration:
@Configuration
public class CommonBean {

    @Bean
    public ObjectMapper objectMapper() {
        ObjectMapper mapper = new ObjectMapper();
        mapper.configure(SerializationFeature.WRITE_DATES_AS_TIMESTAMPS, false);
        mapper.registerModule(new JavaTimeModule());
        //mapper.disable(MapperFeature.DEFAULT_VIEW_INCLUSION);
        mapper.getSerializationConfig().without(MapperFeature.DEFAULT_VIEW_INCLUSION);
        //mapper.getDeserializationConfig().without(
        // MapperFeature.DEFAULT_VIEW_INCLUSION);
        return mapper;
    }
}
Detailed Working of @JsonView Use Cases
Allows control over the data exposed
Let’s define a snippet of our model class definition:
public class UserData {
  @JsonView(value = {Views.GetView.class, Views.UserSummary.class})
  private long id;

  @JsonView(value = {Views.GetView.class, Views.UserSummary.class})
  private String firstName;

  @JsonView(value = {Views.GetView.class, Views.UserSummary.class})
  private String lastName;

  // More UserSummary view fields

  @JsonView(Views.UserDetailedSummary.class)
  private String createdBy;

  @JsonView(Views.UserDetailedSummary.class)
  private LocalDate createdDate;

  @JsonView(Views.UserDetailedSummary.class)
  private String updatedBy;

  @JsonView(Views.UserDetailedSummary.class)
  private LocalDate updatedDate;

  // More fields
}
Next, let’s take a look at how UserSummary and UserDetailedSummary views are used:
@RestController
@RequestMapping("/internal")
public class InternalUserController {
private static final Logger log = LoggerFactory.getLogger(
InternalUserController.class);
private final UserService userService;
public InternalUserController(UserService userService) {
this.userService = userService;
}
@GetMapping("/userdetails/all")
@JsonView(Views.UserDetailedSummary.class)
public ResponseEntity<UserData> getDetailUsers(@RequestParam String loginId) {
return ResponseEntity.ok().body(userService.getUser(loginId));
}
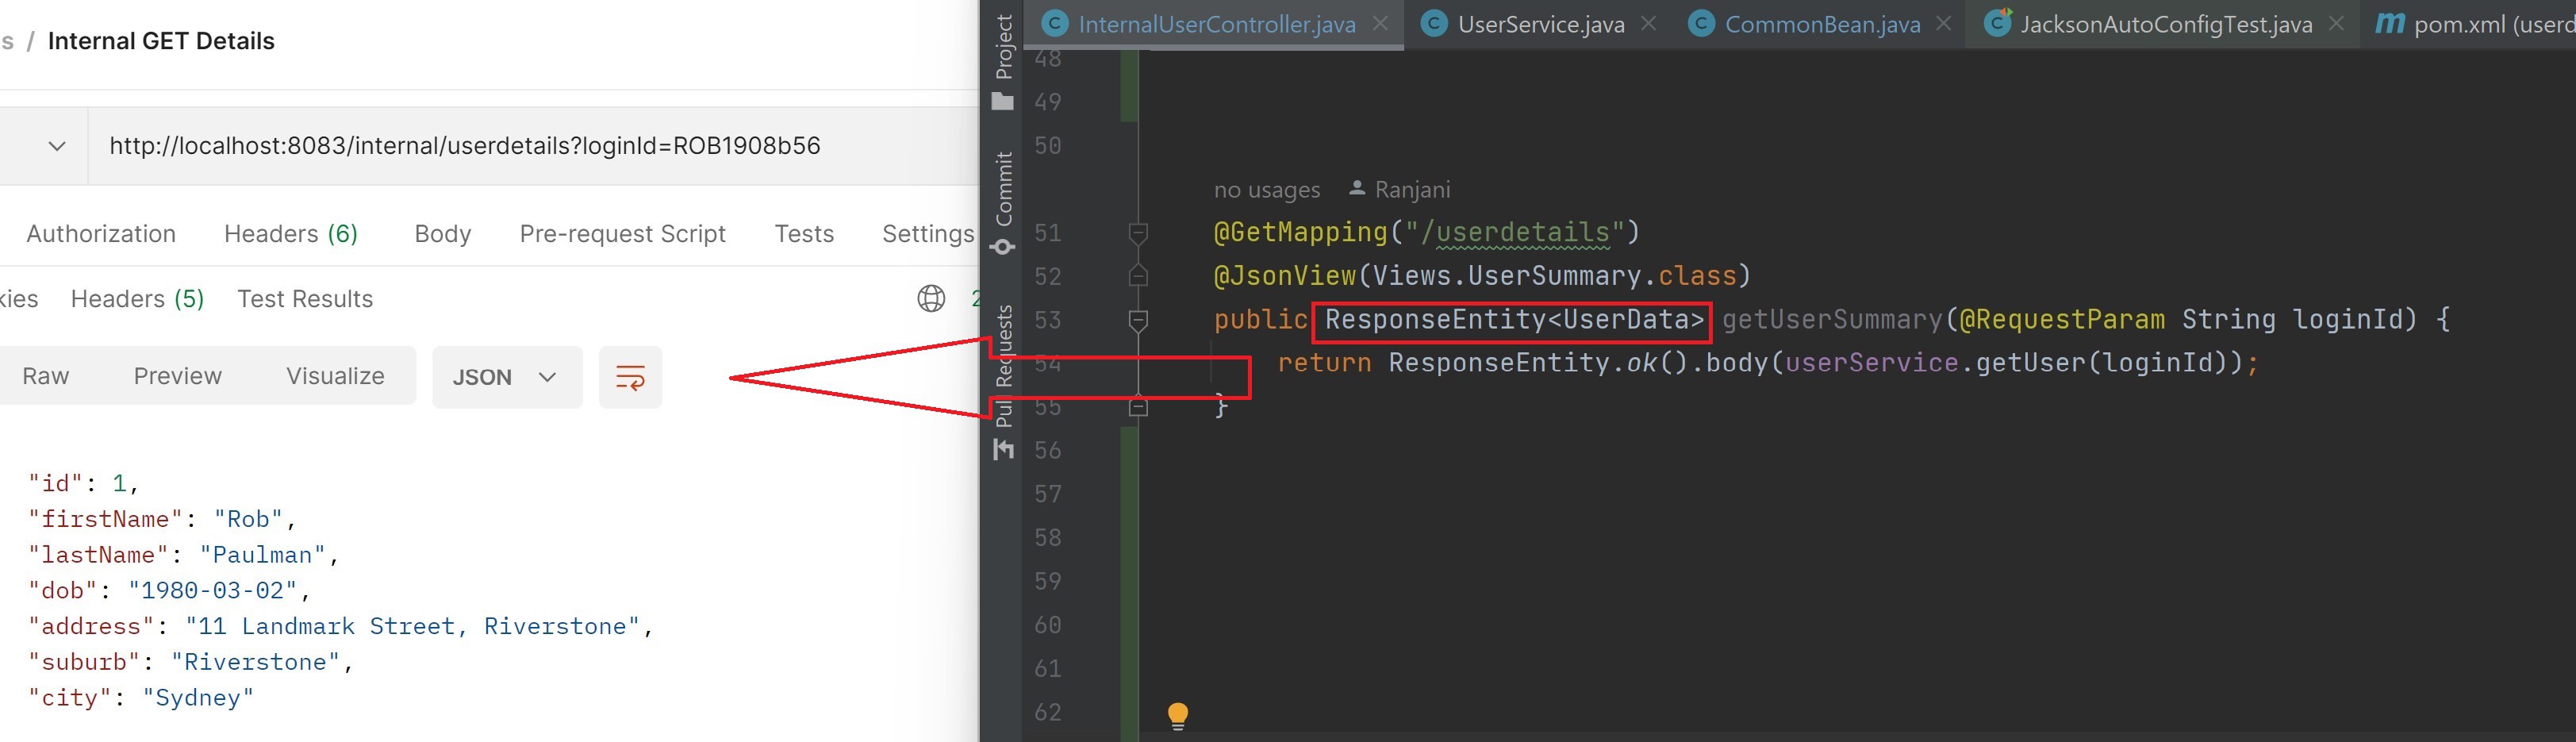
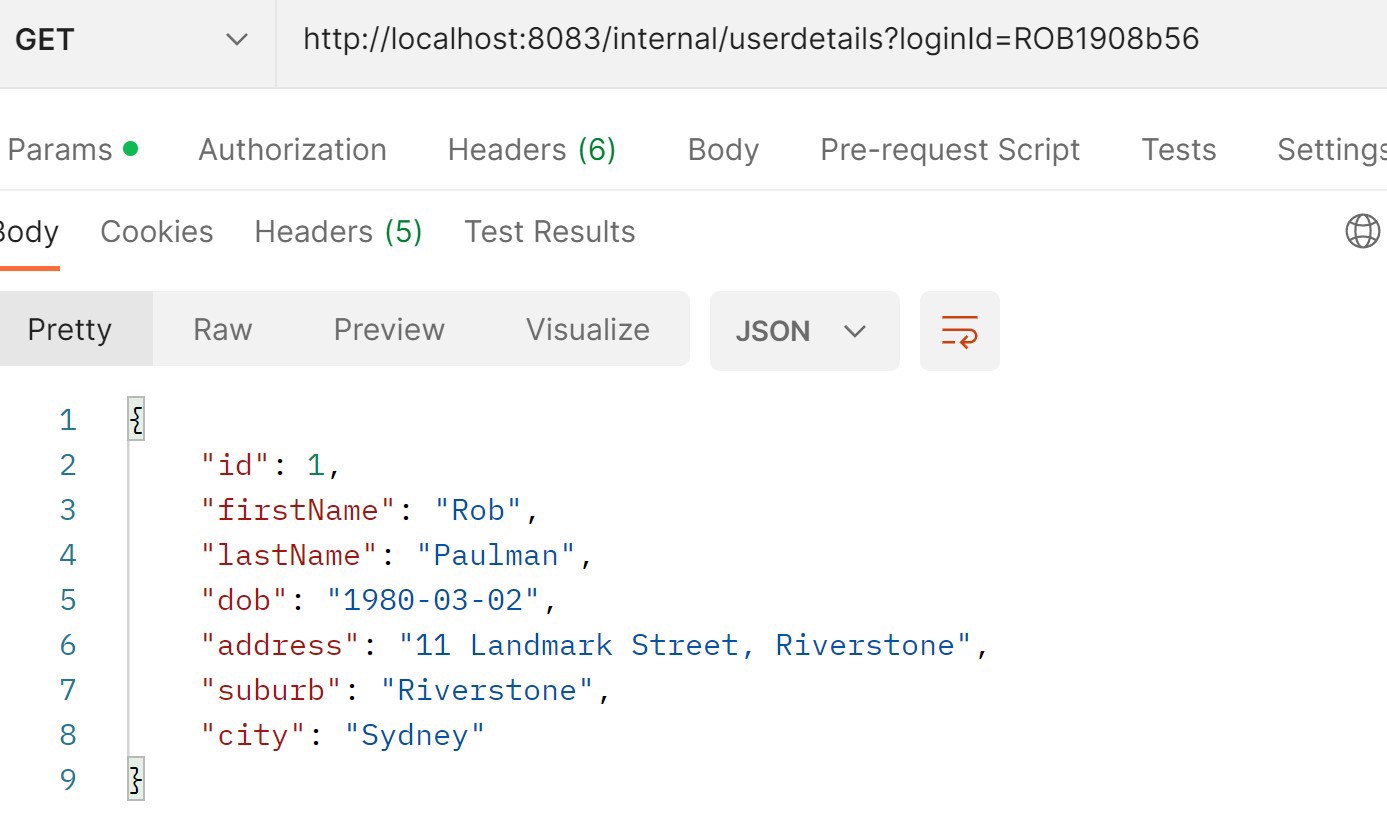
@GetMapping("/userdetails")
@JsonView(Views.UserSummary.class)
public ResponseEntity<UserData> getUserSummary(@RequestParam String loginId) {
return ResponseEntity.ok().body(userService.getUser(loginId));
}
}
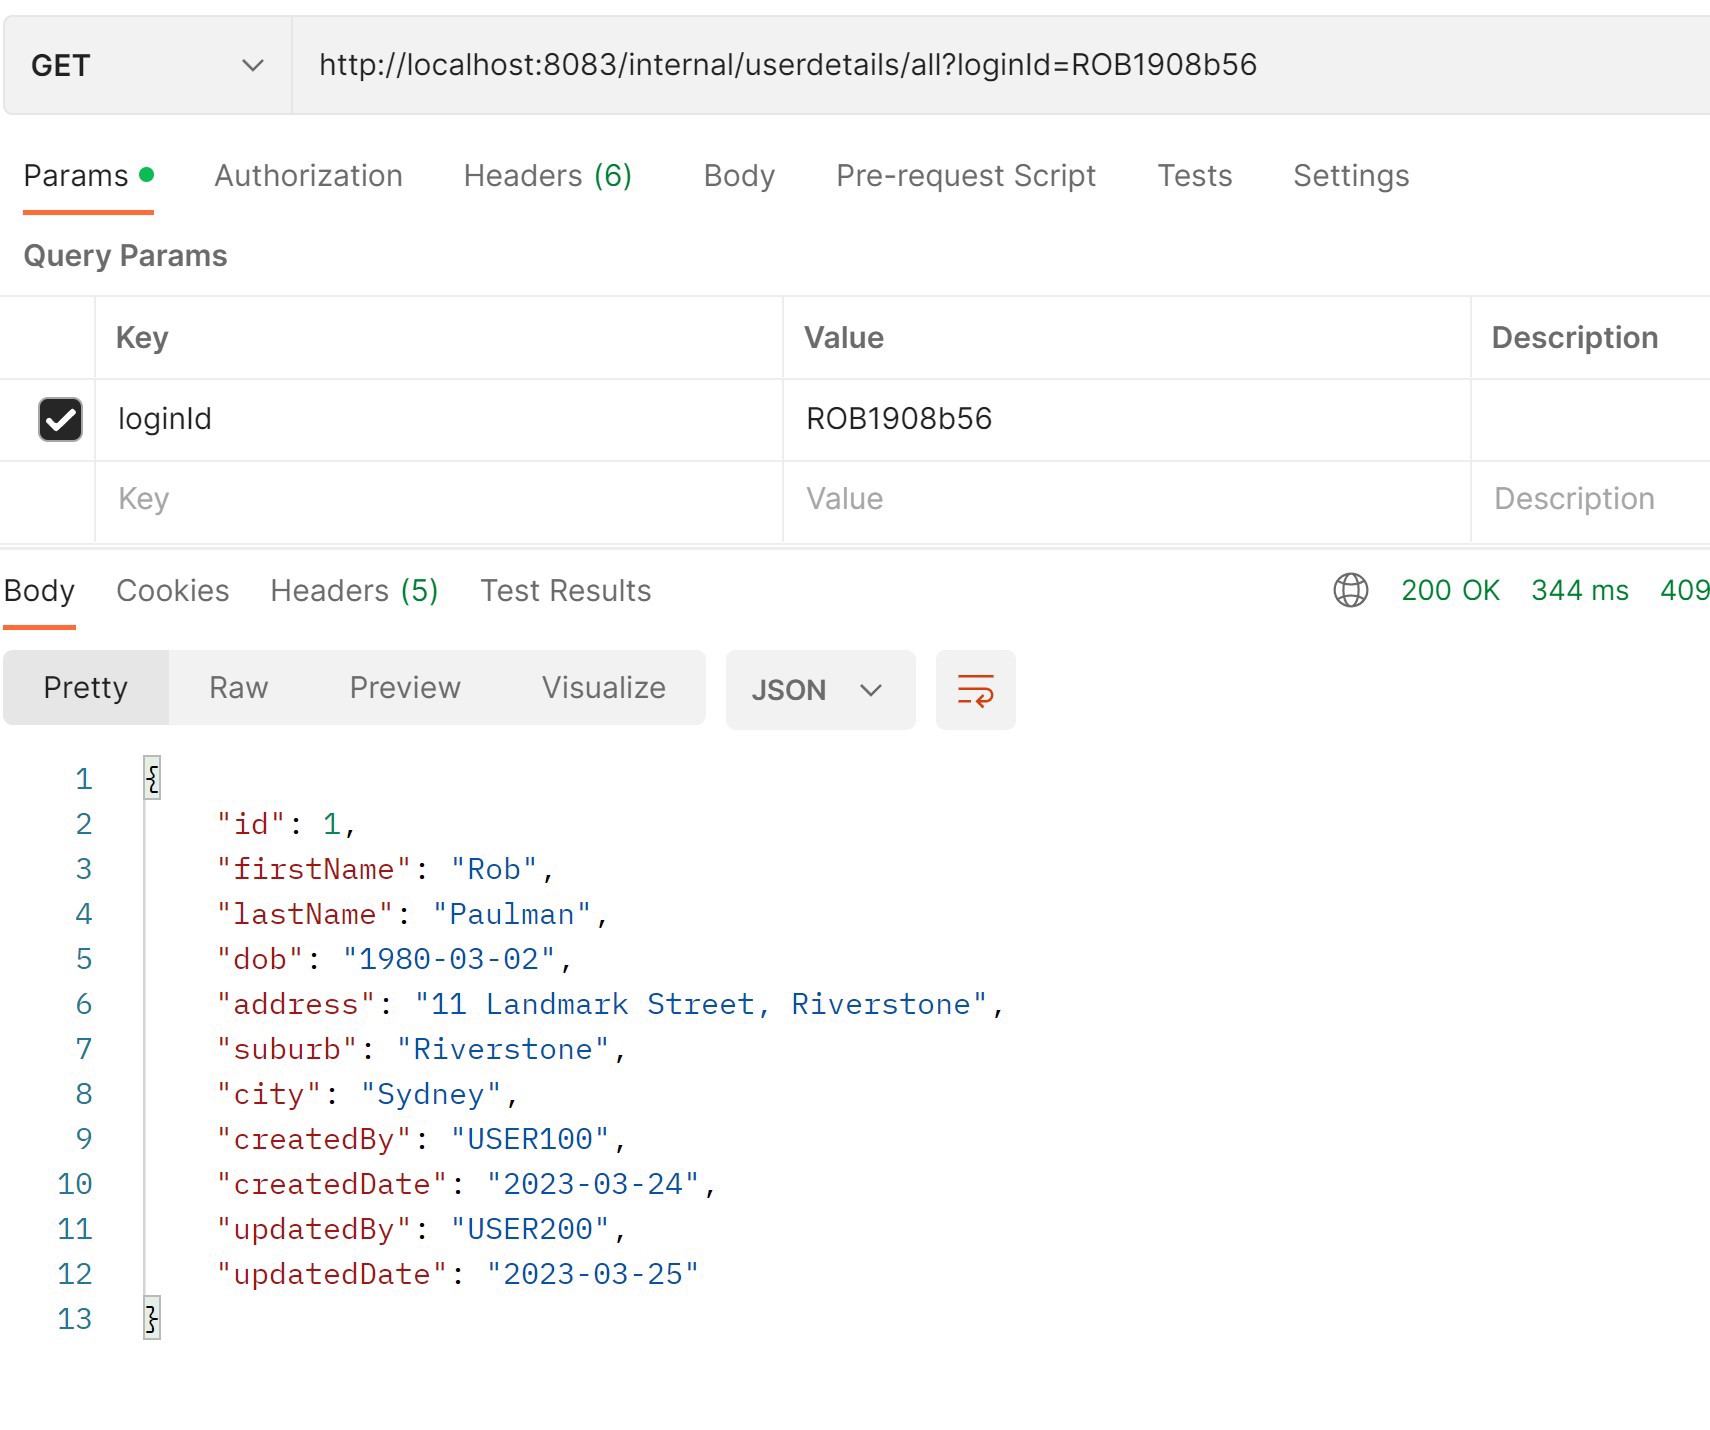
As seen from the JSON responses, /internal/userdetails/all API uses the UserDetailedSummary view to return a detailed response in comparison to
/internal/userdetails that uses the UserSummary view having fewer fields.
Separate views for HTTP Request Methods
We can also create a view that caters to PATCH requests, so that only the defined fields get updated in the downstream system.
In our UserData model class, only the below three address fields cater to PatchView:
public class UserData {
  @JsonView(value = {Views.PatchView.class, Views.UserSummary.class})
  private String address;

  @JsonView(value = {Views.PatchView.class, Views.UserSummary.class})
  private String suburb;

  @JsonView(value = {Views.PatchView.class, Views.UserSummary.class})
  private String city;
}
Let’s fire a GET request for a user Rob:
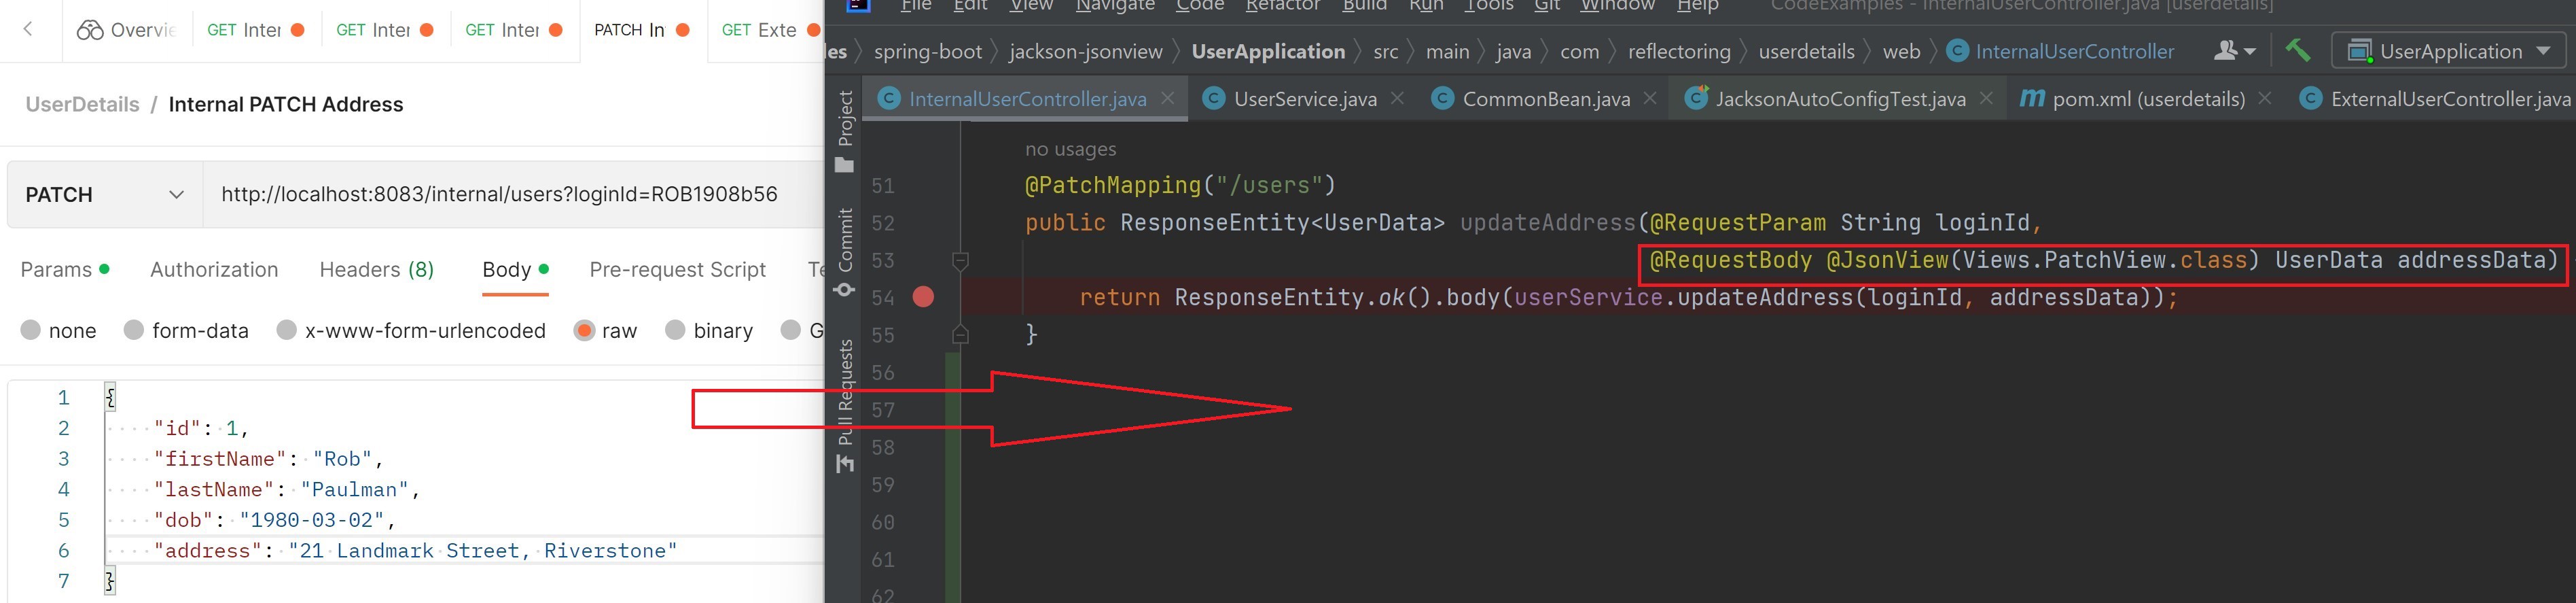
Next, let’s make a PATCH request to change Rob’s address. In this process, let’s try to change a few other details too:
When the PATCH request is made, we can see only the PatchView fields have been updated and the other fields ignored.
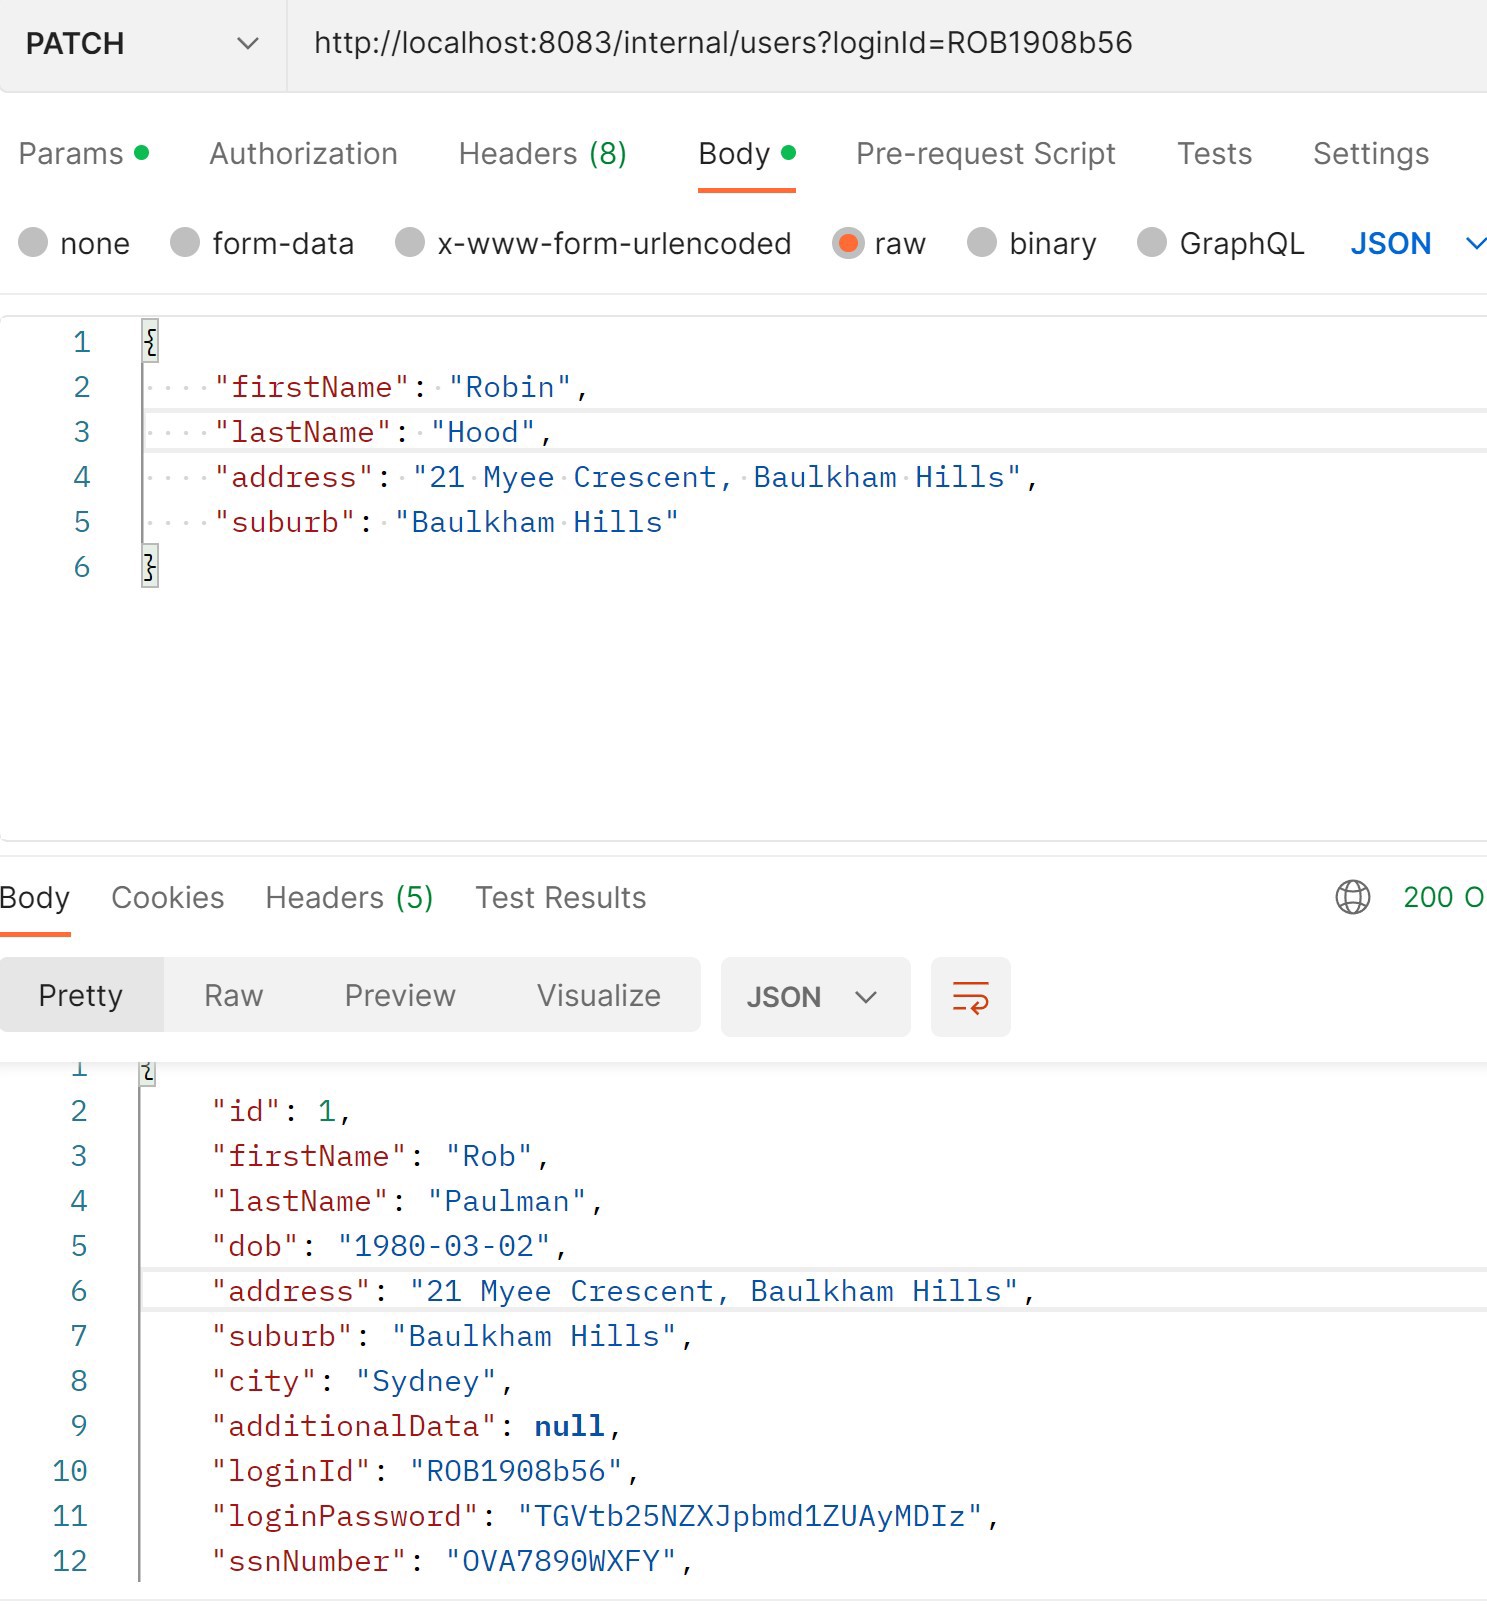
For this PATCH request to apply, we need to add @JsonView along with the @RequestBody parameter:
@PatchMapping("/users")
public ResponseEntity<UserData> updateAddress(@RequestParam String loginId,
                                              @RequestBody
                                              @JsonView(Views.PatchView.class)
                                                UserData addressData) {
    return ResponseEntity.ok().body(userService.updateAddress(loginId, addressData));
}
Thus, we can use @JsonView to control which fields need to updated in our database.
Protect sensitive information being exposed
In our example we have created different views for internal users (InternalView) and external users (ExternalView) so that confidential details are not exposed to the external users.
public class UserData {
  @JsonView(value = {Views.GetView.class, Views.ExternalView.class})
  private long id;

  @JsonView(value = {Views.GetView.class, Views.ExternalView.class})
  private String firstName;

  @JsonView(value = {Views.GetView.class, Views.ExternalView.class})
  private String lastName;

  // More ExternalView fields

  @JsonView(value = {Views.GetView.class, Views.InternalView.class})
  private String loginId;

  @JsonView(value = {Views.GetView.class, Views.InternalView.class})
  private String loginPassword;

  @JsonView(value = {Views.GetView.class, Views.InternalView.class})
  private String ssnNumber;

  // More fields here
}
When we add those views to our controllers:
@RestController
@RequestMapping("/internal")
public class InternalUserController {

    private static final Logger log = LoggerFactory.getLogger(
            InternalUserController.class);

    private final UserService userService;

    public InternalUserController(UserService userService) {
        this.userService = userService;
    }

    @GetMapping("/users")
    @JsonView(Views.InternalView.class)
    public ResponseEntity<List<UserData>> getAllUsers(
            @RequestParam(required = false) String loginId) {
        if (Objects.isNull(loginId)) {
            return ResponseEntity.ok().body(userService.getAllUsers(true));
        } else {
            return ResponseEntity.ok().body(List.of(userService.getUser(loginId)));
        }

    }
}

@RestController
@RequestMapping("/external")
public class ExternalUserController {
    private static final Logger log = LoggerFactory.getLogger(
            ExternalUserController.class);

    private final UserService userService;

    public ExternalUserController(UserService userService) {
        this.userService = userService;
    }

    @GetMapping("/users")
    @JsonView(Views.ExternalView.class)
    public ResponseEntity<List<UserData>> getExtUsers(
            @RequestParam(required = false) String loginId) {
        if (Objects.isNull(loginId)) {
            return ResponseEntity.ok().body(userService.getAllUsers(false));
        } else {
            return ResponseEntity.ok().body(
                    List.of(userService.getUser(loginId, false)));
        }

    }
}
The Output JSON response looks like this.
Internal View:
External View:
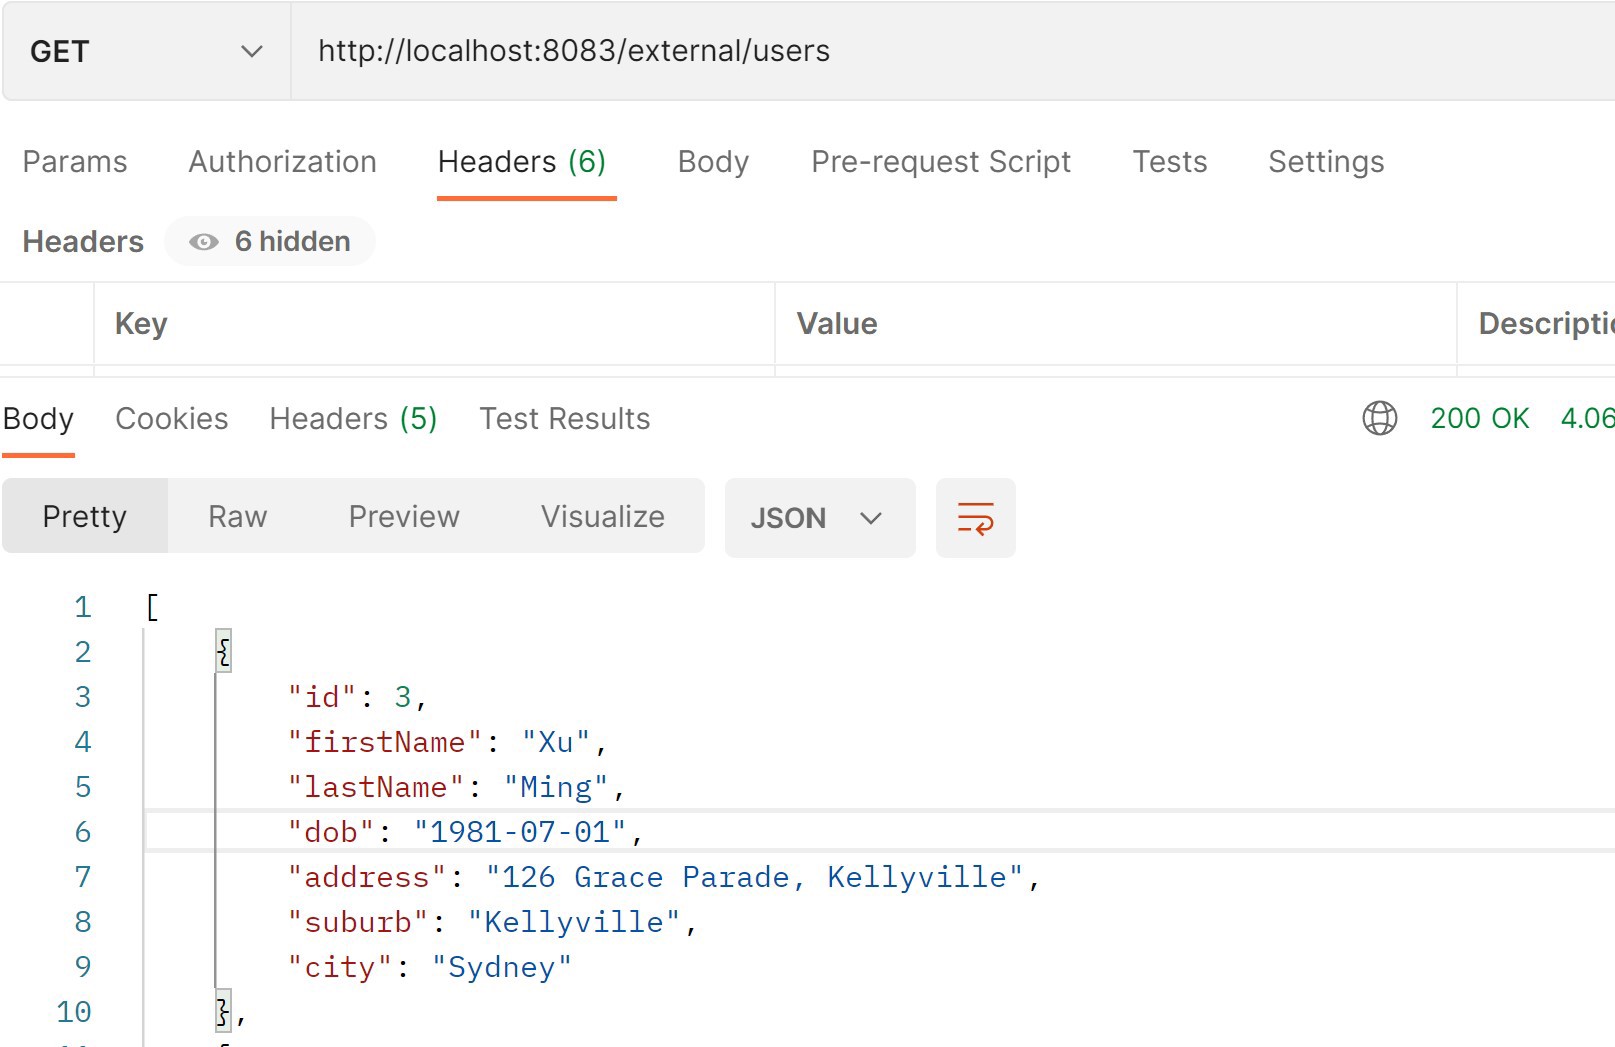
As seen from the JSON responses, the internal view exposes more user information than the external view.
Testing with @JsonView
With the right ObjectMapper configuration, we can write tests to verify if the objects were serialized and deserialized as expected.
Let’s consider this sample test:
@SpringBootTest
public class JsonViewTest {
    @Test
    public void serializeUserSummaryViewTest() throws JsonProcessingException {
        final UserData mockedUser = MockedUsersUtility.getMockedUserData();

        final ObjectMapper objectMapper = new ObjectMapper();
        objectMapper.configure(MapperFeature.DEFAULT_VIEW_INCLUSION, false);
        final String serializedValue = objectMapper
                .writerWithView(Views.UserSummary.class)
                .writeValueAsString(mockedUser);

        final List<String> expectedFields = Arrays.asList(
                "createdBy", "createdDate", "updatedBy", "updatedDate",
                "additionalData", "loginId", "loginPassword", "ssnNumber");
        expectedFields.stream().forEach(field -> {
            assertFalse(serializedValue.contains(field));
        });

        final ObjectMapper objectMapper1 = new ObjectMapper();
        objectMapper1.configure(MapperFeature.DEFAULT_VIEW_INCLUSION, true);
        final String serializedValue1 = objectMapper1
                .writerWithView(Views.UserSummary.class)
                .writeValueAsString(mockedUser);
        System.out.println(serializedValue1);

        assertTrue(serializedValue1.contains("additionalData"));
    }
}
To test object serialization, we have configured the ObjectMapper to have MapperFeature.DEFAULT_VIEW_INCLUSION set to false.
The mockedUser object has all the UserData properties set to mock values. Using the writerWithView(Views.UserSummary.class), we can verify that
the object has been serialized to a String for only the properties that are a part of UserSummary view.
The same test has been repeated with MapperFeature.DEFAULT_VIEW_INCLUSION set to true. Here, we can see that the serialized string contains additionalData(property with no @JsonView annotation).
Now, let’s verify the deserialization process:
@SpringBootTest
public class JsonViewTest {

    @Test
    public void deserializeUserSummaryViewTest() throws JsonProcessingException {
        final ObjectMapper objectMapper = new ObjectMapper();
        objectMapper.configure(MapperFeature.DEFAULT_VIEW_INCLUSION, false);
        final UserData deserializedValue = objectMapper
                .readerWithView(Views.UserSummary.class)
                .forType(UserData.class)
                .readValue(MockedUsersUtility.userDataObjectAsString());

        System.out.println(
                "Deserialize with DEFAULT_VIEW_INCLUSION as false :" + deserializedValue);

        assertTrue(Objects.isNull(deserializedValue.getCreatedBy()));
        assertTrue(Objects.isNull(deserializedValue.getCreatedDate()));
        assertTrue(Objects.isNull(deserializedValue.getUpdatedBy()));
        assertTrue(Objects.isNull(deserializedValue.getUpdatedDate()));
        assertTrue(Objects.isNull(deserializedValue.getAdditionalData()));

    }
}
Here, we use the readerWithView(Views.UserSummary.class) method of the ObjectMapper to verify that the deserialization from the string
representation of json to UserData object contains values only for the view annotated fields.
Conclusion
In this article, we took a closer look at @JsonView annotations to understand the flexibility it provides to expose different views.
This annotation helps to write clean code and have better control over when and how to expose properties during serialization and deserialization process.