In this article, we will build a production-grade application with Spring Boot.
After understanding the use case and requirements, we will implement the application layer by layer.
Let us dive into the requirements for the application.
Example Code
This article is accompanied by a working code example on GitHub.Requirements
We need to build an application for the local bookstore that will allow them to keep track of borrowed books.
The bookstore wants to have these functionalities in the application:
- The application should be accessible through a web browser.
- The user has to provide their name, last name, email, and password.
- Each book has information about an author, date of publication, and the number of copies (instances) in the bookstore.
- The user can see all available books.
- The user can borrow a book.
- Each user can borrow only three books at one point in time.
- The admin user can see all users that currently own a specific book.
- The admin user can add a new book into the bookstore.
- The admin user can delete a book from the bookstore.
- The admin user can update information about a book in the bookstore.
High-level Architecture
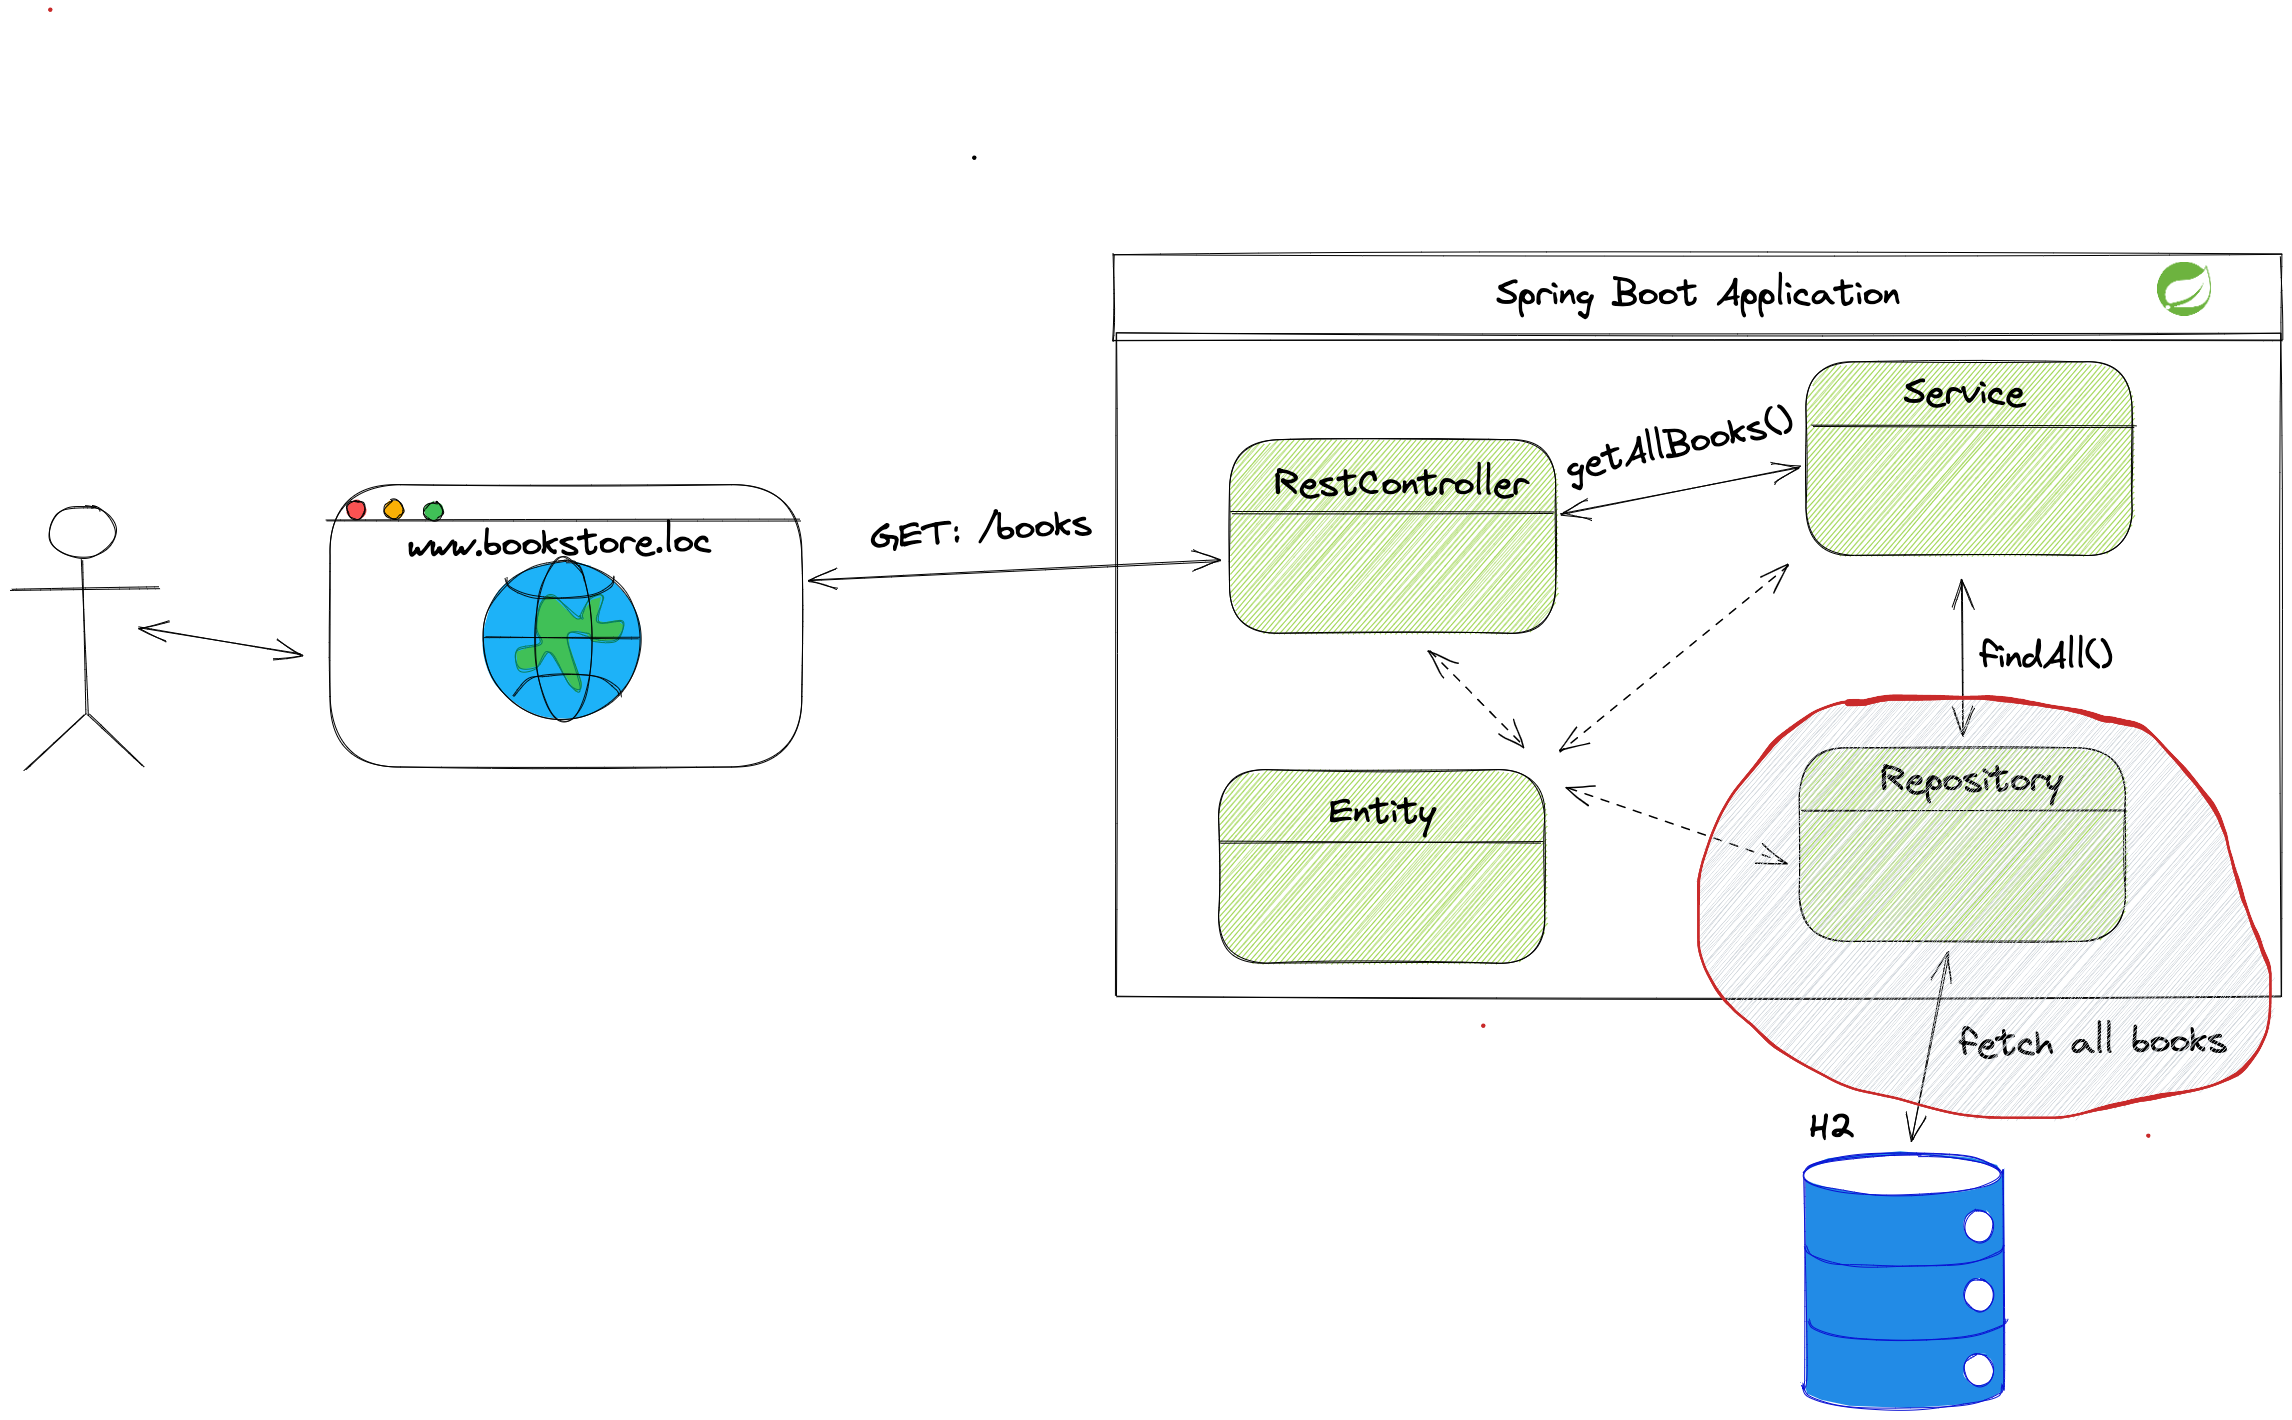
Let’s take a look at a high-level architecture diagram to see how the application behaves:

Typing www.bookstore.loc in the browser will guide the user to the homepage.
The homepage triggers the request to load all books available in the bookstore.
Inside the Spring Boot Application box, we can see layers we will implement through this article.
Controller classes accept the request from the browser and send it further down layers.
Methods inside the service layers contain all business logic. We will implement most requirements from the chapter above in this layer.
The service methods contact the repository layer to access the database.
We store data about books and users in the in-memory H2 database.
Setting up the Project
Spring provides the Spring Initializr project, which creates an application skeleton for us. The generated application eases the configuration phase and allows us to dive straight into the code.
We will look at two ways of creating a new Spring Boot project:
Both ways use the Spring Initializr project underneath and you can choose whichever way works best for you.
Creating the Project with Spring Initializr
On the Spring Initilizr page, we can create a new Spring Boot project:
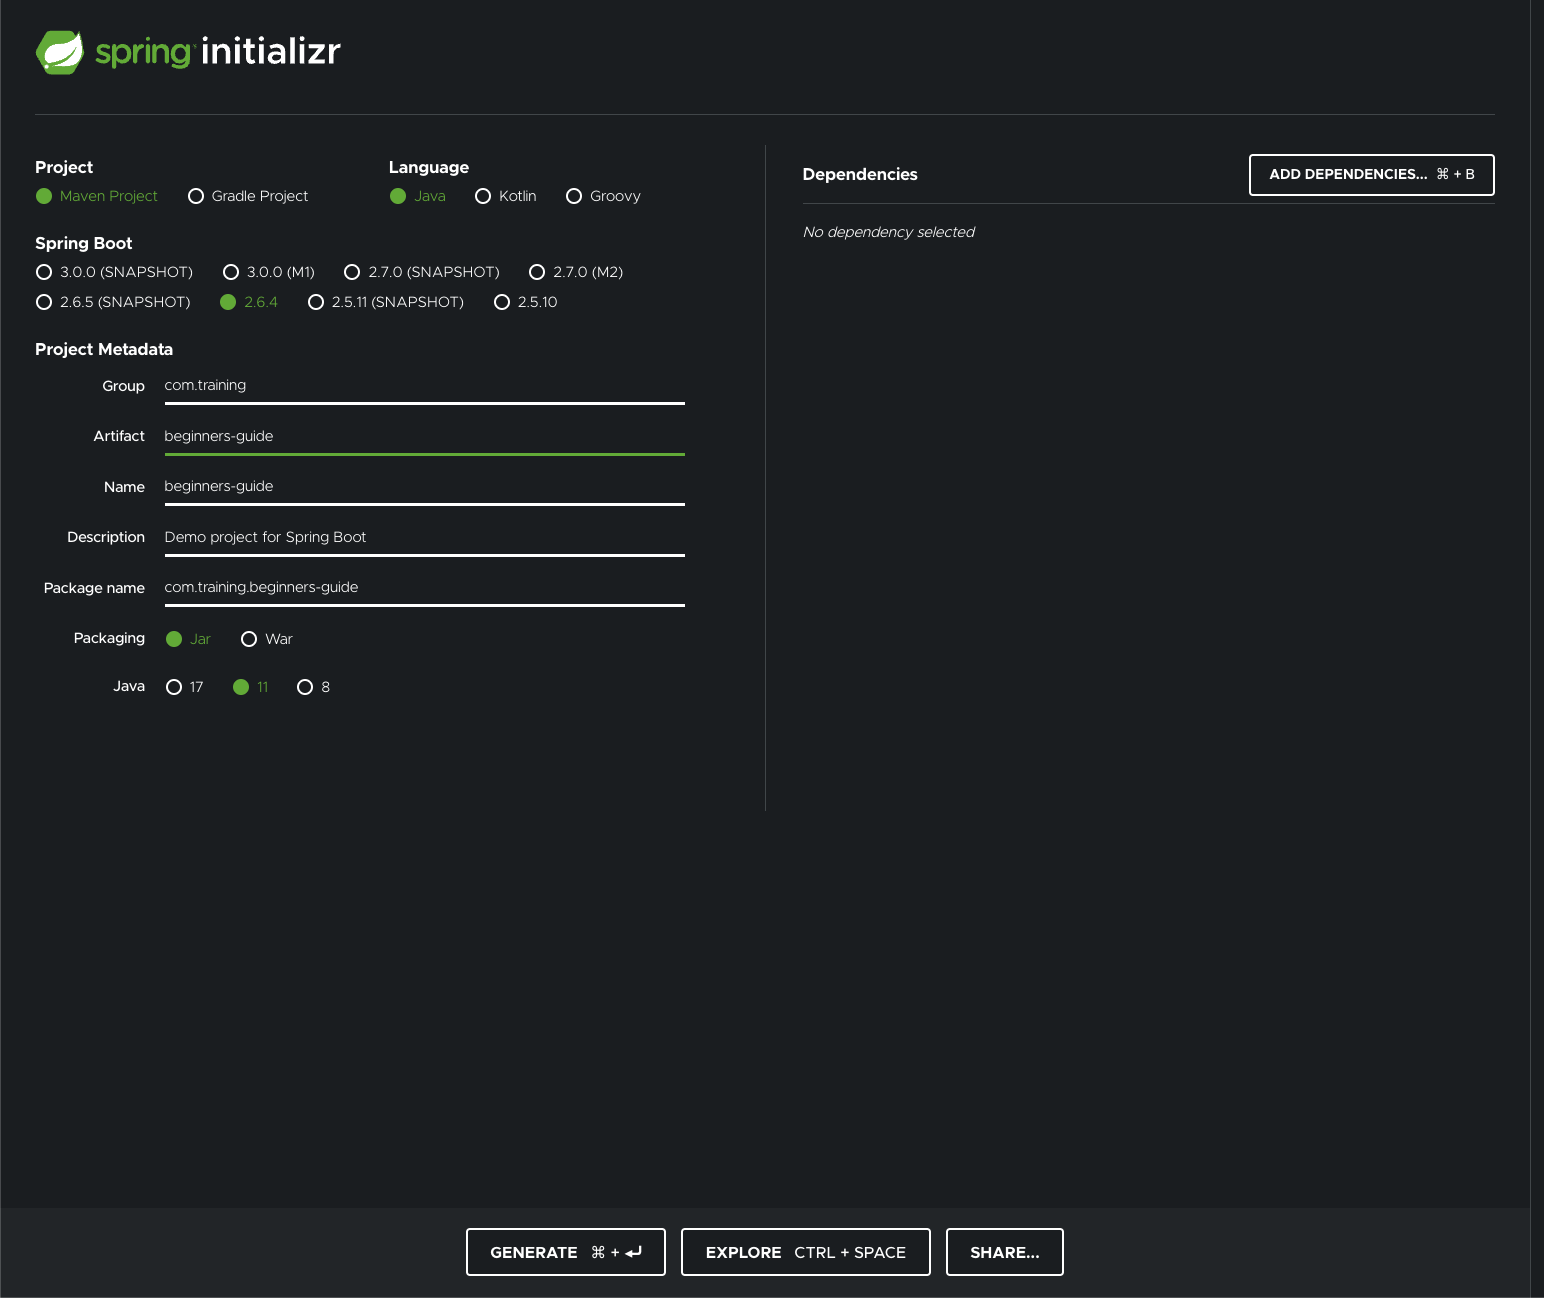
On this page, we provide the metadata about the application. After defining all necessary information, we can go and add our dependencies.
By clicking on the button on the top right corner, we can see the dependency selection screen:
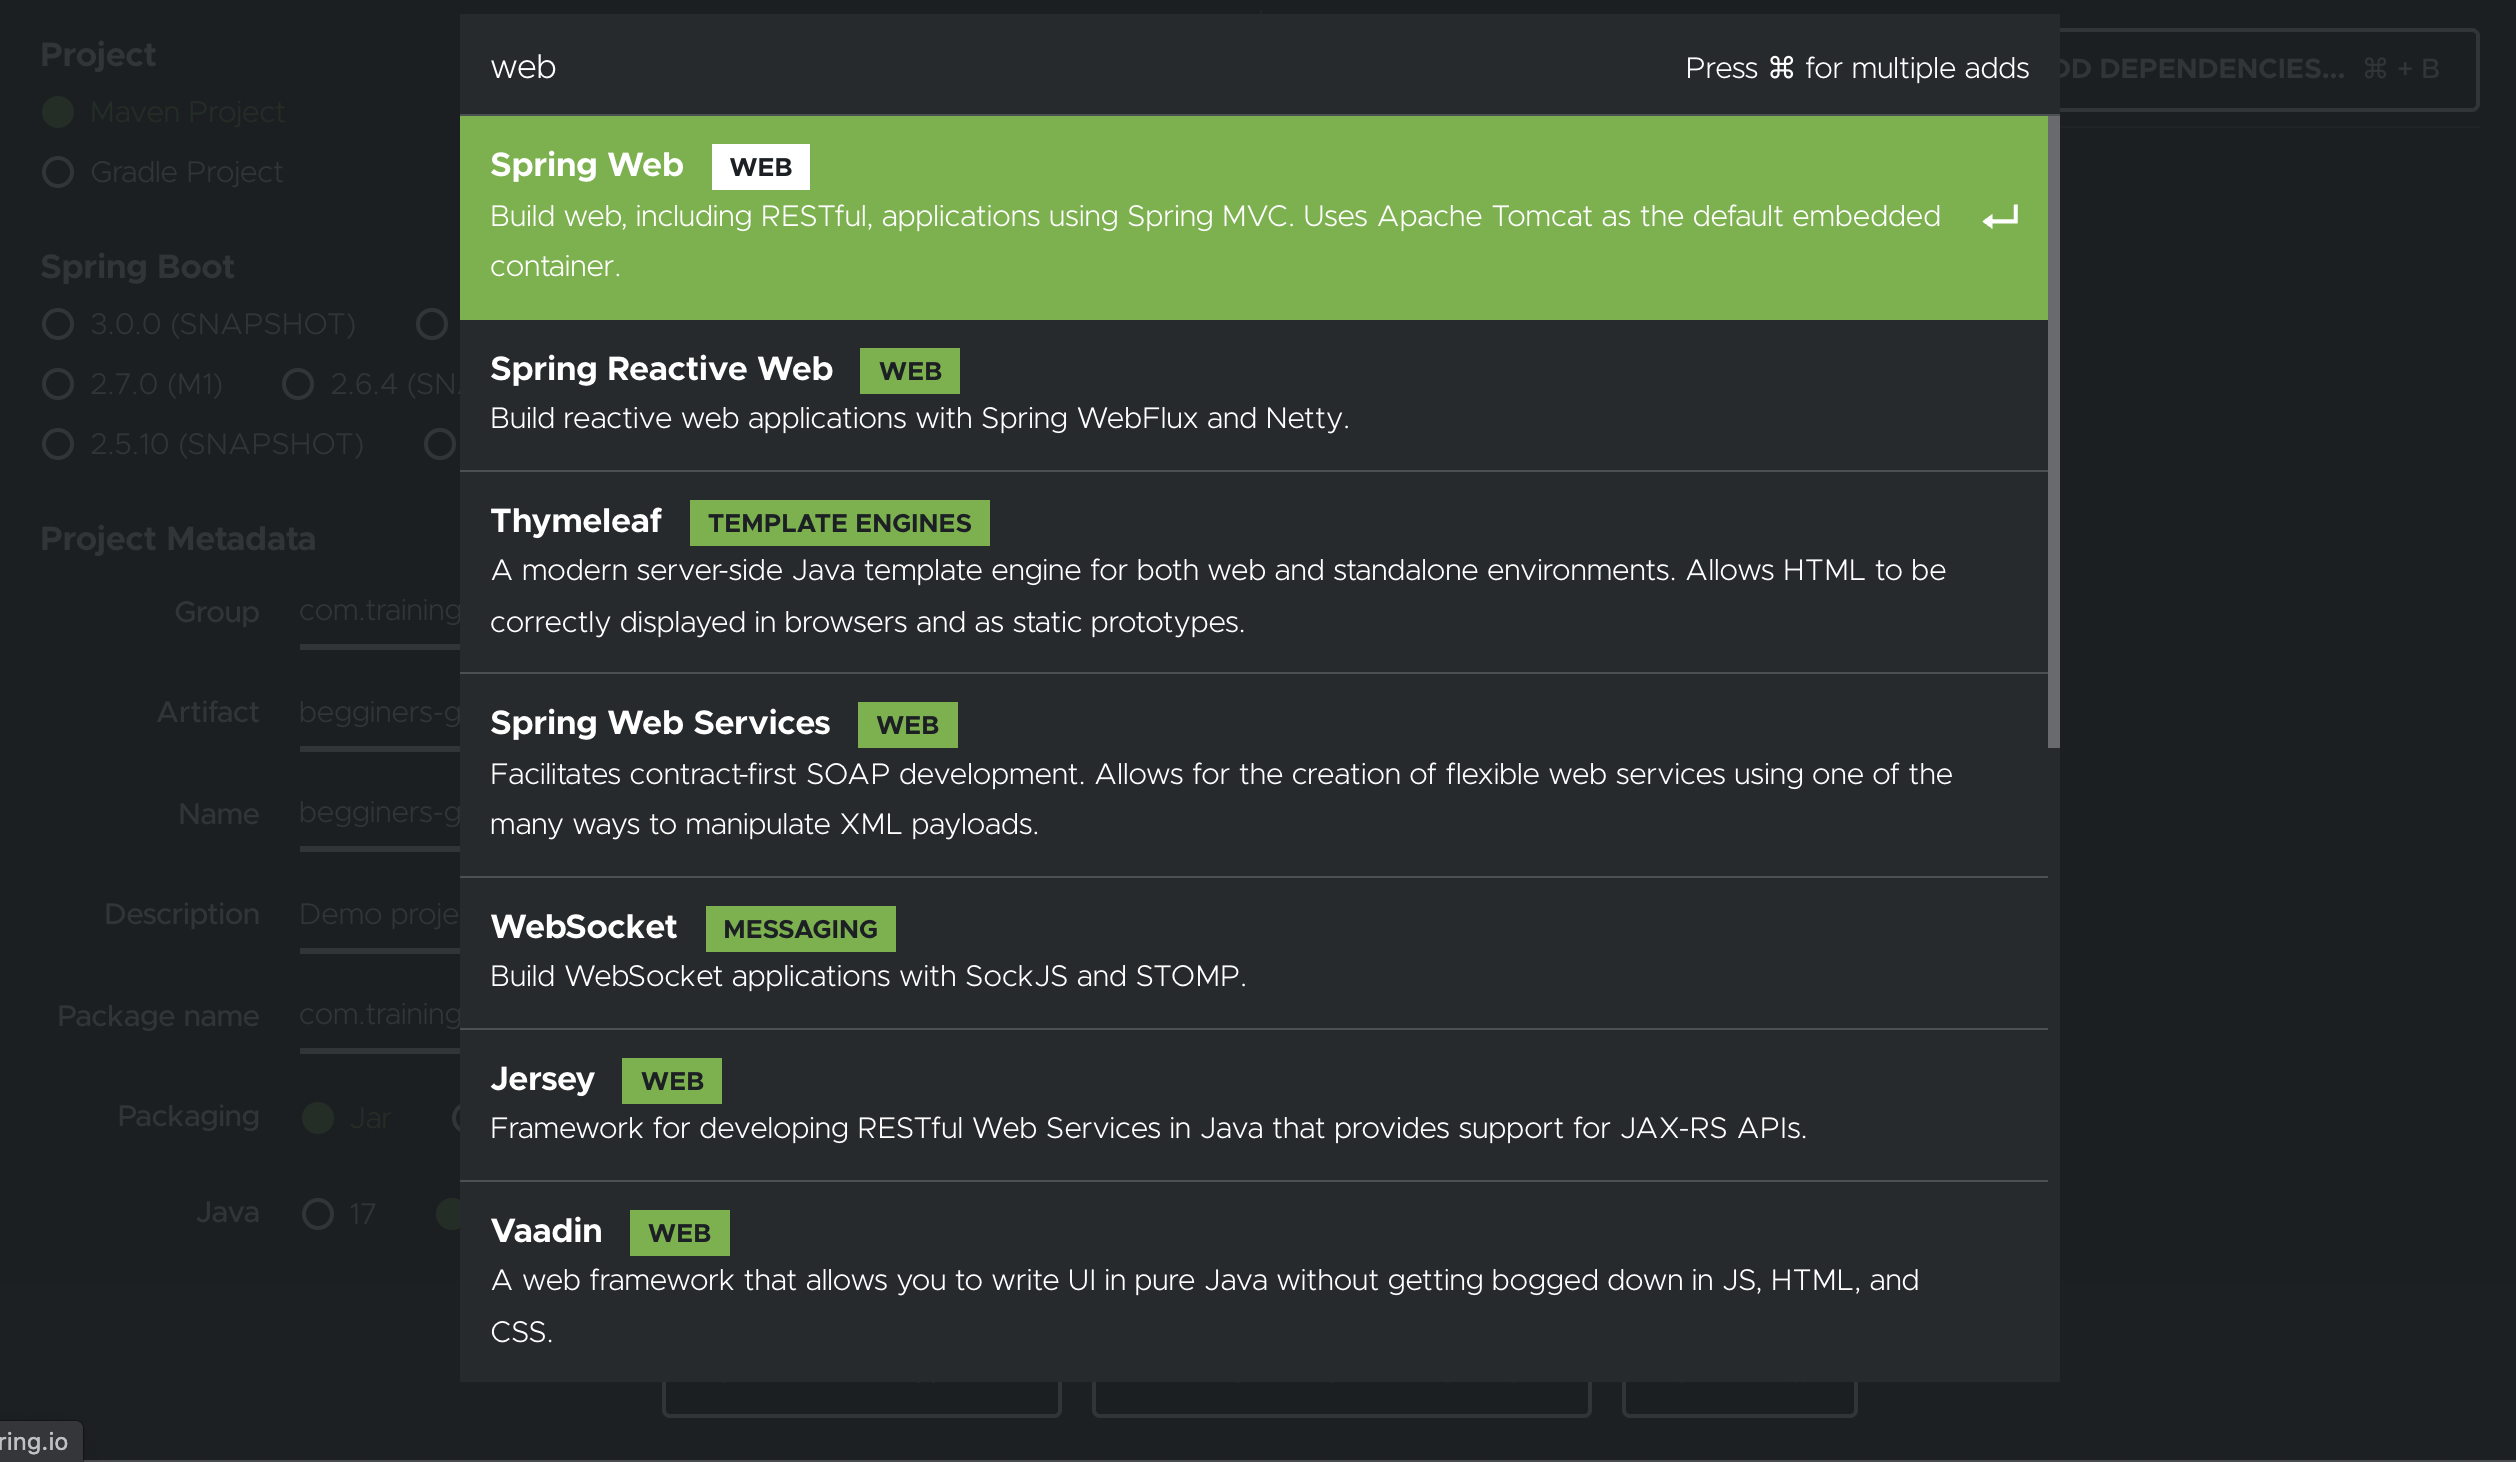
We will choose these three dependencies:
After selecting desired dependencies, we can generate our project by clicking the “Generate” button on the lower-left corner of the screen. Clicking the button will download the zip file onto our machine. After unpacking the zip and importing the project into IDE, we can start developing.
Creating the Project with IntelliJ
In the IntelliJ IDE, we can go to the File -> New -> Project…. We will get the next screen:
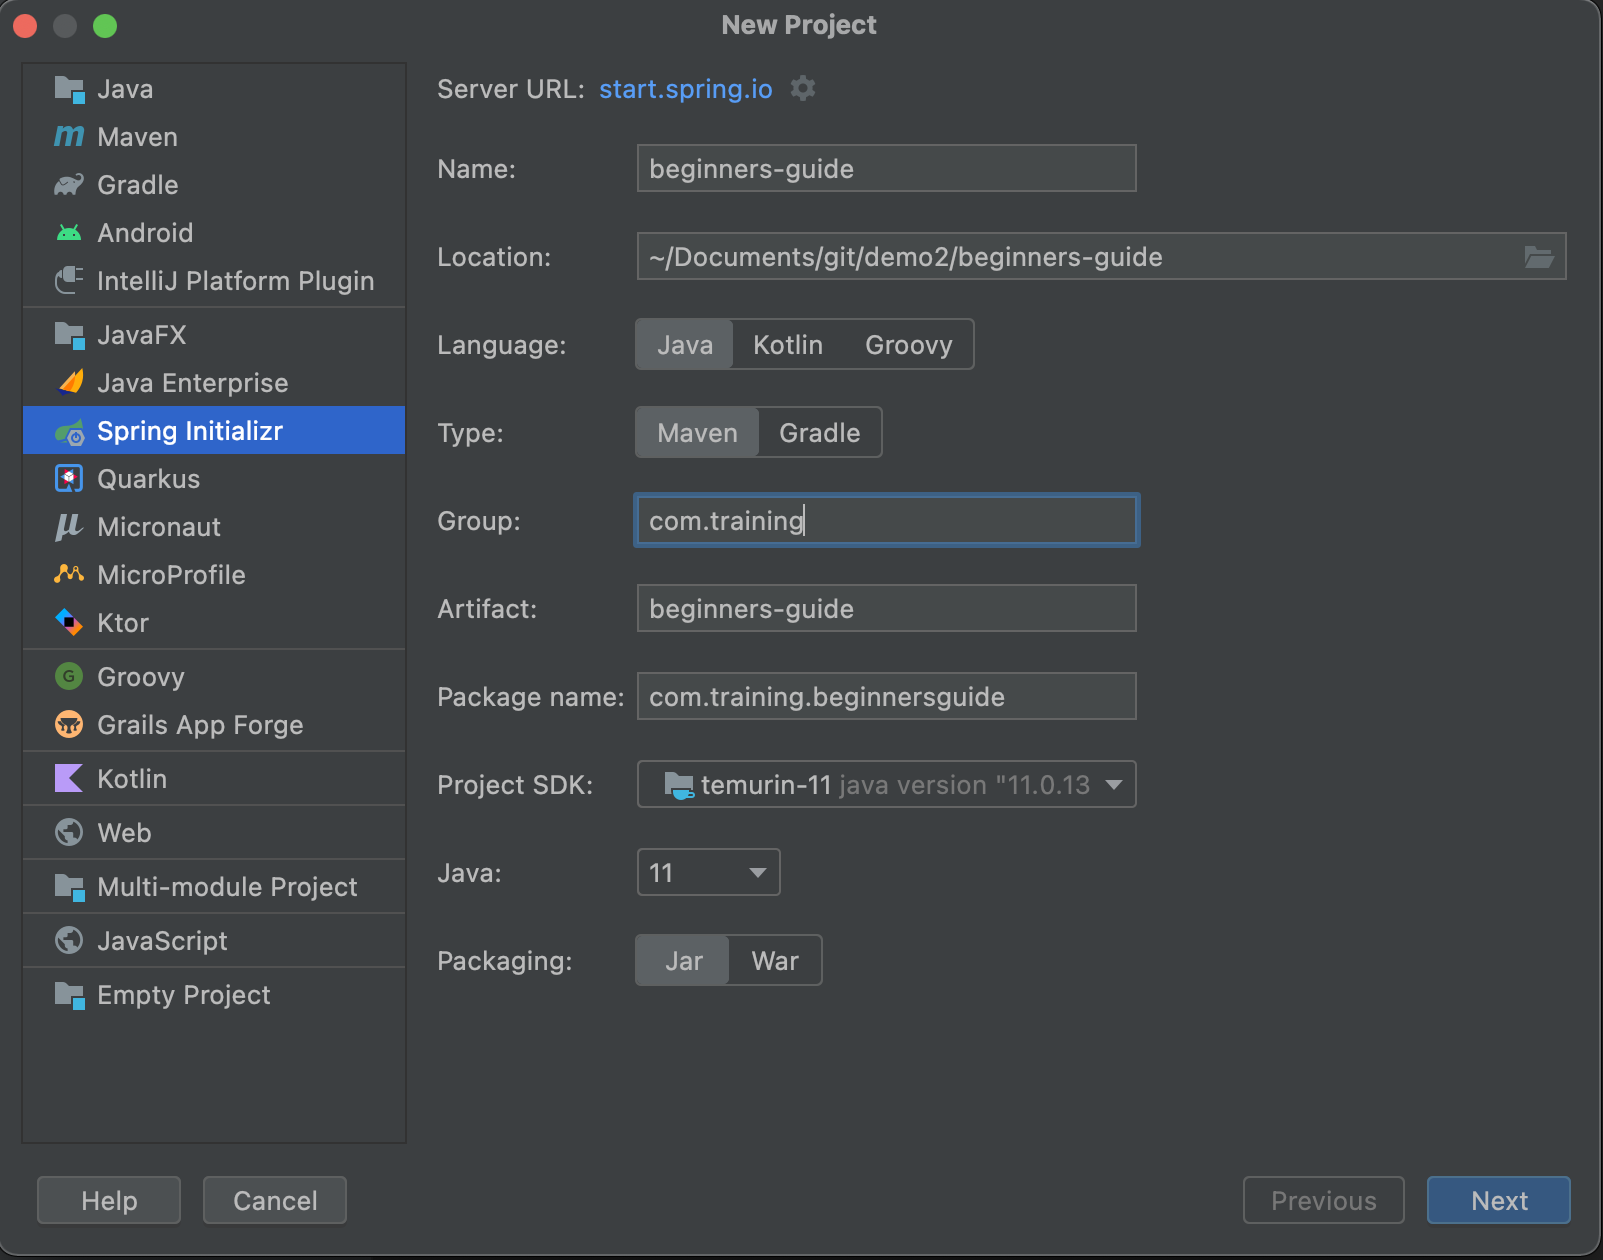
After defining the project on this screen, we can move forward to the next screen:
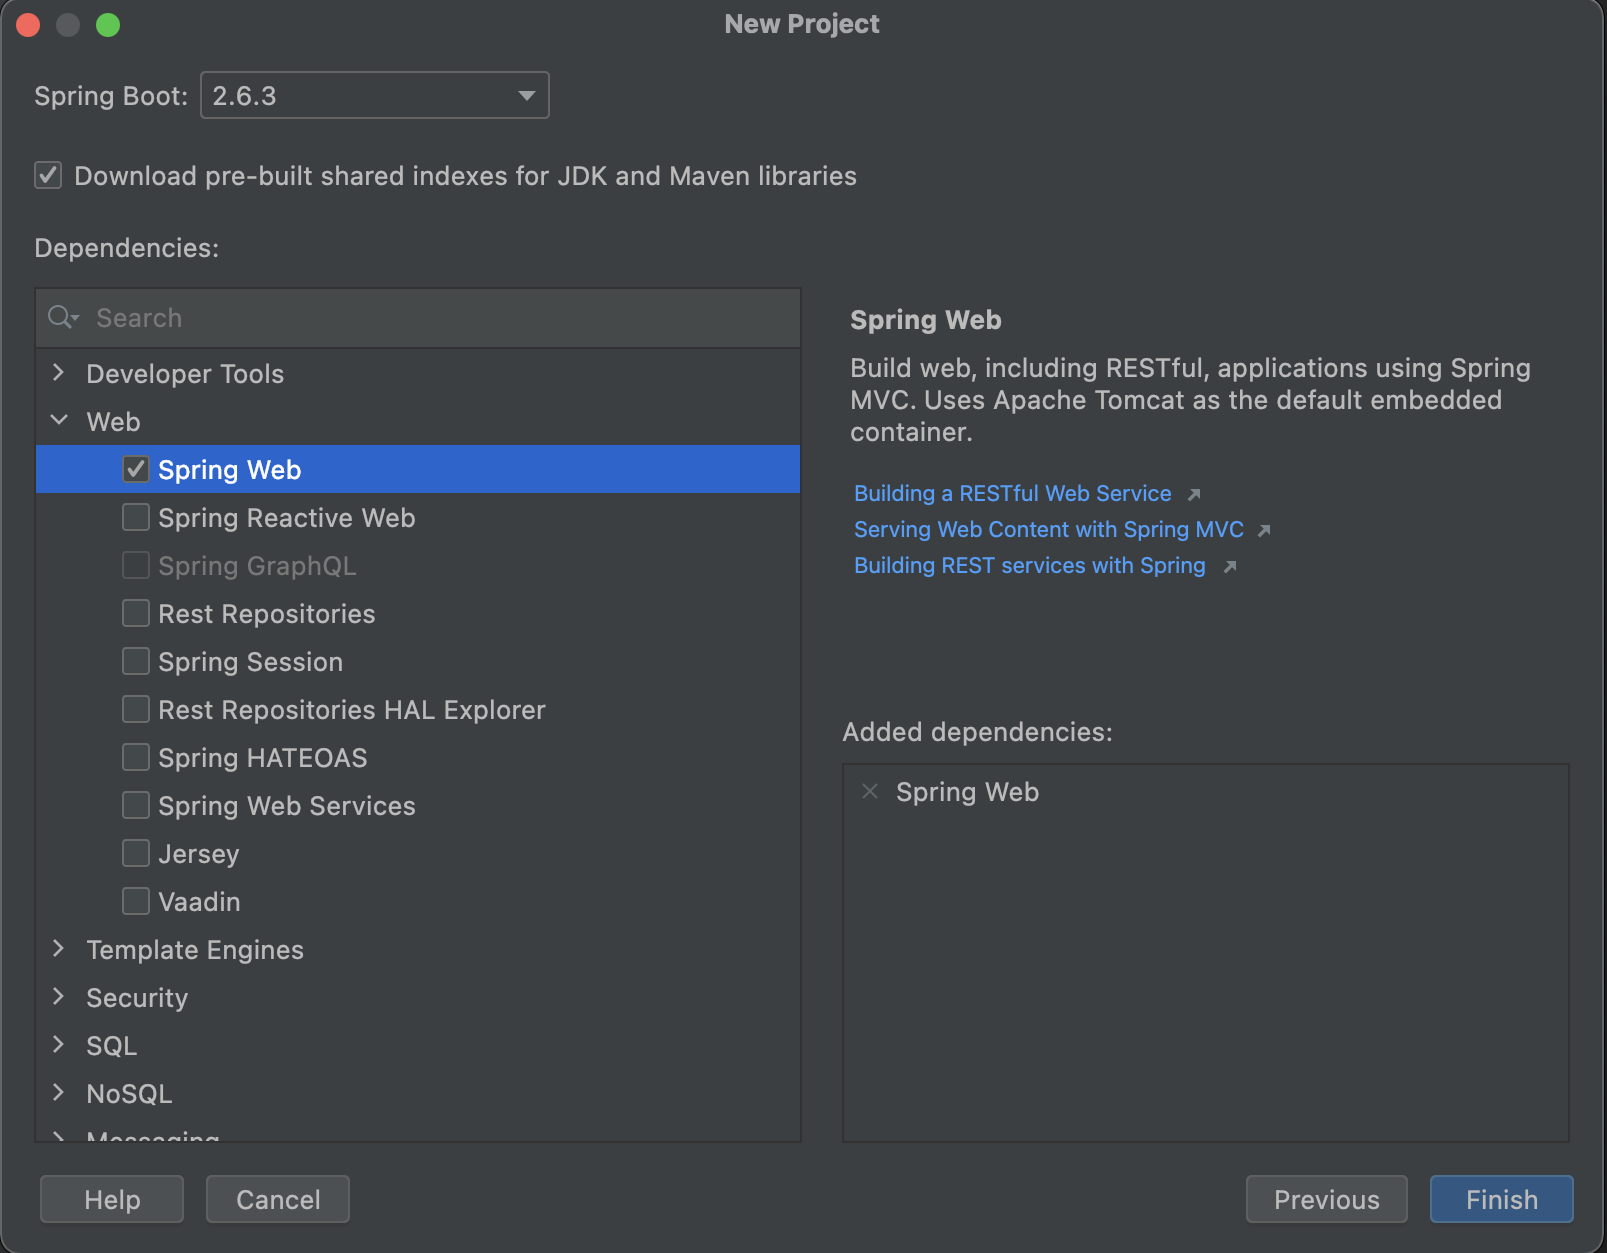
We choose the same dependencies as above and click the finish button to create the project and start developing.
Project Dependencies
Let’s learn a bit about the dependencies that we selected for our new project.
The Spring Web Dependency
The Spring Web dependency gives us everything we need to build a Spring MVC application.
Spring MVC is Spring’s implementation of the Model-View-Controller design pattern. A controller is the front part of the application that takes incoming requests and relays them to the right destination. Model is the object or collection that holds our data, and view represents the pages that the browser renders.
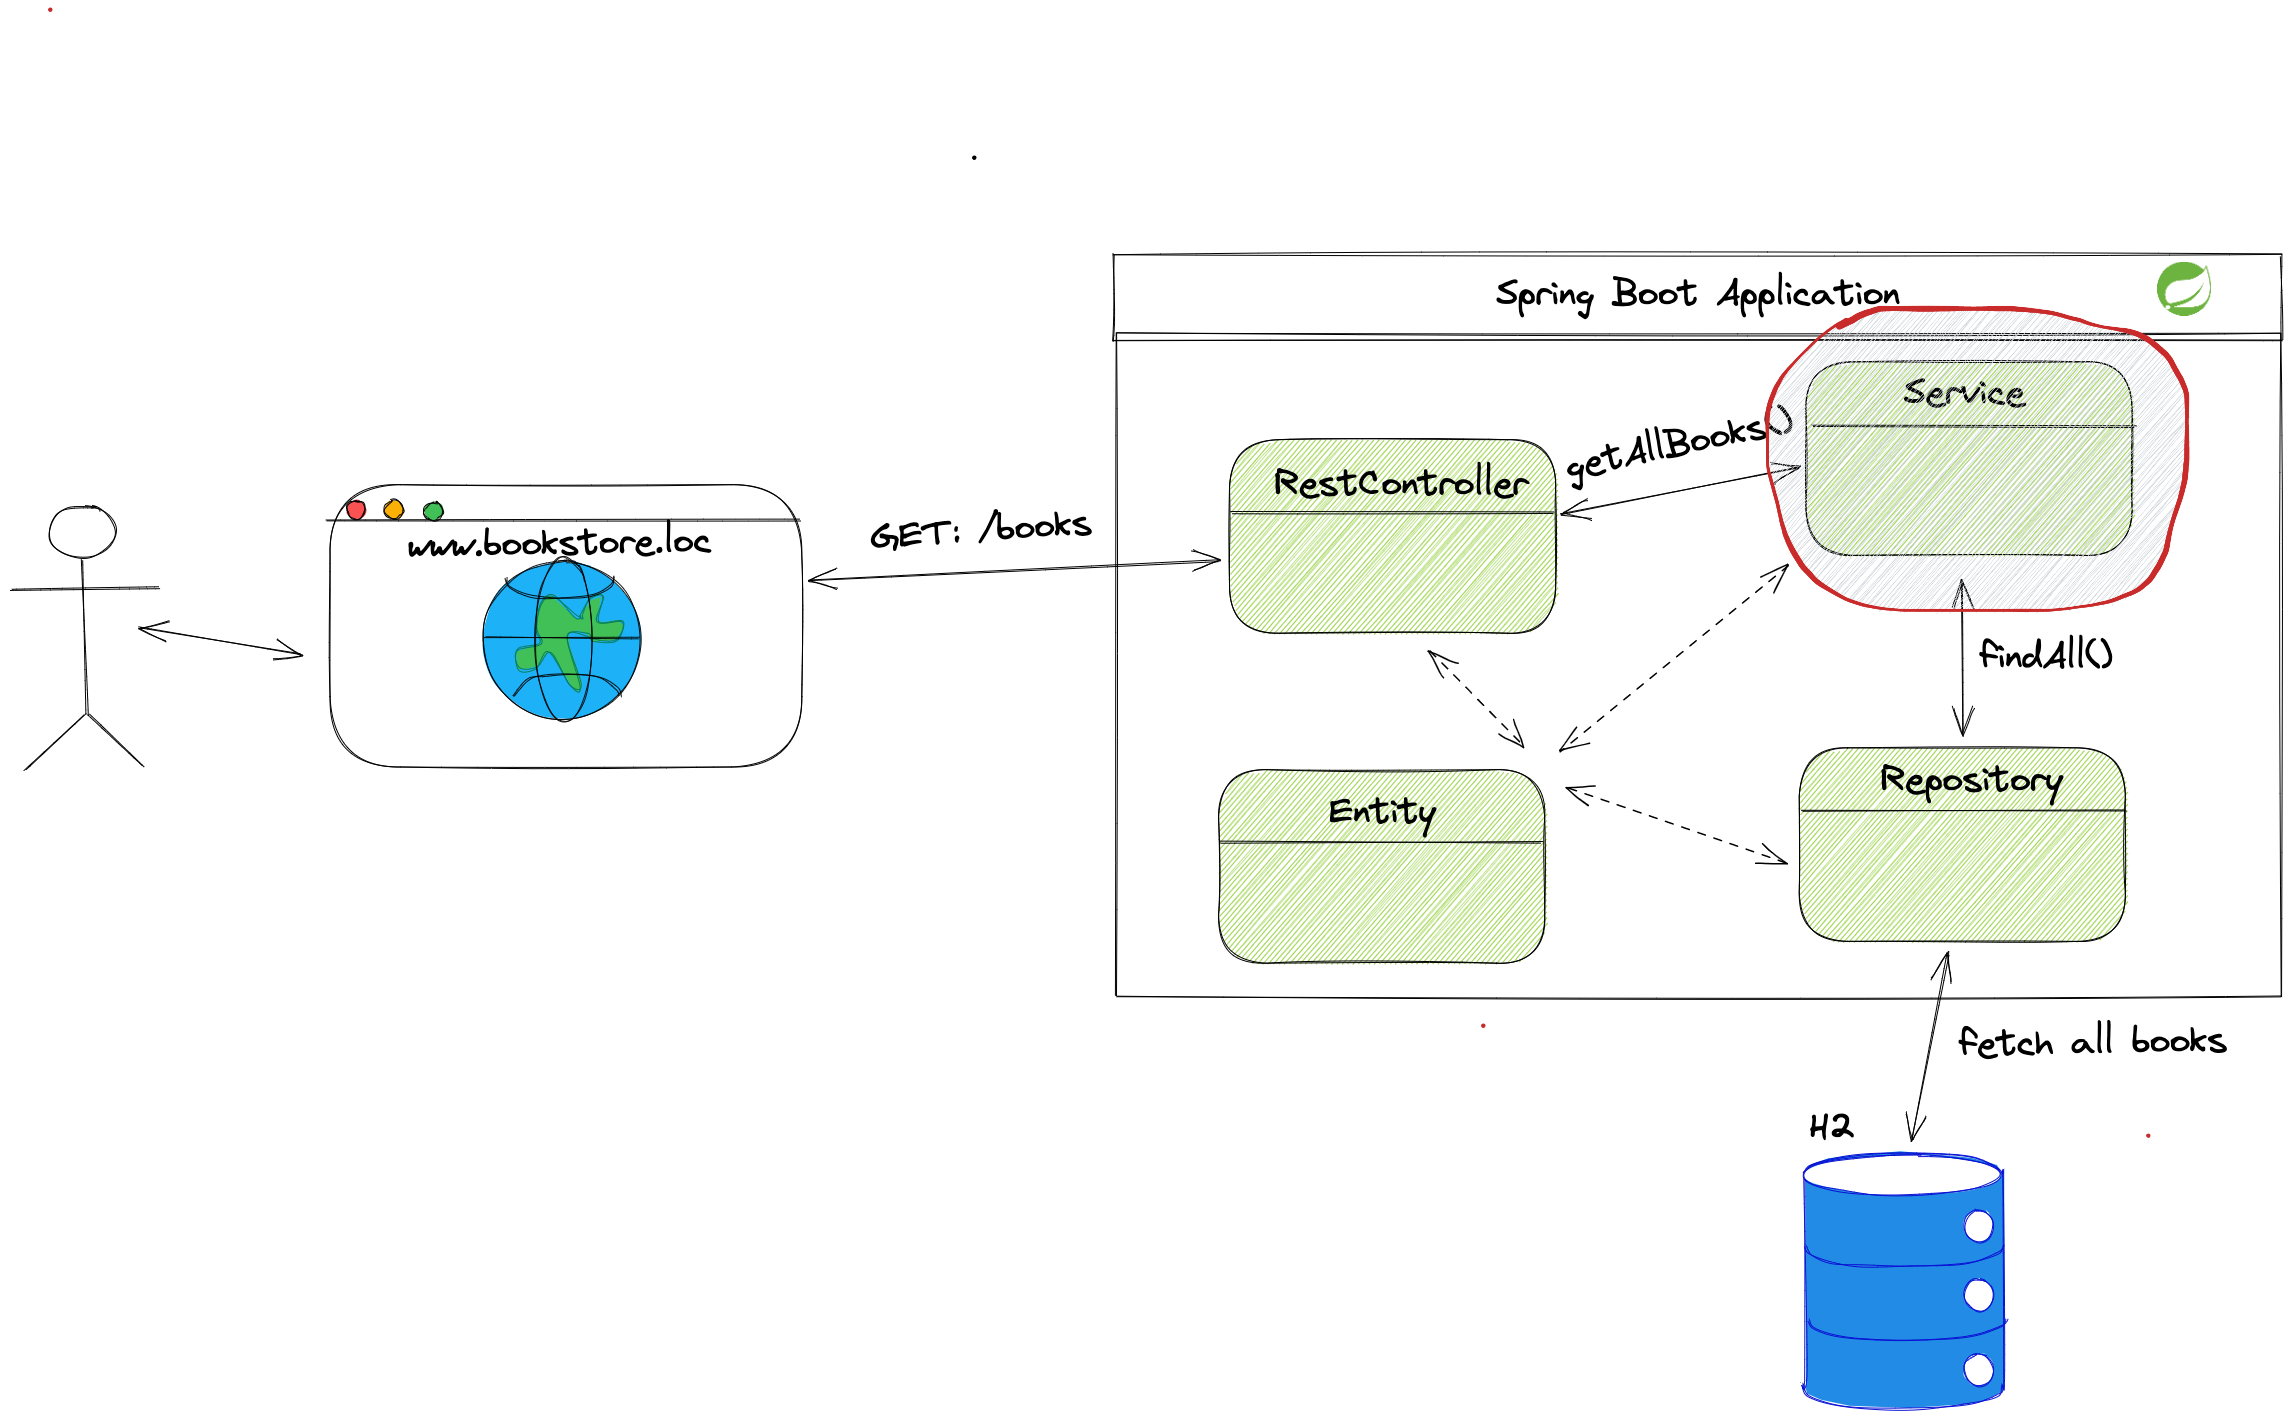
Let us look into the high-level architecture again and determine what does Spring Web provides:
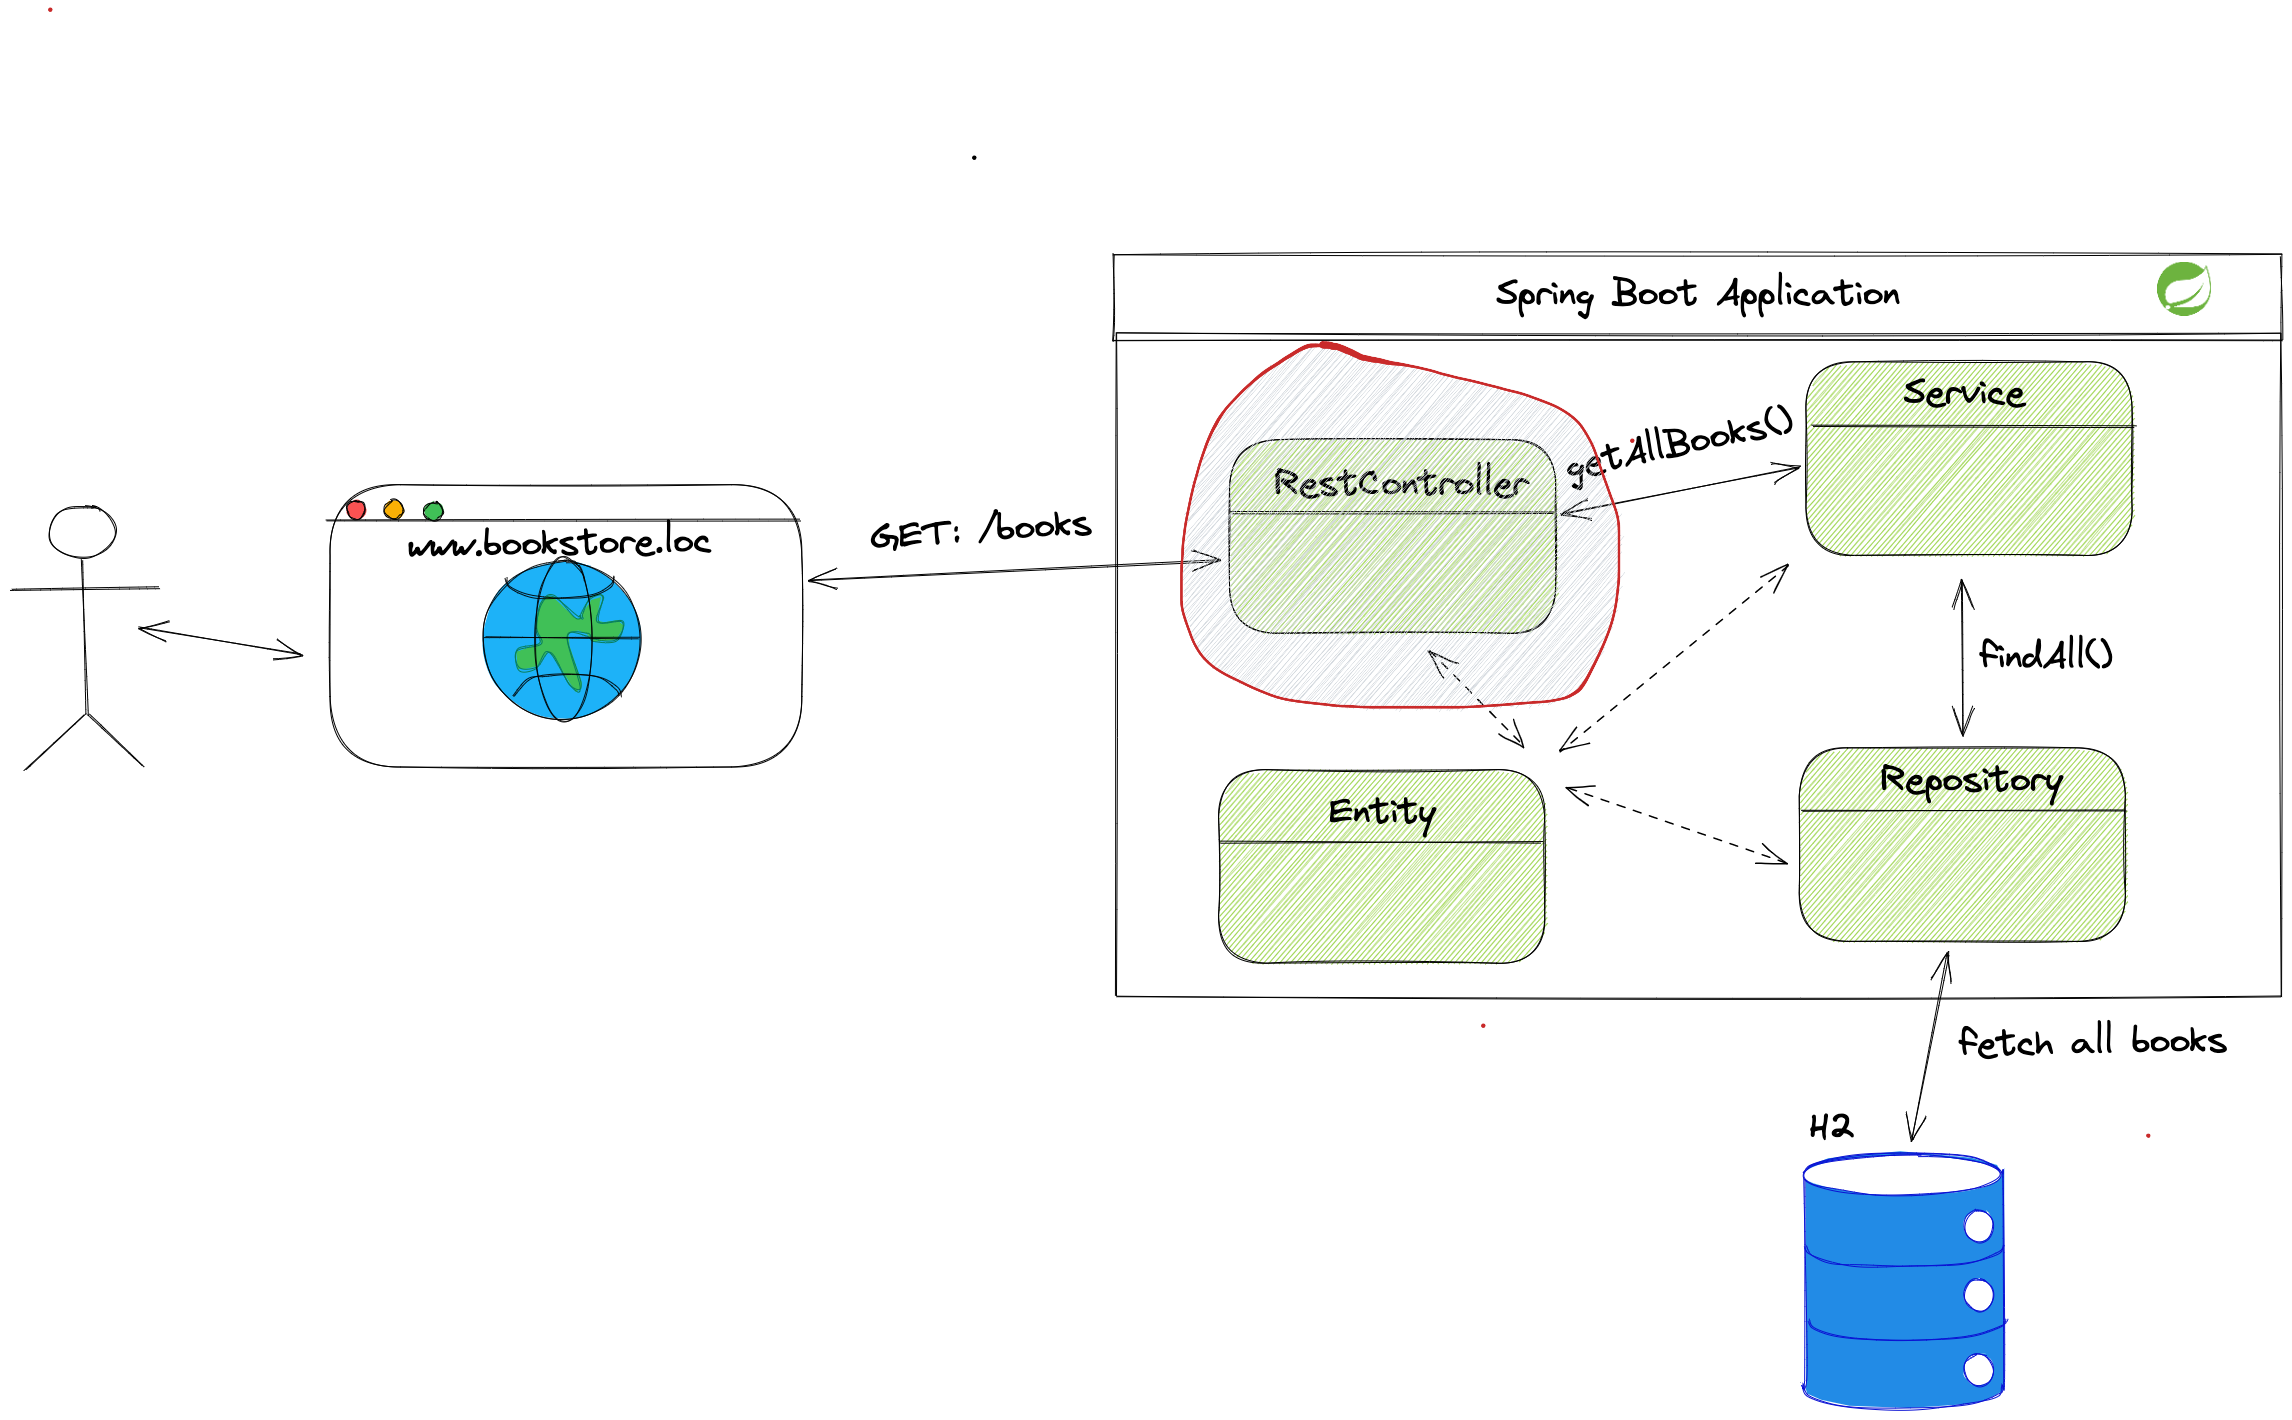
The Spring Web dependency provides core Spring features (Inversion of Control, Spring MVC, server container for local running, etc.). With the Spring Web dependency, we can create controller classes from the image above.
The controller does several things:
- Accepts incoming HTTP requests
- Validates and deserializes input
- Sends the data to the business logic layer
- Deserializes output from the business logic layer
- Handles exceptions and returns a correct response to the user
If we run the application, we will see that we can access the application on http://localhost:8080.
We won’t see much, but the application will be up and running.
If you want to dive deeper into the responsibilities of a web controller and how to write tests for them, have a look at the article on testing MVC web controllers.
The Spring Data JPA Dependency
Building the data access layer can be cumbersome, and Spring Data JPA data gives us everything we need to start communicating with the database.
JPA (Java Persistence API) is a set of concepts that helps us write code against a database. Since JPA is just a set of specifications, it requires an implementation like Hibernate ORM.
Hibernate is an ORM (Object/Relational Mapping) solution. Hibernate takes care of mapping between Java classes and tables in the database. It allows us to edit data in tables without writing any SQL code.
Let us look into the application diagram to see which parts Spring Data JPA supports:
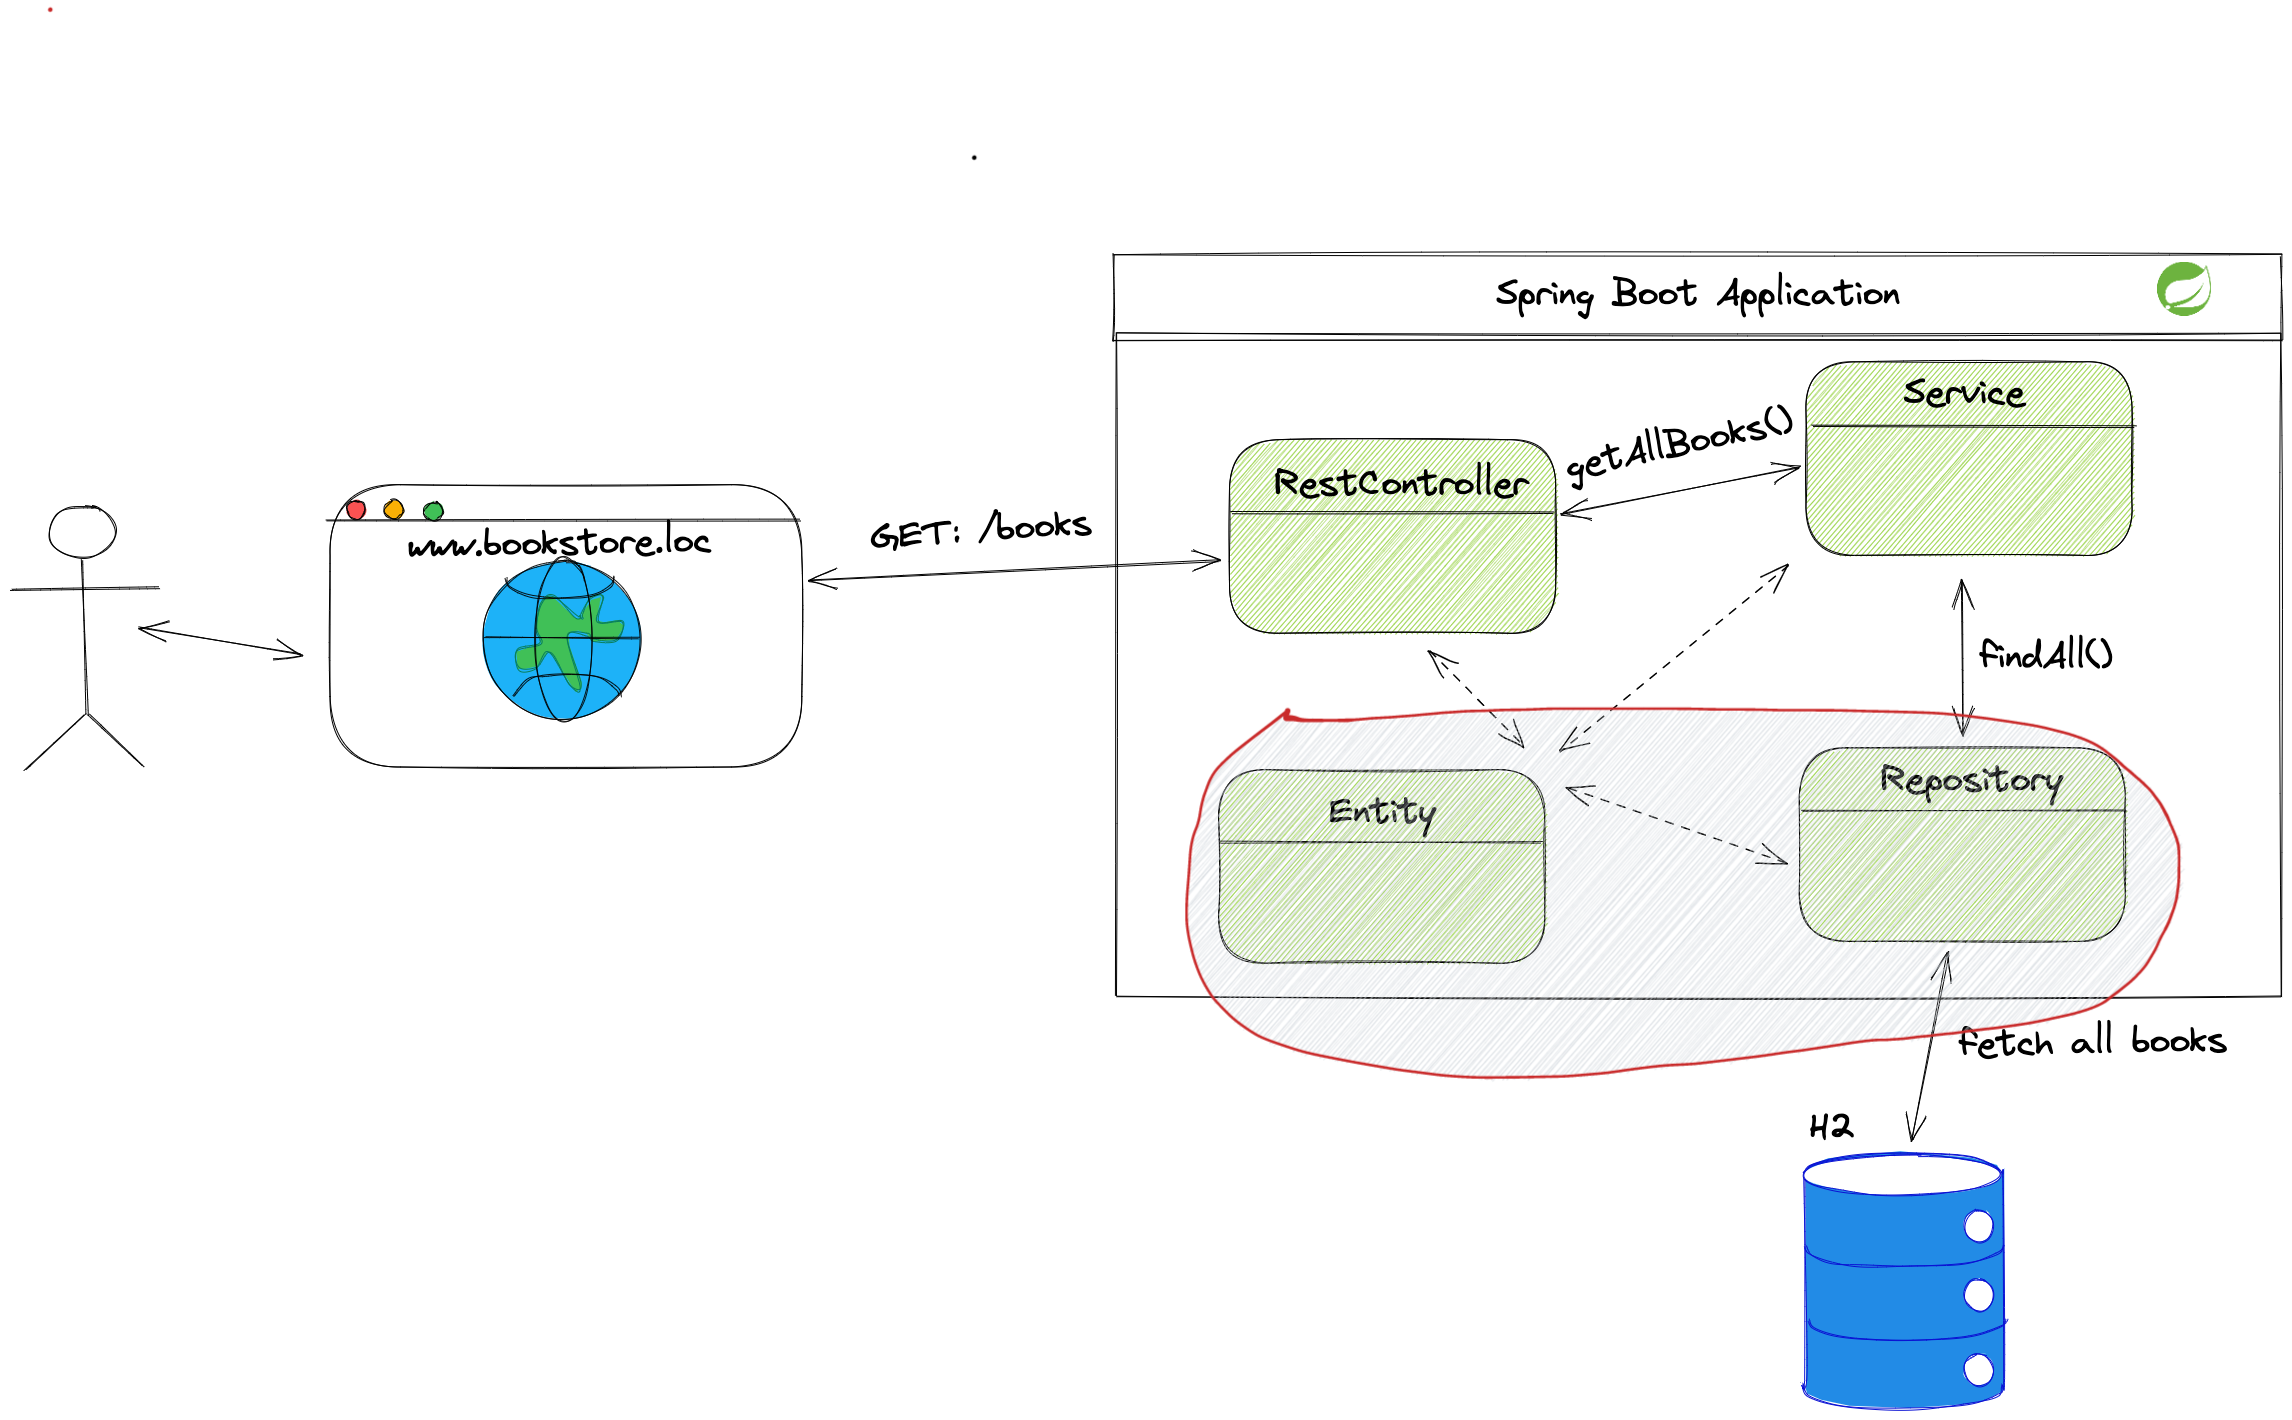
With Spring Data JPA, we can use the @Entity annotation to create database entities.
The database entity is the direct connection between the application and the table in the database. Using annotations like @ManyToMany, @Column, etc., we can define relationships between tables and constraints on columns.
Spring Data JPA also provides the repository interfaces:
CrudRepositoryPagingAndSortingRepositoryJpaRepository
Repositories are interfaces that hide the logic required for accessing the database. By extending the interface, we can run queries on the database without worrying about connection details.
We will talk more about this when we start building the repository layer.
If you want to dive deeper into Spring Data JPA repositories and how to write tests for them, have a look at the article on testing JPA queries.
Spring Data JPA Alternatives
Spring Data JPA is only one of many different alternatives of data access layers.
To read more about alternatives to Spring Data JPA, like Spring Data JDBC or Spring Data Neo4J please refer to the official page.
The H2 Database Dependency
The in-memory H2 database is excellent for fast iteration when we don’t care that the data is lost when we shut down the application.
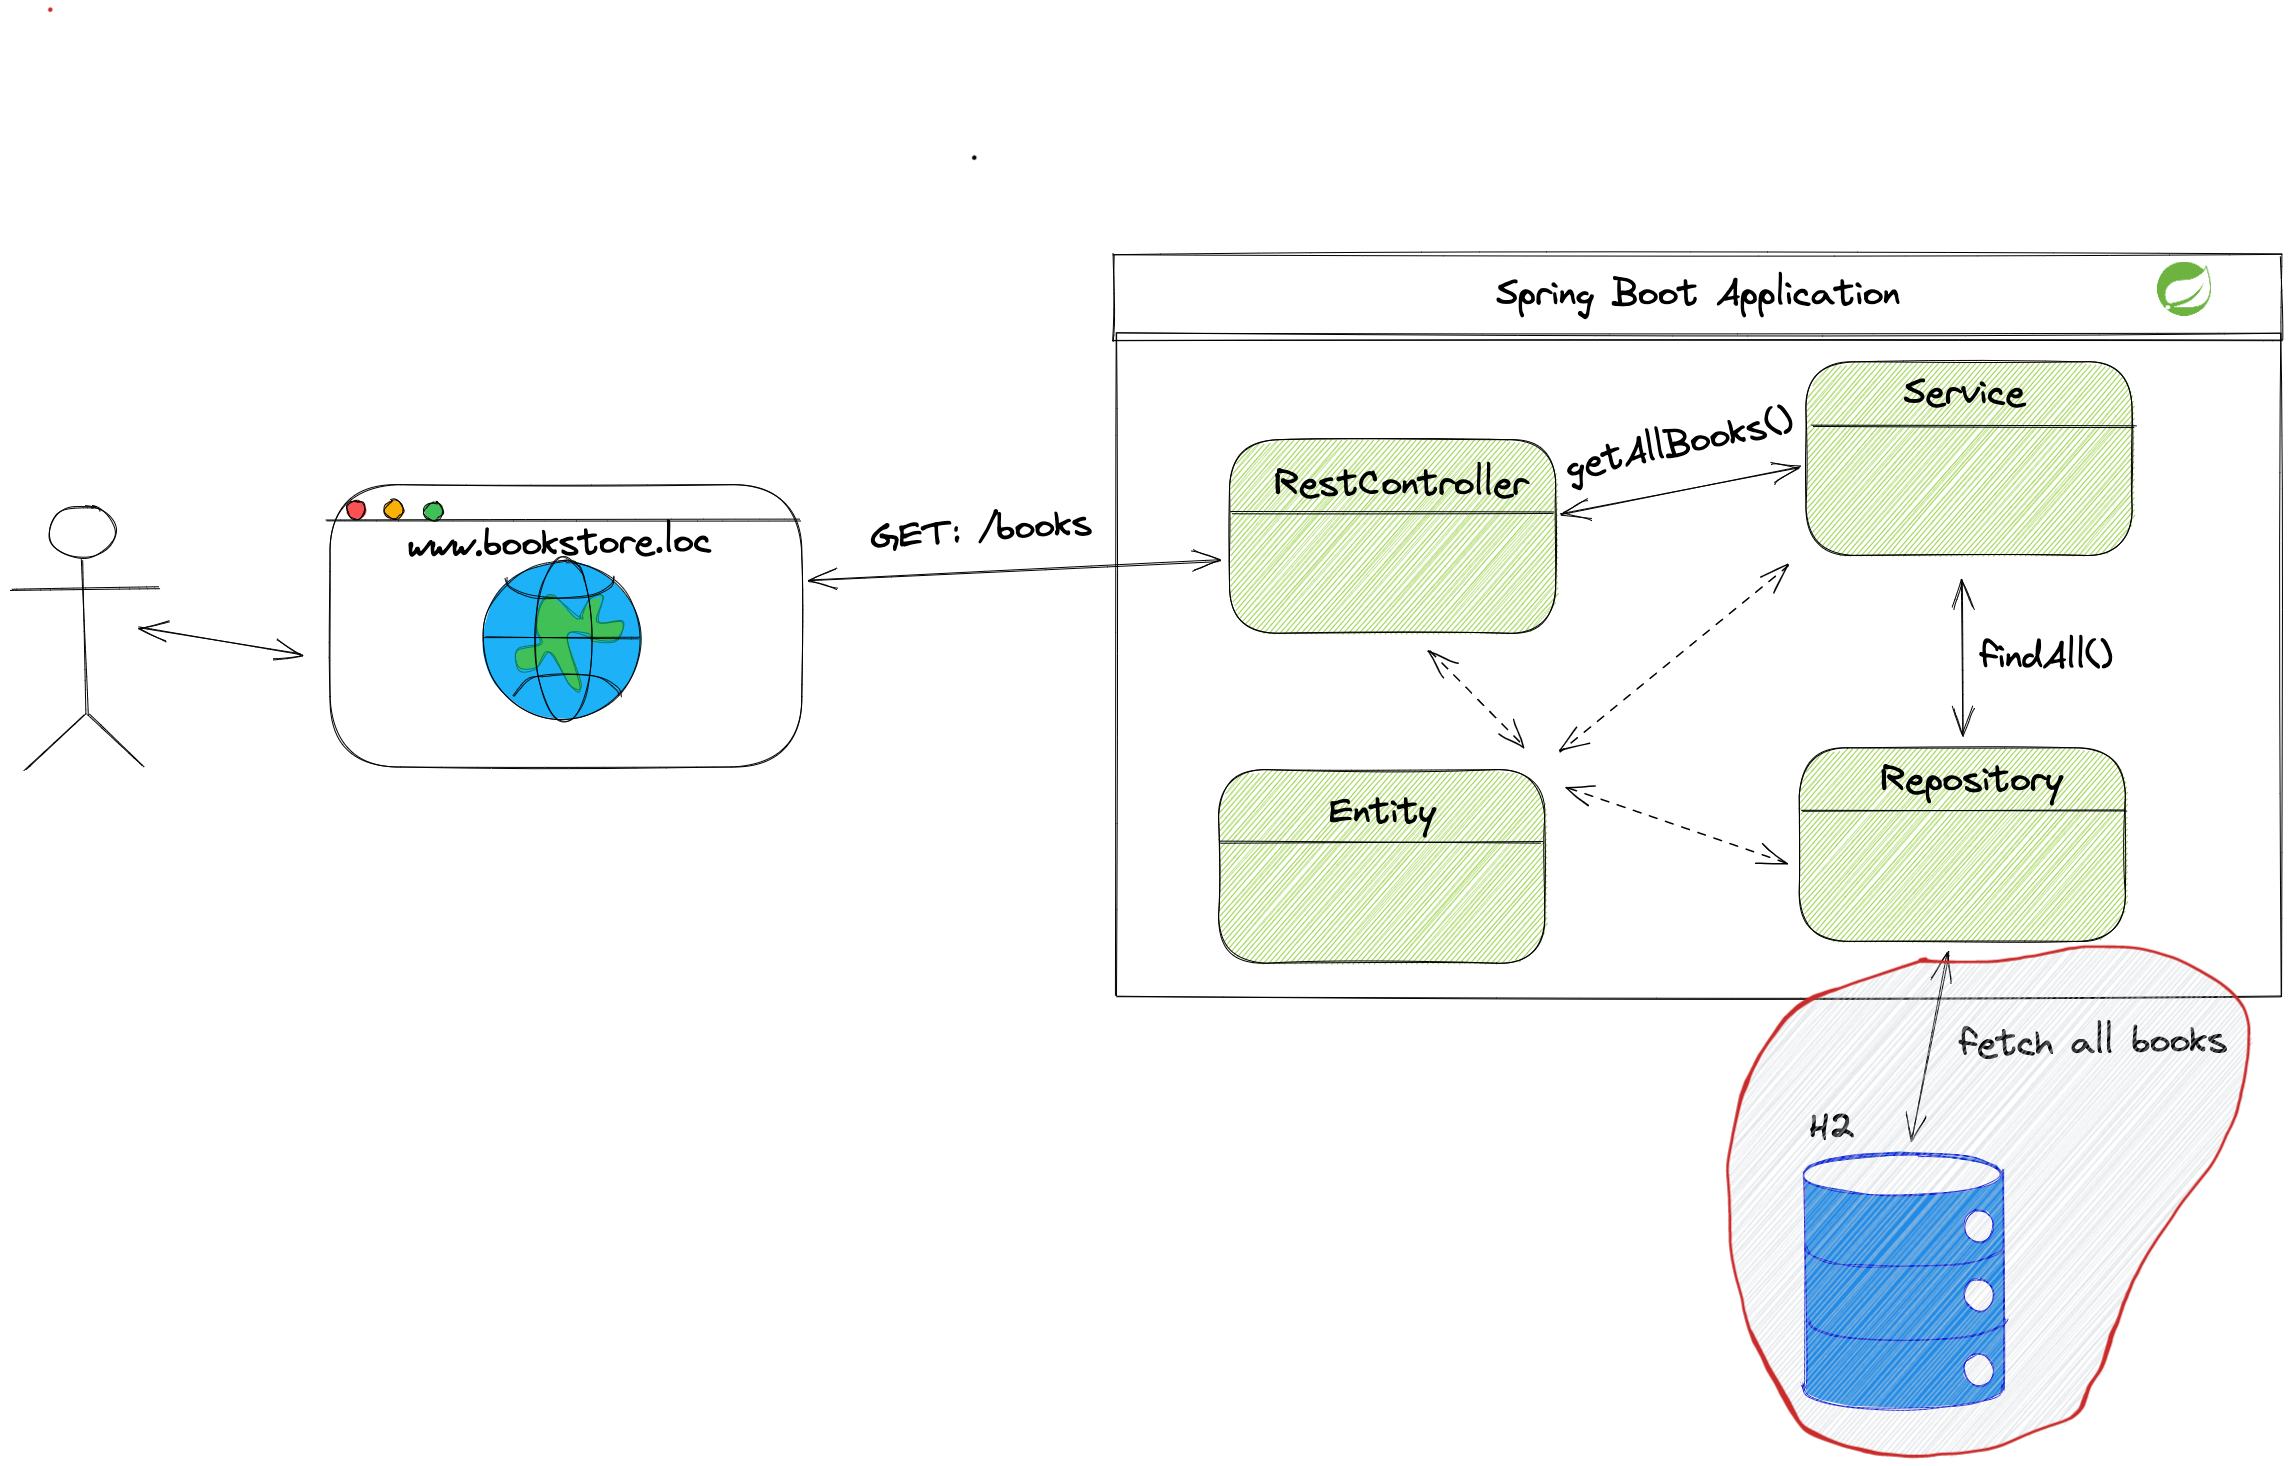
This dependency offers us the ability to define the H2 database shown in the image above. We can define it as an in-memory or file-based database.
In the development environment, when we want to keep the data for easier access and testing different use cases, we want to configure the file-based database. The data will remain permanent at the desired location. We can access the data each time we start the application.
The H2 database
We should use the H2 database only in the prototyping phase. For later development and production, we should use something more stable and production-ready (e.g. Oracle, PostgreSQL, MySQL, etc.)
Project Files
The initialization process creates several files and folders. One of those files is the pom.xml.
The pom.xml defines all dependencies we are using in our project. Each dependency has its pom.xml. The inner pom.xml declares what does it bring into the application.
The dependency is the package that contains a piece of code that our project needs to run successfully.
Let us look into the pom.xml that Spring Boot generated for us:
<?xml version="1.0" encoding="UTF-8"?>
<project xmlns="http://maven.apache.org/POM/4.0.0" xmlns:xsi="http://www.w3.org/2001/XMLSchema-instance"
         xsi:schemaLocation="http://maven.apache.org/POM/4.0.0 https://maven.apache.org/xsd/maven-4.0.0.xsd">
    <modelVersion>4.0.0</modelVersion>
    <parent>
        <groupId>org.springframework.boot</groupId>
        <artifactId>spring-boot-starter-parent</artifactId>
        <version>2.6.2</version>
        <relativePath/> <!-- lookup parent from repository -->
    </parent>
    <groupId>com.reflectoring</groupId>
    <artifactId>beginners-guide</artifactId>
    <version>0.0.1-SNAPSHOT</version>
    <name>beginners-guide</name>
    <description>beginners-guide</description>
    <properties>
        <java.version>11</java.version>
    </properties>
    <dependencies>
        <dependency>
            <groupId>org.springframework.boot</groupId>
            <artifactId>spring-boot-starter-web</artifactId>
        </dependency>
        <dependency>
            <groupId>org.springframework.boot</groupId>
            <artifactId>spring-boot-starter-test</artifactId>
            <scope>test</scope>
        </dependency>
        <dependency>
            <groupId>org.springframework.boot</groupId>
            <artifactId>spring-boot-starter-data-jpa</artifactId>
            <version>2.6.3</version>
        </dependency>
        <dependency>
            <groupId>com.h2database</groupId>
            <artifactId>h2</artifactId>
            <version>2.1.210</version>
        </dependency>
    </dependencies>

    <build>
        <plugins>
            <plugin>
                <groupId>org.springframework.boot</groupId>
                <artifactId>spring-boot-maven-plugin</artifactId>
            </plugin>
        </plugins>
    </build>
</project>
We can see that most of our dependencies have the keyword starter. The starter keyword means that this dependency is built for Spring Boot and comes with pre-made configurations that we can use out of the box.
Before the starter dependency, the user had to provide all dependencies manually. Also, we had to create our configuration for most things.
The new approach helps us to start the development process much faster.
It is important to note that the configurations that come with starter dependencies are not invasive. We can create custom configurations only where we need them.
If you want to know more about Spring Boot starters, have a look at the quick guide to building a Spring Boot starter.
Building the Database Entities
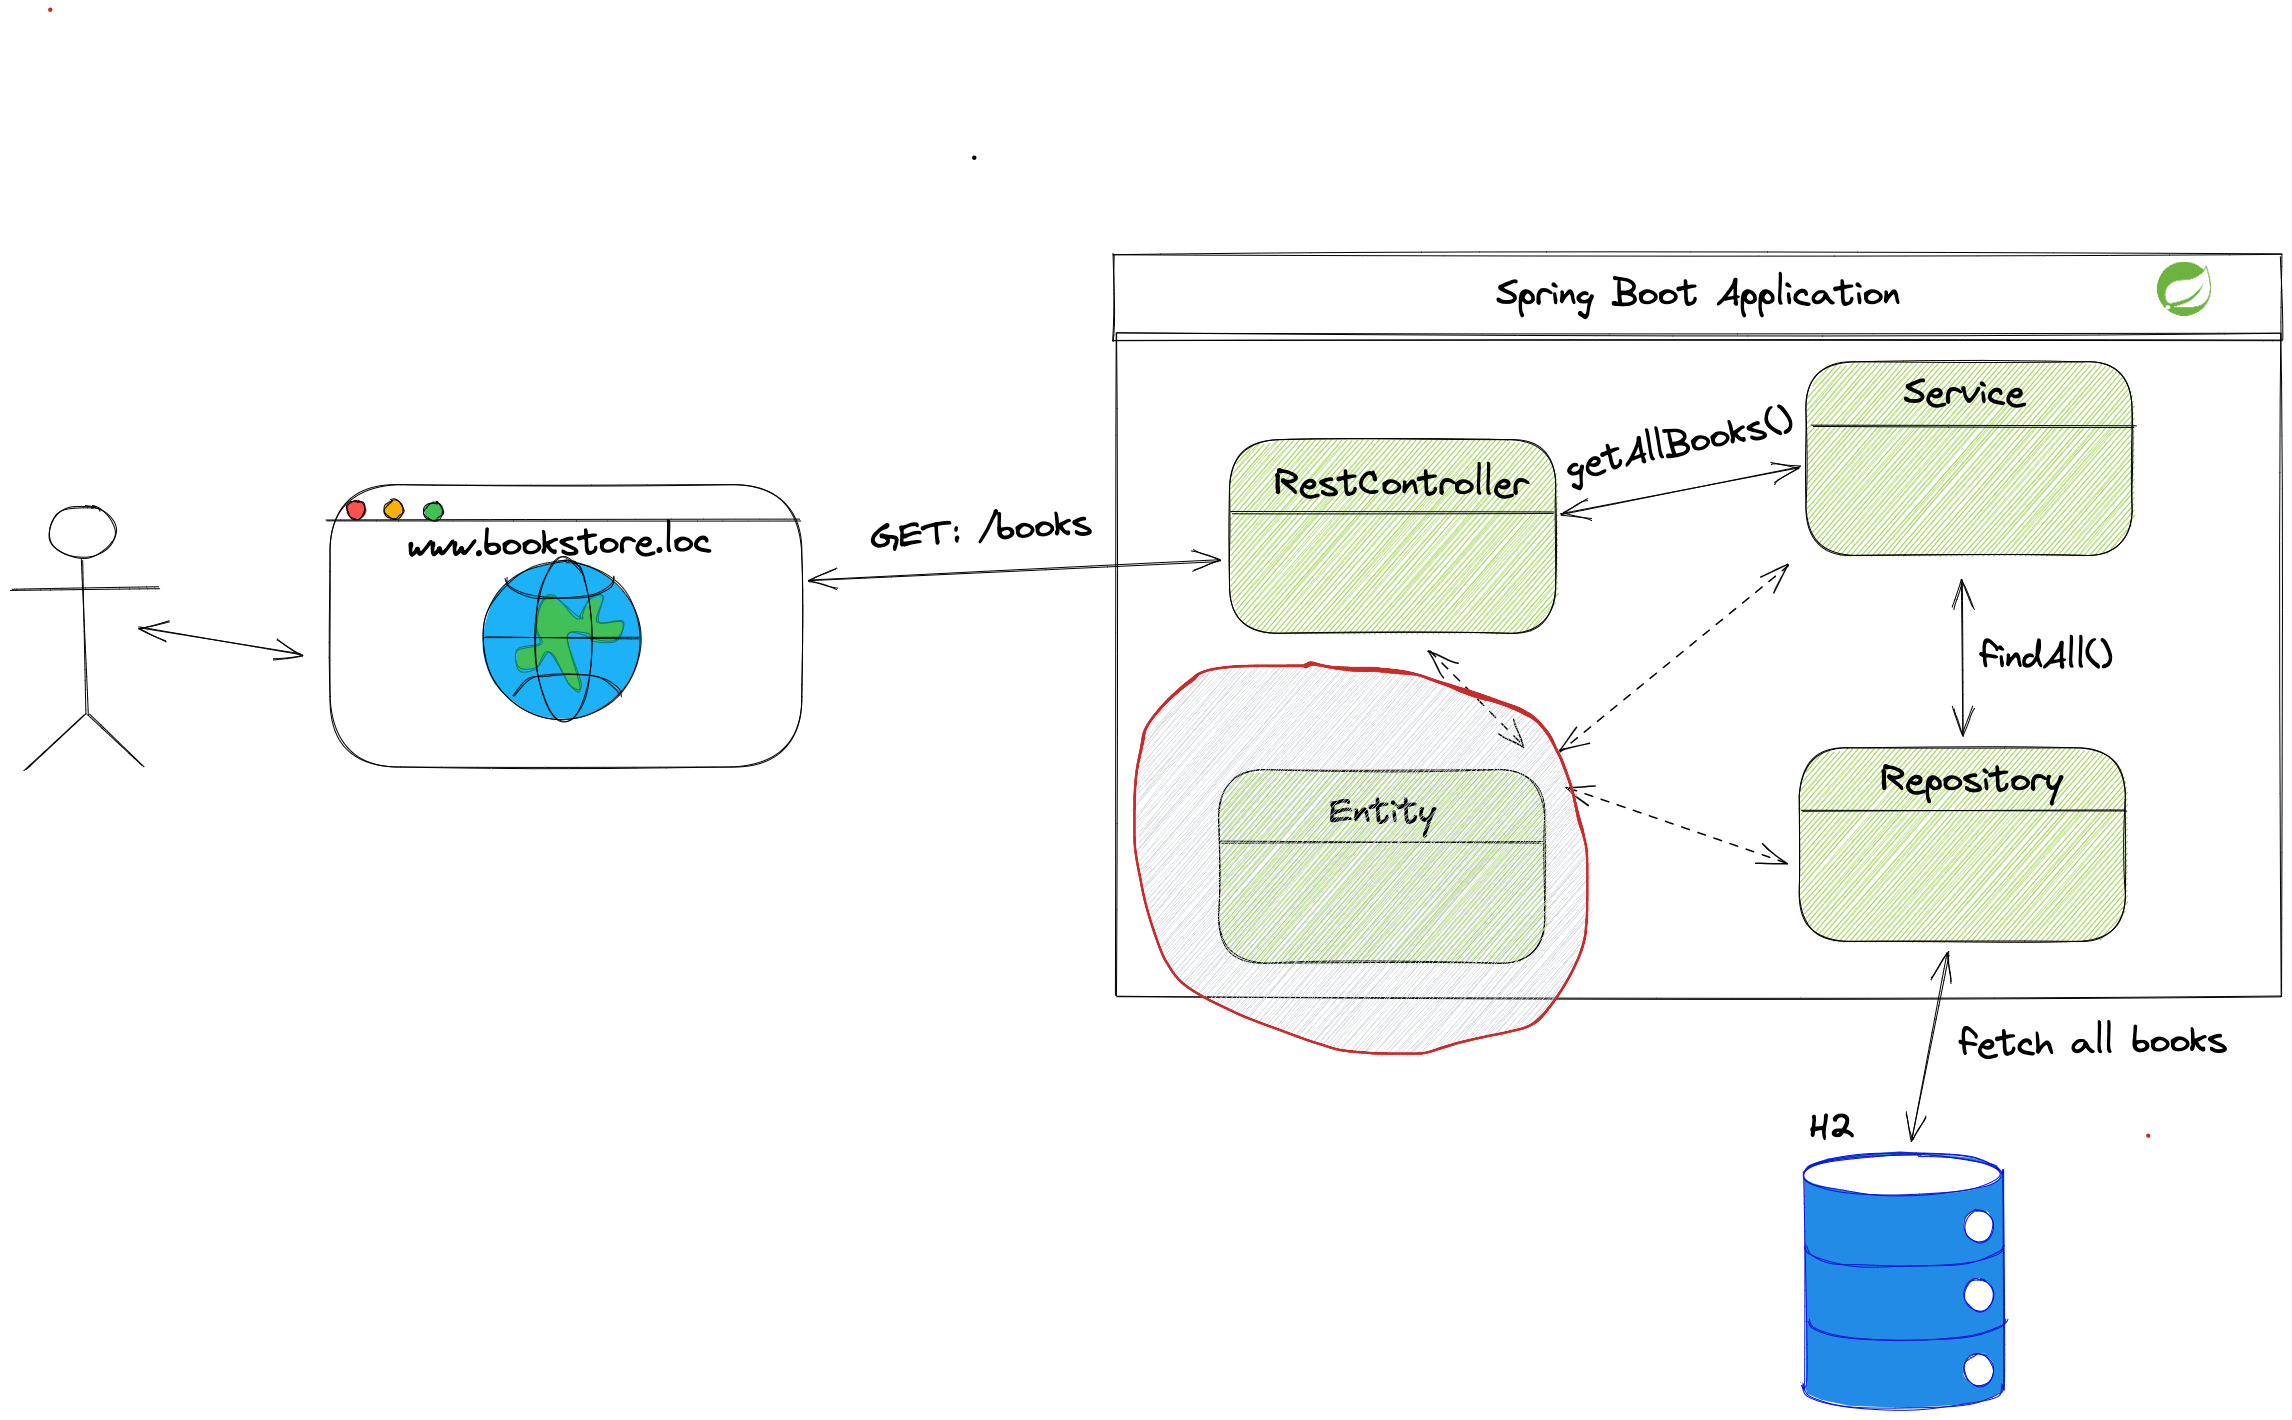
A database entity represents the direct link with a database table. Entity classes represent columns, relationships between different tables, and constraints.
While creating database entities, we have to think about requirements from the beginning of the article:
- The user has to provide their name, last name, email, and password.
- Each book has information about the author, date of publication, number of instances, and users that currently own the book.
- The user can see all books and borrow them.
After sketching which data tables we need, we will create those objects in the Java code.
Defining the Database Entities
Let’s take a look at the database diagram for our application:
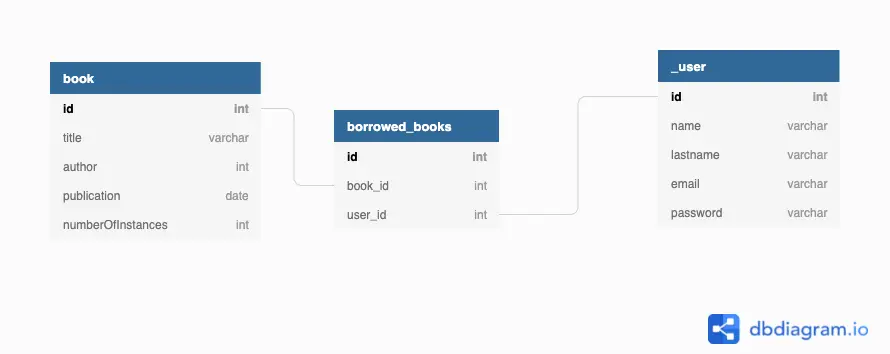
We have three tables in the database:
userbookborrowed_books
The user table contains the columns id, name, lastname, email, and password. The id is our primary key, and the database will autogenerate it. We will see how to do it in the next chapter.
The book table has the columns id, title, author, publication, and numberOfInstances in the bookstore.
The borrowed_books table represents the many-to-many relationship between user and book. The many-to-many relationship means that one user can borrow several books and that one book can be borrowed by several users at the same time (given there are enough copies of the book).
Implementing the Book Entity
After we have defined the database, we can start implementing entity classes. The entity class is the direct connection to the table in the database:
@Entity(name = "book")
public class Book {

    //The rest of the class omitted

}
The @Entity annotation indicates that the annotated class is a JPA entity. The name attribute inside the annotation defines the table name.
Setting the name is not mandatory, but if we do not set it, Spring will assume that the table name is the same as the class name.
Defining a Primary Key
When defining a class as an entity, we need to provide an id column using the @Id annotation. The id column is the primary key of that table.
@Entity(name = "book")
public class Book {

    @Id
    @GeneratedValue(strategy = GenerationType.AUTO)
    private long id;
    //The rest of the class omitted

}
We need to decide how will the id column be generated. Using the @GeneratedValue annotation we can define several different strategies:
We used the AUTO strategy, which leverages whatever the database prefers. Most databases prefer to use the SEQUENCE strategy for their primary key definition.
IDENTITY Generation Strategy
The GenerationType.IDENTITY strategy allows the database to autoincrement the id value when we insert a new row.
Let us look into the example of using the identity generation strategy:
@Entity(name = "book")
public class Book {

    @Id
    @GeneratedValue( strategy = GenerationType.IDENTITY)
    private long id;

    // Rest of the code omitted
}
We define the identity generation type in the strategy attribute of the @GeneratedValue. While the identity strategy is highly efficient for the database, it doesn’t perform well with the Hibernate ORM.
Hibernate expects that every managed entity has its id set, so it needs to go and call the database to insert the id.
The identity strategy is excellent for fast iteration and the early stages. When we move to the development environment, we should move to something more stable and with better performance.
SEQUENCE Generation Strategy
The GenerationType.SEQUENCE strategy uses a database sequence to determine which primary key to select next.
Let us look at how to define the primary key with sequence generators:
@Entity(name = "book")
public class Book {

    @Id
    @GeneratedValue(strategy = GenerationType.SEQUENCE,
            generator = "book_generator")
    @SequenceGenerator(name = "book_generator",
            sequenceName = "book_seq",
            initialValue = 10)
    private long id;
}
To define the sequence generator, we annotate the field with the @SequenceGenerator annotation. We declare the name for Hibernate, the sequence name, and the initial value.
After defining the generator, we need to connect it to the @GeneratedValue annotation by setting its name in the generator attribute.
TABLE Generation Strategy
The GenerationType.TABLE strategy uses a separate table to keep track of which primary key can be next:
@Entity(name = "book")
public class Book {

    @Id
    @GeneratedValue(strategy = GenerationType.TABLE,
            generator = "book_generator")
    @TableGenerator(name = "book_generator", table = "book_id_table")
    private long id;
}
We need to define the @TableGenerator annotation with the name and table attributes.
We provide the generator name to the generator attribute inside the @GeneratedValue annotation.
Defining the Columns
We define each table column with the @Column annotation and the name of the column inside the name attribute:
@Entity(name = "book")
public class Book {

    @Id
    @GeneratedValue(strategy = GenerationType.AUTO)
    private long id;

    @Column(name = "title")
    private String title;

    @Column(name = "author")
    private String author;

    @Column(name = "publication")
    private Date publication;

    @Column(name = "numberOfInstances")
    private int numberOfInstances;

    //The rest of the class omitted

}
If we do not provide the name attribute, Hibernate will assume that the column name is the same as the field name inside the Java class.
It is always better to be safe and set the name attribute so that things do not start crashing when someone accidentally changes a field name.
Defining the Many-to-Many Relationship
We define the many-to-many relationship between Book and User with the @ManyToMany annotation
Each relationship has two sides:
- the owner - the table that has the foreign key
- the target - the table to which one the owner is referring to with foreign key
The Owner of the Relationship
One side of that relationship needs to be the owning side and define the join table.
We decided that it will be the User side:
@Entity(name = "_user")
public class User {
    // Rest of the code omitted

    @ManyToMany
    @JoinTable(
            name = "borrowed_books",
            joinColumns = @JoinColumn(name = "user_id"),
            inverseJoinColumns = @JoinColumn(name = "book_id")
    )
    private List<Book> borrowedBooks;

    // Rest of the code omitted
}
After setting the @ManyToMany annotation, we need to define the table that will connect the user and book tables.
In the @JoinTable annotation, we declare the name, foreign key, and inverse foreign key.
We define the foreign and the inverse foreign key with the @JoinColumn annotation.
The Target Side
@Entity(name = "book")
public class Book {
    // Rest of the code omitted

    @ManyToMany(mappedBy = "borrowedBooks")
    private List<User> users;

    // Rest of the code omitted
}
We defined the target side with the @ManyToMany annotation with mappedBy attribute. We set the mappedBy attribute to the name on the owning side.
Configuring the Database
We said that the entity class represents the direct link to the table in the database. We have to define a configuration for database location, login information, etc.
In Spring Boot applications, the application.properties file (or application.yml, if you prefer YAML over properties) is the place where we set that information.
Even though the Spring Boot framework comes with the configurations for most things, we need to tap in and change them. The excellent thing about provided configurations is that they are non-invasive, and we can change only those things that we need.
In this example, we will see how to configure the database. The H2 database can be an in-memory or persistent file-based database, and let us look at how to set them up.
Defining the Database URL
Let us look how we define the URL for the in-memory database.
spring.datasource.url=jdbc:h2:mem:localdb
spring.jpa.database-platform=org.hibernate.dialect.H2Dialect
spring.datasource.driver-class-name=org.h2.Driver
# Rest of the configuration is omitted
After defining the keywords jdbc and h2 to note that we are using the H2 database, we are defining that we are using the in-memory database with the mem keyword.
The localdb is the database name and can be whatever we want.
The in-memory database is good for fast iterations and prototyping, but we need something more persistent when we go into full development. Let us see how to define the file-based H2 database:
spring.datasource.url=jdbc:h2:file:/Users/mateostjepanovic/Documents/git/code-examples/spring-boot/beginners-guide/src/main/resources/data/demo;AUTO_SERVER=true
spring.jpa.database-platform=org.hibernate.dialect.H2Dialect
spring.datasource.driver-class-name=org.h2.Driver
# Rest of the configuration is omitted
After defining the jdbc and the h2 keywords, we note that we want to use a file-based H2 database with the file keyword. The last part of the URL is the absolute path to the folder where we want to save our database.
The H2 database
Please note that we should use the H2 database only for the development phase. When going to the production environment, move to something more persistent and production-ready like Oracle, PostgreSQL, etc.
Defining the Database Login Credentials
After we defined the URL for the database, we need the login information for that database:
spring.datasource.username=username
spring.datasource.password=password
spring.h2.console.enabled=true

# Rest of the configuration is omitted
We define the username and password for the database.
Don’t Put Passwords in Your Configuration Files!
Please note that it’s fine to put the password in the configuration file only because it’s for an in-memory H2 database that is only used for local testing. In a production environment, the password and username should be externalized via environment variables or similar. Spring Boot supports first-class support for externalizing configuration.
Defining Schema Creation
We can set the configuration to autocreate the schema for us:
spring.jpa.hibernate.ddl-auto=create
spring.jpa.generate-ddl=true

# Rest of the configuration is omitted
Setting hibernate.ddl-auto to create, we tell Hibernate that we want to destroy and recreate the schema on each run. Only use this setting for testing!
Building the Data Access Layer
After creating entities, we can develop the data access layer. The data access layer allows us to use methods to manipulate the data in the database. We will build the data access layer using the repository pattern.
The repository pattern is the design pattern that leverages the usage of interfaces for connection to the database. The repository interface hides all implementation details of connecting to the database, maintaining the connection, transactions, etc.
Let us look at how to create the repository for the entity and explain how we use it.
Creating the Book Repository
public interface BookRepository extends JpaRepository<Book, Long> {
   // Rest of the code is omitted
}
Extending JpaRepository turns our interface into the repository bean that is added to Spring’s ApplicationContext.
Spring’s ApplicationContext contains all the objects that make up our application. Objects in the ApplicationContext are called “beans” in Spring lingo. If an object is in the ApplicationContext, it can be injected into other beans and thus used by them.
The dependency injection is the pattern where objects do not construct dependencies they need but let the controller (in this case, Spring) do it.
When a class is a Spring Bean class, we are sure that we will get the instance where ever it is asked for using the @Autowired annotation, or one of the other ways of injection explained in the next chapter.
Our repository can extend several different interfaces:
CrudRepositoryPagingAndSortingRepositoryJpaRepository
The CrudRepository contains CRUD (Create, Read, Update, Delete) methods. It is the most basic one, and we should use it when we do not need anything besides those four methods.
The PagingAndSortingRepository extends the CrudRepository and adds some more functionality. Besides CRUD methods, we can fetch results in pages from the database and sort them with simple interface methods.
The JpaRepository extends the PagingAndSortingRepository. Except for methods from the PagingAndSortingRepository and the CrudRepository, we can flush and delete database records in batches.
Besides queries from the repository interface, we can create custom queries. We can do it in several ways:
Native SQL Queries
public interface BookRepository extends JpaRepository<Book, Long> {

    @Query(nativeQuery = true, value = "SELECT * FROM Book " +
            "book WHERE book.currentlyAvailableNumber > 5 ")
    List<Book> findWithMoreInstancesThenFive();

    // Rest of the code is omitted
}
We create the query by annotating the method with the @Query annotation. If we set the nativeQuery attribute to true, we can leverage the syntax from the underlying database.
Using Native Queries
Native queries are bound to a chosen database. If we use native queries, we lose one of the main advantages of using JPA, which abstracts away the database specifics. If you end up using a lot of native queries, you might be better off using a simpler abstraction like Spring Data JDBC.
JPQL Queries
If we don’t want to be bound to the syntax of the underlying database (maybe because we want to support multiple databases), we can use JPQL (Java Persistence Query Language) syntax:
public interface BookRepository extends JpaRepository<Book, Long> {

    @Query( value = "SELECT b FROM book b where b.numberOfInstances > 5")
    List<Book> findWithMoreInstancesThenFiveJPQL();

    // Rest of the code is omitted
}
We define the query with the @Query annotation, and the nativeQuery is, by default, set to false.
The JPQL syntax allows us to change the underlying database while the query stays the same.
Named Method Queries
Spring framework provides one more feature regarding queries. We can build queries by using a special naming convention for our repository methods:
public interface BookRepository extends JpaRepository<Book, Long> {

    List<Book> findAllByNumberOfInstancesGreaterThan(long limit);

    // Rest of the code is omitted
}
Using the attribute names and special keywords, we can create queries. Spring JPA will generate the proper queries according to our definition.
Building the Business Layer
The business layer is the core part of the application.
The business layer is where we should write the business logic. It should contain the code for the requirement that one user can borrow a maximum of three books. Each service class contains the business logic for part of the application.
We split our business layer in two ways. The first one is that each entity has its service class (e.g., BookService, UserService ). After we split the layer by entities, we split them by use case.
The end product of splitting is that we have the GetBookService.java class. By reading the name of the class, we can conclude that the code for fetching books will be inside this class.
Defining the Service Class
One of the requirements is that the user can borrow three books maximum at one point in time. This check should be done in the business layer.
Let us look at how in the implementation class:
@Service
public class UpdateBookService {
    private final GetUserService getUserService;
    private final BookRepository bookRepository;

    public UpdateBookService(
            GetUserService getUserService,
            BookRepository bookRepository) {
        this.getUserService = getUserService;
        this.bookRepository = bookRepository;
    }

    public void borrow(long bookId, long userId){
        User user = getUserService.getById(userId);
        if(user.getBorrowedBooks().stream()
                .anyMatch(book -> book.getId()== bookId)){
            throw new IllegalStateException("User already borrowed " +
                    "the book");
        }
        if(user.getBorrowedBooks().size() >= 3){
            throw new IllegalStateException("User already has " +
                    "maximum number of books borrowed!");
        }
        Book book =
                bookRepository.findById(bookId)
                            .orElseThrow(() -> new EntityNotFoundException());

        if(book.getNumberOfInstances()-1 < 0){
            throw new IllegalStateException("There are no available" +
                    " books!");
        }
        book.getUsers().add(user);
        book.numberOfInstances(book.getNumberOfInstances()+1);
        bookRepository.save(book);
    }
    // Rest of the code is omitted
}
The @Service annotation transforms our class into Spring Bean controlled by ApplicationContext.
The primary task of ApplicationContext is to control the lifecycles of each Spring Bean and provide them when they are needed.
After fetching the user that wants to borrow the book, we check if the user borrowed the book already. If that check passes, we can check our requirement of a maximum of three books at one point in time. Before allowing the user to borrow the book, we need to make sure that there is an instance of the book available.
Injecting the Repository Class
We use the dependency injection to obtain required classes into the GetBookService.class. For now, we only need the BookRepository.class.
Dependency injection is explained in the previous chapter.
We can inject the GetBookRepository.class using three methods:
You can read a bit more about different types of dependency injection in this article.
Field-based Injection
Let us look at how to use the field-based injection:
@Service
public class GetBookService {
    @Autowired
    private final BookRepository bookRepository;

    // Rest of the code is omitted
}
Spring recognizes the @Autowired annotation and makes sure that the BookRepository is provided.
Setter-based Injection
@Service
public class GetBookService {

    private BookRepository bookRepository;

    @Autowired
    private void setBookRepository(BookRepository bookRepository){
        this.bookRepository = bookRepository;
    }

    // Rest of the code is omitted
}
We can put the @Autowired annotation on the setter method. The setter-based injection does not allow us to mark the variable as final.
Constructor-based Injection
@Service
public class GetBookService {

    private final BookRepository bookRepository;

    @Autowired
    public GetBookService(BookRepository bookRepository) {
        this.bookRepository = bookRepository;
    }

    // Rest of the code is omitted
}
For the constructor-based annotation, we should set the @Autowired annotation on the constructor.
Learn about why you should usually choose constructor injection over the other types in this article.
Building a Web Controller
After creating entities, repositories, and services let us create our first controller that is solving the requirement that the application should be accessible through the browser.
The imported spring-boot-starter-web contains everything that we need for the controller. We have Spring MVC autoconfigured and the local server ready to use.
With Spring MVC, we can define a controller with the @Controller or @RestController annotation so it can handle incoming requests.
Creating an Endpoint With @RestController
We are going to create our first endpoint. We want to fetch all books that the bookstore owns. This is the endpoint that will be called from the homepage.
Let us look into the codebase:
@RestController
@RequestMapping("/books")
public class BooksRestController {

    private final GetBookService getBookService;

    @Autowired
    public BooksRestController(GetBookService getBookService) {
        this.getBookService = getBookService;
    }

    @GetMapping
    List<BookResponse> fetchAllBooks(){
        return getBookService.getAllBooks();
    }

    // Rest of the code
}
To make our class the controller bean we need to annotate it with @RestController or with @Controller.
The difference between these two is that @RestController automatically wraps the return object from the methods annotated with @GetMapping, @PostMapping, etc. into ResponseEntity<>.
We went with @RestController because it gives cleaner and more readable code.
The @RequestMapping("/books") annotation maps our bean to this path.
If we start the application locally we can access the endpoint on the http://localhost:8080/books.
We annotated the fetchAllBooks() method with the @GetMapping annotation to define that this is the GET method.
Since we didn’t define an additional path on the @GetMapping annotation we are using the path from the @RequestMapping definitions.
Creating an Endpoint With the @Controller Annotation
Instead with @RestController we can define the controller bean with the @Controller annotation:
@Controller
@RequestMapping("/controllerBooks")
public class BooksController {

    private final GetBookService getBookService;

    @Autowired
    public BooksController(GetBookService getBookService) {
        this.getBookService = getBookService;
    }

    @GetMapping
    ResponseEntity<List<BookResponse>> fetchAllBooks(){
        return ResponseEntity.ok(getBookService.getAllBooks());
    }
    // Rest of the code omitted

}
When using the @Controller annotation we need to make sure that we wrap the result in the ResponseEntity<> class.
This approach gives us more freedom when returning objects than @RestController.
Let us imagine we are rewriting some legacy backend code of the Spring Boot project.
One of requirements was that the current frontend will continue working throughout our refactoring.
Previous code always returned the 200 code but the body would differ if some error occurred.
In a scenario like this we can use the @Controller annotation and control the body and status code that is returned to the user.
Creating a POST Endpoint
The POST method is used when we want to create a new resource in the database.
With this POST method, we will cover the requirement “The admin user can add new book into the bookstore”.
Now, let us take a look how we can create new data:
@RestController
@RequestMapping("/admin/books")
public class AdminBooksRestController {

    private final CreateBookService createBookService;

    @Autowired
    public AdminBooksRestController(CreateBookService createBookService) {
        this.createBookService = createBookService;
    }

    @PostMapping
    BookResponse create(@RequestBody BookRequest request){
        return createBookService.createBook(request);
    }

    // Rest of the code omitted

}
@PostMapping defines that this is the POST method and that we want to create a new resource through it.
The @RequestBody annotation defines that we are expecting the data inside the HTTP requests body. That date should be serializable to the BookRequest instance.
Creating a PUT Endpoint
The PUT method is used when we want to update the resource that is already in the database. With this endpoint we are allowing the admin user to update information about a book:
@RestController
@RequestMapping("/admin/books")
public class AdminBooksRestController {

    private final CreateBookService createBookService;

    private final UpdateBookService updateBookService;

    private final DeleteBookService deleteBookService;

    @Autowired
    public AdminBooksRestController(CreateBookService createBookService,
                                    UpdateBookService updateBookService,
                                    DeleteBookService deleteBookService) {
        this.createBookService = createBookService;
        this.updateBookService = updateBookService;
        this.deleteBookService = deleteBookService;
    }


    @PutMapping("/{id}")
    BookResponse update(@PathVariable("id") long id,
                        @RequestBody BookRequest request){
        return updateBookService.updateBook(id,request);
    }

    // Rest of the code omitted
}
In the @PutMapping annotation, we define the path that continues on the one defined with @RequestMapping at the top of the class.
The path looks like this:
http://localhost:8080/admin/books/{id}.
The id variable is called the path variable and we can pass it into the method using the @PathVariable("id") annotation on the method argument.
We need to be careful that the value inside @PathVariable matches the value inside @PutMapping.
The body of the method is defined with the @RequestBody annotation and we pass it as the json object inside the HTTP request.
Creating a DELETE Endpoint
With the DELETE endpoint we are meeting the requirement that admin users can delete a book from the bookstore:
@RestController
@RequestMapping("/admin/books")
public class AdminBooksRestController {


    private final CreateBookService createBookService;

    private final UpdateBookService updateBookService;

    private final DeleteBookService deleteBookService;

    @Autowired
    public AdminBooksRestController(CreateBookService createBookService,
                               UpdateBookService updateBookService,
                               DeleteBookService deleteBookService) {
        this.createBookService = createBookService;
        this.updateBookService = updateBookService;
        this.deleteBookService = deleteBookService;
    }

    @DeleteMapping("/{id}")
    void delete(@PathVariable("id") long id){
        deleteBookService.delete(id);
    }

    // Rest of the code omitted

}
With @DeleteMapping("/{id}") we define which resource we want to delete.
We can see that the path is the same as in the PUT endpoint but the HTTP method is different.
The paths have to be unique for the same HTTP method.
Calling an Endpoint
After we build our endpoints we want to test them and see what do we get as the result. Since we don’t have any frontend we can use command-line tools or a graphical tool like Postman. With the cURL command-line tool, we can do the following, for example:
curl --location --request GET 'http://localhost:8080/books'
We will get a result like the following:
[
    {
        "title": "The Sandman Vol. 1: Preludes & Nocturnes",
        "author": "Neil Gaiman",
        "publishedOn": "19/10/2010",
        "currentlyAvailableNumber": 4
    },
    {
        "title": "The Lord Of The Rings Illustrated Edition",
        "author": "J.R.R. Tolkien",
        "publishedOn": "16/11/2021",
        "currentlyAvailableNumber": 1
    }
]
Conclusion
After deciding which dependencies we needed and generating the project, we looked at how to create a functional application that can store and retrieve data from a database via a REST API.
We learned how to build the basic Spring Boot application, and went through several concepts:
Spring Boot provides all the scaffolding for us, and we can focus on building the business logic of our application.
You can browse the source code of the Spring Boot application on GitHub.