AWS Step Functions is a serverless orchestration service by which we can combine AWS Lambda functions and other AWS services to build complex business applications.
We can author the orchestration logic in a declarative style using a JSON-based format called the Amazon States Language(ASL). AWS Step functions also provides a Workflow Studio where we can define and run our workflows.
In this article, we will introduce the concepts of AWS Step Functions and understand its working with the help of an example.
Step Functions: Basic Concepts
Let us first understand some basic concepts of Step Functions.
State Machine, State, and Transitions
A state machine is a mathematical model of computation consisting of different states connected with transitions. AWS Step functions also implement a state machine to represent the orchestration logic. Each step of the orchestration is represented by a state in the state machine and connected to one or more states through transitions.
They are represented by a diagram to visualize the current state of a system as shown here:
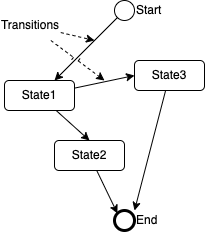
State machines contain at least one state. Transitions represent different events that allow the system to transition from one state to another state. They also have a start position from where the execution can start and one or more end positions where the execution can end.
Amazon State Language (ASL)
We define a state machine in JSON format in a structure known as the Amazon States Language (ASL). The state is the fundamental element in ASL. The fields of a state object vary depending on the type of the state but the fields: Type, Next, InputPath, and OutputPath are common in states of any type. A state object in ASL looks like this:
{
  "Type": "Task",
  "Next": "My next state",
  "InputPath": "$",
  "OutputPath": "$",
  "Comment": "My State"
}
In this state object, we have specified the type of state as Task and provided the name of the next state to execute as My next state. The fields: InputPath and OutputPath are filters for input and output data of the state which we will understand in a separate section.
The ASL contains a collection of state objects. It has the following mandatory fields:
States: This field contains a set ofstateobjects. Each element of the set is a key-value pair with the name of the state askeyand an associatedstateobject as the value.StartAt: This field contains the name of one of the state objects in theStatescollection from where the state machine will start execution.
Amazon States Language (ASL) also has optional fields:
Comment: Description of state machineTimeoutSeconds: The maximum number of seconds an execution of the state machine can run beyond which the execution fails with an error.Version: Version of the Amazon States Language used to define the state machine which is1.0by default.
An example of a state machine defined in ASL is shown below:
{
  "Comment": "Example State Machine",
  "StartAt": "state1",
  "States": {
    "state1": {...},
    "state2": {...},
    "state3": {...}
  }
}
This structure has the States field containing a collection of 3 state objects of names: state1, state2, and state3. The value of the field: StartAt is state1 which means that the state machine starts execution from the state named state1.
Types of State
States receive input, perform actions to produce some output, and pass the output to other states. States are of different types which determine the nature of the functions a state can perform. Some of the commonly used types are:
- Task: A state of type
taskrepresents a single unit of work performed by a state machine. All the work in a state machine is performed by tasks. The work is performed by using an activity or an AWS Lambda function, or by passing parameters to the API actions of other services. - Parallel: State of type
parallelis used to trigger multiple branches of execution. - Map: We can dynamically iterate steps with a state of type
map. - Choice: We use this type of state as decision points within a state machine to choose among multiple branches of execution.
- Fail or Succeed: We can stop the execution with a failure or success.
We also have mechanisms for transforming the inputs and the outputs with JSONpath expressions. The state machine executes one state after another till it has no more states to execute. We will understand these concepts further by implementing a sample checkout process of an e-commerce application with a state machine.
Types of State Machine: Standard vs Express
We can create two types of state machine. State machine executions differ based on the type. The type of state machine cannot be changed after the state machine is created.
- Standard: State machine of type:
Standardshould be used for long-running, durable, and auditable processes. - Express: State machine of type:
Expressis used for high-volume, event-processing workloads such as IoT data ingestion, streaming data processing and transformation, and mobile application backends. They can run for up to five minutes.
Introducing The Example: Checkout Process
Let us take an example of a checkout process in an application. This checkout process will typically consist of the following steps:
| Function | Input | Output | Description |
|---|---|---|---|
fetch customer |
customer ID | Customer Data: email, mobile | Fetching Customer information |
fetch price |
cart items | Price of each item | Fetching Price of each item in the cart |
process payment |
payment type, cart items | Price of each item | Fetching Price of cart items |
create order |
customer ID, cart items with price | success/failure |
Create order if payment is successful |
When we design the order in which to execute these steps, we need to consider which steps can execute in parallel and which ones are in sequence.
We can execute the steps for fetch customer and fetch price in parallel. Once these two steps are complete, we will execute the step for process payment. If the payment fails, we will end the checkout process with an error. If the payment succeeds, we will create an order for the customer. The step for process payment can be retried a specific number of times on failures.
We will use AWS Step Function to represent this orchestration in the next sections.
Creating the Lambda Functions for Invoking from the State Machine
Let us define skeletal Lambda functions for each of the steps of the checkout process. Our Lambda function to fetch the customer data looks like the following:
exports.handler = async (event, context, callback) => {
    console,log(`input: ${event.customer_id}`)
    // TODO fetch from database
    callback(null,
                {
                    customer_id: event.customer_id,
                    customer_name: "John Doe",
                    payment_pref: "Credit Card",
                    email: "john.doe@yahoo.com",
                    mobile: "677896678"
                }
            )
};
This lambda takes customer_id as input and returns a customer record corresponding to the customer_id. Since the lambda function is not the focus of this post, we are returning a hardcoded value of customer data instead of fetching it from the database.
Similarly, our Lambda function for fetching price looks like this:
exports.handler = async (event, context, callback) => {
    const item_no = event.item_no
    console.log(`item::: ${item_no}`)

   // TODO fetch price from database
    const price = {item_no: item_no, price: "123.45", lastUpdated: "2022-06-12"}
    callback(null, price)
}
This Lambda takes item_no as input and returns a pricing record corresponding to the item_no.
We will use similar Lambda functions for the other steps of the checkout process. All of them will have skeletal code similar to the fetch customer and fetch price.
Defining the Checkout Process with a State Machine
After defining the Lambda functions and getting an understanding of the basic concepts of the Step Function service, let us now define our checkout Process.
Let us create the state machine from the AWS management console. We can either choose to use the Workflow Studio which provides a visual workflow editor or the Amazon States Language (ASL) for defining our state machine.
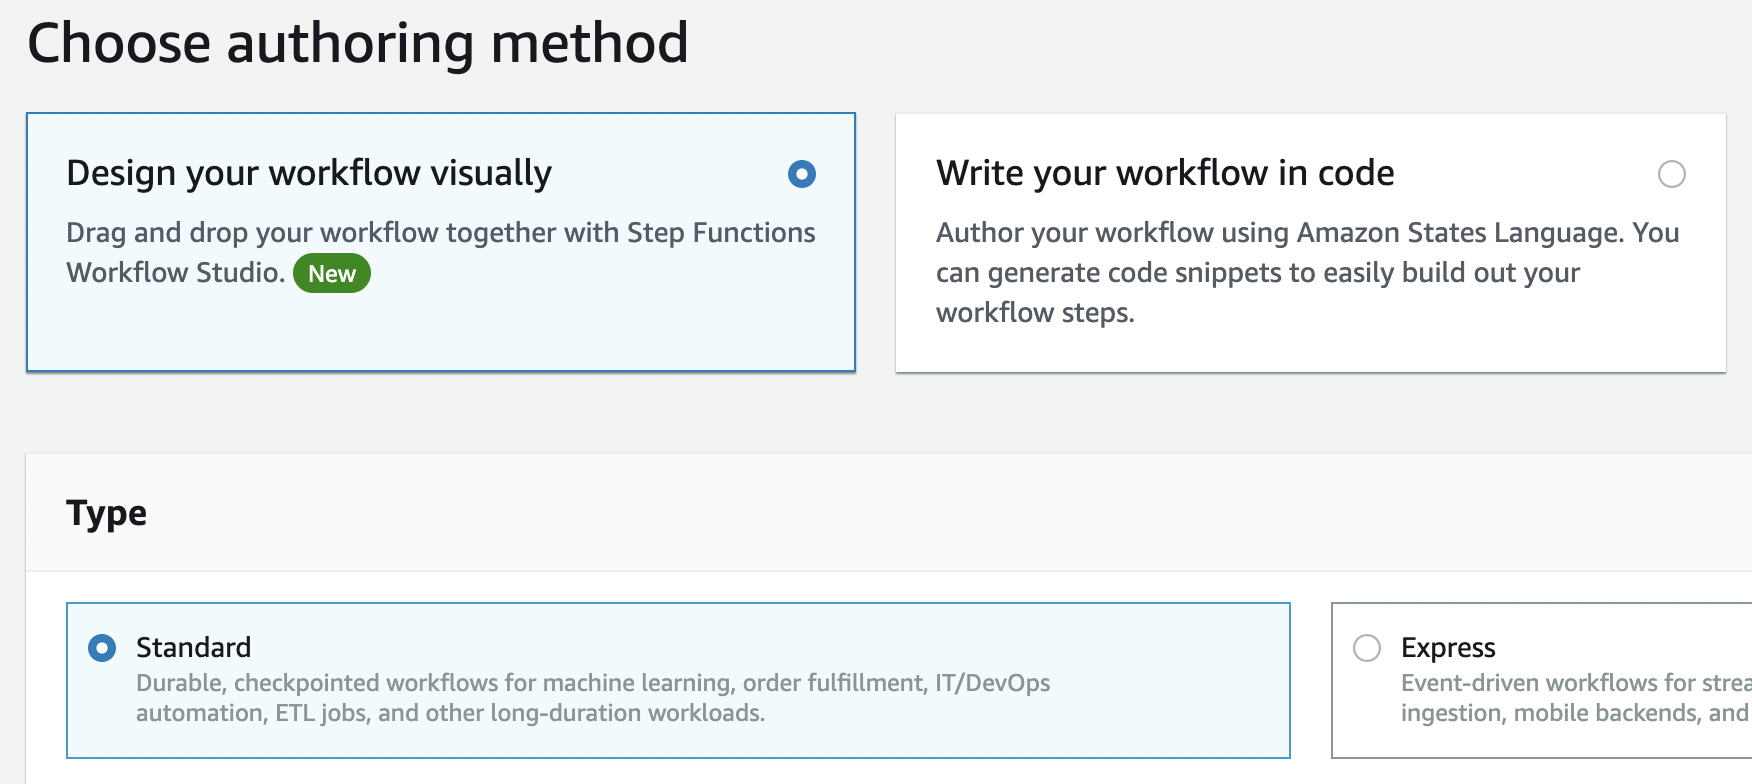
Here we have selected Workflow Studio to author our state machine. We have also selected the type of state machine as standard in the first step.
Let us also give a name: checkout to our state machine and assign an IAM role that defines which resources our state machine has permission to access during execution. Our IAM policy definition is associated with the following policy:
{
    "Version": "2012-10-17",
    "Statement": [
        {
            "Effect": "Allow",
            "Action": [
                "lambda:InvokeFunction"
            ],
            "Resource": [
                "*"
            ]
        }
    ]
}
This policy will allow the state machine to invoke any Lambda function.
We will next add the steps of the checkout process in the state machine.
Adding the States in the State Machine
Each step of the checkout process will be a state in the state machine.
Let us add the steps of the checkout process as different states in the state machine. We will define these states as of type task and will call the API: Lambda: Invoke .
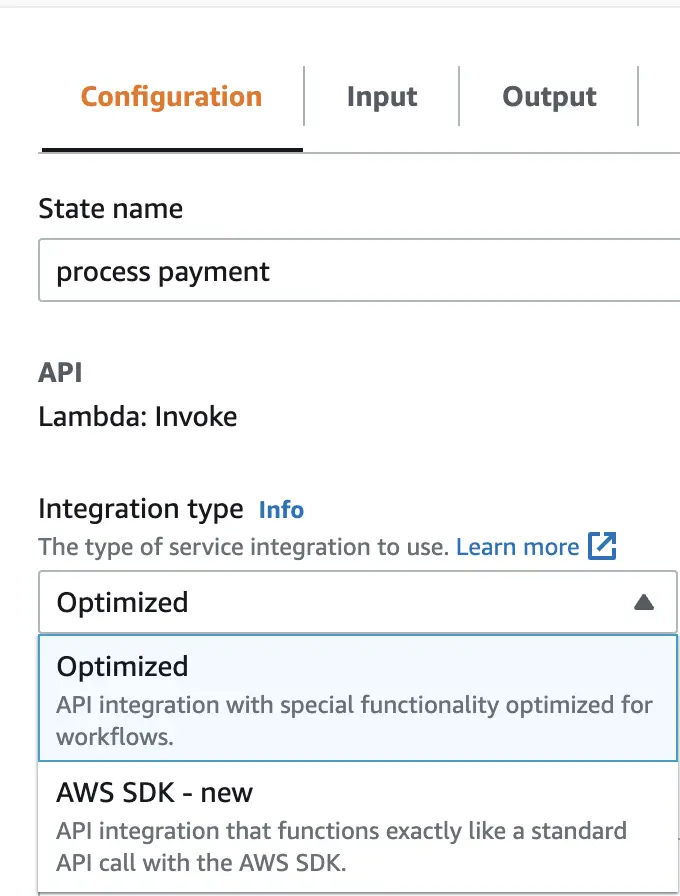
The configuration of the state for the fetch customer step looks like this in the visual editor:
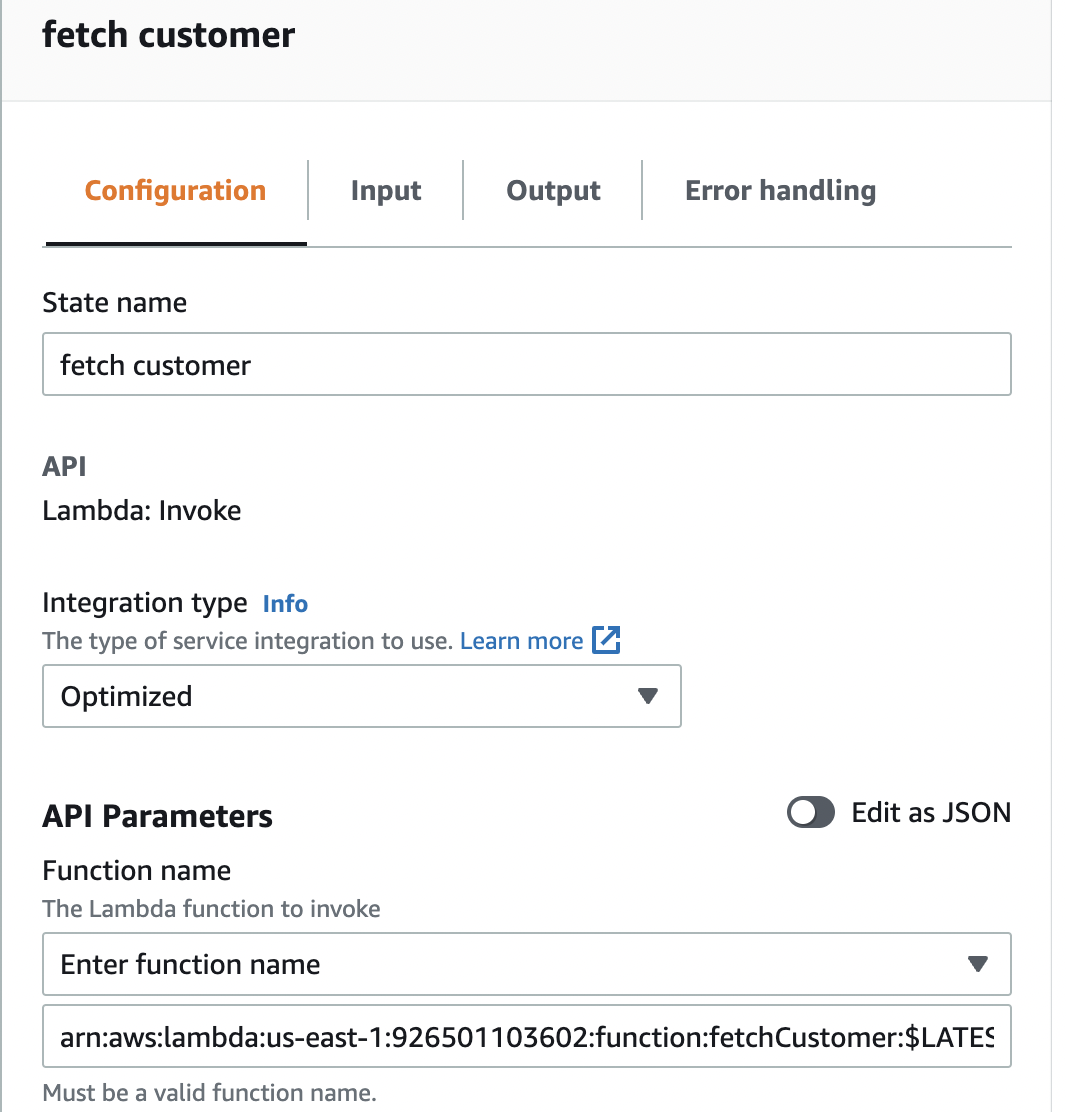
As we can see we have specified the name of the state as fetch customer, defined the API as Lambda:invoke, and selected the integration type as Optimized. We have provided the ARN of the Lambda function as the API parameter. The corresponding definition of the state in Amazon States Language (ASL) looks like this:
{
  "Comment": "state machine for checkout process",
  "StartAt": "fetch customer",
  "States": {
    "fetch customer": {
      "Type": "Task",
      "Resource": "arn:aws:states:::lambda:invoke",
      "OutputPath": "$.Payload",
      "Parameters": {
        "Payload.$": "$",
        "FunctionName": "arn:aws:lambda:us-east-1:926501103602:function:fetchCustomer:$LATEST"
      },
      "End": true
    }
  }
}
We will add the other steps with similar configurations for invoking the corresponding Lambda functions.
The first two steps: fetch customer and fetch price are not dependent on each other. So we can call them in parallel.
Our state machine after adding these two steps looks like this in the visual editor:
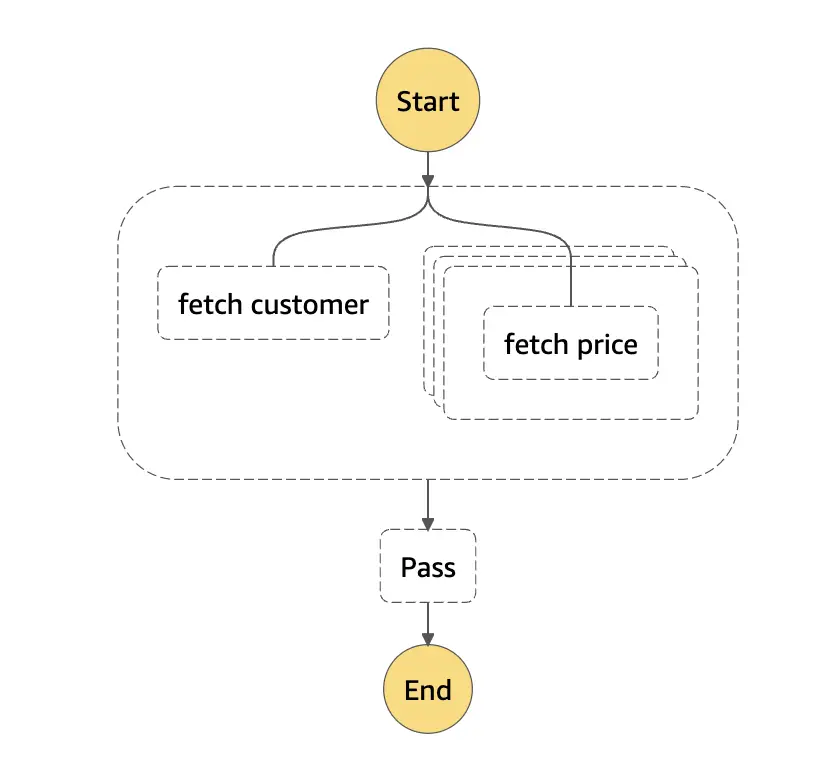
As we can see in this visual, our state machine consists of 2 states: fetch customer and fetch price. We have defined these steps as 2 branches of a state of type parallel which allows the state machine to execute them in parallel.
The corresponding definition of the state machine built so far in Amazon States Language (ASL) looks like this:
{
  "Comment": "state machine for checkout process",
  "StartAt": "Parallel",
  "States": {
    "Parallel": {
      "Type": "Parallel",
      "Branches": [
        {
          "StartAt": "fetch customer",
          "States": {
            "fetch customer": {
              "Type": "Task",
              "Resource": "arn:aws:states:::lambda:invoke",
              "OutputPath": "$.Payload",
              "Parameters": {
                "Payload.$": "$",
                "FunctionName": "arn:aws:lambda:us-east-1:926501103602:function:fetchCustomer:$LATEST"
              },
              "End": true
            }
          }
        },
        {
          "StartAt": "Map",
          "States": {
            "Map": {
              "Type": "Map",
              "Iterator": {
                "StartAt": "fetch price",
                "States": {
                  "fetch price": {
                    "Type": "Task",
                    "Resource": "arn:aws:states:::lambda:invoke",
                    "OutputPath": "$.Payload",
                    "Parameters": {
                      "Payload.$": "$"
                    },
                    "End": true
                  }
                }
              },
              "End": true
            }
          }
        }
      ],
      "Next": "Pass"
    },
    "Pass": {
      "Type": "Pass",
      "End": true
    }
  }
}
We have put the fetch price state as a child state of a map state. The map state allows the state machine to iterate over each item in the cart to fetch their price by executing the task state: fetch price.
We have next added a state of type: pass after the parallel step. The pass type state acts as a placeholder where we will manipulate the output from the parallel state.
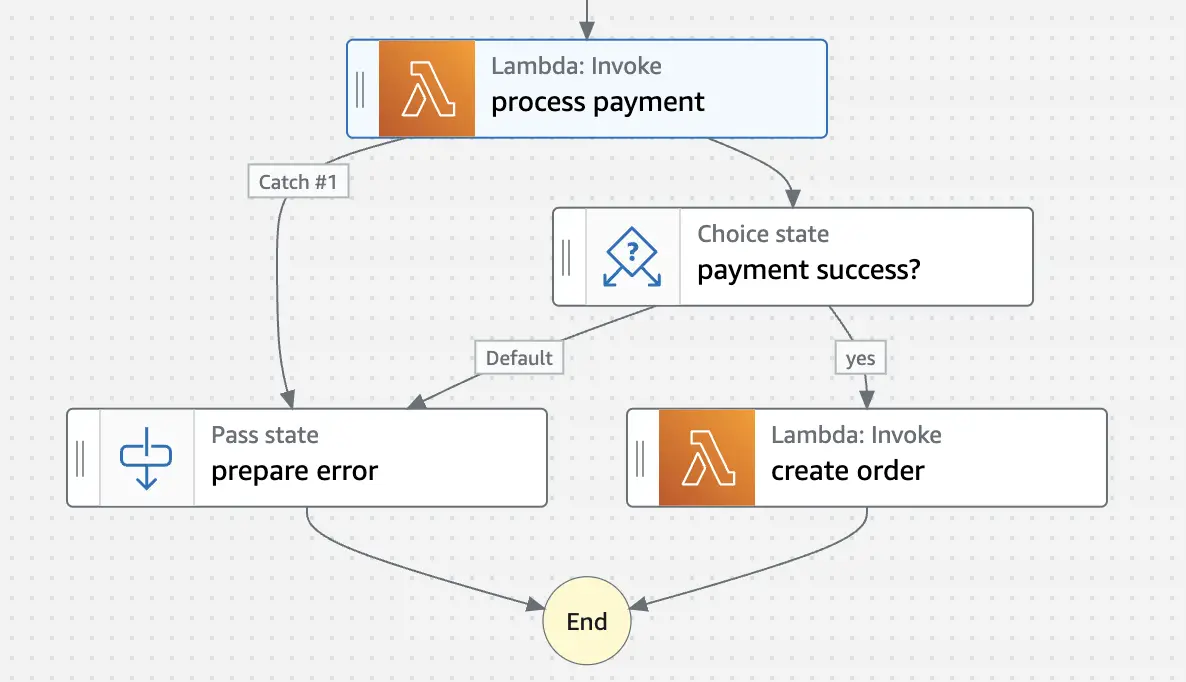
Let us add two more steps for processing payment and placing an order if the payment succeeds. Here is our state machine in the visual editor with the two additional steps: process payment, and create order:
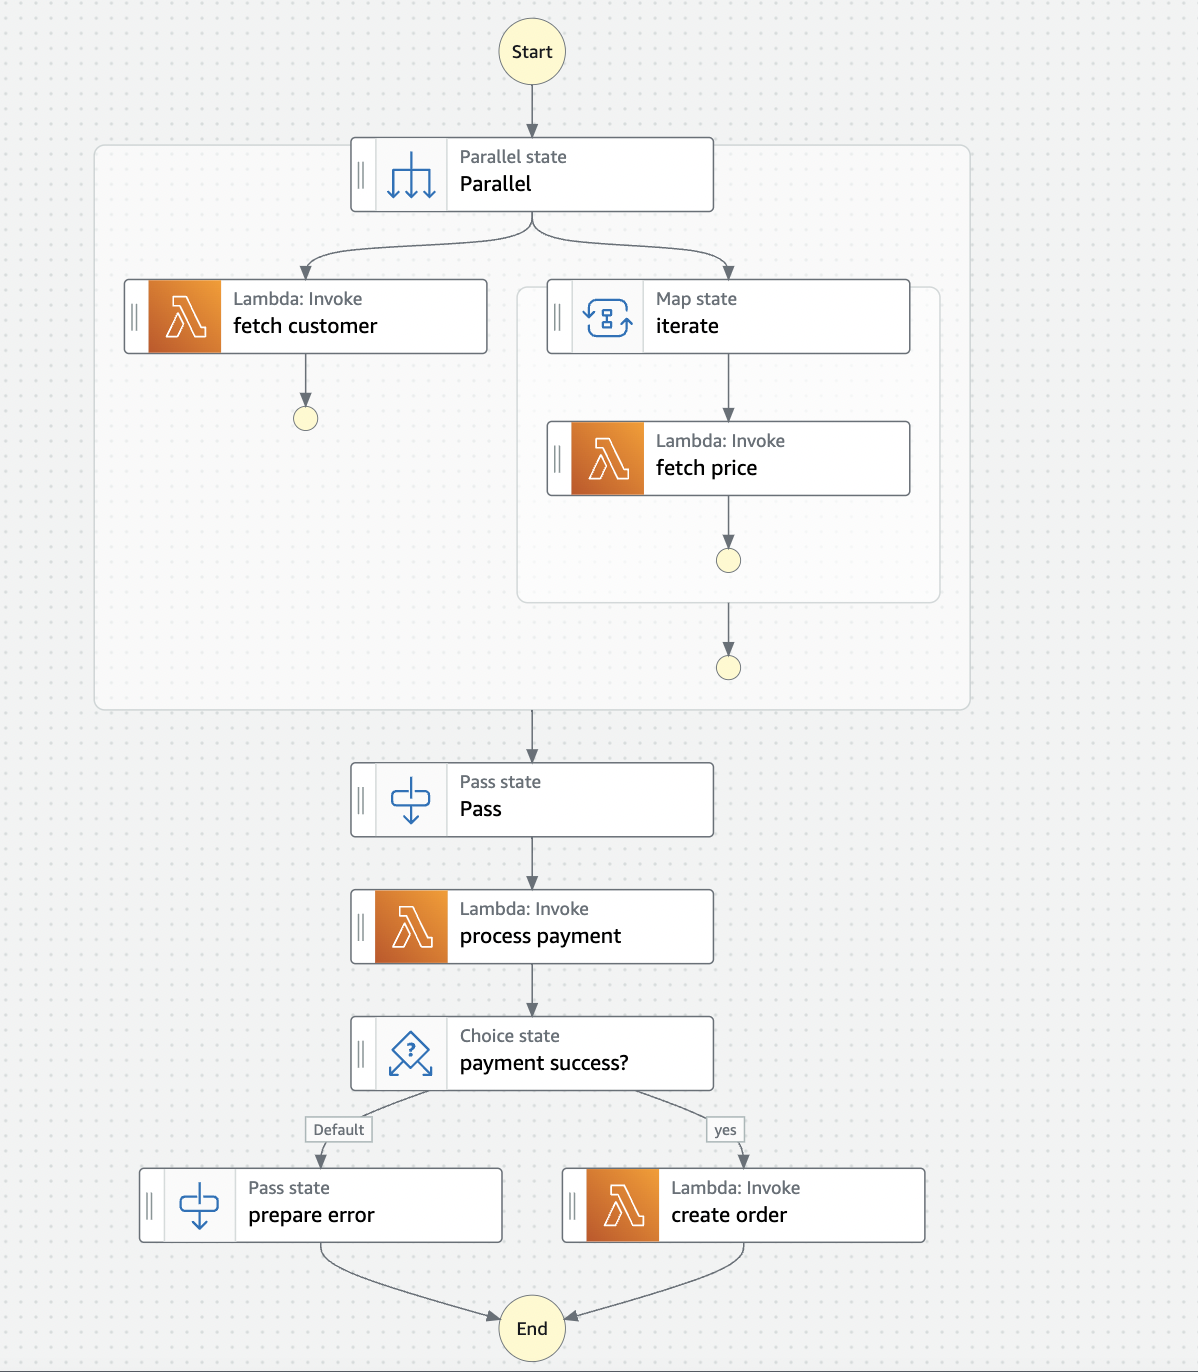
We have also added a state of type choice with 2 branches. Each branch has a rule. The branch will execute only if the result of the rule evaluation is true.
Processing Inputs and Outputs in a State Machine
The input to a Step Functions is sent in JSON format which is then passed to the first state in the state machine. Each state in the state machine receives JSON data as input and usually generates JSON as output to be passed to the next state. We can associate different kinds of filters to manipulate data in each state both before and after the task processing.
Input Filters: InputPath and Parameters
We use the InputPath and Parameters fields to manipulate the data before task processing:
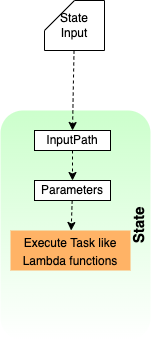
- InputPath: The InputPath field takes a JSONPath attribute to extract only the parts of the input which is required by the state.
- Parameters: The Parameters field enables us to pass a collection of key-value pairs, where the values are either static values that we define in our state machine definition, or that are selected from the input using a path.
Output Filters: OutputPath, ResultSelector, and ResultPath
We can further manipulate the results of the state execution using the fields: ResultSelector, ResultPath, and OutputPath:
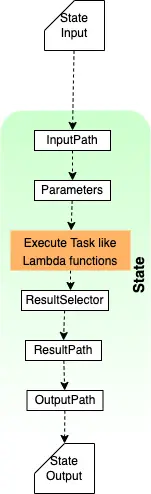
- ResultSelector: This field filters the task result to construct a new JSON object using selected elements of the task result.
- ResultPath: In most cases, we would like to retain the input data for processing by subsequent states of the state machine. For this, we use the ResultPath filter to add the task result to the original state input.
- OutputPath: The OutputPath filter is used to select a portion of the effective state output to pass to the next state. It is often used with Task states to filter the result of an API response.
We will next add these filters to manipulate the input data to our state machine for the checkout process at different stages. We will mainly manipulate the data to make prepare the requests for the different Lambda functions.
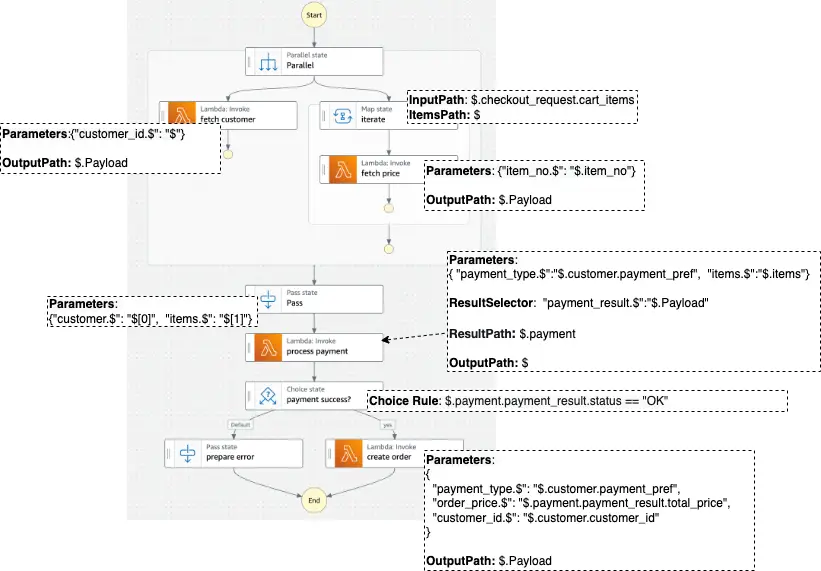
Data Transformations through the Checkout Process State Machine
Our state machine for the checkout process with the input and output filters is shown below:
We need to execute our state machine to run the task type states configured in the earlier sections. We can initiate an execution from the Step Functions console, or the AWS Command Line Interface (CLI), or by calling the Step Functions API with the AWS SDKs. Step Functions records full execution history for 90 days after the execution completes.
We need to provide input to the state machine in JSON format during execution and receive a JSON output after execution.
We can see the list of state machine executions with information such as execution id, status, and start date in the Step Functions console.
On selecting an execution, we can see a graph inspector which shows states and transitions marked with colors to indicate successful tasks, failures, and tasks that are still in progress. The graph inspector of our checkout process is shown below:
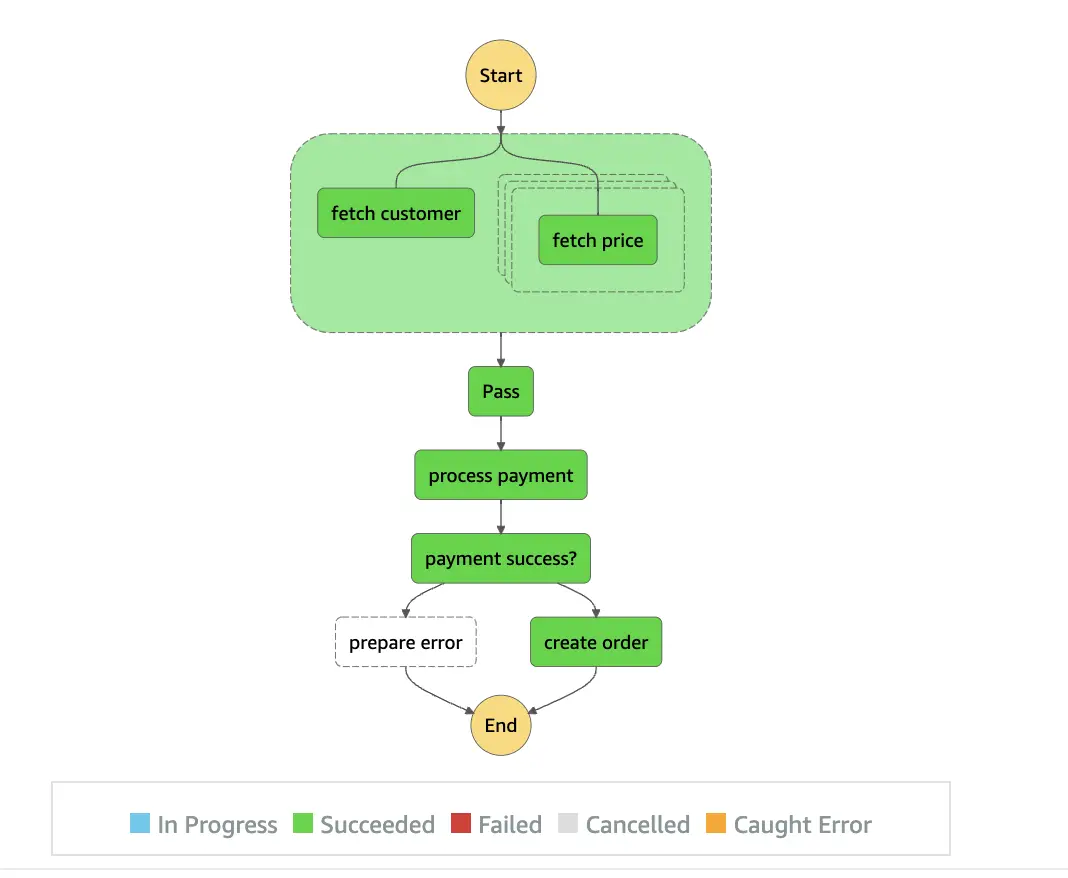
Let us look at how our input data changes during the execution of the state machine by applying input and output filters as we transition through some of the states:
Input to State Machine:
{
    "checkout_request": {
        "customer_id" : "C6238485",
        "cart_items": [
            {
                "item_no": "I1234",
                "shipping_date": "",
                "shipping_address": "address_1"
            },
            {
                "item_no": "I1235",
                "shipping_date": "",
                "shipping_address": "address_2"
            },
            {
                "item_no": "I1236",
                "shipping_date": "",
                "shipping_address": "address_3"
            }
        ]
    }
}
This is the input to our checkout process which is composed of a customer_id and an array of items in the shopping cart: cart_items.
- State:
Parallel
Input: Same input as state machine
- State:
fetch customer
Input: Same input as state machine
Data after filtering with InputPath: $.checkout_request.customer_id
C6238485
Data after applying parameter filter: {"customer_id.$": "$"}
{"customer_id" : "C6238485"}
Output of Lambda function execution:
{
    "customer_id": "C6238485",
    "customer_name": "John Doe",
    "payment_pref": "Credit Card",
    "email": "john.doe@yahoo.com",
    "mobile": "677896678"
}
- State:
iterate
Input: Same input as state machine
Data after filtering with InputPath: $.checkout_request.cart_items
[
            {
                "item_no": "I1234",
                ...
            },
            {
                "item_no": "I1235",
                ..
            },
            {
                "item_no": "I1236",
                ..
            }
]
- State: fetch price (for each element of the array:
cart_items)
Input: Each element of the array: cart_items
Data after applying parameters filter: {"item_no.$": "$.item_no"}
{"item_no" : "I1234"}
Output of Lambda function execution (for each element of the array: cart_items):
{
    "item_no": "I1234",
    "price": 480.7,
    "lastUpdated": "2022-06-12"
}
- Output of State:
Parallel
[
    {
      "customer_id": "C6238485",
      "customer_name": "John Doe",
      "payment_pref": "Credit Card",
      "email": "john.doe@yahoo.com",
      "mobile": "677896678"
    },
    [
      {
        "item_no": "I1234",
        ...
      },
      {
        "item_no": "I1235",
        ...
      },
      {
        "item_no": "I1236",
        ...
      }
    ]
]
- State:
Pass
Data after applying parameters filter:{"customer.$": "$[0]","items.$": "$[1]"}
{
    "customer": {
      "customer_id": "C6238485",
      "customer_name": "John Doe",
      "payment_pref": "Credit Card",
      "email": "john.doe@yahoo.com",
      "mobile": "677896678"},
    "items": [
          {
            "item_no": "I1234",
            ...
          },
          {
            "item_no": "I1235",
            ...
          },
          {
            "item_no": "I1236",
            ...
          }
    ]
}
- State:
process payment
Data after applying parameters filter:{"payment_type.$": "$.customer.payment_pref", "items.$": "$.items"}
"payment_type": "Credit Card", "items": [{"item_no": "I1234",...}, ...]
Output of Lambda function execution:
{
    "status": "OK",
    "total_price": 11274.47
}
ResultSelector:
{
  "payment_result.$": "$.Payload"
}
Data after ResultSelector:
{
 "items": [..],
 "customer": {"payment_type": "Credit Card","customer_id": "C6238485", ...},
 "payment":
   {
      "payment_result": {
         "status": "OK",
         "total_price": 11274.47
   }
 }
ResultPath: $.payment
OutputPath: $
Output of State:
{
  "items": [..],
  "customer": {"payment_type": "Credit Card","customer_id": "C6238485", ...},
  "payment": {
    "payment_result": {
      "status": "OK",
      "total_price": 11274.470000000001
    }
  }
}
- State:
payment success?
Choice rule 1: $.payment.payment_result.status == "OK"
if the rule result is true: Next state is create order
if the rule result is false: Next state is prepare error
- State:
create order
Parameters:
{
  "payment_type.$": "$.customer.payment_pref",
  "order_price.$": "$.payment.payment_result.total_price",
  "customer_id.$": "$.customer.customer_id"
}
Data after applying the above parameters filter:
 "payment_type": "Credit Card",
 "order_price": 11274.47,
 "customer_id": "C6238485"
… …
- Output of state machine
{
  "customer_id": "C6238485",
  "order_id": "oapjjg32g8e",
  "order_price": 11274.47,
  "status": "OK"
}
Handling Errors in Step Function Workflows
Let us understand some of the ways we handle errors in Step functions:
When a state reports an error, the state machine execution fails by default.
States of type task, parallel, and map provide fields for configuring error handling:
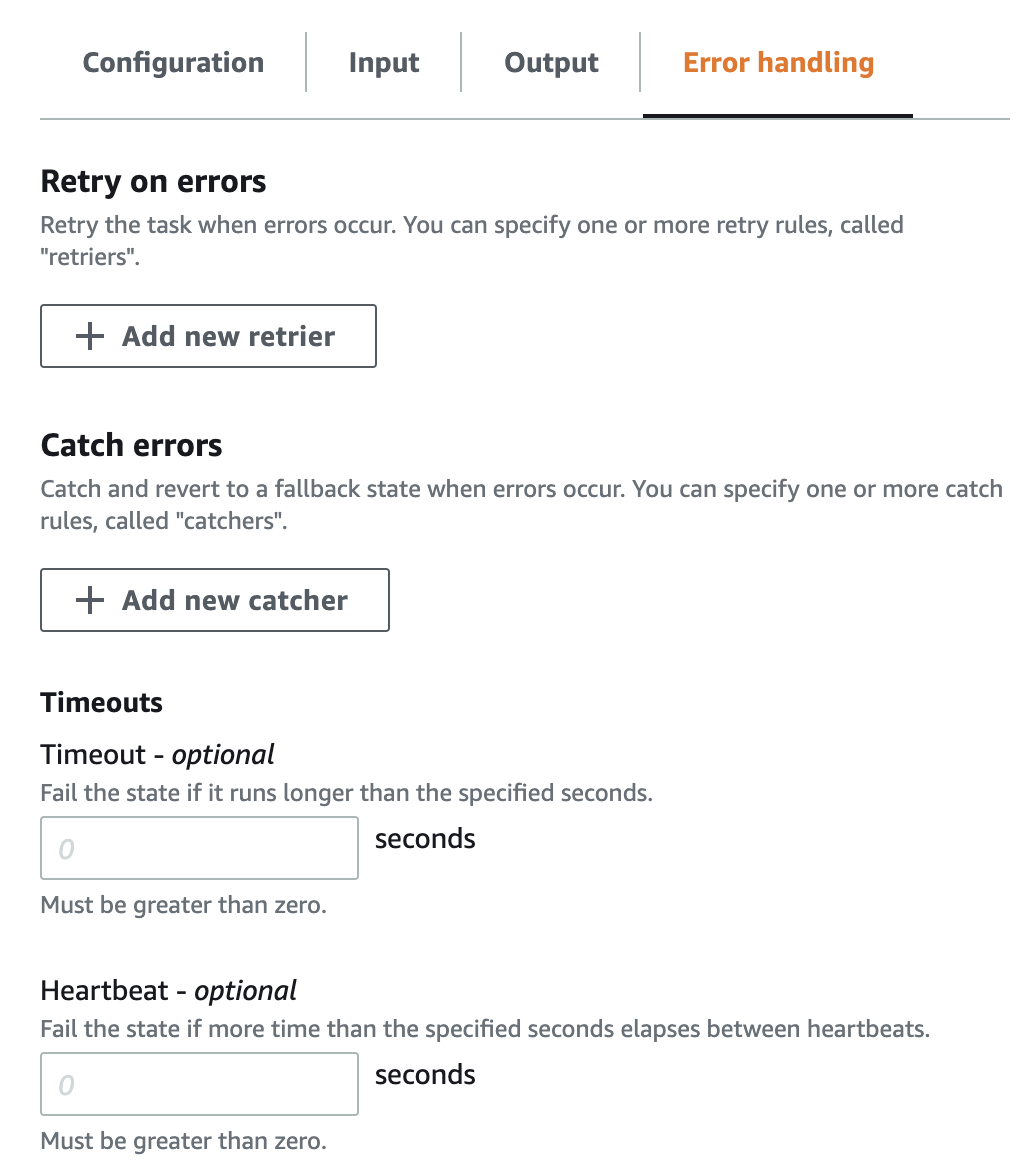
We can handle errors by retrying the operation or by a fallback to another state.
Retrying on Error
We can retry a task when errors occur by specifying one or more retry rules, called “retriers”.
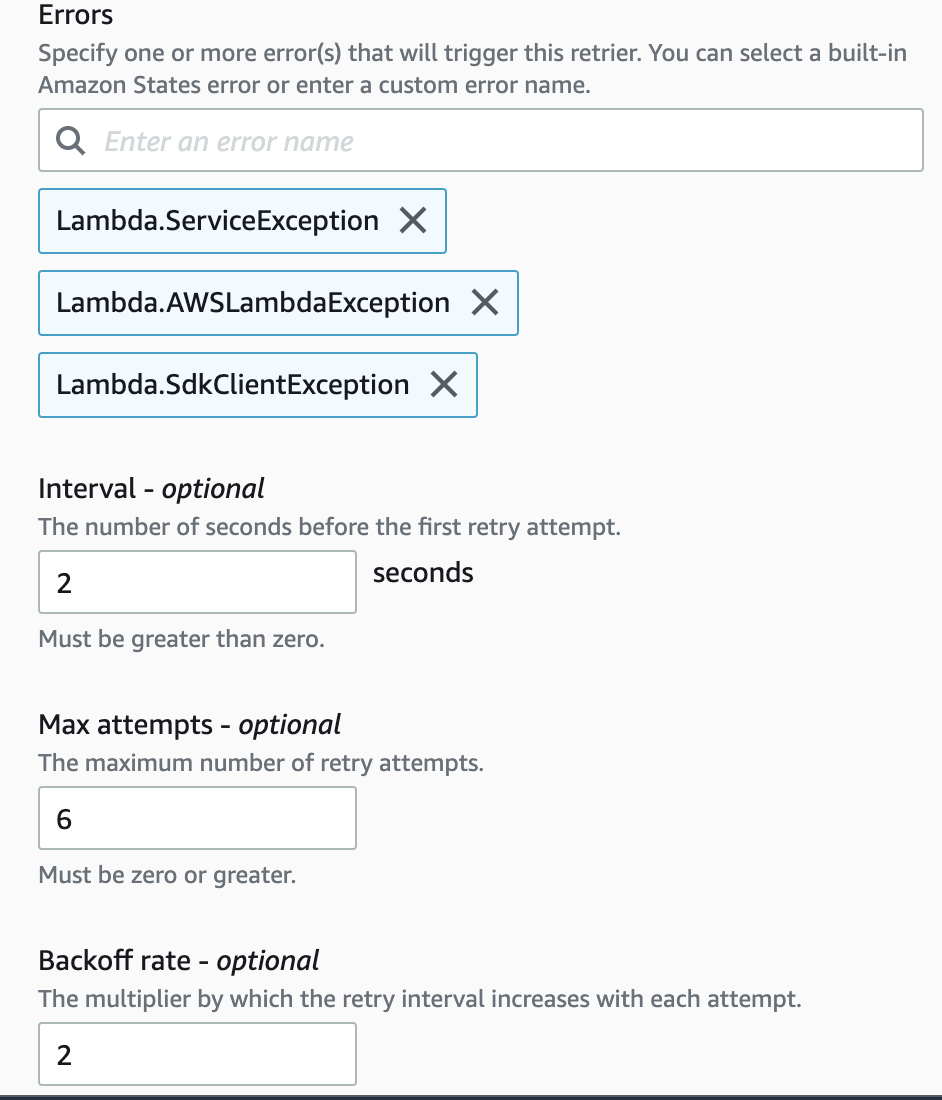
Here we have defined a retrier for 3 types of errors: Lambda.ServiceException, Lambda.AWSLambdaException, and Lambda.SdkClientException with the following retry settings:
- Interval: The number of seconds before the first retry attempt. It can take values from
1which is default to99999999. - Max Attempts: The maximum number of retry attempts. The task will not be retried after the number of retries exceeds this value.
MaxAttemptshas a default value of3and maximum value of99999999. - Backoff Rate: It is the multiplier by which the retry interval increases with each attempt.
Falling Back to a Different State on Error
We can catch and revert to a fallback state when errors occur by specifying one or more catch rules, called “catchers”.
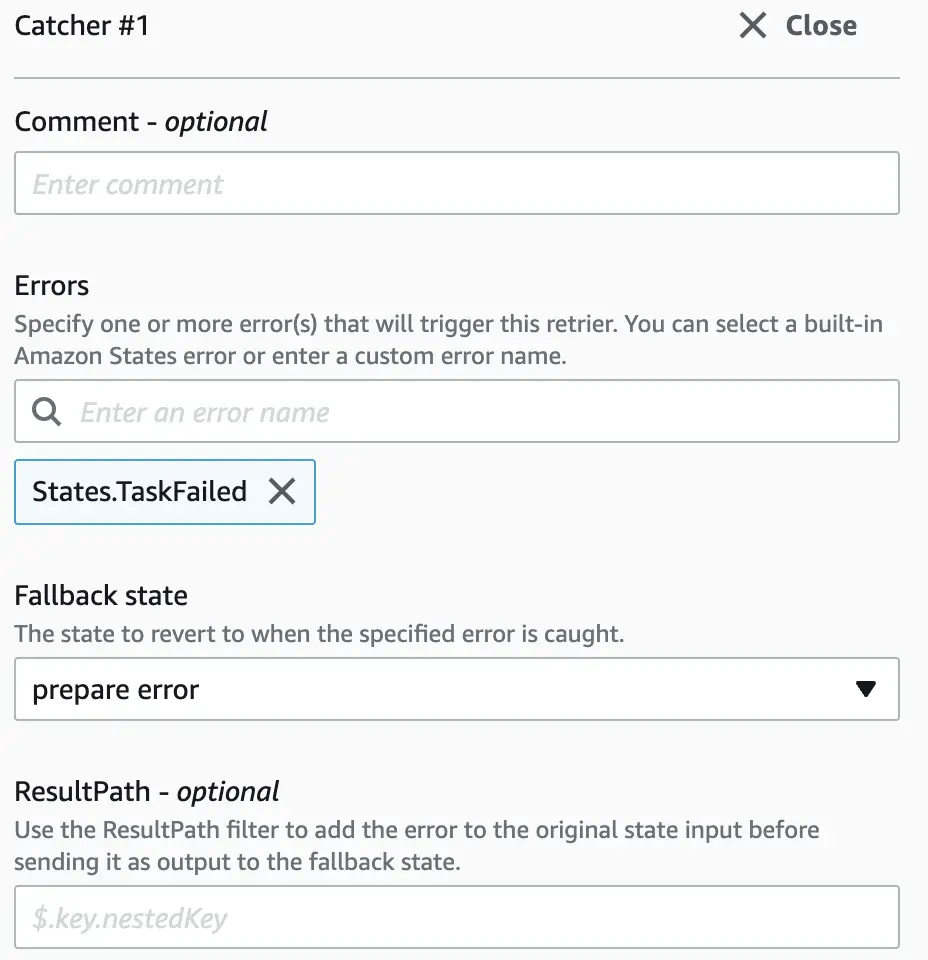
In this example, we are defining a prepare error state to which the process payment state can fall back if it encounters an error of type: States.TaskFailed.
The state machine with a catcher defined for the process payment step looks like this in the visual editor.
Handling Lambda Service Exceptions
As a best practice, we should proactively handle transient service errors in AWS Lambda functions that result in a 500 error, such as ServiceException, AWSLambdaException, or SdkClientException. We can handle these exceptions by retrying the Lambda function invocation, or by catching the error.
Integration with AWS Services
When we configure a state of type task we need to specify an integration type:
We can integrate Step Function with AWS services through two types of service integrations:
Optimized Integrations
When we are calling an AWS service with optimized integration, Step Functions provide some additional functionality when the service API is called. For example, the invocation of the Lambda service converts its output from an escaped JSON string to a JSON object similar to the format:
{
  "ExecutedVersion": "$LATEST",
  "Payload": {
    ...
  },
  "SdkHttpMetadata": {
    ...
  },
  "SdkResponseMetadata": {
    "RequestId": "ac79dacd-7c6f-41c7-bfcf-eea70b43e141"
  },
  "StatusCode": 200
}
We had used optimized integration for invoking our Lambda functions in the state machine of the checkout process.
AWS SDK Integrations
AWS SDK integrations allow us to make a standard API call on an AWS service from the state machine. When we use AWS SDK integrations, we specify the service name and API call with optionally, a service integration pattern (explained in the next section). The syntax for specifying the AWS service looks like this:
arn:aws:states:::aws-sdk:serviceName:apiAction.[serviceIntegrationPattern]
Integration Patterns
Step functions integrate with AWS services using three types of service integration patterns. The service integration pattern is specified by appending a suffix in the Resource URL in the task configuration.
-
Request Response: Step Functions wait for an HTTP response and then progress to the next state immediately after it gets an HTTP response. We do not append any suffix after the resource URI for this integration pattern. We have used this integration pattern for invoking all the Lambda functions from our state machine for the
checkoutprocess. -
Running a Job: Step Functions wait for a request to complete before progressing to the next state. To specify this integration pattern, we specify the
Resourcefield in our task state definition with the.syncsuffix appended after the resource URI. -
Waiting for a Callback with a Task Token: A task might need to wait for various reasons like seeking human approval, integrating with a third-party workflow, or calling legacy systems. In these situations, we can pause Step Functions indefinitely, and wait for an external process or workflow to complete. For this integration pattern, we specify the
Resourcefield in our task state definition with the.waitForTaskTokensuffix appended after the resource URI.
Conclusion
Here is a list of the major points for a quick reference:
- AWS Step Functions is a serverless orchestration service by which we can combine AWS Lambda functions and other AWS services to build complex business applications.
- We can author the orchestration logic in a declarative style using a JSON-based format called the Amazon States Language(ASL).
- AWS Step functions also provide a powerful graphical console where we can visualize our application’s workflow as a series of steps.
- State Machines are of two types:
StandardandExpress. We useStandardfor long-running, and durable processes andExpressfor high-volume, event-processing workloads. - States of a state machine are of various types like
task,choice,map,passdepending on the nature of functions they perform. - We can associate different kinds of filters to manipulate data in each state both before and after the task processing.
- InputPath and parameters filters are used to filter input data before task execution.
- OutputPath, ResultSelector, and ResultPath filters are used to filter the task result before preparing the output of a state.
- We can also configure retry and fallback error handlers for handling error conditions in states.