In the article “Getting Started with AWS CloudFormation”, we have already played around a bit with AWS CloudFormation. We have deployed a network stack that provides the network infrastructure we need, and a service stack that deploys a Docker image with our Spring Boot application into that network.
In this article, we’ll do the same with the Cloud Development Kit (CDK) instead of CloudFormation. Instead of describing our stacks in YAML, however, we’ll be using Java. Furthermore, we’ll replace the AWS CLI with the CDK CLI which allows us to deploy and destroy our stacks with ease.
Under the hood, CDK will “synthesize” a CloudFormation file from our Java code and pass that file to the CloudFormation API to deploy our infrastructure. This means that with CDK, we describe the same resources as we would in a CloudFormation YAML file. But, having the power of a real programming language at our hands (in our case, Java), we can build abstractions on top of the low-level CloudFormation resources (and, most importantly, we don’t have to worry about indentation). These abstractions are called “constructs” in CDK lingo.
Let’s create our first CDK app! Follow along the steps in this chapter to create a CDK app that deploys our “Hello World” application to the cloud.
Check Out the Book!
This article is a self-sufficient sample chapter from the book Stratospheric - From Zero to Production with Spring Boot and AWS.
If you want to learn how to deploy a Spring Boot application to the AWS cloud and how to connect it to cloud services like RDS, Cognito, and SQS, make sure to check it out!
Creating Our First CDK App
The unit of work in CDK is called an “app”. Think of an app as a project that we import into our IDE. In Java terms, this is a Maven project by default.
In that app, we can define one or more stacks. And each stack defines a set of resources that should be deployed as part of that stack. Note that a CDK stack is the same concept as a CloudFormation stack.
Once we have an app in place, the CDK CLI allows us to deploy or destroy (undeploy) all stacks at the same time, or we can choose to interact with a specific stack only.
Before we can start, we have to get some prerequisites out of the way.
Installing Node
Even though we’re using the Java CDK, the CDK CLI is built with Node.js. So, we need to install it on our machine.
If you don’t have Node.js running, yet, you can download it from Node website or use the package manager of your choice to install it. We have tested all the steps in this book with Node.js 14, which is the latest version at the time of writing, but it will probably work with other versions as well.
You can check your Node.js version by calling node -v.
Installing the CDK CLI
Next, we want to install the CDK CLI.
Having Node.js installed, this is as easy as calling npm install -g aws-cdk. This will make the CDK CLI command cdk available globally on your system.
As with Node.js you can check the version of your CDK CLI installation by calling cdk --version.
Creating the CDK App
Now we’re ready to create our first CDK app!
Like many modern development CLIs, the CDK CLI provides the functionality to bootstrap a new project from scratch.
Let’s create a new folder for our app, change into it, and run this command:
cdk init app --language=java
After CDK has created our app we’re greeted with this message:
# Welcome to your CDK Java project!

This is a blank project for Java development with CDK.

The `cdk.json` file tells the CDK Toolkit how to execute your app.

It is a [Maven](https://maven.apache.org/) based project, so you can open this
project with any Maven compatible Java IDE to build and run tests.

## Useful commands

 * `mvn package`   compile and run tests
 * `cdk ls`      list all stacks in the app
 * `cdk synth`     emits the synthesized CloudFormation template
 * `cdk deploy`    deploy this stack to your default AWS account/region
 * `cdk diff`    compare deployed stack with current state
 * `cdk docs`    open CDK documentation

Enjoy!
Aside from some useful commands, there is some important information in this message:
- the project relies on Maven to compile and package the code, and
- there’s a file called
cdk.jsonthat tells the CDK how to run our app.
We’ll make use of that information in the next section.
Making the CDK App Portable with the Maven Wrapper
Before we inspect the generated app in more detail, let’s fix an issue with the auto-generated Maven setup.
The message above says that we need to run mvn package to compile and run the tests. That means Maven needs to be installed on our machine. Thinking a bit further, this also means that Maven needs to be installed on the build server once we decide to set up a continuous deployment pipeline.
While it’s not an unsolvable problem to install Maven on a local or remote machine, we’ll have a more self-contained solution if the build takes care of “installing” Maven itself.
The solution to this is the Maven Wrapper. It’s a script that downloads Maven if necessary. To install it we copy the folder .mvn and the files mvnw and mvnw.cmd from the example project into the main folder of our newly created CDK app.
Instead of calling mvn package, we can now call ./mvnw package for the same effect, even if Maven is not installed on our machine.
But we’re not completely done yet. Remember the message saying that the file cdk.json tells the CDK how to execute our app? Let’s look into that file:
{
  "app": "mvn -e -q compile exec:java",
  "context": {
  "@aws-cdk/core:enableStackNameDuplicates": "true",
  "aws-cdk:enableDiffNoFail": "true",
  "@aws-cdk/core:stackRelativeExports": "true"
  }
}
In the first line of this JSON structure, it’s telling the CDK how to compile and then execute our CDK app. It’s set up to call mvn by default. So, let’s replace that with ./mvnw and we’re done.
Now, any time we call a command like cdk deploy, the CDK will call the Maven Wrapper instead of Maven directly to execute our CDK app.
Inspecting the Generated Source Code
With everything set up, let’s have a look at the code that the CDK created for us. In the folder src/main/java/com/myorg we’ll find the files CdkApp and CdkStack:
public class CdkApp {
  public static void main(final String[] args) {
    App app = new App();

    new CdkStack(app, "CdkStack");

    app.synth();
  }
}
public class CdkStack extends Stack {
  public CdkStack(final Construct scope, final String id) {
    this(scope, id, null);
  }

  public CdkStack(final Construct scope, final String id, final StackProps props) {
    super(scope, id, props);

    // The code that defines your stack goes here
  }
}
That’s all the code we need for a working CDK app!
CdkApp is the main class of the app. It’s a standard Java class with a standard main() method to make it executable. The main() method creates an App instance and a CdkStack instance and finally calls app.synth() to tell the CDK app to create CloudFormation files with all the CloudFormation resources it contains. These CloudFormation files will be written to the folder named cdk.out.
When we run CDK commands like cdk deploy, CDK will execute the main method of CdkApp to generate the CloudFormation files. The deploy command knows where to look for these files and then sends them to the CloudFormation API to deploy.
The CdkStack class represents a CloudFormation stack. As mentioned before, a CDK app contains one or more stacks. This stack is where we would add the resources we want to deploy. We’ll add our own resources later in this chapter. For now, we’ll leave it empty.
Deploying the Generated CDK App
Let’s try to deploy the generated CDK app.
This is as easy as executing the cdk deploy command in the folder of the app. It will take a couple of seconds and we’ll be rewarded with a success message like this one:
TestStack: deploying...
TestStack: creating CloudFormation changeset...
[========================================================] (2/2)

TestStack

Stack ARN:
arn:aws:cloudformation:ap-southeast-2:...
This means that CDK has successfully deployed the (empty) stack. If we log in to the AWS web console and navigate to the CloudFormation service, we should see a stack called “TestStack” deployed there:
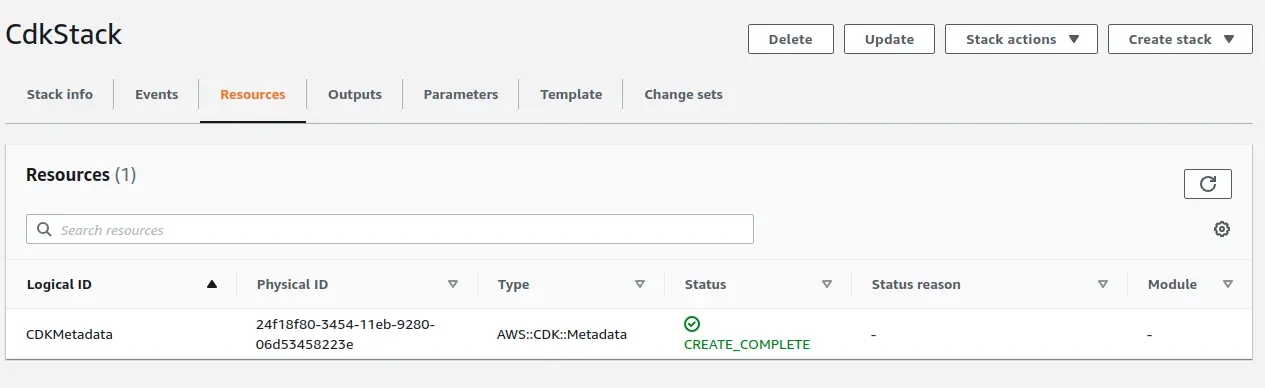
The stack contains a single resource called CDKMetadata, which the CDK needs to work with that stack.
Before moving on, let’s destroy the stack again with cdk destroy.
Deploying a Spring Boot App with a CDK Construct
Now that we know the basic workings of CDK, let’s deploy a real application! The goal is to deploy an ECS Cluster that runs a Docker image with our Spring Boot app. To keep things simple for now, we’ll deploy the “Hello World” app from the Stratospheric book.
As mentioned, the resources that we include in a CDK stack are called constructs. To show the power of CDK - and to keep it easy for now - we have prepared a construct with the name SpringBootApplicationStack that includes all the resources we need. All we need to do is to include this construct into our CDK stack.
Adding the Stratospheric Construct Library
To get access to the SpringBootApplicationStack construct, we need to include the cdk-constructs library in our project. We created this library to provide constructs that we’re going to use throughout the book.
Let’s add the following snippet to the pom.xml file in the CDK project:
<dependency>
    <groupId>dev.stratospheric</groupId>
    <artifactId>cdk-constructs</artifactId>
    <version>0.0.7</version>
</dependency>
You can check for a more recent version of the cdk-constructs library and browse the source files on GitHub.
Using the SpringBootApplicationStack
As you might expect from the name of the construct, SpringBootApplicationStack is a stack. It extends the Stack class of the CDK API. That means we can use it to replace the generated CdkStack class.
So, we modify the generated CdkApp class to include a SpringBootApplicationStack instead of an empty CdkStack:
public class CdkApp {

  public static void main(final String[] args) {
    App app = new App();

    String accountId = (String) app.getNode().tryGetContext("accountId");
    Objects.requireNonNull(accountId, "context variable 'accountId' must not be null");

    String region = (String) app.getNode().tryGetContext("region");
    Objects.requireNonNull(region, "context variable 'region' must not be null");

    new SpringBootApplicationStack(
      app,
      "SpringBootApplication",
      makeEnv(accountId, region),
      "docker.io/stratospheric/todo-app-v1:latest");

    app.synth();
  }

  static Environment makeEnv(String account, String region) {
    return Environment.builder()
      .account(account)
      .region(region)
      .build();
  }
}
The first apparent change is that we’re now accepting two parameters. With app.getNode().tryGetContext(), we’re reading so-called “context variables” from the command line.
We can pass such parameters to the cdk command line with the -c parameter, for example like this:
cdk deploy -c accountId=123456789 -c region=ap-southeast-2
Why are we passing the account ID and the AWS region into the app? The reason is to be more flexible. If not provided, the CDK CLI will always take the account and region that we have pre-configured with the AWS CLI. We’d have no way of deploying resources into other accounts and regions. We don’t really need this flexibility yet but SpringBootApplicationStack uses more sophisticated constructs under the hood which need these parameters as input.
Next, we create a SpringBootApplicationStack instance. We pass in the app instance to let CDK know that this SpringBootApplicationStack is part of the app and should be included in the synthesized CloudFormation files.
The second parameter is an arbitrary (but unique) identifier for the construct within the app.
The third parameter combines the accountId and region parameters to create an Environment object. Environment is a CDK class that we’re reusing here.
The final parameter is the URL to the Docker image that we want to deploy. We’ll use the same image we have used before. We could also decide to make the URL a context variable to be passed from the outside to make the CDK app more flexible.
You might wonder why we’re not doing anything with the SpringBootApplicationStack instance. When creating a construct, we always pass a parent construct or the parent app into the constructor. The construct will then register with the app so that the app knows which constructs to include in the synthesized CloudFormation stack when calling app.synth().
Deploying the CDK App
Let’s try out our shiny new CDK app! Let’s run this command:
cdk deploy -c accountId=<ACCOUNT_ID> -c region=<REGION>
Replace ACCOUNT_ID and REGION with your AWS account number and region, respectively.
The CDK will show a list of “IAM Statement Changes” and “Security Group Changes” for you to confirm. This is a security measure to avoid unintended changes in security configuration. After confirming, the console should show the deployment progress like this:
Do you wish to deploy these changes (y/n)? y
SpringBootApplication: deploying...
SpringBootApplication: creating CloudFormation changeset...
[========·················································] (7/46)

7:29:22 am | CREATE_IN_PROGRESS | AWS::CloudFormation::Stack | SpringBootAppli...
7:29:28 am | CREATE_IN_PROGRESS | AWS::EC2::InternetGateway  | network/vpc/IGW
7:29:28 am | CREATE_IN_PROGRESS | AWS::EC2::VPC        | network/vpc
7:29:29 am | CREATE_IN_PROGRESS | AWS::IAM::Role       | Service/ecsTaskRole
7:29:29 am | CREATE_IN_PROGRESS | AWS::IAM::Role       | Service/ecsTaskE...
Since the SpringBootApplicationStack contains a lot of resources under the hood, it will take a minute or two for the deployment to finish.
When it’s done we should see an output like this in the console:
Outputs:
SpringBootApplication.loadbalancerDnsName = prod-loadbalancer-810384126.ap-southeast-2.elb.amazonaws.com

Stack ARN:
arn:aws:cloudformation:ap-southeast-2:494365134671:stack/SpringBootApplication/0b6b4410-3be9-11eb-b5d5-0a689720a8fe
This means the SpringBootApplication stack has been successfully deployed. CloudFormation stacks support the concept of “output parameters” and CDK prints any such output parameters after a successful deployment. The SpringBootApplication is built to expose the DNS name of its load balancer as an output parameter, which is why we see that DNS name in the console.
If we copy this URL into our browser, we should see our hello world application.
Inspecting the CloudFormation web console again, we should see a stack with a bunch of resources
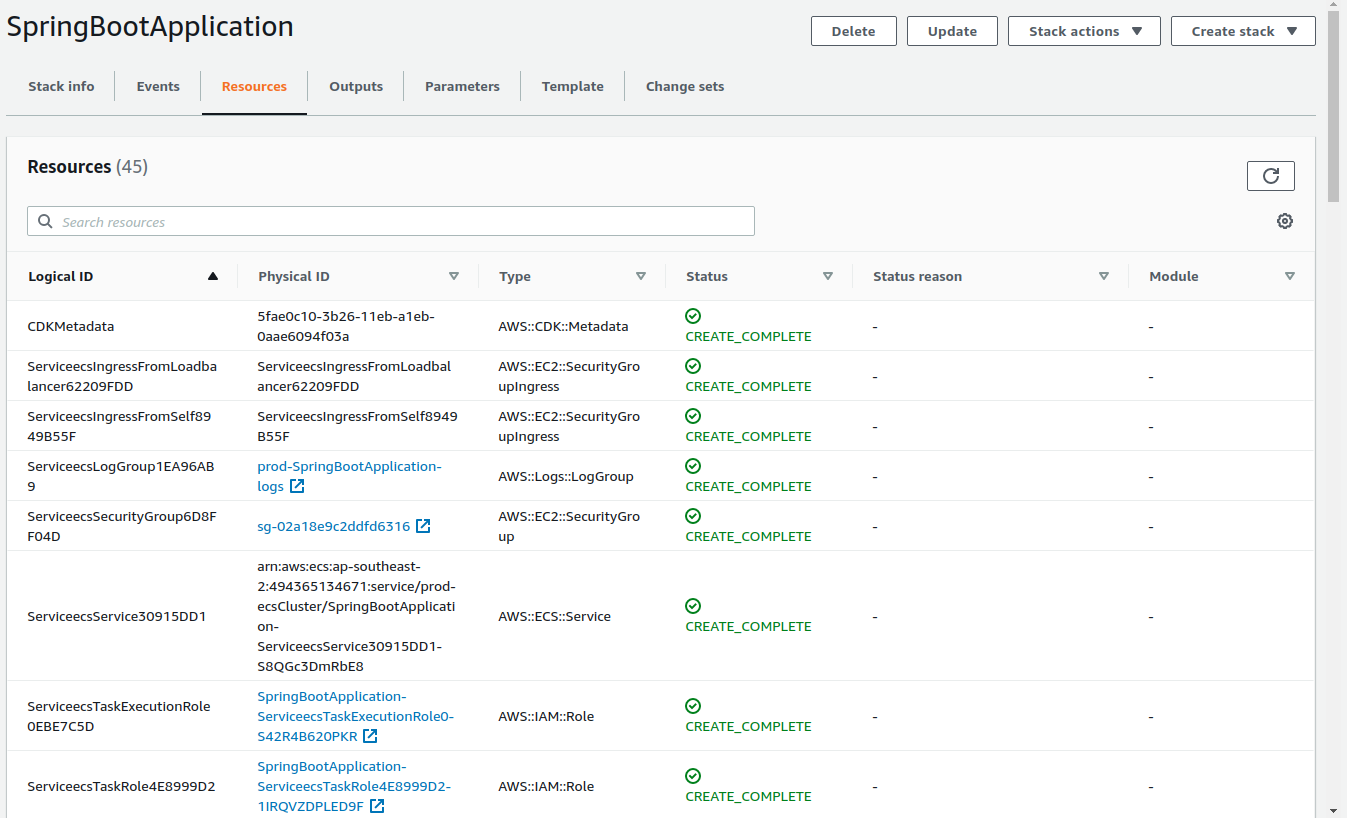
When done inspecting the stack don’t forget to destroy it to avoid unnecessary costs:
cdk destroy -c accountId=<ACCOUNT_ID> -c region=<REGION>
Why Not Stop Here?
We have successfully deployed a Spring Boot application with about 20 lines of Java code with the help of AWS CDK. Doing this with plain CloudFormation templates, the same would take us a couple hundred lines of YAML configuration. That’s quite an achievement!
So, why not stop here? Why is there another in-depth chapter about CDK coming up? Our SpringBootApplicationStack gives us everything we need to deploy a Spring Boot application, doesn’t it?
The main reason is that our SpringBootApplicationStack construct is not very flexible. The only thing we have control over is the URL of the Docker image. Like any abstraction, the SpringBootApplicationStack hides a lot of details from us.
What if we need to connect our Spring Boot application to a database or SQS queues? What if the path to our application’s health check is different from the default? What if our application needs more CPU power than the default 256 units? What if we prefer to use HTTPS rather than HTTP?
Also, imagine an environment with more than one application. We’d have one network for staging and another for production. We’d want to deploy multiple applications into each network. This doesn’t work currently, because each SpringBootApplicationStack would try to create its own VPC (which would fail for the second application because it would try to use the same resource names).
This means our CDK project needs to be flexible enough to let us deploy additional resources as needed and give us a lot of knobs and dials to configure the infrastructure and our application. We want to have fine-grained control.
To get this control, we have to build our own stacks and our own constructs. And this is what we’re going to do in the next chapter.
Check Out the Book!
This article is a self-sufficient sample chapter from the book Stratospheric - From Zero to Production with Spring Boot and AWS.
If you want to learn how to deploy a Spring Boot application to the AWS cloud and how to connect it to cloud services like RDS, Cognito, and SQS, make sure to check it out!


