
This document explains the workflow of writing articles for reflectoring to make our cooperation as productive as possible for both of us.
If you have any questions at all, don’t hesitate to reach out via email to tom@reflectoring.io.
Overview
The Workflow in a Nutshell
The workflow is pretty straightforward:
- You pick a topic
- You create an outline
- An editor reviews the outline
- You write the article
- An editor reviews the article
- I publish the article
- I process payment
These steps will be described in more detail in the rest of this document.
Tracking the Work
We use Trello as the tool of choice to track work on the reflectoring blog. You will have gotten an invite email with a link to the Trello board.
Communication
Communication is key to avoid misunderstandings and unnecessary work. All communication concerning an article should take place on the Trello card of that article. If you need feedback or have any questions while working on an article, add a comment to the Trello card and mention the user @Reflectoring Editors. Your editor will get back to you. Please be patient, because the editors don’t look into their messages every day.
Please rather communicate too much than too little!
Timeframe Expectations
You can write an article in a day or in a month, I don’t care much (longer than a month is tedious to follow up, though, so have a good reason). I do expect you to give me a due date, though, so I know when to expect a result.
It’s not a big deal if something happened and you don’t make that date, but expect me to ask when that date is past. Please fill the “Due Date” field in the Trello card of your article and keep it up-to-date.
0 - You Bring a Topic (Optional)
Submit the Topic
If you have a topic that you would like to write about and that you think is a good fit for the reflectoring blog, simply create your own Trello card in the “Propose your topic” column.
Request a Review of the Topic
Mention the editors on the card (@Reflectoring Editors) so they can review the topic and decide the next steps.
1 - You Pick a Topic
Browse Available Topics
Pick a topic from the column “Topics ready to pick”.
Change the Status to OUTLINING
Once you have found a topic or created your own, add yourself to the card, set a due date, and move it to the “Outlining” column.
2 - You Create an Outline
Research an Outline
If you’re very familiar with the topic, you may know from the top of the head what to write. Sometimes, though, you need to research a topic deeper to create an outline of the article.
This research may require you to create a code example to try out some things.
Write the Outline
With your research in mind, think of the structure of your article and the sub-headings it will have. Will it have only one level of headings? Or will it need a deeper structure? What is the order of things to discuss? Where will you provide code examples? Is there a certain point or warning you want to make that should be displayed in an info or warning box?
Prepare an outline with section headings and a few bullet-points with the content you plan for each section.
The outline is just an orientation and a means of checking that we have the same understanding of the topic. It’s better to discuss changes to an outline than changes to an already written article - it avoids unnecessary work. If, while writing, you find that you need to deviate from the outline, do it.
Post the outline in the description of the topic card (Trello supports Markdown!) and mention the editors (@Reflectoring Editors) in a comment to let your editor know to review the outline.
3 - An Editor Reviews the Outline
Timeframe
Expect feedback on the outline within a day or two. Nudge your editor by adding @Reflectoring Editors in a comment on the Trello card if you still don’t have feedback after 3 or so days (the editors don’t look every day, so please be patient).
Address Comments
If there are any remarks on the Outline that need addressing, the Editor will add them in a comment to the Trello card so you can address them and submit it for review again by mentioning me.
Once the outline has been reviewed, your editor will move it to the WRITING column and you can start working on the article.
4 - You Write the Article
Writing Guidelines
Once the outline has been reviewed, write the article in Markdown. Please read through the Writing Guidelines to create high-quality content.
Set a Due Date
Please set a due date to the card you’re working on so your editor knows when to expect a draft for review. You can change the due date at any time, this is just a tool for editors to keep up with their authors. 2 days and 5 days after the due date, you will get an automatic reminder to update the due date. 10 days after the due date, the card will be marked as “inactive”.
(Optional) Local Preview
If you want to preview the article in the real layout and design, follow the instructions on the reflectoring GitHub repository to set up the blog on your local machine.
Submit the Article via Pull Request
When you have the text ready for review , create a pull request. The blog is just like a software project, so if you have worked with GitHub before, this should be familiar to you. If you haven’t created pull requests before, follow the instructions on the reflectoring GitHub repository.
Make sure to activate the checkbox “Allow edits from maintainers”!

Online Preview
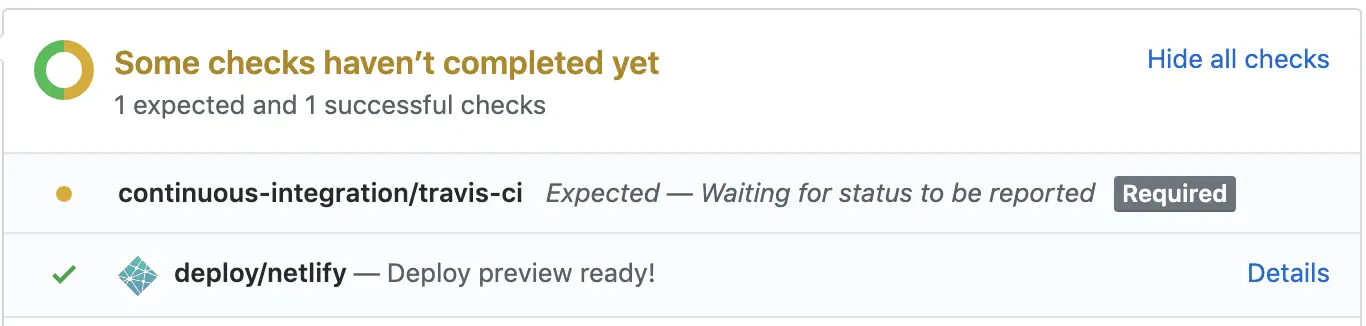
Once you have created a pull request, an online preview will be generated automatically. Please check the article in the online preview before requesting a review.
To access the online preview, click on “Show all checks” in the detail view of your pull request, and then on “Details” next to the netlify check.
Submit the Code Examples via Pull Request
Most articles will require some code examples to prove the ideas or discussion in the text. As a general rule, all code examples must be included in the code-examples GitHub repository. Create a pull request to that contains the code examples. You can find instructions on the GitHub page of the repository.
Submit the Topic for Review
Mention the editors @Reflectoring Editors in a comment on the Trello card to let me know that the topic is ready for review.
5 - Editor Reviews the Article
Timeframe
I’m usually pretty quick in giving feedback to submitted articles. Give me a day or two to respond. In the response you’ll either get the feedback directly or a timeframe in which to expect it.
Nudge your editor by adding @Reflectoring Editors in a comment on the Trello card if you didn’t get feedback within a week.
Minor Changes
I will do minor changes to the article during the review. This includes fixing typos or increasing the readability of certain phrases.
Major Changes
If major changes are necessary, I will return the Trello card to the WRITING column and assign it back to you to address the requested changes. I will add a comment to the Trello card explaining my request.
Note that every article will require at least one round of changes from your side.
I reserve the right to decline articles completely if during a review it becomes clear to me that too much work is necessary to make it high-quality content.
6 - I Publish the Article
Merging the Pull Request
When the review is finished and all changes have been addressed, I will publish the article by merging the pull request.
7 - I Process Payment
Provide your Paypal Account
Be sure to provide the email address of your Paypal account so I can process payments for finished articles.
If Paypal doesn’t work for you, feel free to suggest an alternative payment channel (that does not incur horrendous transfer fees).
Receiving Payment
At least once a week, I will process payments for articles that have been published.