Back-end server resources like databases often contain data that is critical for an application to function consistently. So these resources are protected from public access over the internet by placing them in a private subnet. This will however make it inaccessible to the database clients and applications running on our local development workstations.
We usually run data manipulation queries in query editors provided by different database clients or from our application’s unit test cases to check out various scenarios during application development.
If the database is not accessible from our local workstation, we need to seek alternate methods of testing like moving the compiled application code to the cloud environment each time we want to test which is not very convenient and results in reducing productivity with a poor developer experience.
This problem is addressed by using a server called “Jump host” that can receive requests from external sources over the internet and securely forward or “jump” to the database secured in the private subnet.
In this tutorial, we will use a jump host for accessing an Amazon Relational Database Service(RDS) database residing in a private subnet.
Amazon RDS supports multiple databases. We will use MySQL in our example. However, this approach will work for all other databases supported by Amazon RDS.
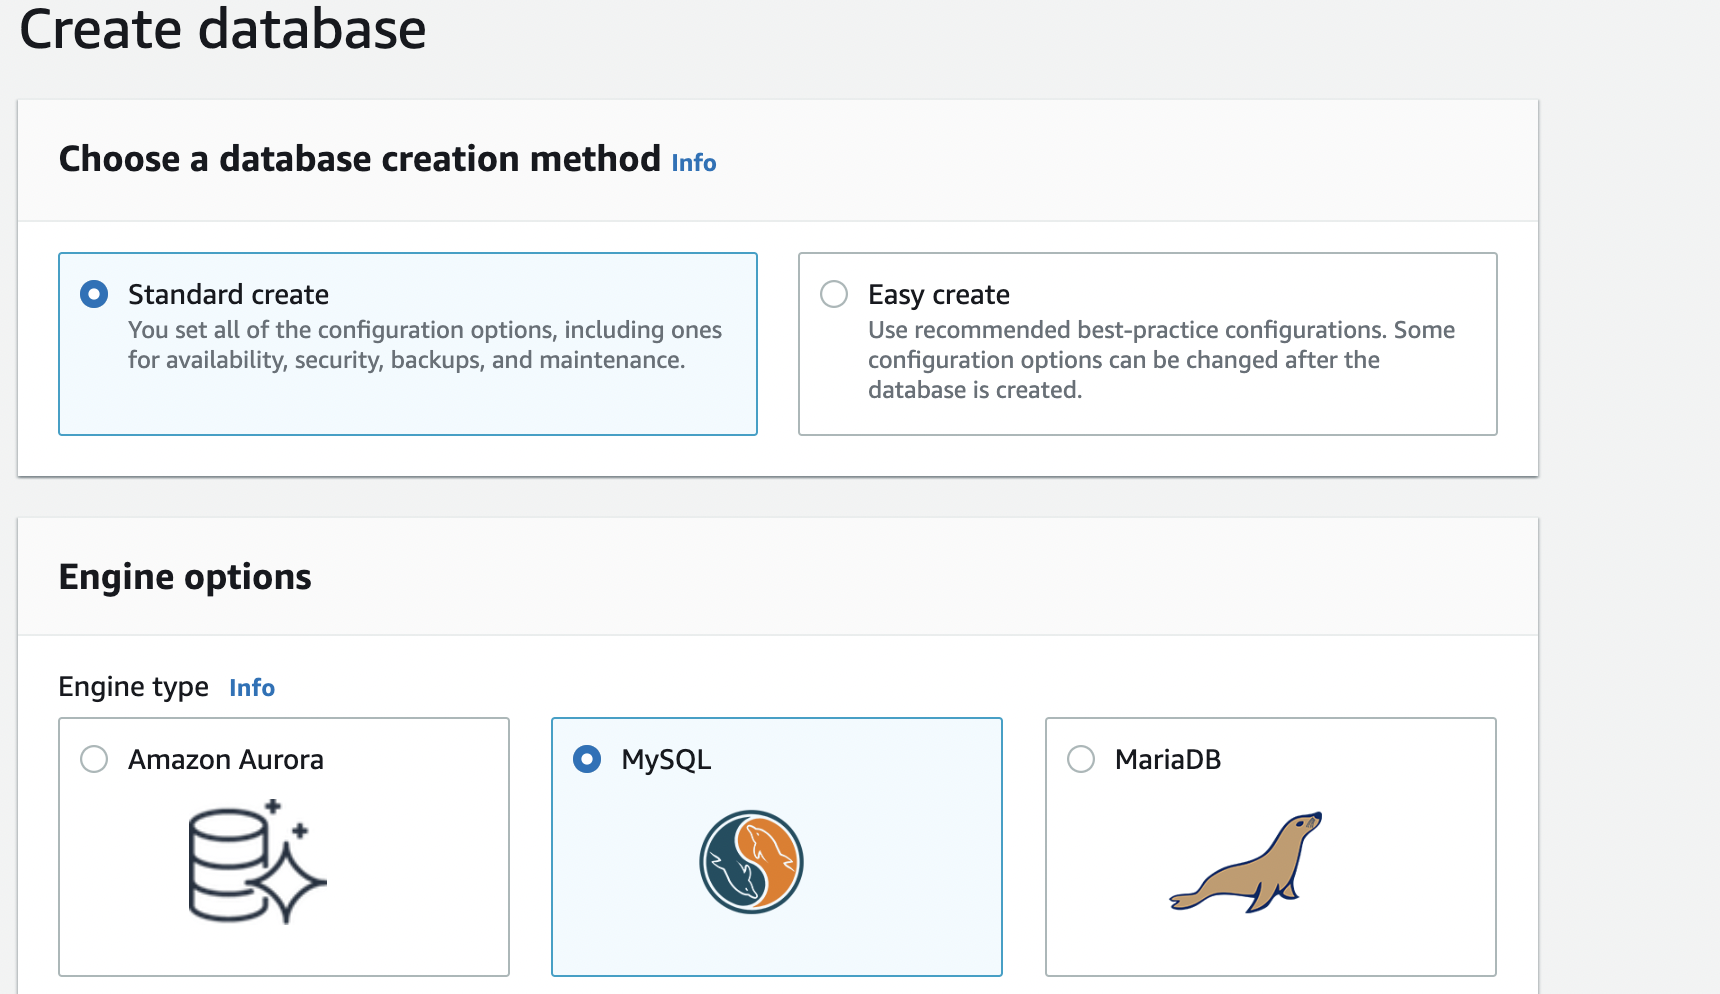
Creating an RDS Database with Engine Type: MySQL
Let us first create our RDS database using the AWS Management Console with MySQL as the engine type:
For creating the RDS database in a private subnet we have used the following configurations:
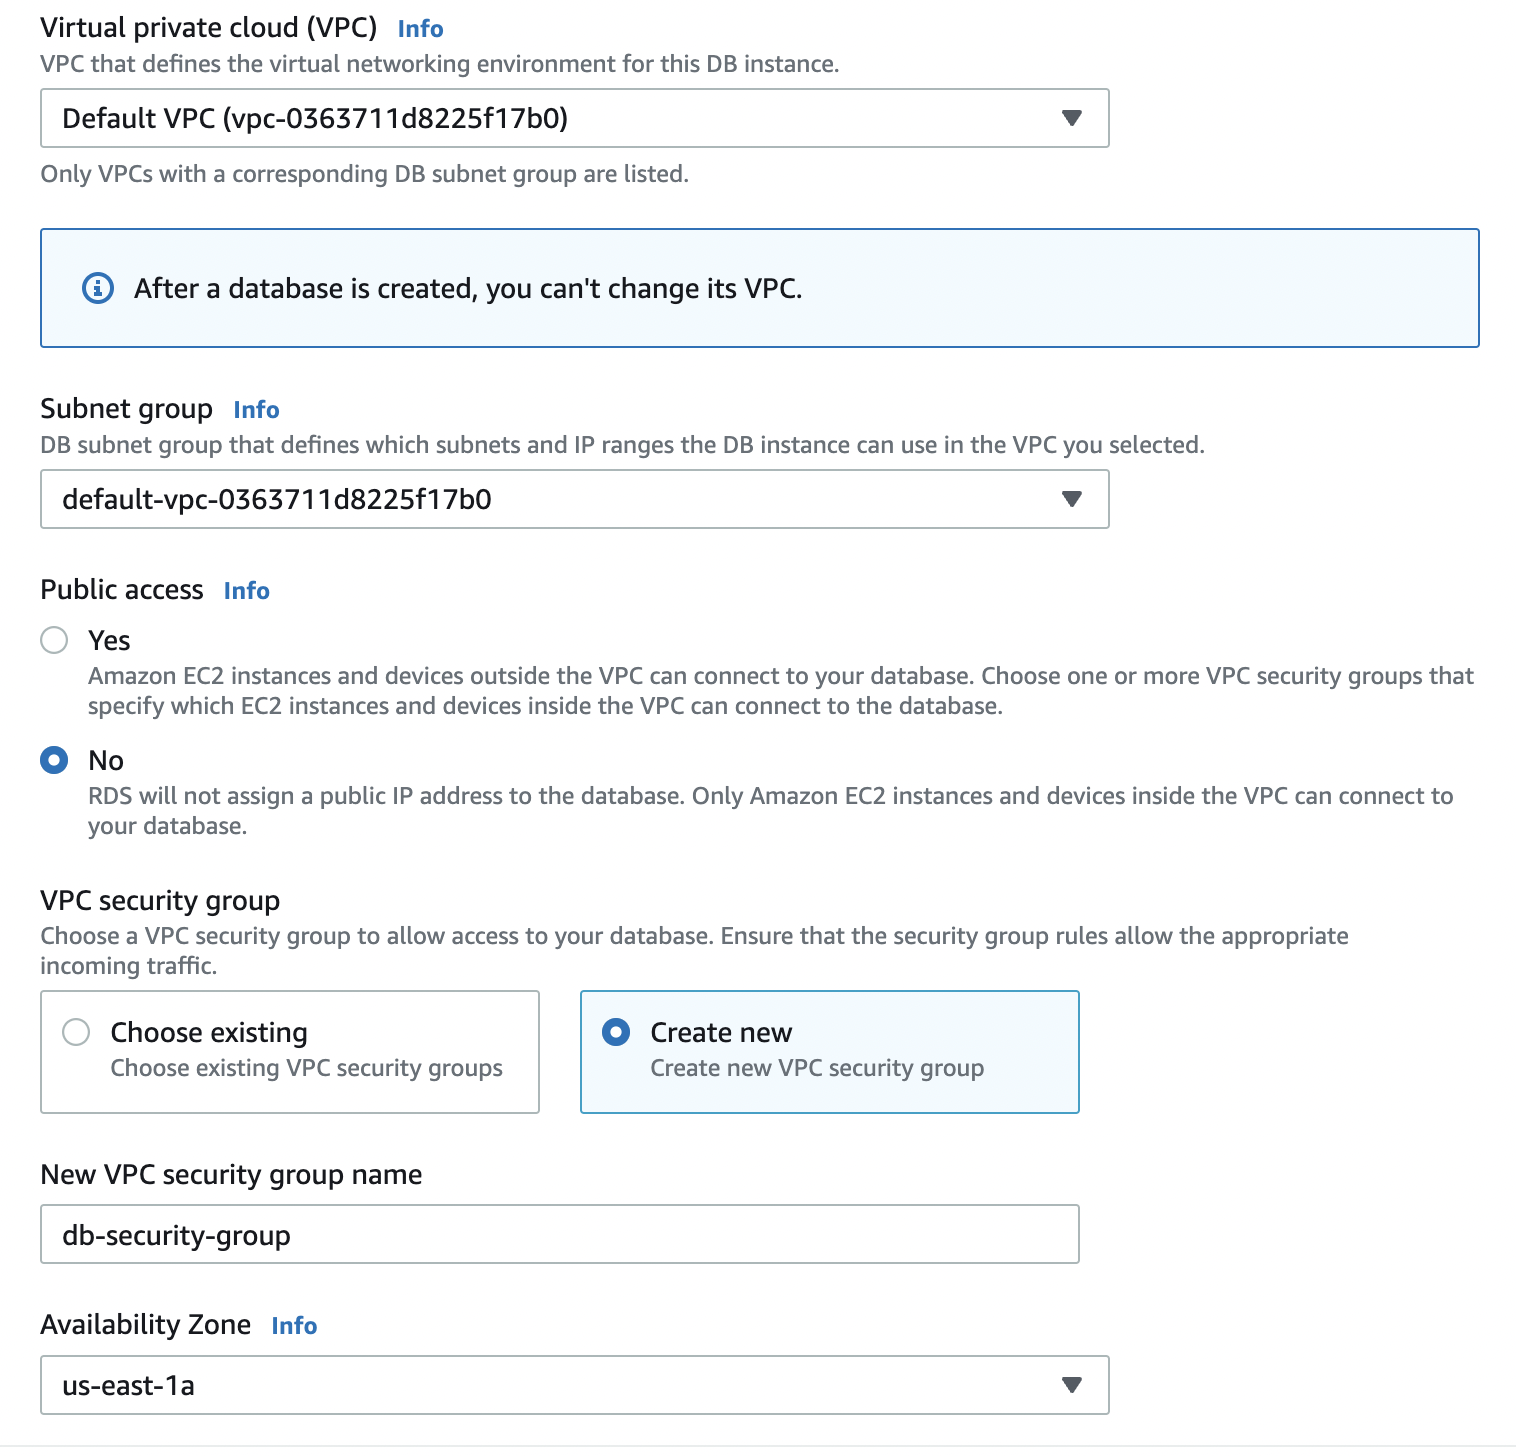
We have used the default virtual private cloud(VPC) available in our AWS account and set the public access to No. We have also chosen the option to create a new security group where we will define the inbound rules to allow traffic from selected sources.
We will also select Password authentication as the Database authentication option.
Our RDS database created in a private subnet is ready to use when the status changes to available
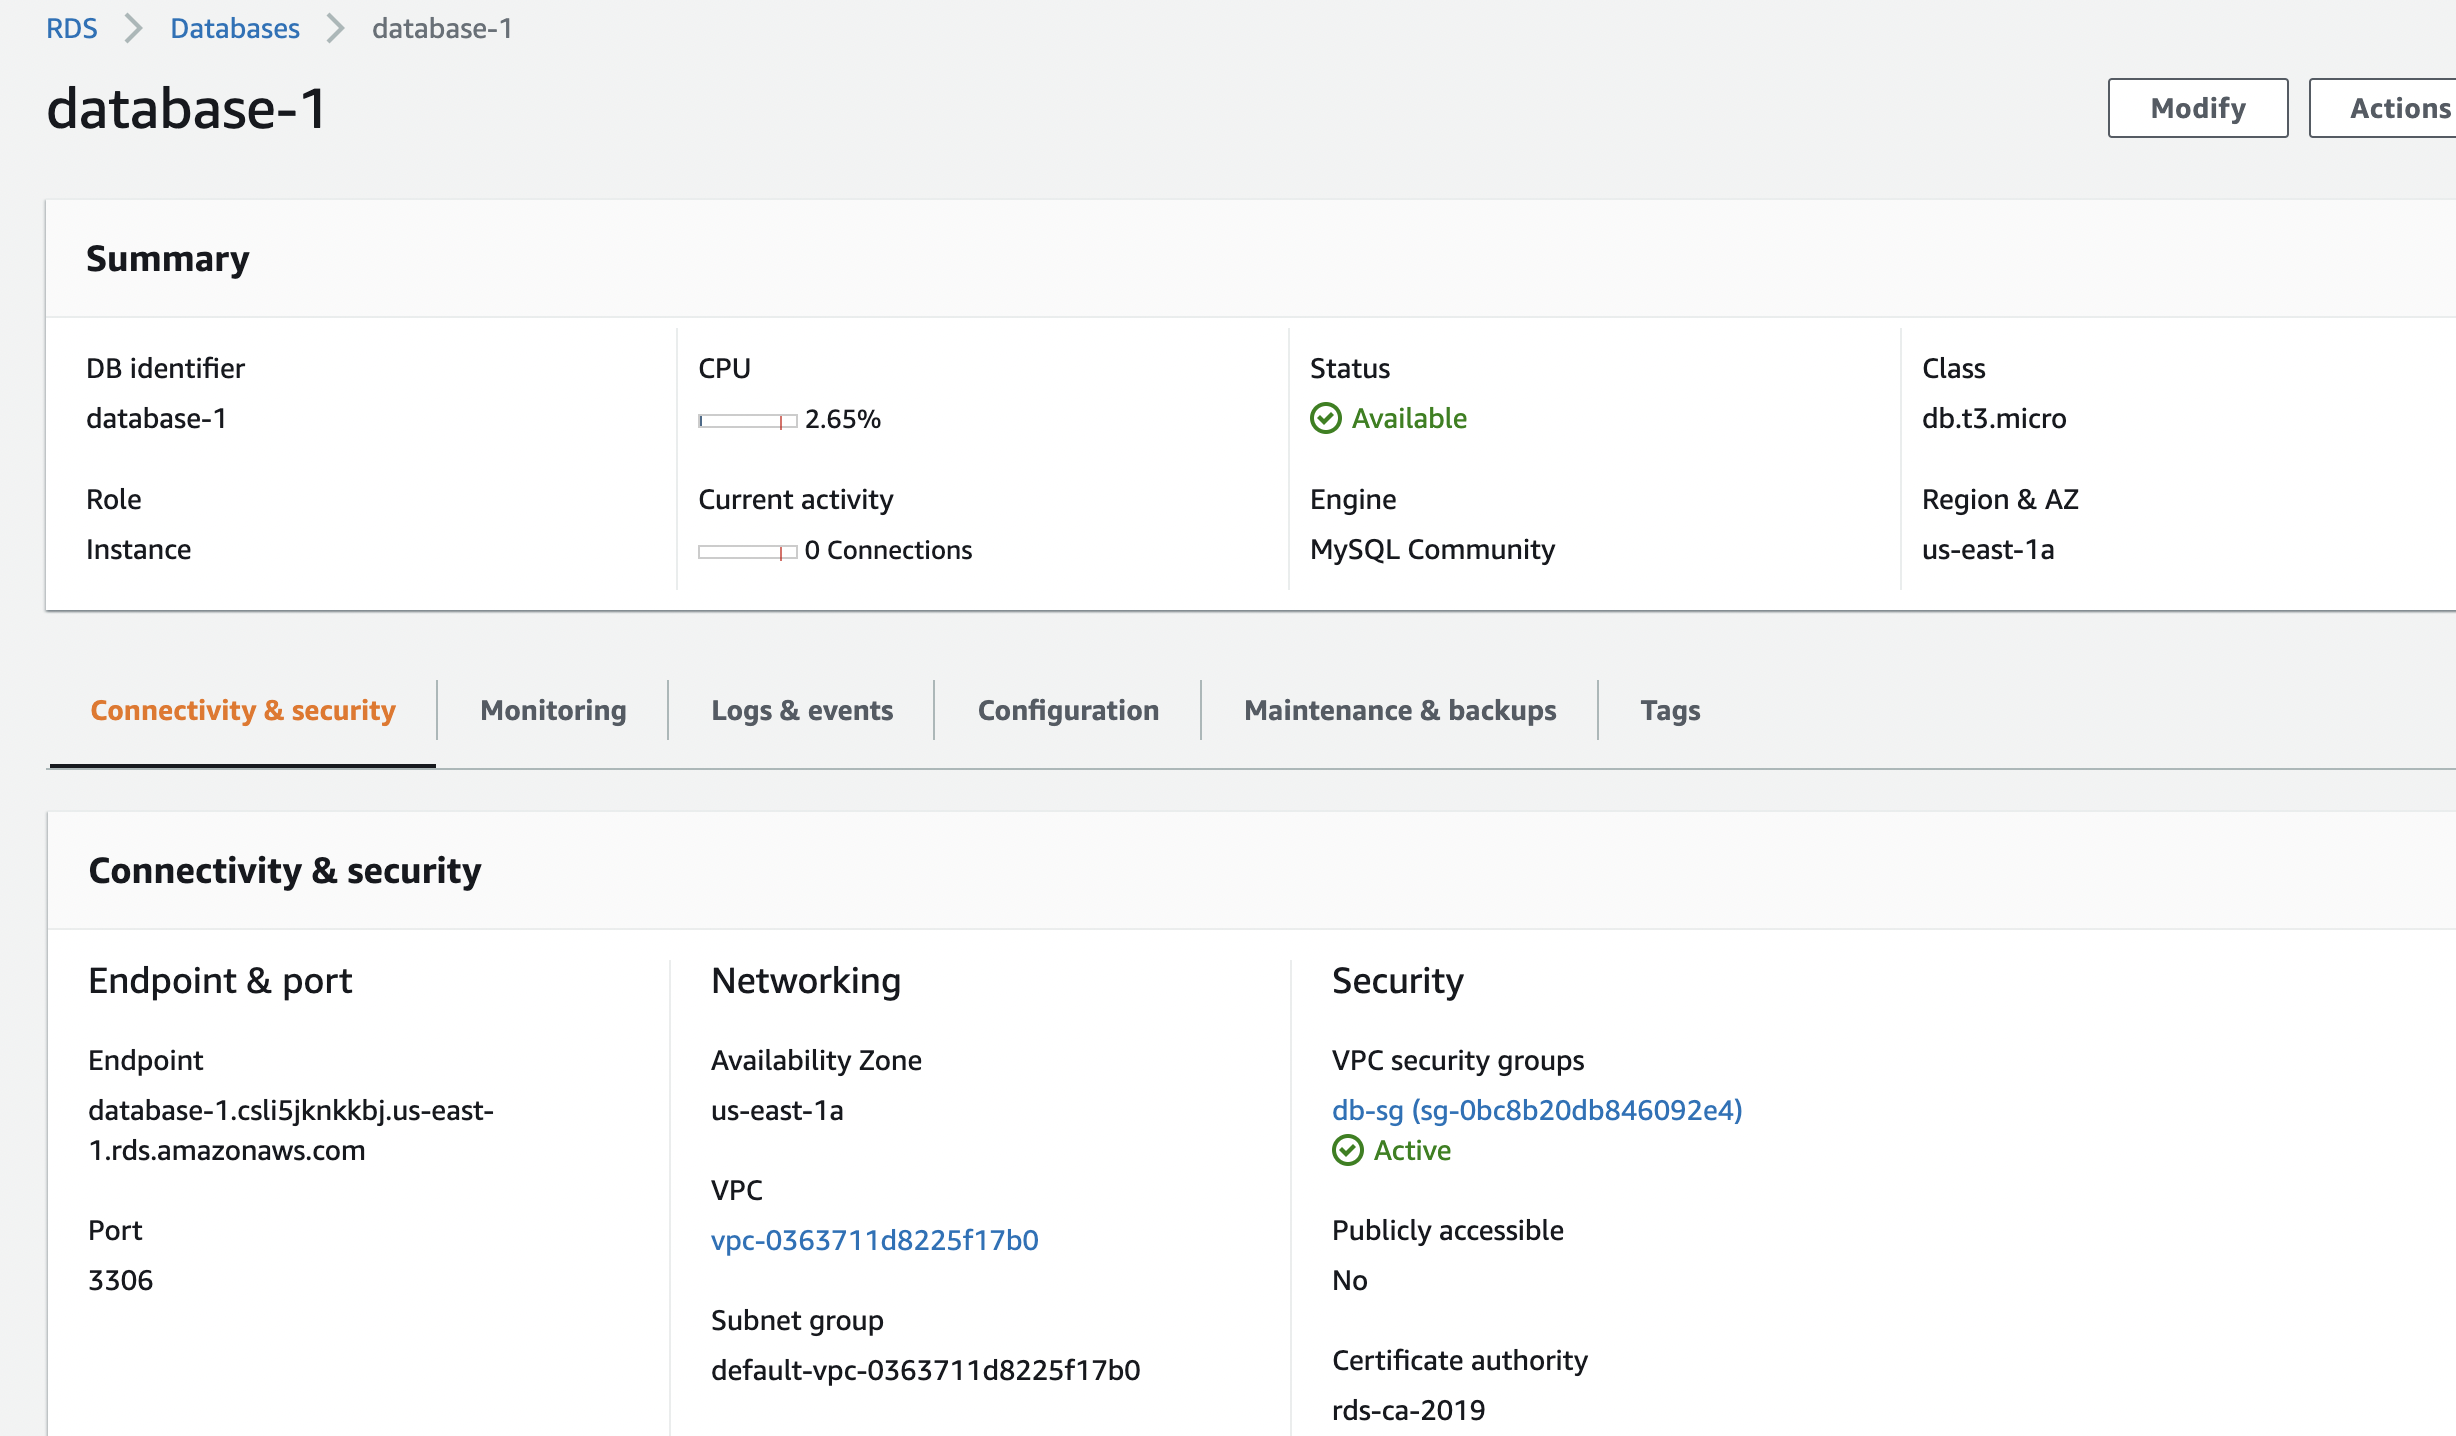
When the database is ready to be used, we can see the endpoint of the database along with the port which we will use later to connect to the database.
With our database created, we will next set up a jump host and populate inbound rules in the security groups in the following sections.
Creating an EC2 Instance as the Jump Host
A jump host is also called a bastion host/server whose sole purpose is to provide access to resources in a private network from an external network like the internet. A rough representation of this architecture is shown below:
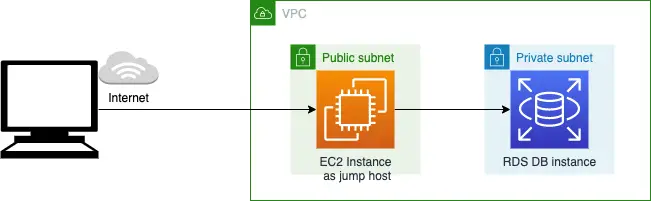
Here we are using an EC2 instance in a public subnet as our jump host for connecting to an RDS database in a private subnet.
Let us create the EC2 instance from the AWS Management Console in a public subnet in the same VPC where we had created our RDS database in the previous section.:
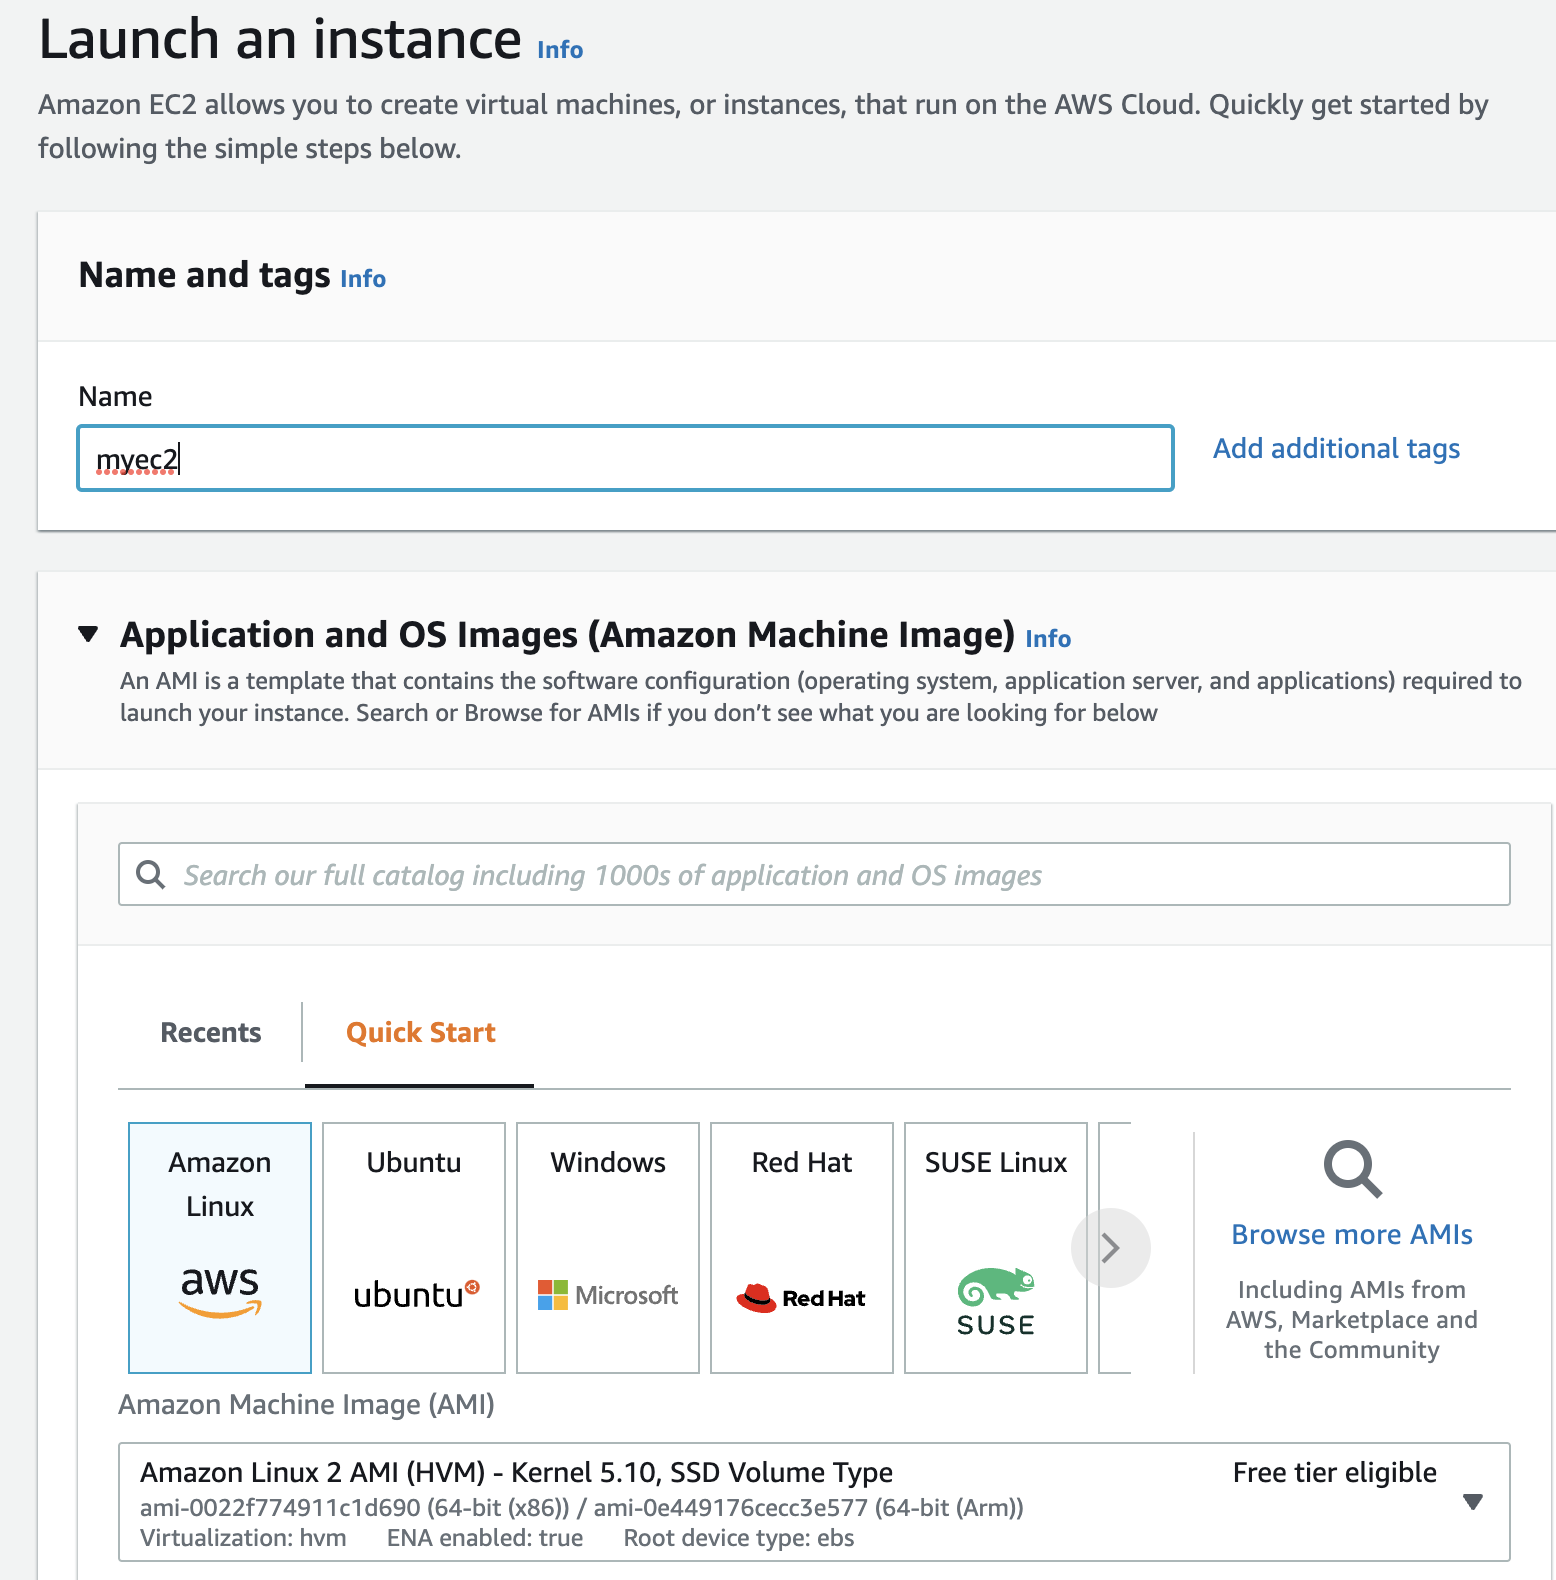
We have created our instance in the free tier with an SSH key pair to securely access the instance with SSH in the later sections. An SSH key pair is used to authenticate the identity of a user or process (local workstation) that wants to access a remote system (the EC2 instance) using the SSH protocol.
We can either create a new SSH key pair or choose to use an existing key pair when creating the instance. We have created a new key pair as shown below:
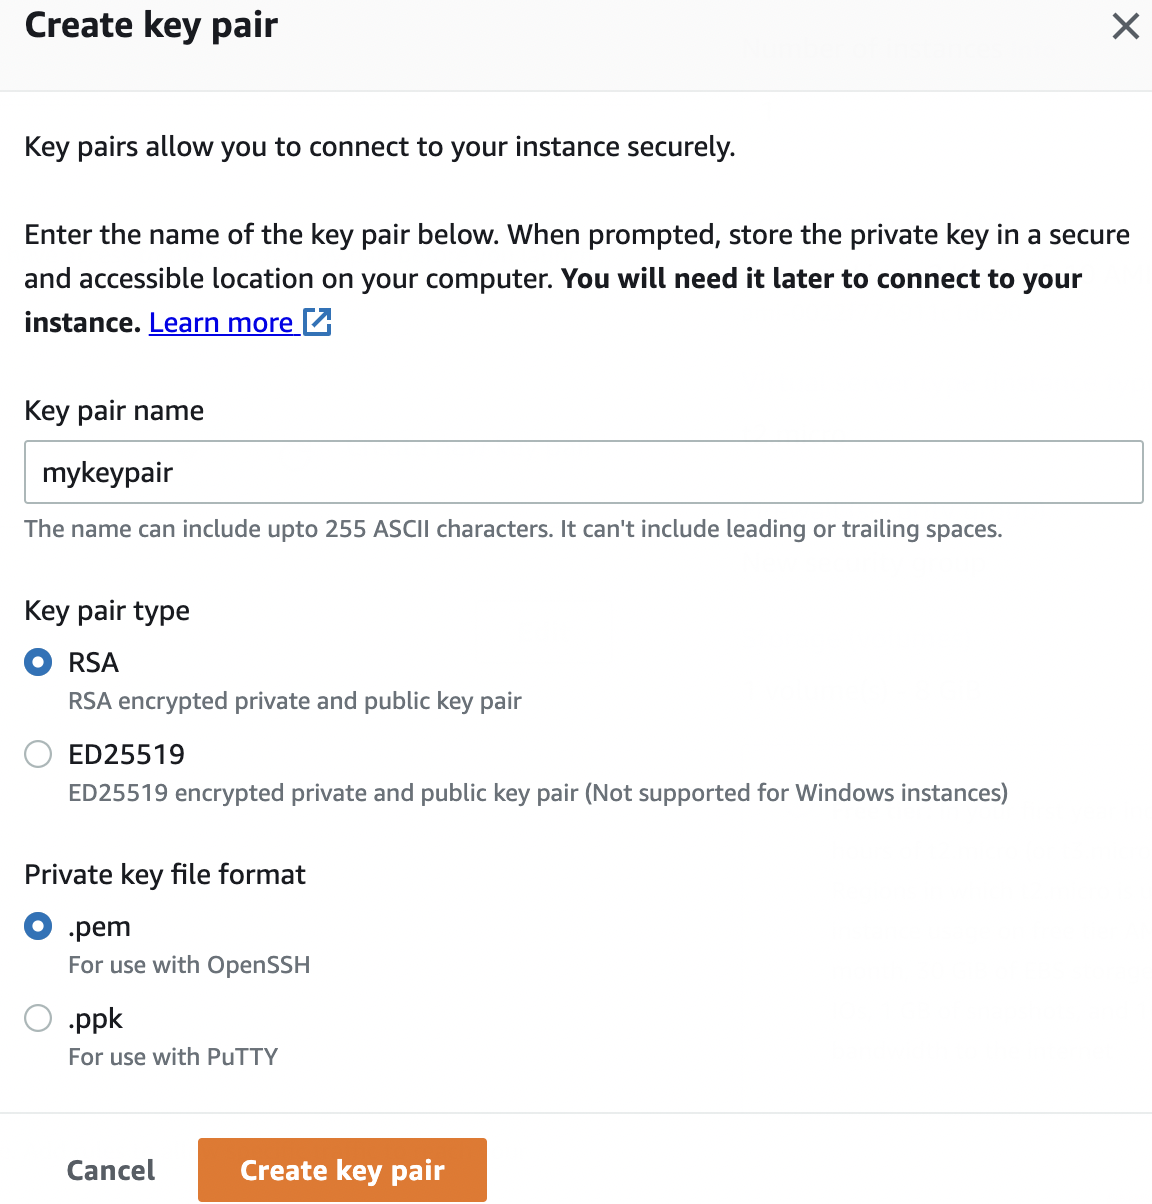
The SSH key pair consists of a public key and a private key. The public key is used by the local workstation and the EC2 instance to encrypt messages. On the EC2 side, it is saved as an entry in a file: ~/.ssh/authorized_keys that contains a list of all authorized public keys.
We have downloaded the private key of the SSH key pair and saved it to our local workstation.
For creating the instance in the public subnet we have used the network settings as shown below:
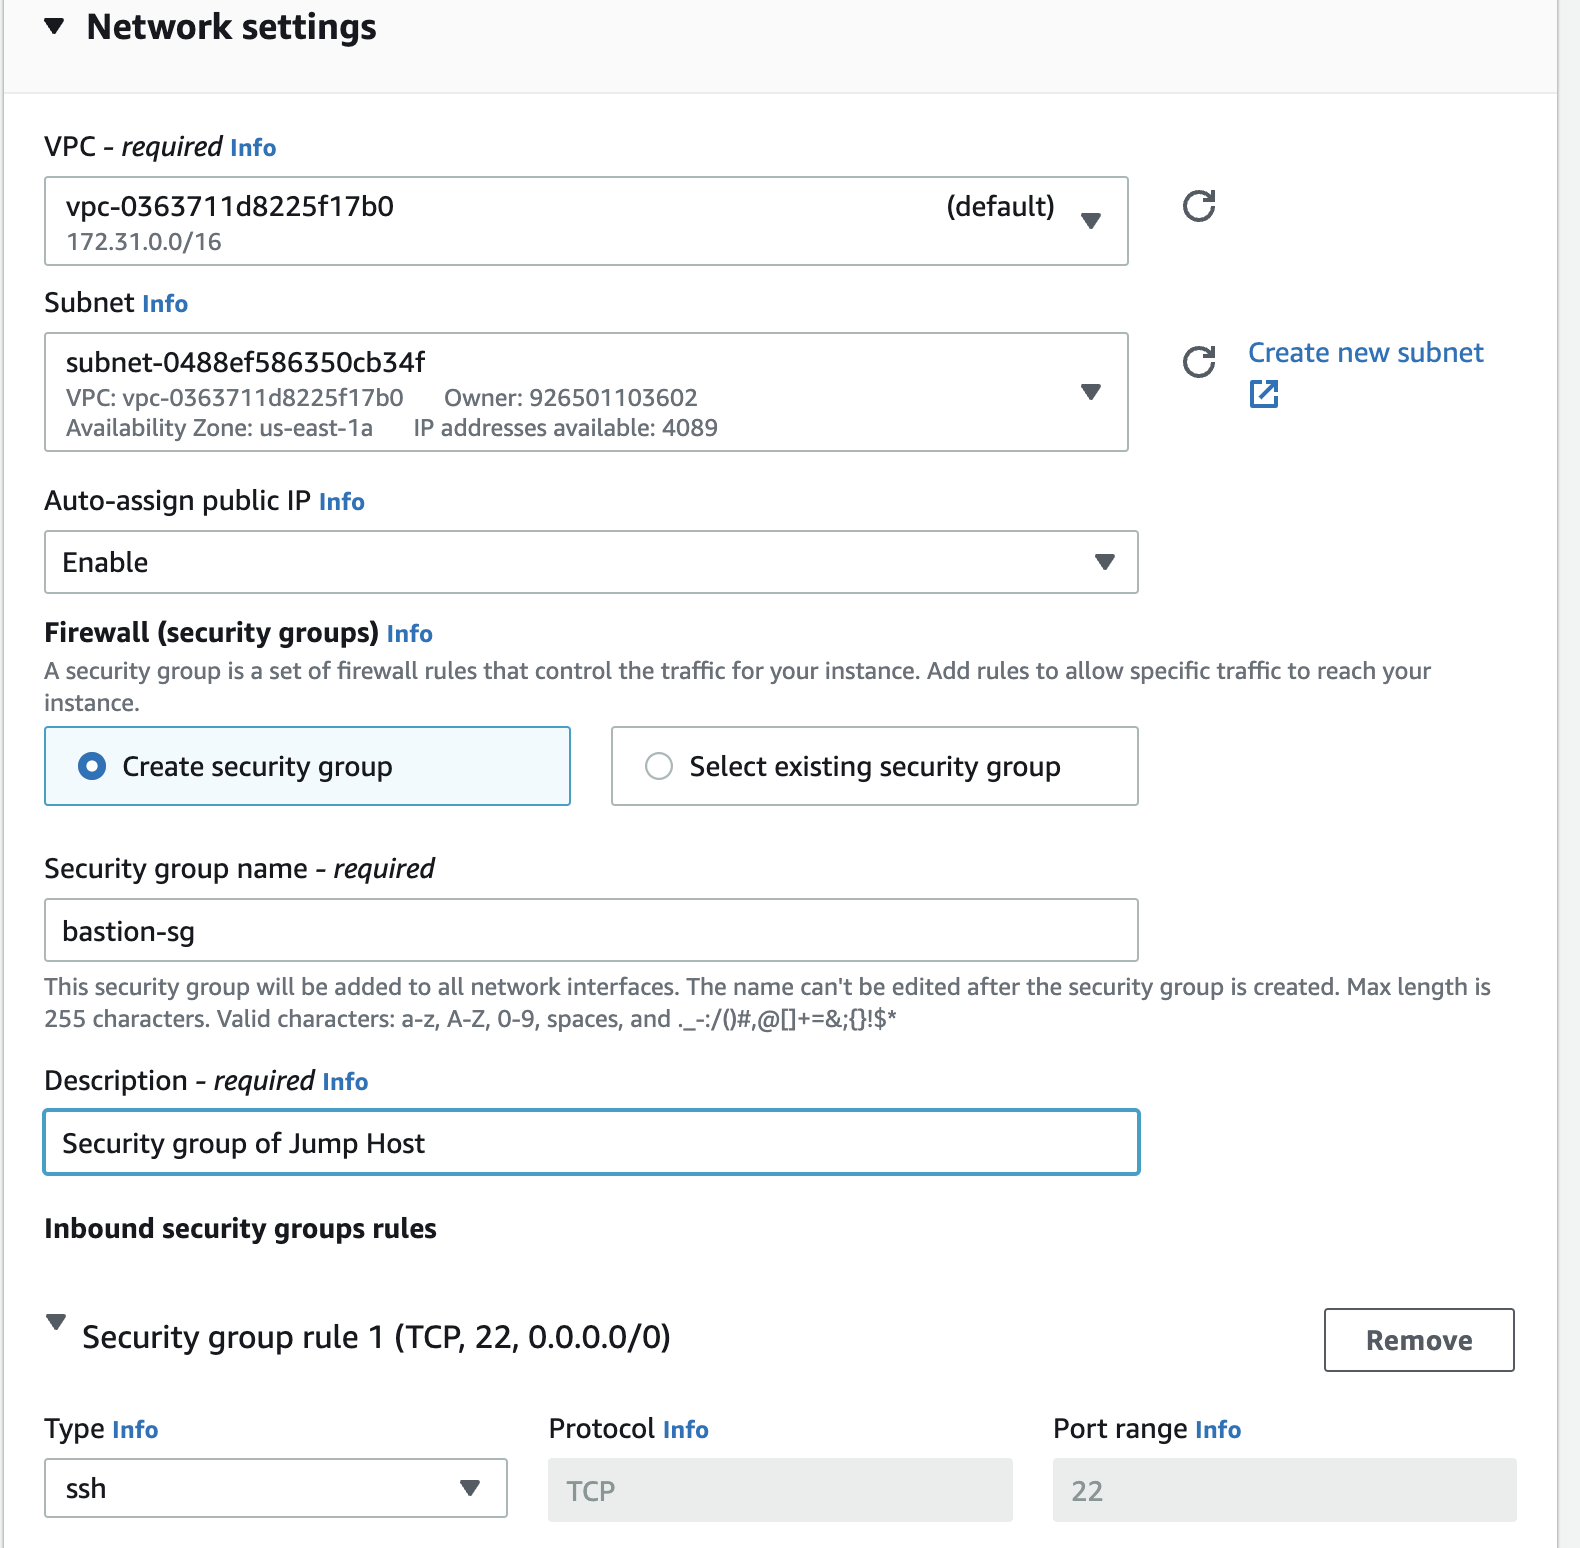
We will use this EC2 instance as our jump host on which we will set up an SSH tunnel for connecting to the RDS database in the next section.
Allow Traffic to the RDS Database from the Jump Host
To enable connectivity to our RDS database, any security groups, network ACL, security rules, or third-party security software that exist on the RDS database must allow traffic from the EC2 instance used as the jump host.
In our example, the security group of our RDS database must allow access to port 3306 from the EC2 instance. To enable this access, let us add an inbound rule to the new security group associated with the RDS database to allow connections from the EC2 instance:

Here we have specified the port range as 3306 and the source as 172.31.24.5/32 which is the private IP of the EC2 instance.
The EC2 instance is also secured by a security group. A security group is associated with an outbound rule, by default, that allows outbound traffic to all destinations. Accordingly, this rule will also allow the EC2 instance to make an outbound connection to the RDS database.
Connecting to the RDS Database
We use a mechanism called: SSH tunneling or port forwarding for connecting to the RDS database. SSH tunneling is a method of transporting arbitrary networking data over an encrypted SSH connection.
The SSH client on our local workstation listens for connections on a configured port. When it receives a connection, it tunnels the connection to the SSH server which is our EC2 instance acting as the jump host.
The SSH server(EC2 instance) connects to a destination port, usually on a different machine than the SSH server. In our example, the destination port is the port of the RDS database.
Additionally, since the SSH private key is securely saved on our local workstation, the communication with the RDS database is secured/encrypted over the SSH tunnel and the owner of the SSH private key is authenticated by the jump host.
Please refer to the official documentation to understand more details about SSH tunneling.
We will use MySQL workbench which provides a GUI to connect to our RDS MySQL database in two ways:
Connect using Standard TCP/IP
In this method, we create an SSH tunnel from our local machine to access the RDS MySQL database using the EC2 instance as the jump host.
Let us start the SSH tunnel by running the following command:
ssh -i <SSH key of EC2 instance> ec2-user@<instance-IP of EC2> -L 3306:<RDS DB endpoint>:3306
When we run this command, the local port 3306 on our local machine tunnels to port 3306 on the RDS instance. We can then use MySQL workbench to access the RDS MySQL with connection type as Standard TCP/IP:
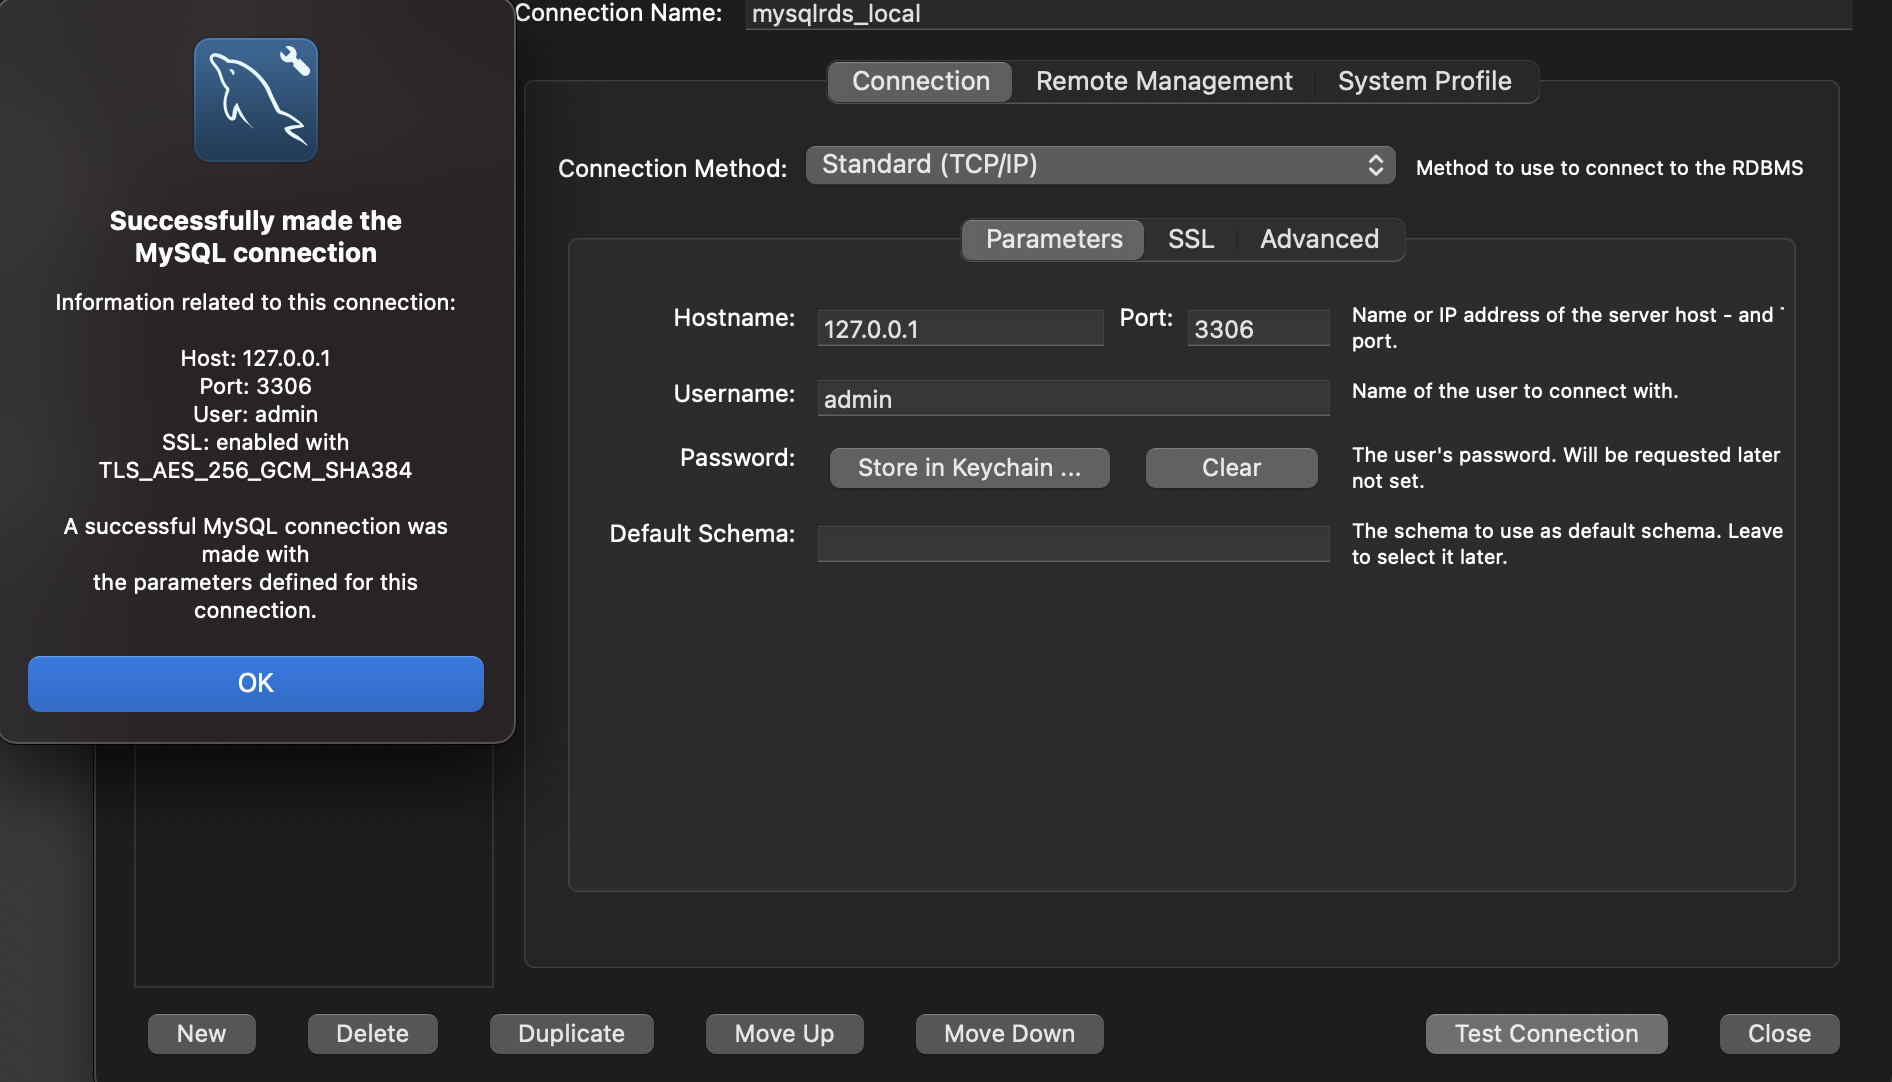
We can see the successful test connection message with 127.0.0.1 as the hostname and 3306 as the port.
Alternately, we can run the following command in our terminal using the MySQL Command-Line Client: mysql:
mysql -u <DB User> -h 127.0.0.1 -P 3306 -p <DB password>
Here also we are connecting to the RDS MySQL database with 127.0.0.1 as the hostname and 3306 as the port.
Connect using Standard TCP/IP over SSH
In this method, we are connecting to the RDS MySQL database using the MySQL workbench using TCP/IP over SSH as the connection type:

We can see the successful test connection message with the following parameters :
- SSH Hostname: DNS name or IP of the EC2 instance used as the jump host
- SSH Username: SSH user name (
ec2-userin our example) to connect to the EC2 instance. - SSH Key File: Path to the SSH private key file saved in our local machine when creating the EC2 instance.
- MySQL Hostname: Endpoint of the RDS MySQL database.
- MySQL Server Port: TCP/IP port of the RDS MySQL database.
- Username: The user name of the RDS MySQL database set up during RDS database creation.
- Password: Password of the RDS MySQL database set up during RDS database creation.
Conclusion
In this article, we walked through the stages of creating an RDS database in a private subnet and then connecting to the database using a jump host. Here is a summary of the steps for our quick reference:
- Create an RDS database in a private subnet.
- Create an EC2 instance in a public subnet in the same VPC where the RDS database was created. This EC2 instance will act as the bastion or Jump host for connecting to the RDS database. A bastion or jump host is a server whose purpose is to provide access to a private network from an external network like the internet.
- Add an inbound rule to the security group associated with the RDS database to allow incoming traffic from the EC2 instance created in step 2.
- Optionally add an outbound rule to the security group associated with the EC2 instance to allow outgoing traffic to the RDS database.
- Use a database client and connect to the endpoint of the RDS database with the database credentials configured during creation time or later using the SSH tunneling method.