In this article we will learn how to mock objects with Mockito. We’ll first talk about what test doubles are and then how we can use them to create meaningful and tailored unit tests. We will also have a look at the most important Dos and Don’ts while writing clean unit tests with Mockito.
Example Code
This article is accompanied by a working code example on GitHub.Introduction to Mocks
The basic concept of mocking is replacing real objects with doubles. We can control how these doubles behave. These doubles we call test doubles. We’ll cover the different kinds of test doubles later in this article.
Let’s imagine we have a service that processes orders from a database. It’s very cumbersome to set up a whole database just to test that service. To avoid setting up a database for the test, we create a mock that pretends to be the database, but in the eyes of the service it looks like a real database. We can advise the mock exactly how it shall behave. Having this tool, we can test the service but don’t actually need a database.
Here Mockito comes into play. Mockito is a very popular library that allows us to create such mock objects.
Consider reading Why Mock? for additional information about mocking.
Different Types of Test Doubles
In the world of code, there are many different words for test doubles and definitions for their duty. I recommend defining a common language within the team.
Here is a little summary of the different types for test doubles and how we use them in this article:
| Type | Description |
|---|---|
| Stub | A stub is an object that always returns the same value, regardless of which parameters you provide on a stub’s methods. |
| Mock | A mock is an object whose behavior - in the form of parameters and return values - is declared before the test is run. (This is exactly what Mockito is made for!) |
| Spy | A spy is an object that logs each method call that is performed on it (including parameter values). It can be queried to create assertions to verify the behavior of the system under test. (Spies are supported by Mockito!) |
Mockito in Use
Consider the following example:
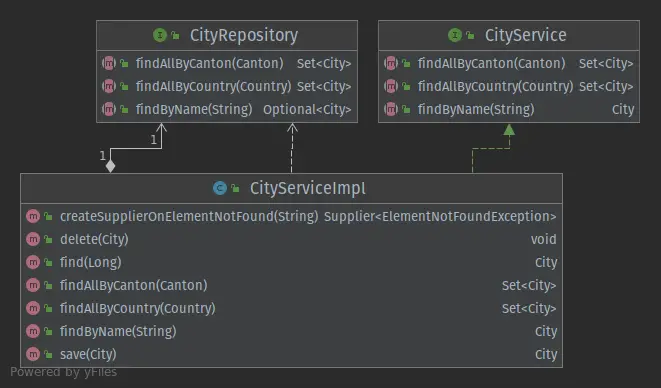
The green arrow with the dotted line and filled triangle stands for implements. CityServiceImpl is the
implementation of CityService and therefore an instance of CityService.
The white arrow with the diamond says
that CityRepository is part of CityService. It is also known as composition.
The remaining white arrow with the
dotted line stands for the fact that CityServiceImpl owns a reference to CityRepository.
We don’t want to consider the CityRepository implementation when unit testing CityServiceImpl. If we used a real CityRepository implementation in the test, we would have to connect it to a database, which makes the test setup more complicated and would increase the number of reasons why our test could fail, since we have added complexity in our test fixture
with potentially failing components.
Here Mockito comes to the rescue! Mockito allows us to create a suitable test double for the CityRepository interface and lets us define the behavior we expect from it. Applying this possibility we can create meaningful unit
Here Mockito comes to the rescue! Mockito allows us to create a suitable test double for the CityRepository interface and lets us define the behavior we expect from it. Applying this possibility we can create meaningful unit
tests to ensure the correct behavior of the service.
In summary, what we want is a simple, fast, and reliable unit test instead of a potentially complex, slow, and flaky test!
Let’s look at an example:
class CityServiceImplTest {

  // System under Test (SuT)
  private CityService cityService;

  // Mock
  private CityRepository cityRepository;

  @BeforeEach
  void setUp() {
    cityRepository = Mockito.mock(CityRepository.class);
    cityService = new CityServiceImpl(cityRepository);
  }

  // Test cases omitted for brevity.

}
The test case consists of the system under test CityService and its dependencies. In this case, the only dependency
is an instance of CityRepository. We need those references to test the expected behavior and reset the test double to not
interfere with other test cases (more about that later).
Within the setup section, we create a test double with Mockito.mock(<T> classToMock). Then, we inject this test double
into the CityServiceImpl constructor so that its dependencies are satisfied. Now we are ready to create the test cases:
class CityServiceImplTest {

  // System under Test (SuT)
  private CityService cityService;

  // Mock
  private CityRepository cityRepository;

  @BeforeEach
  void setUp() {
    cityRepository = Mockito.mock(CityRepository.class);
    cityService = new CityServiceImpl(cityRepository);
  }

  @Test
  void find() throws Exception {
    City expected = createCity();
    Mockito.when(cityRepository.find(expected.getId()))
        .thenReturn(Optional.of(expected));
    City actual = cityService.find(expected.getId());
    ReflectionAssert.assertReflectionEquals(expected, actual);
  }

  @Test
  void delete() throws Exception {
    City expected = createCity();
    cityService.delete(expected);
    Mockito.verify(cityRepository).delete(expected);
  }

}
Here we have two example test cases.
The first one (find()) is about finding a city via the CityService. We create an instance of City as the object which we expect to be returned from the CityService. Now we have to advise the repository to return that
value if - and only if - the declared ID has been provided.
Since cityRepository is a Mockito mock, we can declare its behavior with Mockito.when(). Now we can call
the find() method on the service, which will return an instance of City.
Having the expected and the actually returned City objects, we can assert that they have the same field values.
In case a method has no return value (like cityService.delete() in the code example), we can’t create an assertion on
the return value. Here Mockito’s spy features come into play.
We can query the test double and ask if a method was called with the expected parameter. This is what Mockito.verify()
does.
These two features - mocking return values and verifying method calls on test doubles - give us great power to create various simple test cases. Also, the shown examples can be used for test-driven development and regression tests. Mockito fits both needs!
How to Create Mocks with Mockito
Until now, we have seen how to create fast and simple test cases. Now let’s look at the different ways of creating mocks for our needs. Before we’ll continue, we must understand what kind of test double Mockito creates.
Mockito creates test doubles of the type mock, but they have some features of a spy. These extra features allow us to verify if a certain method was called after we executed our test case. More about that later.
Creating Mocks with Plain Mockito
Let’s continue with the first variant to create a mock with Mockito. This variant doesn’t require any framework or annotations. It is applicable in every project where we have included Mockito.
CityRepository cityRepository = Mockito.mock(CityRepository.class);
CityService cityService = new CityServiceImpl(cityRepository);
We can simply declare a variable with the type of the component we want to mock. Taking the example from above, we want
CityRepository to be a mock so that we don’t have to rely on its dependencies (like a database). The mock is then passed to the
service, which is the system under test.
That’s all we need to set up our first mock with Mockito!
Initializing Mocks with Mockito Annotations
In case we have multiple dependencies that must be mocked, it gets cumbersome to create each and every mock manually
with the variant shown above. So, we can also create mocks by using the @Mock annotation:
class CityServiceImplTestMockitoAnnotationStyle {

  // System under Test (SuT)
  private CityService cityService;

  // Mock
  @Mock
  private CityRepository cityRepository;

  @BeforeEach
  void setUp() {
    MockitoAnnotations.openMocks(this);
    cityService = new CityServiceImpl(cityRepository);
  }

}
We can annotate each field to be a mock with the annotation of @Mock. Annotating them doesn’t initialize them yet. To
do so, we call MockitoAnnotations.openMocks(this) in the @BeforeEach section of our test. The annotated fields of the
provided object are then initialized and ready to use, which is in our case is the class instance itself (this). We don’t have to deal
with boilerplate code anymore and can keep our unit tests neat and concise.
Using JUnit Jupiter’s MockitoExtension
As an alternative to the Mockito annotation style we can make use of JUnit Jupiter’s @ExtendWith and extend JUnit
Jupiter’s context with MockitoExtension.class:
@ExtendWith(MockitoExtension.class)
class CityServiceImplTestMockitoJUnitExtensionStyle {

  // System under Test (SuT)
  private CityService cityService;

  // Mock
  @Mock
  private CityRepository cityRepository;

  @BeforeEach
  void setUp() {
    cityService = new CityServiceImpl(cityRepository);
  }

}
The extension assumes the initialization for annotated fields, so we must not do it ourselves. This makes our setup even more neat and concise!
Injecting Mocks with Spring
If we have a more complex test fixture, and we want to inject the mock into Spring’s ApplicationContext we can make
use of @MockBean:
@ExtendWith(SpringExtension.class)
class CityServiceImplTestMockitoSpringStyle {

  // System under Test (SuT)
  private CityService cityService;

  // Mock
  @MockBean
  private CityRepository cityRepository;

  @BeforeEach
  void setUp() {
    cityService = new CityServiceImpl(cityRepository);
  }

}
Note that @MockBean is not an annotation from Mockito but from Spring Boot! In the startup process, Spring places the
mock in the context so that we don’t need to do it ourselves. Wherever a bean requests to have its dependency satisfied,
Spring injects the mock instead of the real object. This becomes handy if we want to have the same mock in different
places.
See Mocking with Mockito and Spring Boot for a deep dive on how to mock Beans in Spring Boot.
Defining the Behavior of Mocks
In this section, we have a look at how to define the behavior of the mocks in our test. What we have seen until now is what mocks are used for and how to create them. We are ready to use them in our test cases.
How to Return an Expected Object
The probably most common case when using Mockito is to return expected objects. If we call findByName(name) on CityService
we would expect that the argument for name is forwarded to the repository which returns an Optional of a City. The
service unpacks the Optional if present or otherwise throws an exception.
  @Test
  void findByName() throws ElementNotFoundException {
    City expected = createCity();
    Mockito.when(cityRepository.findByName(expected.getName()))
      .thenReturn(Optional.of(expected));
    City actual=cityService.findByName(expected.getName());
    ReflectionAssert.assertReflectionEquals(expected,actual);
  }
We first create the expected object for City. Having that expected instance for a City, we can define the behavior
of the mock which is to return the Optional of the expected instance. We do so by
calling Mockito.when() with the call we want to make. As a last step, we must declare the return value of that call at
the end of the method chain.
If we try to find the expected city by its name, the service will return the previously declared object without throwing
an exception. We can assert that the expected City equals the actual City from the service.
How to Throw an Exception
Mockito gives us developers also the possibility to throw exceptions instead of returning a value. This is mostly used to test error handling blocks in our code.
  @Test
  void findByNameThrowsExceptionIfCityNameContainsIllegalCharacter() {
    String cityName="C!tyN@me";
    Mockito.when(cityRepository.findByName(cityName))
      .thenThrow(IllegalArgumentException.class);
    Assertions.assertThrows(IllegalArgumentException.class,
      () -> cityService.findByName(cityName));
  }
Declaring the behavior only differs by the last call in the method chain. With thenThrow(), we advise Mockito to throw an
IllegalArgumentException in this case.
In our case, we just assert that our CityService implementation re-throws the exception.
How to Verify a Method Call
We can’t advise Mockito to return a value on void methods. In this case it is better to assert an underlying component
was called. This can be achieved by using Mockito.verify():
  @Test
  void delete() throws ElementNotFoundException {
    City expected = createCity();
    cityService.delete(expected);
    Mockito.verify(cityRepository).delete(expected);
  }
In this example, it isn’t necessary to declare the behavior of the mock beforehand. Instead, we just query the mock if it has been called during the test case. If not, the test case fails.
How To Verify the Number of Method Calls
Mockito.verify(cityRepository, Mockito.times(1)).delete(expected);
We can verify how many times a mock was called by simply use the built-in verify() method. If the condition is not met,
our test case will fail. This is extremely handy for algorithms or similar processes. There are other predefined
verification modes such as atLeastOnce() or never() already present and ready to use!
Mockito Best Practices
Knowing how to create the mocks, let’s have a look at some best practices to keep our tests clean and maintainable. It will save us much time debugging and doesn’t let our team members guess what the intent of the test case is.
Don’t Share Mock behavior Between Tests
We might be tempted to put all behavior declarations using Mockito.when() into a setup method that runs before each test (i.e. annotated with @BeforeEach)
to have them in a common place. Even though this reduces the test cases to a minimum, the readability suffers a lot:
  @BeforeEach
  void setUp() {
    expected = createCity();
    cityRepository = Mockito.mock(CityRepository.class);
    cityService = new CityServiceImpl(cityRepository);

    // Avoid such complex declarations
    Mockito.when(cityRepository.save(expected))
        .thenReturn(Optional.of(expected));
    Mockito.when(cityRepository.find(expected.getId()))
        .thenReturn(Optional.of(expected));
    Mockito.when(cityRepository.findByName(expected.getName()))
        .thenReturn(Optional.of(expected));
    Mockito.when(cityRepository.findAllByCanton(expected.getCanton()))
        .thenReturn(Collections.singleton(expected));
    Mockito.when(cityRepository.findAllByCountry(expected.getCanton().getCountry()))
        .thenReturn(Collections.singleton(expected));
  }
This will get us simple test cases like this because we don’t have to define the behavior in each test case:
  @Test
  void save() throws ElementNotFoundException {
    ReflectionAssert.assertReflectionEquals(expected, cityService.save(expected));
  }

  @Test
  void find() throws ElementNotFoundException {
    ReflectionAssert.assertReflectionEquals(expected, cityService.find(expected.getId()));
  }

  @Test
  void delete() throws ElementNotFoundException {
    cityService.delete(expected);
    Mockito.verify(cityRepository).delete(expected);
  }
But, because all mocking behavior is in a central place, we must pay attention to not break any test cases when modifying this central code. Also, we don’t know which test case requires which behavior when reading the test case. We have to guess or investigate the actual code to find out.
We better declare the behavior for each test case in isolation, so that the test cases are independent of each other. The code from above should be refactored to something like the following:
  @BeforeEach
  void setUp() {
    cityRepository = Mockito.mock(CityRepository.class);
    cityService = new CityServiceImpl(cityRepository);
  }

  @Test
  void save() throws ElementNotFoundException {
    City expected = createCity();
    Mockito.when(cityRepository.save(expected))
      .thenReturn(Optional.of(expected));
    City actual=cityService.save(expected);
    ReflectionAssert.assertReflectionEquals(expected,actual);
  }

  @Test
  void find() throws ElementNotFoundException {
    City expected = createCity();
    Mockito.when(cityRepository.find(expected.getId()))
      .thenReturn(Optional.of(expected));
    City actual=cityService.find(expected.getId());
    ReflectionAssert.assertReflectionEquals(expected,actual);
  }

  @Test
  void delete() throws ElementNotFoundException {
    City expected = createCity();
    cityService.delete(expected);
    Mockito.verify(cityRepository).delete(expected);
  }
If we explicitly want to re-use a certain mock behavior in multiple test cases, we can move it into special methods like this:
  void givenCityExists(City city) throws ElementNotFoundException {
    Mockito.when(cityRepository.find(city.getId()))
    .thenReturn(Optional.of(city));
  }

  @Test
  void find() throws ElementNotFoundException {
    City expected = createCity();
    givenCityExists(expected);
    City actual=cityService.find(expected.getId());
    ReflectionAssert.assertReflectionEquals(expected,actual);
  }
We can then use these methods in the test cases like above. It’s important to make methods with shared mock behavior very specific and name them properly to keep the test cases readable.
Write Self-Contained Test Cases
The unit tests we write should be runnable on any machine with the same result. They shouldn’t affect other test cases in any way. So we must write every unit test self-contained and independent of test execution order.
It’s likely that the errors in non-self-contained test cases are caused by setup blocks that declare behavior shared between test methods. If we need to add a new behavior at the end of the block, each previous declaration must be executed before we can to call ours. Or vice versa: if a new declaration is inserted at the beginning, causes a shift of all other declarations towards the end. At least now our alarm bell should ring, and it’s time to reconsider our test case!
Avoid Mockito.reset() for Better Unit Tests
Mockito recommends in their documentation to prefer recreation of mocks over resetting them:
Smart Mockito users hardly use this feature because they know it could be a sign of poor tests. Normally, you don’t need to reset your mocks, just create new mocks for each test method.
We better create simple and small test cases than lengthy and over-specified tests. The cause of such tests might be testing too much in a single unit test. But let’s look at an example for this situation:
  @Test
  void findAndDelete() throws ElementNotFoundException {
    City expected = createCity();
    Mockito.when(cityRepository.find(expected.getId()))
      .thenReturn(Optional.of(expected));
    City actual = cityService.find(expected.getId());
    ReflectionAssert.assertReflectionEquals(expected,actual);
    cityService.delete(expected);
    Mockito.verify(cityRepository).delete(expected);
    Mockito.reset(cityRepository);
    Mockito.when(cityRepository.find(expected.getId()))
      .thenReturn(Optional.empty());
    Assertions.assertThrows(ElementNotFoundException.class,
      () -> cityService.find(expected.getId()));
  }
What is this test case doing?
- Tries to find a city and asserts that it’s equal to the expected city
- Deletes a city and verifies that the delete method on the repository has been called
- Tries to find the previously created city again but expecting an exception.
We must call cityRepository.reset() to let Mockito forget what was declared before that line. This is necessary,
because we declared two different behaviors of cityService(expected.getId()) in the same test. This test case’s
because we declared two different behaviors of cityService(expected.getId()) in the same test. This test case’s
design is unfortunate. It tests too much for one single test and could be split in simpler and smaller units:
  @BeforeEach
  void setUp() {
    cityRepository = Mockito.mock(CityRepository.class);
    cityService = new CityServiceImpl(cityRepository);
  }

  @Test
  void find() throws ElementNotFoundException {
    City expected = createCity();
    Mockito.when(cityRepository.find(expected.getId())).thenReturn(Optional.of(expected));
    City actual = cityService.find(expected.getId());
    ReflectionAssert.assertReflectionEquals(expected,actual);
  }

  @Test
  void delete() throws ElementNotFoundException {
    City expected = createCity();
    cityService.delete(expected);
    Mockito.verify(cityRepository).delete(expected);
  }

  @Test
  void findThrows () {
    City expected = createCity();
    Mockito.when(cityRepository.find(expected.getId())).thenReturn(Optional.empty());
    Assertions.assertThrows(ElementNotFoundException.class,()->cityService.find(expected.getId()));
  }
Now each test is simple and easily understandable. We don’t have to reset the mocks anymore, since this is achieved in
the setUp() method. The effectively tested code is the same but a lot more meaningful than before.
Don’t Mock Value Objects or Collections
Mockito is a framework to mock objects with behavior that can be declared at the beginning of our test. It is common to have Data Transfer Objects (or DTOs). The intent of such a DTO is, as its name says, to transport data from a source to a destination. To retrieve this data from the object, we could declare the behavior of each getter. Albeit this is possible, we should rather use real values and set them to the DTO. The same rule applies for collections too, since they are a container for values as well.
As explained, it is possible to mock a City, which is a wrapper for the city name and other properties.
  @Test
  void mockCity() {
    String cityName = "MockTown";
    City mockTown = Mockito.mock(City.class);
    Mockito.when(mockTown.getName()).thenReturn(cityName);
    Assertions.assertEquals(cityName, mockTown.getName());
  }
It’s not worth the effort to declare the behavior for numerous getters of an object. We better create a real
object containing the values and don’t cover implicitly clear behavior of objects. Now let’s see a mocked List:
  @Test
  void mockList() {
    List<City> cities = Mockito.mock(List.class);

    City city = createCity();
    City anotherCity = createCity();

    Mockito.when(cities.get(0)).thenReturn(city);
    Mockito.when(cities.get(1)).thenReturn(anotherCity);

    assertEquals(city, cities.get(0));
    assertEquals(anotherCity, cities.get(1));
  }
There is no value added to mock the list. It’s even harder to understand what we expected from our list.
In comparison with a real List (i. e. ArrayList) things get clearer right away.
  @Test
  void mockListResolution() {
    List<City> cities = new ArrayList<>();

    City city = createCity();
    City anotherCity = createCity();

    cities.add(city);
    cities.add(anotherCity);

    assertEquals(city, cities.get(0));
    assertEquals(anotherCity, cities.get(1));
  }
Using mocks for collections we might hide the natural behavior of a List. In the worst case, our application fails in
production because we assumed a List to behave differently from how it actually does!
Mockito is a framework to mock behavior of components based on values and not to mock values. This means that we better create tests for components that process DTOs rather than for the DTOs themselves.
Testing Error Handling with Mockito
Mockito.when(cityRepository.find(expected.getId()))
   .thenThrow(RuntimeException.class);
We often only test the happy flow of our application. But how to test the correct behavior in our try-catch blocks? Mockito has the answer: Instead of declaring a return value, we can declare an exception to be thrown. This allows us, to write unit tests, that ensure our try-catch-blocks work as expected!
Important to know: In case we throw checked exceptions, the compiler doesn’t let us throw checked exceptions that are not declared on the method!
Mockito FAQ
In this section, we want to point out important things which are nice to know.
- What types can I mock? Mockito allows us to mock not only interfaces but also concrete classes.
- What is returned if I don’t declare a mock’s behavior? Mockito by default returns
nullfor complex objects, and the default values for primitive data types (for example0forintandfalseforboolean) - How many times does Mockito return a previously declared value? If we have declared a return value once, Mockito returns always the same value, regardless of
how many times a method is called. If we have multiple calls to
Mockito.when()with different return values, the first method call will return the first declared value, the second method call the second value, and so on. - Can I mock
finalclasses? No, final classes can’t be mocked and neither can final methods. This has to do with the internal mechanism of how Mocktio creates the mock and the Java Language Specification. If we want to do so, we can use PowerMock. - Can I mock a constructor? Mockito can’t mock constructors, static methods,
equals()norhashCode()out of the box. To achieve that, PowerMock must be used.
Pros and Cons
Mockito helps us to create simple mocks fast. The Mockito API is easy to read since it allows us to write tests in fluent style. Mockito can be used in plain Java projects or together with frameworks such as Spring Boot. It is well documented and has lots of examples in it. In case of problems, there is a huge community behind it and questions are answered frequently on StackOverflow. It provides great flexibility to its users which can contribute their ideas since it is an open-source project. Therefore, the development is ongoing, and the project is maintained.
Mockito can’t mock everything out of the box. In case we want to mock final or static methods, equals() or the
construction of an object, we need PowerMock.
Conclusion
In this post, we learned how to create mocks for unit tests in various variants. Mockito gives us a lot of flexibility, and the freedom to choose between numerous tools to achieve our goals. When working in teams, we define a common language and Mockito code style guideline on how we want to use this powerful tool for testing. This will improve our performance and helps to discuss and communicate.
Although Mockito comes with a lot of features, be aware of its restrictions. Don’t spend time to make the impossible possible, better reconsider our approach to test a scenario.
You will find all examples on GitHub.