Choosing a backend and frontend stack for web apps can be a daunting task, as there are numerous options available for backend (Node.js, Ruby, Python, C#, Go, etc) and frontend (Angular, React, Vue, Swift, etc) development. With this many options, it can be challenging to determine which technology stack will be the best fit for our application.
Factors like performance, speed, scalability, and the availability of skilled developers must be considered while choosing a technology stack. In this article, we’ll look at why Spring Boot and ReactJs can be a perfect duo for building full-stack web applications and also walk through the process of creating a Spring Boot backend application and integrating it with a React frontend application.
Example Code
This article is accompanied by a working code example on GitHub.Prerequisite:
The following knowledge and tools are required to get started with this tutorial:
- Basic knowledge of JavaScript and the React library
- Basic knowledge of Java and Spring Boot
- Basic knowledge of MongoDB database clusters
Tools Required
- Download and install Node JS.
- Download and install the Java Open JDK.- at least version 8
- Download and install the IntelliJ IDEA IDE for Spring Boot app development.
- Download and install Visual Studio Code IDE for ReactJs app development.
Benefits of Using Spring Boot with ReactJs
Spring Boot and ReactJs offer multiple benefits when building fullstack web applications:
- High performance and scalability: They are a powerful duo for high performance and scalability. Spring Boot’s lightweight container is ideal for deploying and running applications, while ReactJs excels at rendering complex user interfaces efficiently.
- Robust backend: Spring Boot is ideal for developing enterprise-level applications as it offers a powerful and scalable backend for building APIs and microservices. It has extensive support for various data sources and allows easy integration with other projects, making it simpler to build microservices based architectures.
- Efficient frontend development: ReactJs simplifies frontend development by utilizing a component-based architecture, which allows for code reusability. This leads to faster development, easier maintenance, and improved user experience.
- Easy integration: ReactJs has the ability to consume RESTful APIs from a Spring Boot backend using HTTP libraries like Axios, fetch, and superagent simplifies data communication.
- Large community: They both have large and active developer communities that provide useful resources, support, and up-to-date information.
Alright, let’s roll up our sleeves and have some fun building a fullstack application using Spring Boot and ReactJs.
Here is a schema architecture of the application we will be building:
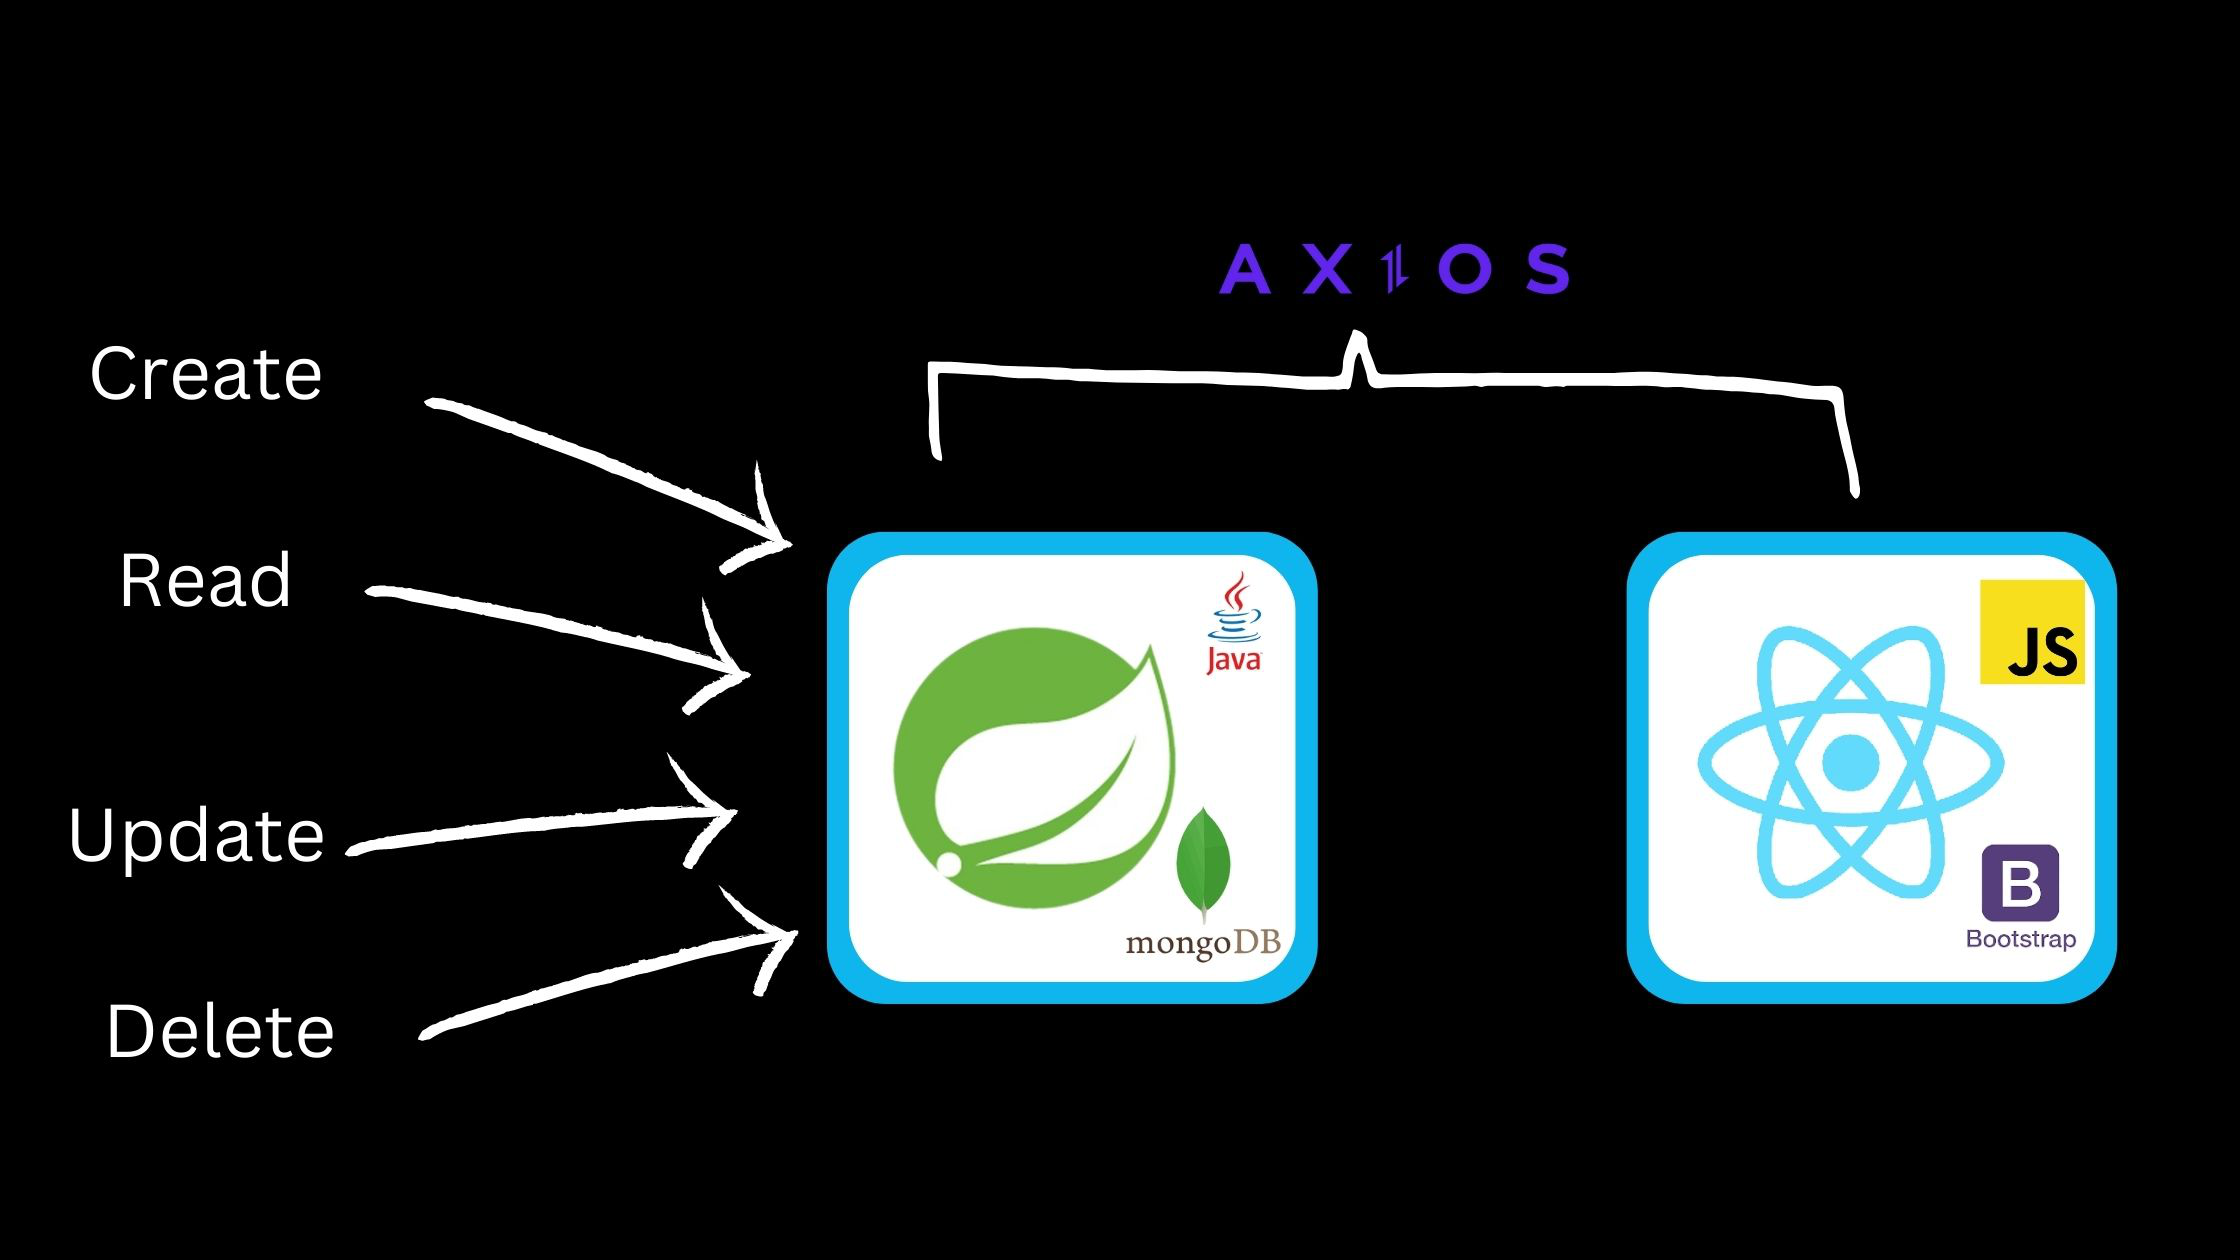
To make things more interesting, we will create a table register that tracks the number of published posts for all publishers in an organization. We can easily Create, Read, Update, or Delete a publisher’s data right from the table. To fetch data from our Spring Boot backend and present it on a ReactJs frontend, we will utilize the Axios library for making API requests.
Let’s start by setting up the backend and then integrating it into a frontend application.
Setting up Spring Boot Development Environment
Spring Boot is an opinionated web framework that allows us to build faster by hiding configuration and customization options at the outset.
This means that as developers, we only need to think about the logic our application uses, rather than worrying about the underlying architecture and boilerplate setup code that would normally need to be written. Spring Boot provides a number of pre-configured templates and components that allow developers to quickly and easily get applications up and running.
The first step to building Spring Boot Endpoints is to initialize.
To do this, go to Spring Initializr start.spring.io. Fill out the initializer form as follows:
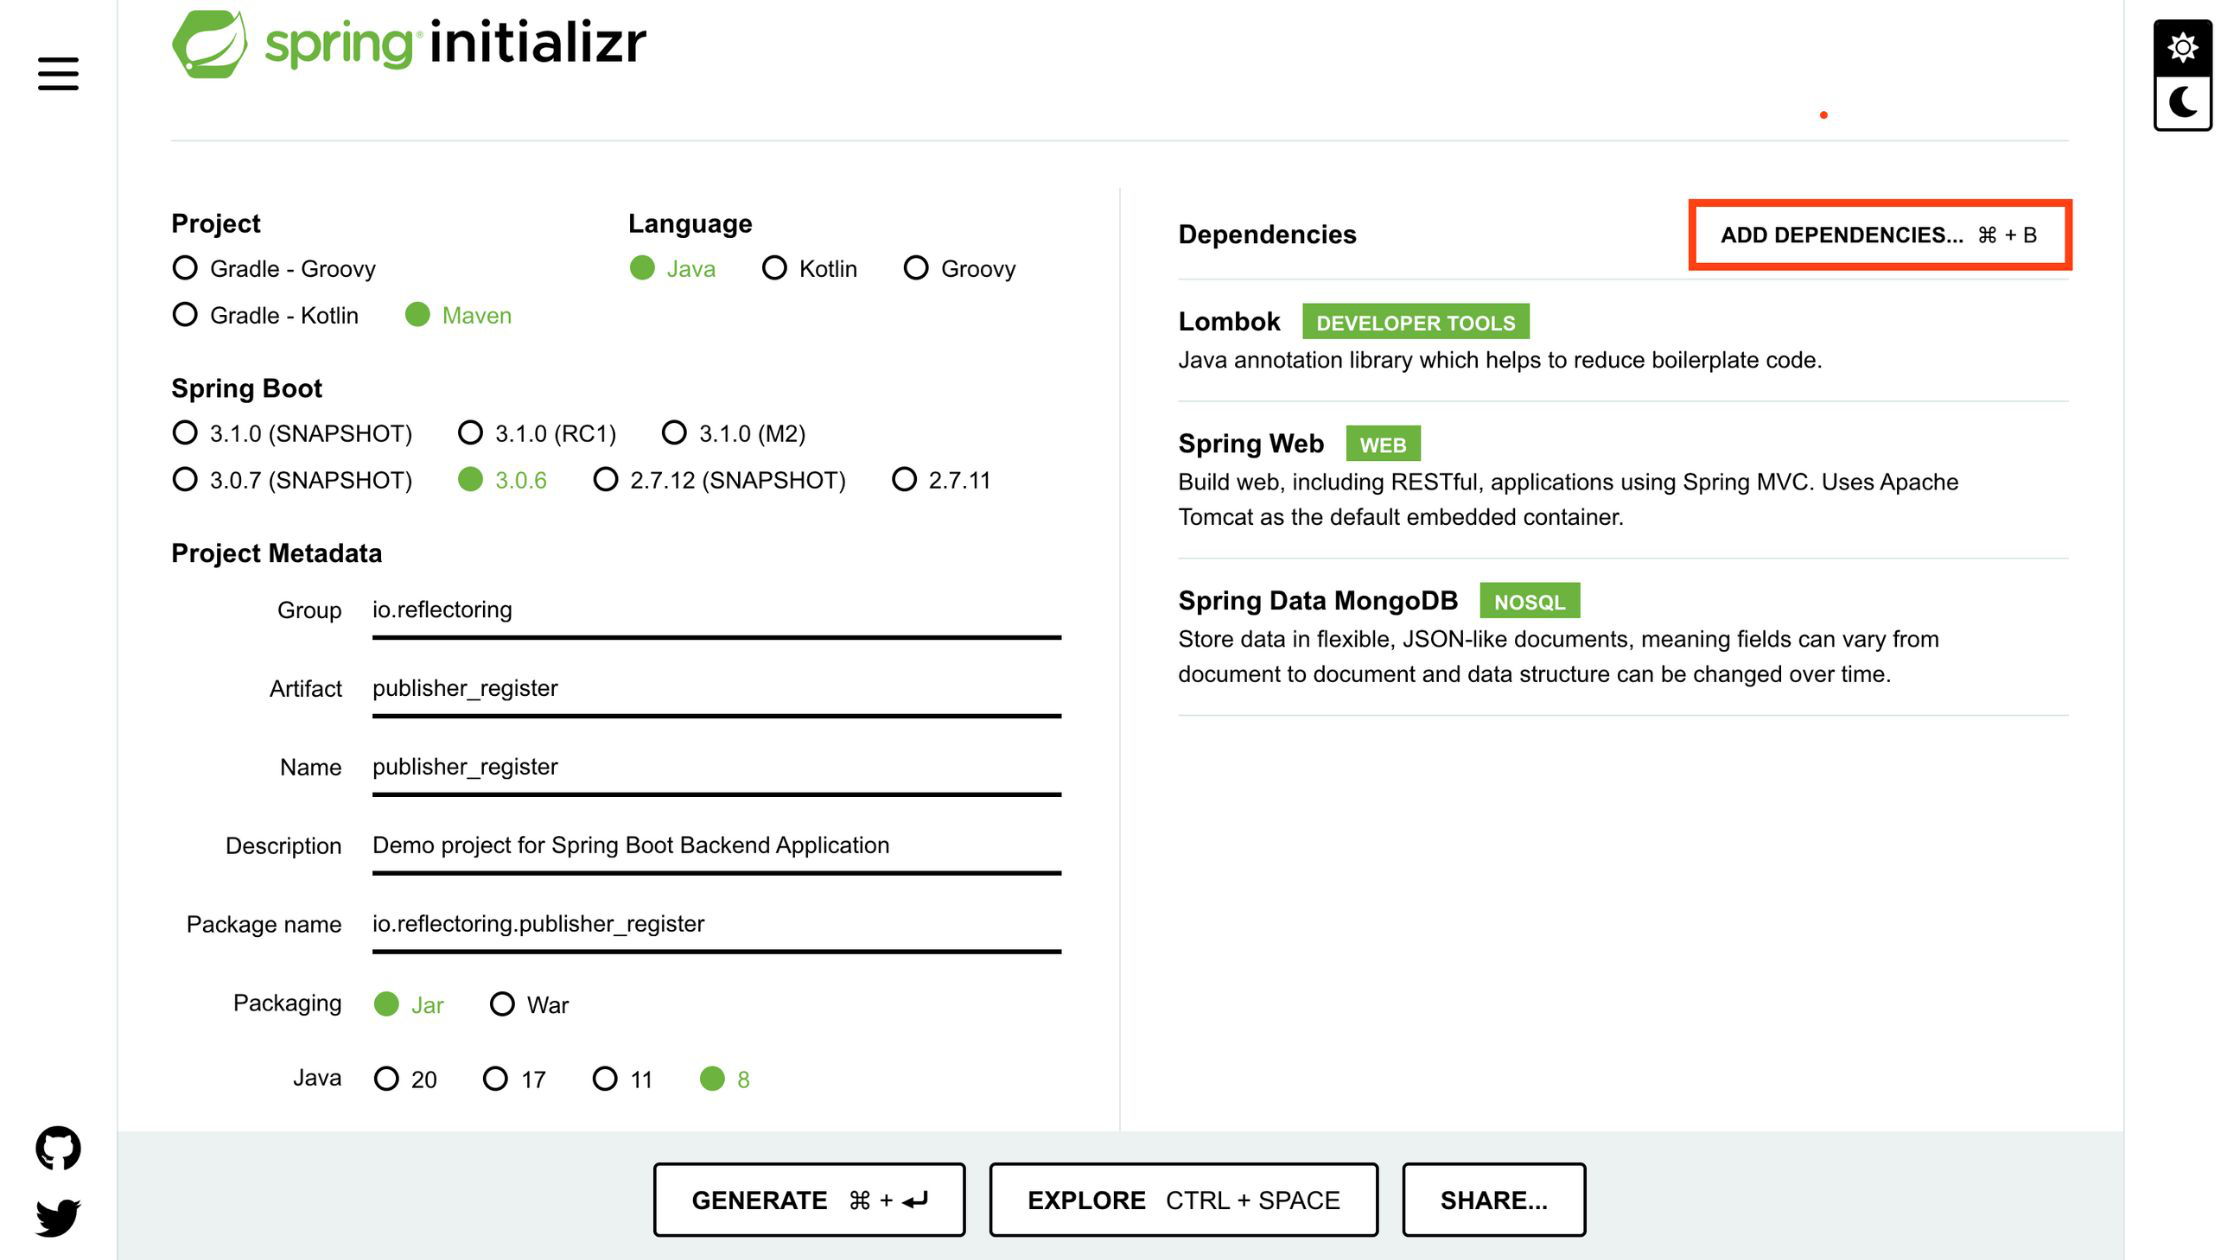
As seen above, we:
- Picked
mavenas our applications build automation tool. - Select
Javafor the programming language. - Then the Spring Boot version.
- Filled in the project metadata details
- Selected
Jaras the project packaging format. - Java Version 8.
- In the right column, we selected the dependencies required by our application.
- Click on
ADD DEPENDENCIES...button.
The dependencies we will be using are
- Lombok: This is a Java library used to reduce boilerplate code. It lets us use annotations and generates the boilerplate code after our codes are compiled.
- Spring Web: build Spring-based web applications with minimal configuration by adding all required dependencies to your project, such as the Apache Tomcat web server, jackson, spring-mvc, etc.
- Spring Data MongoDB: used to access data from our MongoDB Atlas cluster.
Once all of the above settings have been entered into the Initializr tool. We can proceed by clicking on GENERATE button.
This will generate and download the Spring Boot project into our computer.
For our Spring Boot development, we will be using the intellij IDE, a widely used and user-friendly integrated development environment (IDE) for Java.
Next, unzip the downloaded file from the download path and then open the publisher_register folder in your IDE.
Give the IDE some time to resolve and download all our app dependencies.
Once the setup process is complete, we can move on to the next step. Our focus will be on the src folder.
To proceed, let’s set up MongoDB database for our application. It can be installed locally on our machine or deployed to a cloud provider such as AWS or Google Cloud via MongoDB Atlas. For this article, we will use the MongoDB Atlas cloud service.
Setting up MongoDB Atlas
Here is a step-by-step process for creating a MongoDB Atlas cluster:
- Sign up for a MongoDB Atlas account.
- Click on
Build a Databasebutton, choose a free plan. - Create a username and password.
- Add IP Address
0.0.0.0by using this, we can conveniently connect to our project’s clusters from anywhere. - Click on the finish and close button.
- In the database section click on the
connectbutton. - In
Connect to your applicationselectDrivers - Copy the connection string URI.
The connection URI should look like this:
mongodb+srv://<username>:<password>@cluster0.tpabvhf.mongodb.net
If you need help setting up a MongoDB Atlas cluster, you can follow this more detailed guide here.
To use MongoDB in our application, we have to store our database URI in the application.properties file.
The application.properties file is a Spring Boot configuration file that stores key-value pairs of application settings. It is usually found in the src/main/resources directory and is used to configure many application properties like database connection, server port, logging, security, and so on.
To set up our Spring Boot application settings, add the following code to the application.properties file:
spring.data.mongodb.database=publisher_register
spring.data.mongodb.uri= #Paste MongoDB URI here
server.port=8000
Above, we named our database publisher_register, configured the app to use our MongoDB URI, and set the server port to 8000. Don’t forget to copy and paste your MongoDB URI.
Our application is now ready to connect to our database using the MongoDB URI and the Spring Data MongoDB dependency.
To make our codebase more manageable and organized, we’ll split our application setup into different sections: Repository, Model, and Controller.
The Repository section will manage database interactions and queries, while the Model section will define the application’s data structures. Lastly, the Controller section will manage request and response handling.
Structuring our Spring Boot Application
To organize our application’s code and separate concerns, we will create three new folders (packages) and corresponding files.
Create the following in io.reflectoring.publisher_register directory located in the src/main/java folder.
controllerfolder with aPublisherControllerclass file.modelfolder with aPublisherclass file.repositoryfolder with aPublisherRepositoryinterface file.
Our application structure will now look like this:
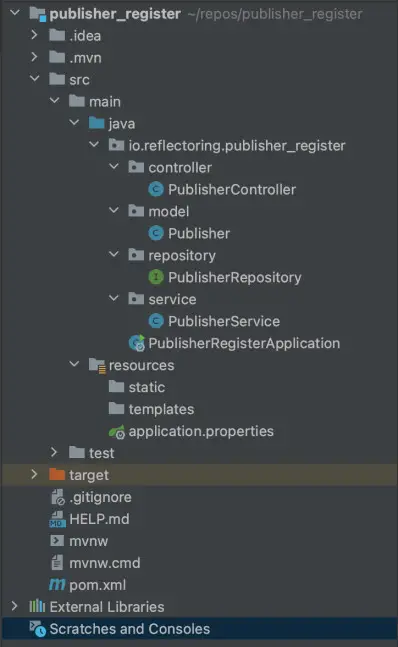
The model folder containing our Publisher class file is where we are defining the data model for our Publisher object.
Paste the following code in the model/Publisher file:
package io.reflectoring.publisher_register.model;

import lombok.AllArgsConstructor;
import lombok.Data;
import lombok.NoArgsConstructor;
import lombok.ToString;
import org.springframework.data.annotation.Id;
import org.springframework.data.mongodb.core.mapping.Document;

@Data
@AllArgsConstructor
@NoArgsConstructor
@ToString
@Document(collection = "Publisher")
public class Publisher {
@Id
private String id;
private String name;
private String email;
private Integer published;
}
In the above code, the @Data annotation generates boilerplate code for Java classes such as getters, setters, equals(), hashCode(), and a toString() method.
@AllArgsConstructor automatically generates a constructor with arguments for all non-final fields in a class, and @NoArgsConstructor generates a constructor with no arguments. This means that when you create an object of that class, you don’t need to provide any arguments to initialize the object.
@ToString generates a toString() method for the annotated class, which returns a string that represents the state of the object.
The @Document annotation in Spring Data MongoDB indicates that a class is a domain object that should be persisted in a MongoDB collection.
The @Id annotation marks the field that should be used as the identifier for the document.
Next, the repository folder contains a PublisherRepository interface that defines the necessary database operations such as saving, updating, and deleting publishers for our Publisher model. It also has a @Repository annotation, indicating that it is a repository class.
The PublisherRepository is an interface that extends Spring Data MongoDB’s MongoRepository interface, which provides out-of-the-box methods for common database operations.
These methods can be used as they are or customized based on specific requirements.
In the repository/PublisherRepository file, paste the following code:
package io.reflectoring.publisher_register.repository;

import io.reflectoring.publisher_register.model.Publisher;
import org.springframework.data.mongodb.repository.MongoRepository;
import org.springframework.stereotype.Repository;

@Repository
public interface PublisherRepository extends MongoRepository<Publisher, String> {
}
Finally, the PublisherController class in our controller folder is in charge of handling incoming endpoint requests and responding to them. This section contains functionality for dealing with REST API queries relating to our Publisher model.
To create our application controller, paste the following code into the controller/PublisherController file:
package io.reflectoring.publisher_register.controller;

import io.reflectoring.publisher_register.model.Publisher;
import io.reflectoring.publisher_register.repository.PublisherRepository;
import org.springframework.beans.factory.annotation.Autowired;
import org.springframework.web.bind.annotation.*;

import java.util.List;
import java.util.Optional;

@RestController
@CrossOrigin
@RequestMapping("/publisher")
public class PublisherController {

    @Autowired
    private PublisherRepository publisherRepository;

    @PostMapping("/create")
    public Publisher create(@RequestBody Publisher publisher){
        return publisherRepository.save(publisher);
    }

    @GetMapping("/all")
    public List<Publisher> getAllAuthors() {
        return publisherRepository.findAll();
    }

    @GetMapping("/{id}")
    public Optional<Publisher> findOneById(@PathVariable String id) {
        return publisherRepository.findById(id);
    }

    @PutMapping("/update")
    public Publisher update(@RequestBody Publisher publisher){
        return publisherRepository.save(publisher);
    }

    @DeleteMapping("/delete/{id}")
    public void deleteById(@PathVariable String id){
        publisherRepository.deleteById(id);
    }
}
In the above code, we are using various annotations like, @RestController which informs Spring that this class will handle REST requests, while the @RequestMapping annotation defines the URL path to which our endpoint request will be mapped, here we are mapping our request to /publisher.
The @Autowired annotation is used to inject dependencies into the class, such as the PublisherRepository object which handles the business logic of the application.
The @CrossOrigin annotation in Spring Boot provides a convenient and flexible way to configure Cross-Origin Resource Sharing (CORS) in our application. By specifying allowed origins, headers, and methods, we can control which external domains are allowed to access our API endpoints. It can be used at both the class and method levels to fine-tune the CORS configuration for our application.
However, it is important to keep in mind the security implications of allowing cross-origin requests. It is recommended to only allow access from trusted sources and to restrict the allowed headers and methods to those that are necessary for the application to function correctly. By doing so, we can ensure that our application is not vulnerable to malicious attacks, such as cross-site scripting (XSS) or cross-site request forgery (CSRF).
Overall, the PublisherController class file is the entry point for incoming endpoint requests and is responsible for returning the appropriate HTTP response back to the client.
Our backend server application is now good to go, and ready for use!! 🚀
To start our Spring Boot application, Hit the green Run button at the top right corner of your IDE.
Our server can now start listening on http://localhost:8000/publisher.
Setting up React Frontend Client
ReactJs is a widely used JavaScript library that enables the creation of Single Page Web Applications with dynamic and interactive UIs. It emphasizes the development of reusable UI components that can handle changing data over time, making it a great choice for building engaging user interfaces.
React application is typically composed of multiple components, each with its own logic and controls. The component-based approach makes it easy to maintain and scale the codebase in large projects.
Before creating our React project, make sure you have Node.js installed on your machine. We’ll be using the Node Package Manager (npm) to create our project.
Create React Project
To develop our React application, we will be switching to VSCode, which is a popular and highly customizable IDE. VSCode has a lot of built-in features and extensions that are specifically designed to make React development easier and more efficient.
These include features such as syntax highlighting, code completion, debugging, and hot reloading, as well as extensions for linting, formatting, and testing.
To create a new React application, open your terminal or command prompt and run the following command:
npx create-react-app publisher_registerUI
The create-react-app command is a standard command for creating a new React project.
publisher_registerUI is the project name. We can replace it with any desired name for our project.
The publisher_registerUI application can now be opened in a VScode IDE.
Next, run the following command in the terminal/command prompt to start the React application:
npm start
After running the previous command, our React development server will be started and the application will be loaded on port: 3000. React project comes with an auto-reload feature, meaning that any changes made to the code will be automatically compiled and the page will be reloaded upon saving.
This is a common feature used in modern JavaScript libraries and frameworks to enhance the development experience.
Structuring our React Application:
To start structuring our React application, we need to install all necessary dependencies.
React applications are purely client side and do not have the built-in capability to make HTTP requests to external APIs or other sources of data. Therefore, in order to enable this functionality, we need to install a third-party library like Axios.
Axios is a popular JavaScript library that provides an easy-to-use interface for making HTTP requests from the client side. It is highly configurable, and it supports various request methods, such as GET, POST, PUT, DELETE, and more. With Axios, we can easily fetch data from external APIs and update our application’s state accordingly.
Additionally, we will install Bootstrap, a popular CSS and JavaScript library that provides a collection of components, such as buttons, forms, modals, and more, to easily style our React components.
Paste the following code in the React application’s terminal:
npm install axios bootstrap
The above code will install the Axios and Bootstrap dependency into our application. All dependency files are saved in the node_modules folder.
To structure our React project, Run the following command to create the necessary folders and files for the application.
mkdir src/api src/components
touch src/api/axiosConfig.js src/components/PublisherCrud.jsx src/components/PublisherList.jsx
Our React application structure will now look like this:
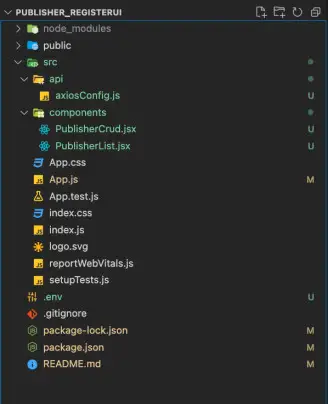
The src folder, is where we will write our code. With the command above we have created components file PublisherCrud.jsx and PublisherList.jsx.
JSX is a syntax extension to JavaScript, used by React for creating user interfaces. It allows developers to write HTML-like syntax directly in their JavaScript code, making it easier to visualize and manipulate the UI elements.
Our App.js and App.css are components of our React application. App.js is the default landing page where we can define, pass and render all our application components UI.
We also created an api folder in the src directory, this contains an axiosConfig.js file. This is where our application will make all API calls.
In the axiosConfig.js file we will create a connection to our SpringBoot endpoints.
To achieve this, Paste the following code in the axiosConfig.js file:
import axios from "axios";

export default axios.create({
  baseURL: "http://localhost:8000/publisher",
});
In the above code, we are using Axios dependency’s .create() method.
This method allows us to set default values for headers, timeouts, interceptors, and other properties that will be applied to all requests made by that instance. It is useful when we have to make multiple requests to the same API or when we need to customize the request behavior for a particular endpoint.
With this, we can easily call our Spring Boot endpoints from the frontend code without needing to repeatedly specify our full backend URL. Read this article here to learn more about the Axios library.
Next, let’s begin creating our UI components.
Creating Components In React.
React is component-based, we can create reusable pieces of UI called components. For example, we are building a publisher registration website and we want to display a table that shows information about publishers who have registered. Instead of creating separate tables for each publisher, we can create a single table component and pass different properties for each publisher, such as name, email, and registration date. This way, we can represent hundreds of publishers with just one block of code, making our development process more efficient.
Functional components in React are JavaScript functions that receive an optional object of properties (props) and return HTML (JSX) that describes the user interface. Hooks are functions that enable us to use state and other React features in functional components without writing a class.
Some popular hooks in React include useState, useEffect, useContext, and useReducer. They enable us to manage state, trigger re-renders, hook into component lifecycle methods, and perform actions like fetching data from APIs. Check out this link to learn more about hooks.
To create our application component. We will update both files in our components folder.
In src/components/PublisherCrud.jsx file, paste the following code:
import { useState } from "react";
import api from "../api/axiosConfig";
import PublisherList from "./PublisherList";

const PublisherCrud = ({ load, publishers }) => {
/* state definition  */
  const [id, setId] = useState("");
  const [name, setName] = useState("");
  const [email, setEmail] = useState("");
  const [published, setPublished] = useState("");

  /* being handlers */
  async function save(event) {
    event.preventDefault();
    await api.post("/create", {
      name: name,
      email: email,
      published: published,
    });
    alert("Publisher Record Saved");
    // reset state
    setId("");
    setName("");
    setEmail("");
    setPublished("");
    load();
  }
  async function editEmployee(publishers) {
    setName(publishers.name);
    setEmail(publishers.email);
    setPublished(publishers.published);
    setId(publishers.id);
  }

  async function deleteEmployee(id) {
    await api.delete("/delete/" + id);
    alert("Publisher Details Deleted Successfully");
    load();
  }

  async function update(event) {
    event.preventDefault();
    if (!id) return alert("Publisher Details No Found");
    await api.put("/update", {
      id: id,
      name: name,
      email: email,
      published: published,
    });
    alert("Publisher Details Updated");
    // reset state
    setId("");
    setName("");
    setEmail("");
    setPublished("");
    load();
  }
  /* end handlers */

/* jsx */
  return (
    <div className="container mt-4">
      <form>
        <div className="form-group my-2">
          <input
            type="text"
            className="form-control"
            hidden
            value={id}
            onChange={e => setId(e.target.value)}
          />
          <label>Name</label>
          <input
            type="text"
            className="form-control"
            value={name}
            onChange={e => setName(e.target.value)}
          />
        </div>

        <div className="form-group mb-2">
          <label>Email</label>
          <input
            type="text"
            className="form-control"
            value={email}
            onChange={e => setEmail(e.target.value)}
          />
        </div>

        <div className="row">
          <div className="col-4">
            <label>Published</label>
            <input
              type="text"
              className="form-control"
              value={published}
              placeholder="Published Post(s)"
              onChange={e => setPublished(e.target.value)}
            />
          </div>
        </div>

        <div>
          <button className="btn btn-primary m-4" onClick={save}>
            Register
          </button>
          <button className="btn btn-warning m-4" onClick={update}>
            Update
          </button>
        </div>
      </form>
      <PublisherList
        publishers={publishers}
        editEmployee={editEmployee}
        deleteEmployee={deleteEmployee}
      />
    </div>
  );
};

export default PublisherCrud;
There’s a lot to unpack here, let’s break it down section by section to better understand what’s happening.
In state definition section, here we use React’s useState hook for state management. This hook accepts an initial state value and returns an array with the current state value and a function for updating the state. When the state changes, the component re-renders with the new state value.
The handlers section within our PublisherCrud component sets up functions to handle the fetching of our API data and saving, editing, deleting of our table data, and resetting of our application’s state.
And finally, our jsx section, gives a clear idea of what the component is going to render to the DOM. You can learn more about it here. In our components JSX we are making use of bootstrap classes for styling.
Lastly, we are passing the PublisherList component with a set of props, which are optional object properties that can be passed down from parent components to child components.
To specify props, we set them as attributes on the component where it is to be used. Here, we are passing state values and handler functions as props to the child component PublisherList.
Next, paste the following in PublisherList.jsx.
import React from "react";

const PublisherList = ({ publishers, editEmployee, deleteEmployee }) => {
  return (
    <table className="table table-hover mt-3" align="center">
      <thead className="thead-light">
        <tr>
          <th scope="col">Nº</th>
          <th scope="col">Name</th>
          <th scope="col">Email</th>
          <th scope="col">Published</th>

          <th scope="col">Option</th>
        </tr>
      </thead>
      {publishers.map((employee, index) => {
        return (
          <tbody key={employee.id}>
            <tr>
              <th scope="row">{index + 1} </th>
              <td>{employee.name}</td>
              <td>{employee.email}</td>
              <td>{employee.published}</td>
              <td>
                <button
                  type="button"
                  className="btn btn-warning"
                  onClick={() => editEmployee(employee)}
                >
                  Edit
                </button>
                <button
                  type="button"
                  className="btn btn-danger mx-2"
                  onClick={() => deleteEmployee(employee.id)}
                >
                  Delete
                </button>
              </td>
            </tr>
          </tbody>
        );
      })}
    </table>
  );
};

export default PublisherList;
In the PublisherList component above, we are destructuring the passed props and using Bootstrap classes to display a table with the list of all saved publishers.
Next in React, the App.js file is the root component of our application, and it is responsible for rendering and displaying all other components in the application.
To render our components, paste the following code in the App.js file:
import "bootstrap/dist/css/bootstrap.css";
import api from "./api/axiosConfig";
import { useEffect, useState } from "react";
import "./App.css";
import PublisherCrud from "./components/PublisherCrud";

function App() {
  const [publishers, setPublishers] = useState([]);

  /* manage side effects */
  useEffect(() => {
    (async () => await load())();
  }, []);

  async function load() {
    const result = await api.get("/all");
    setPublishers(result.data);
  }

  return (
    <div>
      <h1 className="text-center">List Of Publisher</h1>
      <PublisherCrud load={load} publishers={publishers} />
    </div>
  );
}

export default App;
In the code snippet above, the bootstrap dependency and application components were imported into our root component App.js.
The useEffect hook here is used to run side effects in our App.js. These side effects include operations that change the state of the application, such as fetching data from an API, updating the DOM, setting up event listeners, and more.
The load function is responsible for calling the backend API to fetch all publishers in the database.
In the JSX section, we passed our PublisherCrud component with load function and publishers list as props. After saving the code, the application will be updated automatically.
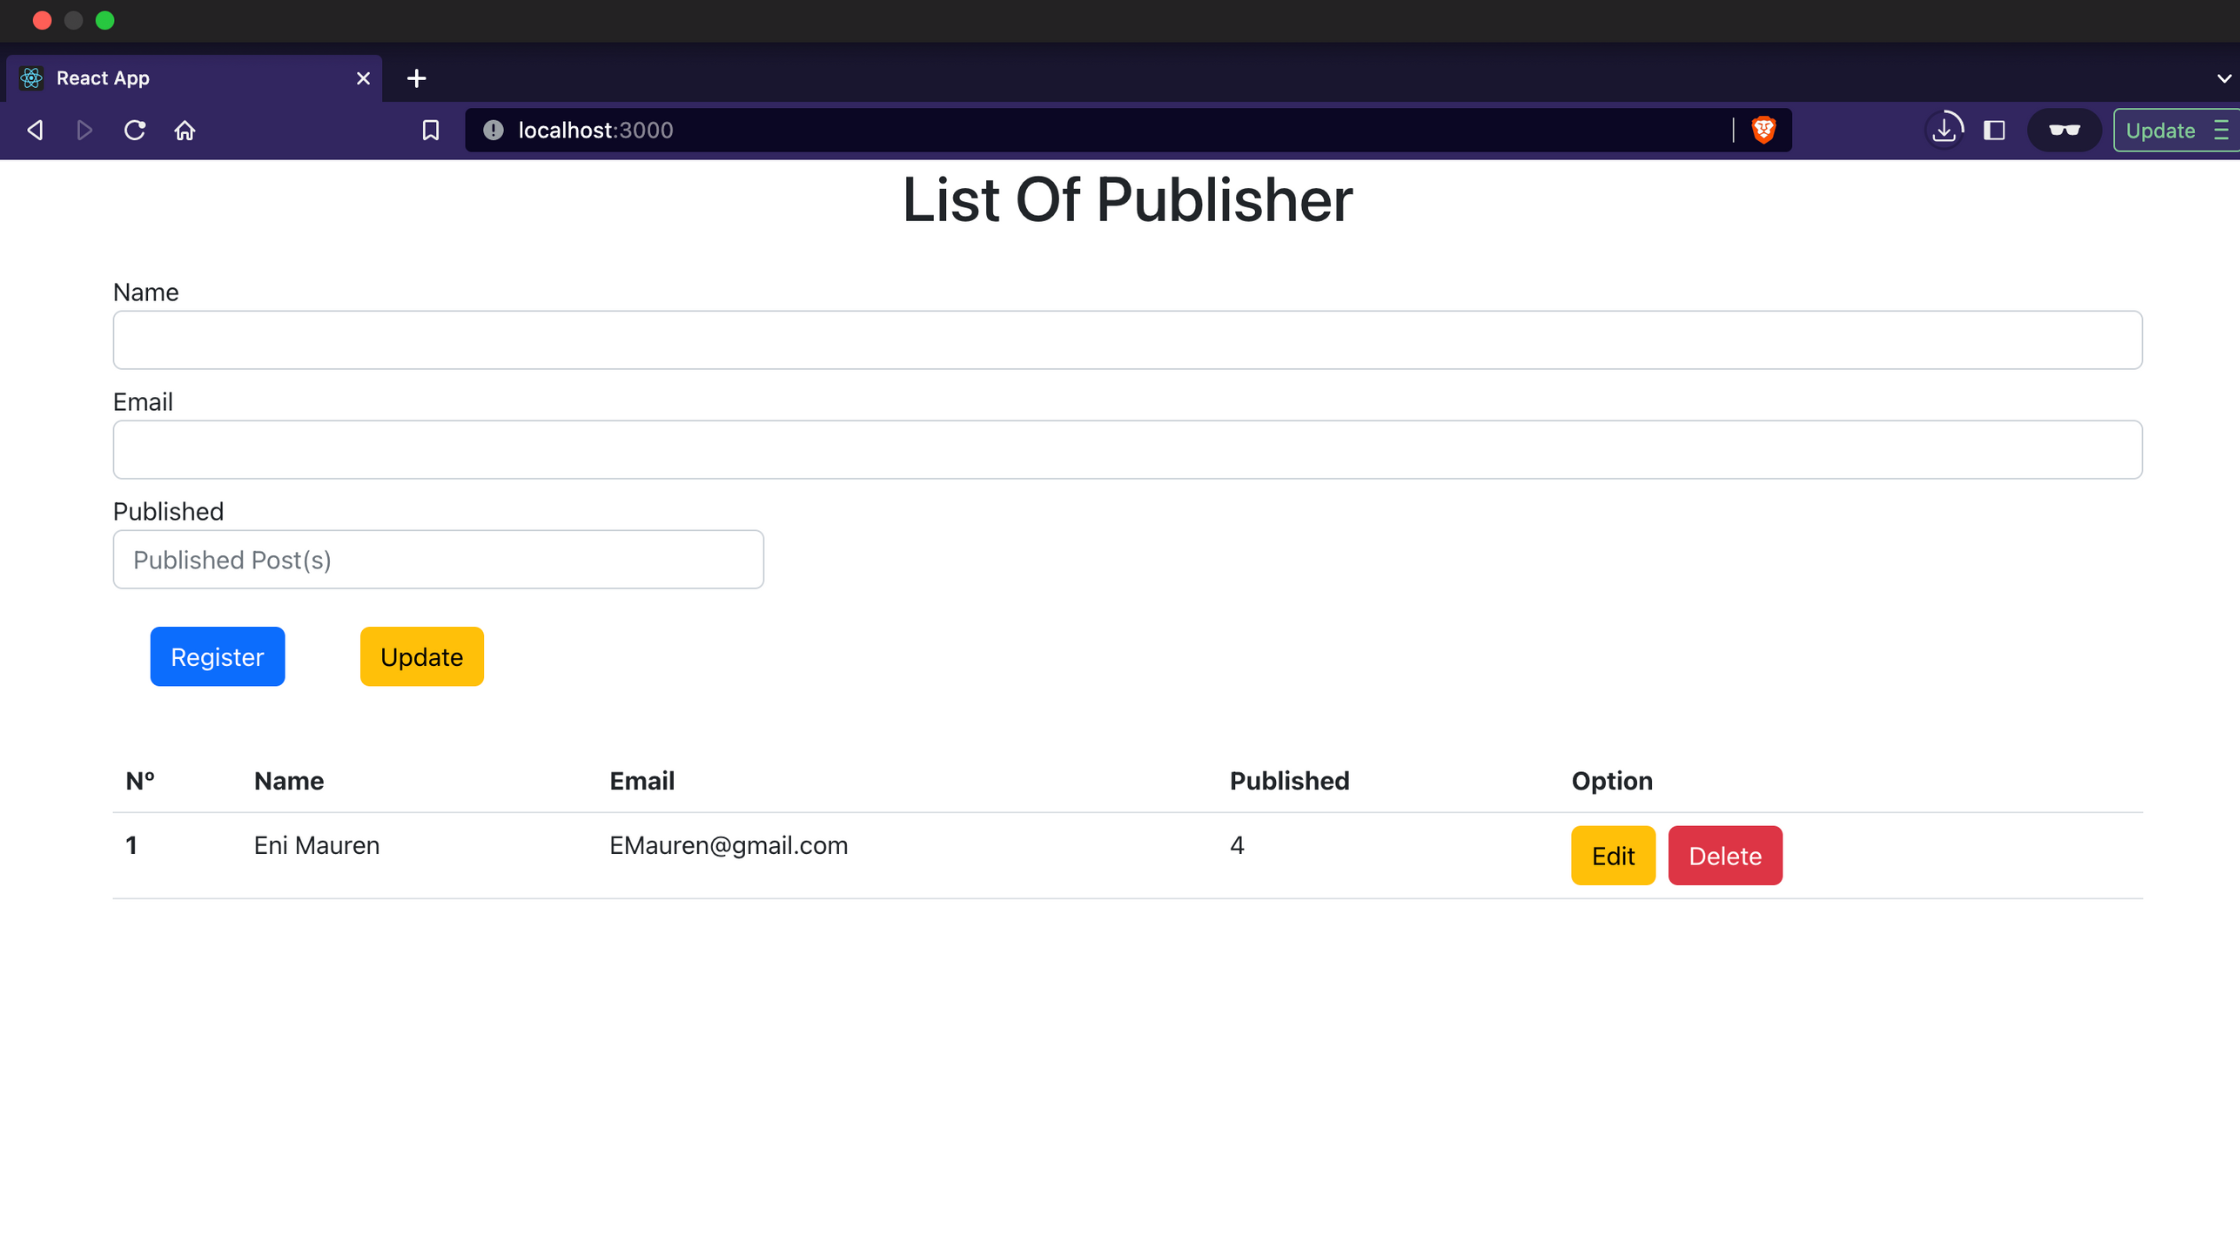
We can open our application on any browser of choice at http://localhost:3000.
Conclusion
By combining the strengths of Spring Boot and React, we can create a responsive, scalable, and modern web application. With careful planning, project structuring, and integration, we can provide a seamless user experience.
You can refer to all the source code used in the article on Github.