Teams looking to control and reduce their cloud costs can choose from multiple cloud cost management approaches. All of them require at least a basic understanding of what’s going on in your cloud infrastructure - this part relies on monitoring and reporting.
Once you gain visibility of the cost, you’re ready to optimize. Traditionally, many such approaches relied on reserving cloud capacity via Reserved Instances or Savings Plans. But we’re not going to cover this point since there are so many ways to get a better deal instead of paying upfront, as long as you do it right.
Here are six battle-tested practices to help you manage and optimize Kubernetes costs.
1. Track the right cost metrics in the right place
Understanding the cloud bill is hard, so it pays to invest in a cost monitoring tool. Ideally, it should show you cost metrics in real time since containerized applications scale dynamically - and so do their resource demands.
But having the best cost monitoring tool isn’t going to work if you don’t know which metrics to keep your eye on. Here are 3 metrics that will help you understand your Kubernetes costs better:
Daily spend
Get a daily cloud spending report to compare actual costs with the budget you set for the month. Suppose your monthly cloud budget is $1000. If your average daily spend is closer to $50 than $33 (30 days x $33 = $990), you’re likely to end up with a higher cloud bill than your budget allows.
Another perk of the daily report? Take a look, and you’ll immediately identify outliers or anomalies that might cause your bill to skyrocket
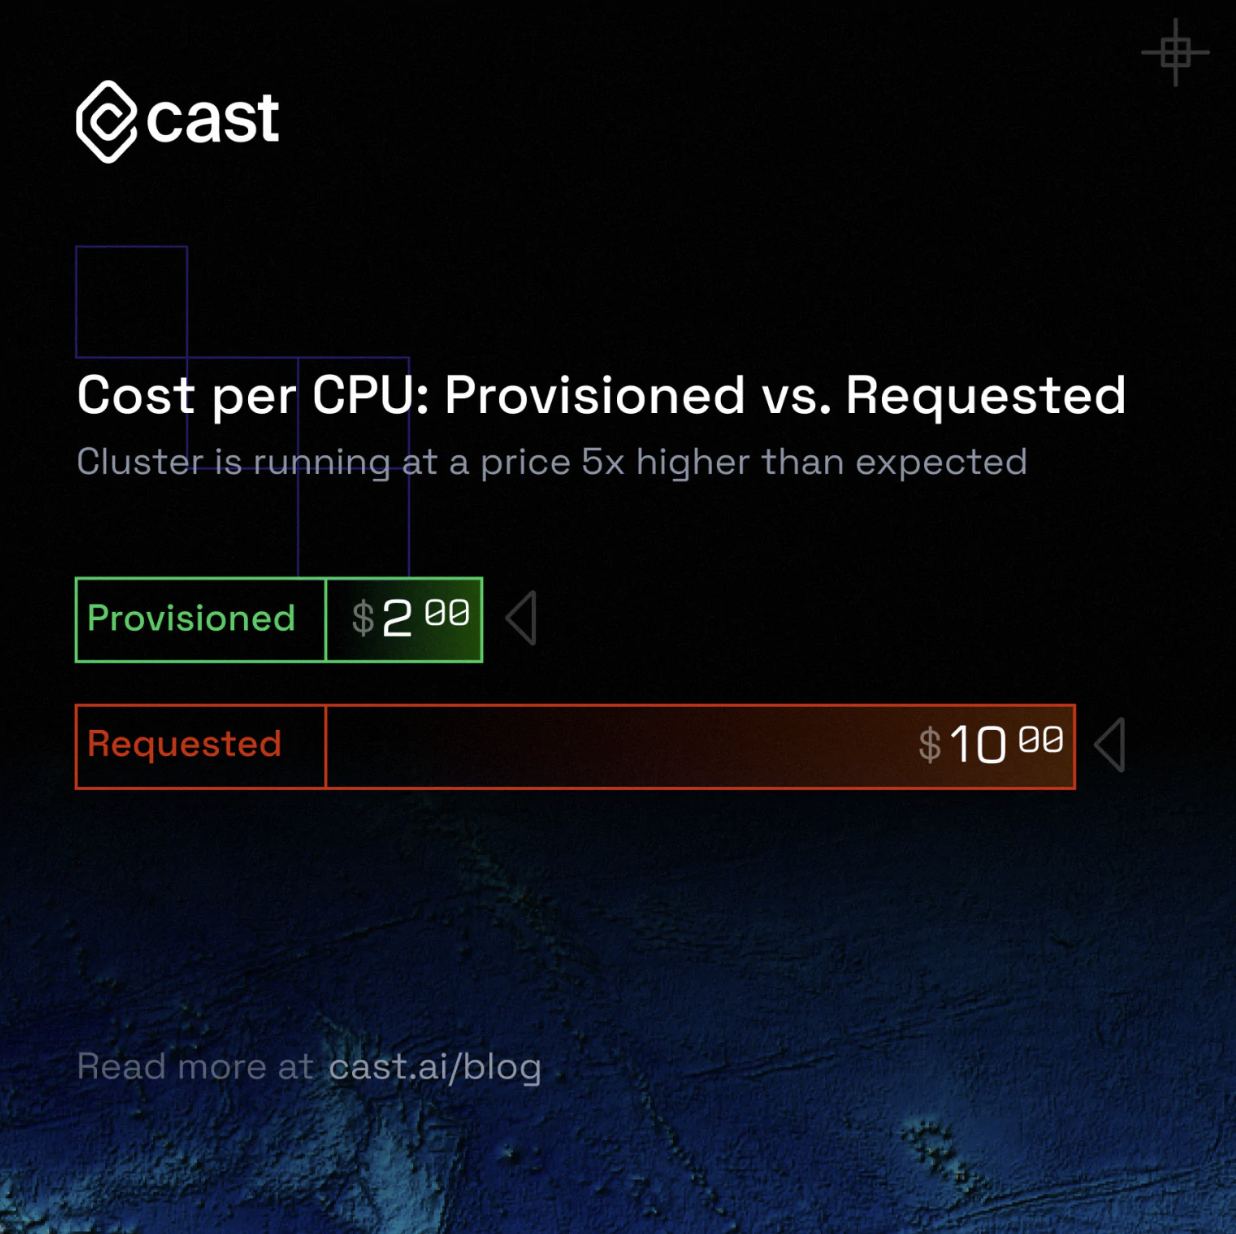
Cost per provisioned CPU vs. requested CPU
Another good practice is tracking the cost per provisioned CPU and requested CPU. If you’re running a Kubernetes cluster that hasn’t been optimized, you’ll see a difference between how much you’re provisioning and how much you’re actually requesting. You spend money on provisioned CPUs but only end up actually using (requesting) a small amount of them - so the price of individual requested CPUs grows.
If you compare the number of requested versus provisioned CPUs, you can find a gap. This gap is your cloud waste. Calculate how much you’re spending per requested CPU to make cost reporting more accurate. CAST AI, for example, makes this gap visible to you like in the image below.
Historical cost allocation
When finance approaches you to explain why your cloud bill is so high again, you probably want to know what ended up costing you more than expected. This is where historical cost allocation helps. A historical cost allocation report like that shows cost data for the past months split into the daily cost to help teams instantly spot cost outliers that are driving cloud waste.
Cloud cost reporting is a challenge since major cloud providers don’t provide access to data in real time. Third-party solutions that increase cost visibility can fill this gap and allow engineering teams to instantly identify cost spikes and keep their cloud expenses in check. They also include automatic alerting features that help to take action immediately. This works really well if you serve cost data in a tool engineers use anyway - for example, the industry-standard observability tool Grafana.
2. Ask the right questions to accelerate cloud cost anomaly detection
So, you’ve got your cost monitoring tool in place, and it’s generating heaps of data. And then you experience a cost spike, so it’s time to investigate the cause.
This may take a while if you don’t have a clue where to look. Investigating cloud cost issues can take a team from a few hours to days. Some teams report dedicating entire sprints to this!
The first step is taking a look at the historical cost allocation report that we discussed in the previous section. To grasp your cost situation quickly, here are a few questions you should ask based on that report:
- What was your projected monthly spend compared to last month’s spend?
- What is the difference between this and the previous month?
- Are there any idle workloads that aren’t doing anything apart from burning your money?
- What was the distribution between namespaces in terms of dollar spend? Namespaces provide a way for isolating groups of resources within a single cluster.
Answering these questions with the support of a historical cost report will speed up the investigation process and prevent such cost anomalies from happening in the future.
3. Choose the right type and size of your virtual machines
Define your requirements
Data from CAST AI shows that by eliminating picking the right instance types and sizes, companies reduce their monthly cloud spend by 43% on average.
The idea here is to provision only as much capacity as your workload really needs. You need to take into account the following compute dimensions:
- CPU count and architecture,
- memory,
- storage,
- network.
See a cheap instance? You might be tempted to get it, but consider this: you start running a memory-intensive application, and all you get for that price is performance issues that impact your brand and customers. Picking the cheapest option will surely slash your costs - but your reputation will go along with it.
Pick the right instance type
Cloud providers offer many different instance types matching a wide range of use cases with different combinations of CPU, memory, storage, and networking capacity. Each virtual machine type comes in one or more sizes to help you scale easily.
Before you settle on a machine type, consider that cloud providers roll out different computers, and the chips in those computers come with various performance characteristics. So you might end up with a machine that has stronger performance that you don’t need. And you won’t even know it.
The best way to verify the capabilities of an instance is benchmarking - dropping the same workload on every machine type and checking its performance.
Check storage transfer limitations
Data storage is another key cost optimization area. An application has unique storage needs, so make sure that the machine you choose has the storage throughput your workloads require.
Steer clear of expensive drive options like premium SSD unless you’re going to maximize your use and take full advantage of them.
4. Optimize Kubernetes autoscaling
Ensure that your autoscaling policies don’t clash
Kubernetes comes with several autoscaling mechanisms: Horizontal Pod Autoscaler (HPA), Vertical Pod Autoscaler (VPA), and Cluster Autoscaler.
VPA automatically adjusts the requests and limits configuration to help you reduce overhead and cut costs. HPA, on the other hand, scales out - and more likely out than in.
That’s why you should make sure that your VPA and HPA policies aren’t interfering with each other. When designing clusters for business- or purpose-class tier of service, it’s a good idea to review your binning and packing density settings as well.
Consider mixing instances
A mixed-instance strategy provides you with high availability and performance at a cost that is reasonable (hopefully, this is how your finance department sees that too).
The idea here is to choose different instance types that are cheaper and just good enough for some of your workloads but not for those that are high-throughput, low-latency ones. Depending on the workload, it’s often ok to pick the cheapest machines. Alternatively, you can get away with a smaller number of machines with higher specs. This is a good method for reducing your Kubernetes bill because each node requires Kubernetes to be installed on it, as a result adding a little overhead.
But prepare for scaling challenges if you use mixed instances. In this scenario, each instance uses a different type of resource. You can scale up the instances in your autoscaling groups using metrics like CPU or network utilization - but then expect to get inconsistent metrics.
This is where Cluster Autoscaler helps. It lets you mix instance types in a node group - as long as your machines have the same capacity in terms of CPU and memory.
Use multiple availability zones
Virtual machines that span across several availability zones (AZs) increase your availability. AWS recommends its users configure multiple node groups, scope each to a single availability zone, and finally enable the –balance-similar-node-groups feature.
If you create a single node group, you can scope that node group to span across multiple Availability Zones.
Apply instance weighted scores
Suppose you have a workload that often ends up consuming more capacity than provisioned. Were these resources really needed? Or did the workload consume them because they were available but not critically required?
You can eliminate this by using instance weighted scores when choosing machine sizes and types that are a good match for autoscaling. Instance weights define the capacity units that each of the instance types contributes to your application’s performance. Instance weighting comes in handy, especially if you adopt a diversified allocation strategy and use spot instances.
5. Use spot instances
Spot instances are a great way to cut your Kubernetes bill as they offer discounts reaching even 90% off the on-demand pricing. A spot instance uses spare EC2 capacity available for less than the On-Demand price. However, this also means that the provider may reclaim the capacity any time, with a notice period lasting from 30 seconds (Google Cloud) to 2 minutes (AWS and Azure).
Data from CAST AI shows that by using spot instances, companies cut their cloud spend by 65% on average. Clusters using only spot instances achieve the greatest savings - 74.2% on average.
But before jumping on this opportunity, take a look at your workload to see if it’s a good fit for spot instances.
Check if your workload is spot-ready
Ask these questions when examining your workload: How much time does it need to finish the job? Is this workload mission- and time-critical? How well can it handle interruptions? Is it tightly coupled between instance nodes? How are you going to deal with interruptions when the cloud provider pulls the plug on your machine?
If your workload is mission-critical and can’t handle interruptions well, it’s probably not a good candidate for a spot instance. But if it’s not so critical, interruption-tolerant, and falls under a clear strategy for dealing with interruptions, running it on a spot instance is a good idea.
Choose your spot instances; here’s how
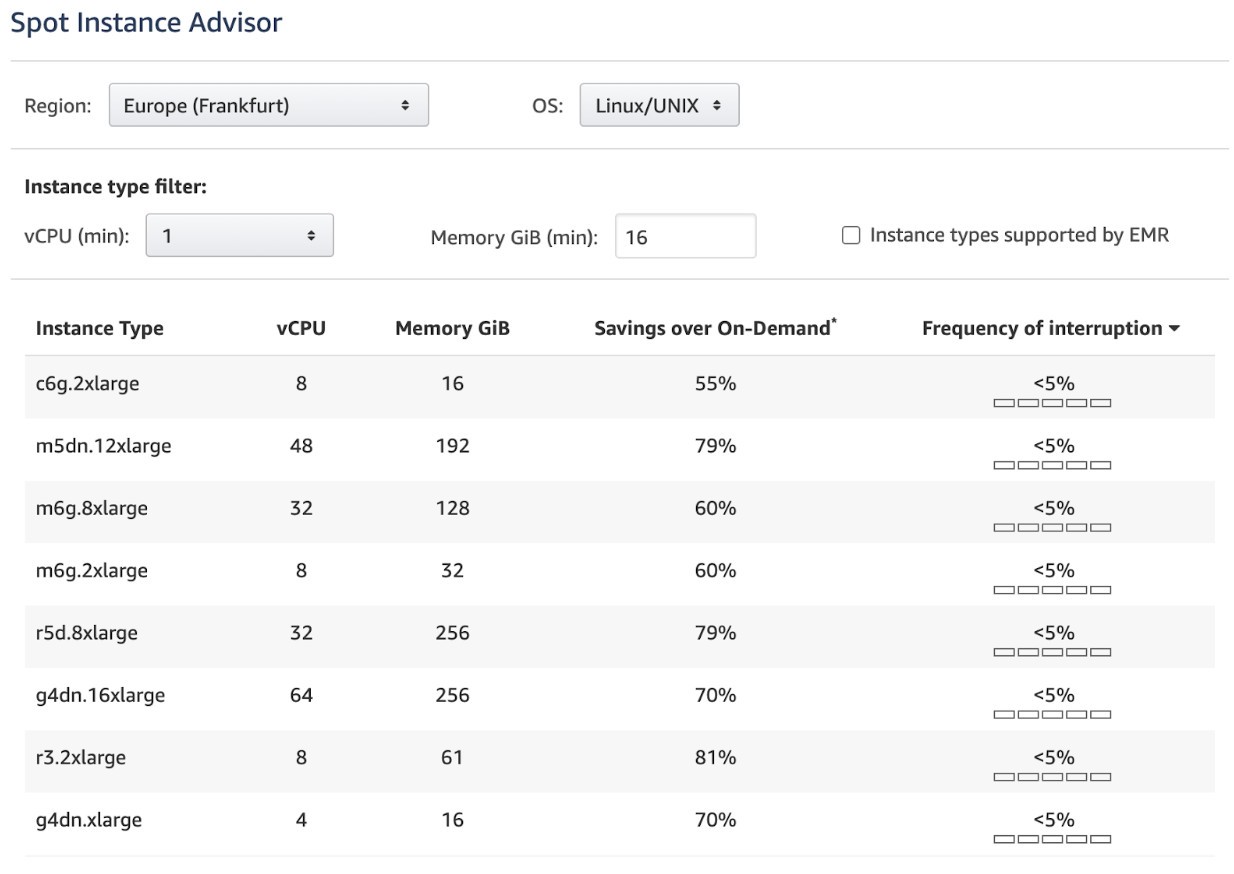
When picking spot instances, consider going for the slightly less popular ones. It’s simple - if they’re less in demand, they’re also less likely to get interrupted.
Before settling on an instance, take a look at its frequency of interruption - this is the rate at which the instance reclaimed capacity during the trailing month.
For example, the AWS Spot Instance Advisor displays the frequency interruption in ranges of <5%, 5-10%,10-15%,15-20%, and >20%:
Bid your price
Found the right spot instance? Now it’s time to set the maximum price you’re ready to pay for it. Note that the machine will only run when the marketplace price is below or equal to your bid.
The rule of thumb here is to set the maximum price to the level of on-demand pricing. If you pick a lower value, you risk more frequent interruptions once the instance price exceeds the one you set for it.
To increase your chances of snatching spot instances, set up spot instance groups (this is called Spot Fleets in AWS). This will let you request multiple machine types at the same time. Expect to pay the maximum price per hour for the entire fleet instead of a specific spot pool (which is a set of instances of the same type with the same OS, availability zone, and network platform).
You can probably tell that making it work means a massive number of configuration, setup, and maintenance tasks.
6. Use an automation tool that does cloud optimization for you
AWS alone has some 400+ virtual machines on offer. What if your teams use different cloud providers? The manual effort of configuring resources, picking virtual machines, and setting autoscaling policies is going to cost you more than its optimization impact.
The market is full of cloud cost optimization and management solutions that take some or all of the above tasks off engineers' shoulders, reclaiming time for teams to do more strategic work.
When picking such solutions, you’re facing the following choice:
-
Cost management tools from cloud providers ( like AWS Cost Explorer) - these tools are the entry point into the world of cloud costs for most teams. But once your cloud footprint grows beyond a single cloud provider and service, they fail to provide accurate data. Also, cloud providers don’t offer access to real-time cost data, and we all know that a cloud bill can grow from $0 to $72k in just a few hours.
-
Legacy cost management tools - legacy cloud monitoring tools like Cloudability that don’t consider the business context are great if all you need is increased visibility into how much you spend, where that money is going, and who exactly is spending it. But they don’t offer any automation capabilities to seriously reduce your cloud bill - it’s all down to manual configuration. If you run on Kubernetes, there are more powerful tools that do it all for you.
-
Cloud-native optimization and monitoring tools - you can choose from a range of modern solutions like CAST AI that handle cloud-native cost dynamics, bringing teams all the cost monitoring and optimization features that act on cloud resources in real time.
Start optimizing your Kubernetes cloud bill
We didn’t mention reserved capacity because long-term commitments aren’t a good fit for many modern companies, and - when using Kubernetes - you can get a better cost outcome with automation. After all, engineers have more important things to do than babysitting their cloud infrastructure.
There’s no reason why Kubernetes costs should remain a black box. You can find out how much you’re spending and where you could save up now - connect your cluster to CAST AI and get access to a free Kubernetes cost monitoring solution that shows your expenses in real time and gives you recommendations - for example, more cost-efficient virtual machines that do the job for your workloads.
Whenever you’re ready, you can turn on CAST AI’s fully automated cloud cost management and - as icing on the cake - check your clusters against security vulnerabilities and configuration best practices, which is free of charge as well.