In this step-by-step guide, we’ll create, publish, and manage an NPM package using TypeScript for better code readability and scalability. We’ll write test cases with Jest and automate our NPM package versioning and publishing process using Changesets and GitHub Actions.
An NPM package allows for the encapsulation of reusable code, simplifies project development, and promotes collaboration by sharing useful libraries with the community. This accelerates the development process and gives us the option to keep this package private or make it public (open-source) for others to use.
Prerequisites
We’ll need the following:
- Node.js installed on our computer.
- Basic knowledge of TypeScript.
- GitHub Account.
- NPM Account.
In this post, we will create an NPM package to validate user inputs such as emails, mobile numbers, and social media links. Instead of rewriting these validation functions for each project, our package can be installed across projects to simplify and standardize the validation process.
Let’s jump right into it:
Example Code
This article is accompanied by a working code example on GitHub.Step 1: Setting up Node.js Application
Begin by creating an empty folder named validate-npm-pc.
This folder will serve as the name of our NPM package. It’s important to choose a unique name since the NPM registry hosts a vast number of packages, each requiring a distinct name for successful publication.
To initialize Node.js in the project, run the following command in the terminal:
npm init -y
This command generates a package.json file, which holds essential metadata about our project, including details of the dependencies and version information.
Again in the terminal, we will execute the following:
mkdir -p \
  .github/workflows \
  src \
  __tests__
touch \
  src/index.ts \
  src/validate.ts \
  __tests__/validate.ts \
  .github/workflows/release.yml \
  .gitignore
These commands create all the necessary files and folders required in the package.
Install all the dependencies needed in the package by running the following command:
npm install \
  typescript \
  jest \
  ts-jest \
  @types/jest \
  @changesets/cli \
  --save-dev
Here’s a brief overview of what each dependency does:
typescript: Enables static typing in our code.jest: A JavaScript testing framework.ts-jest: A TypeScript preprocessor with source map support for Jest.@types/jest: Provides TypeScript type definitions for Jest.@changesets/cli: is a command-line tool for managing versioning and changelogs in a monorepo setup. Changeset automates the NPM versioning process for our package.
NPM versioning follows the Semantic Versioning (SemVer) convention, which consists of three numbers separated by periods: MAJOR.MINOR.PATCH (for example “1.2.3”).
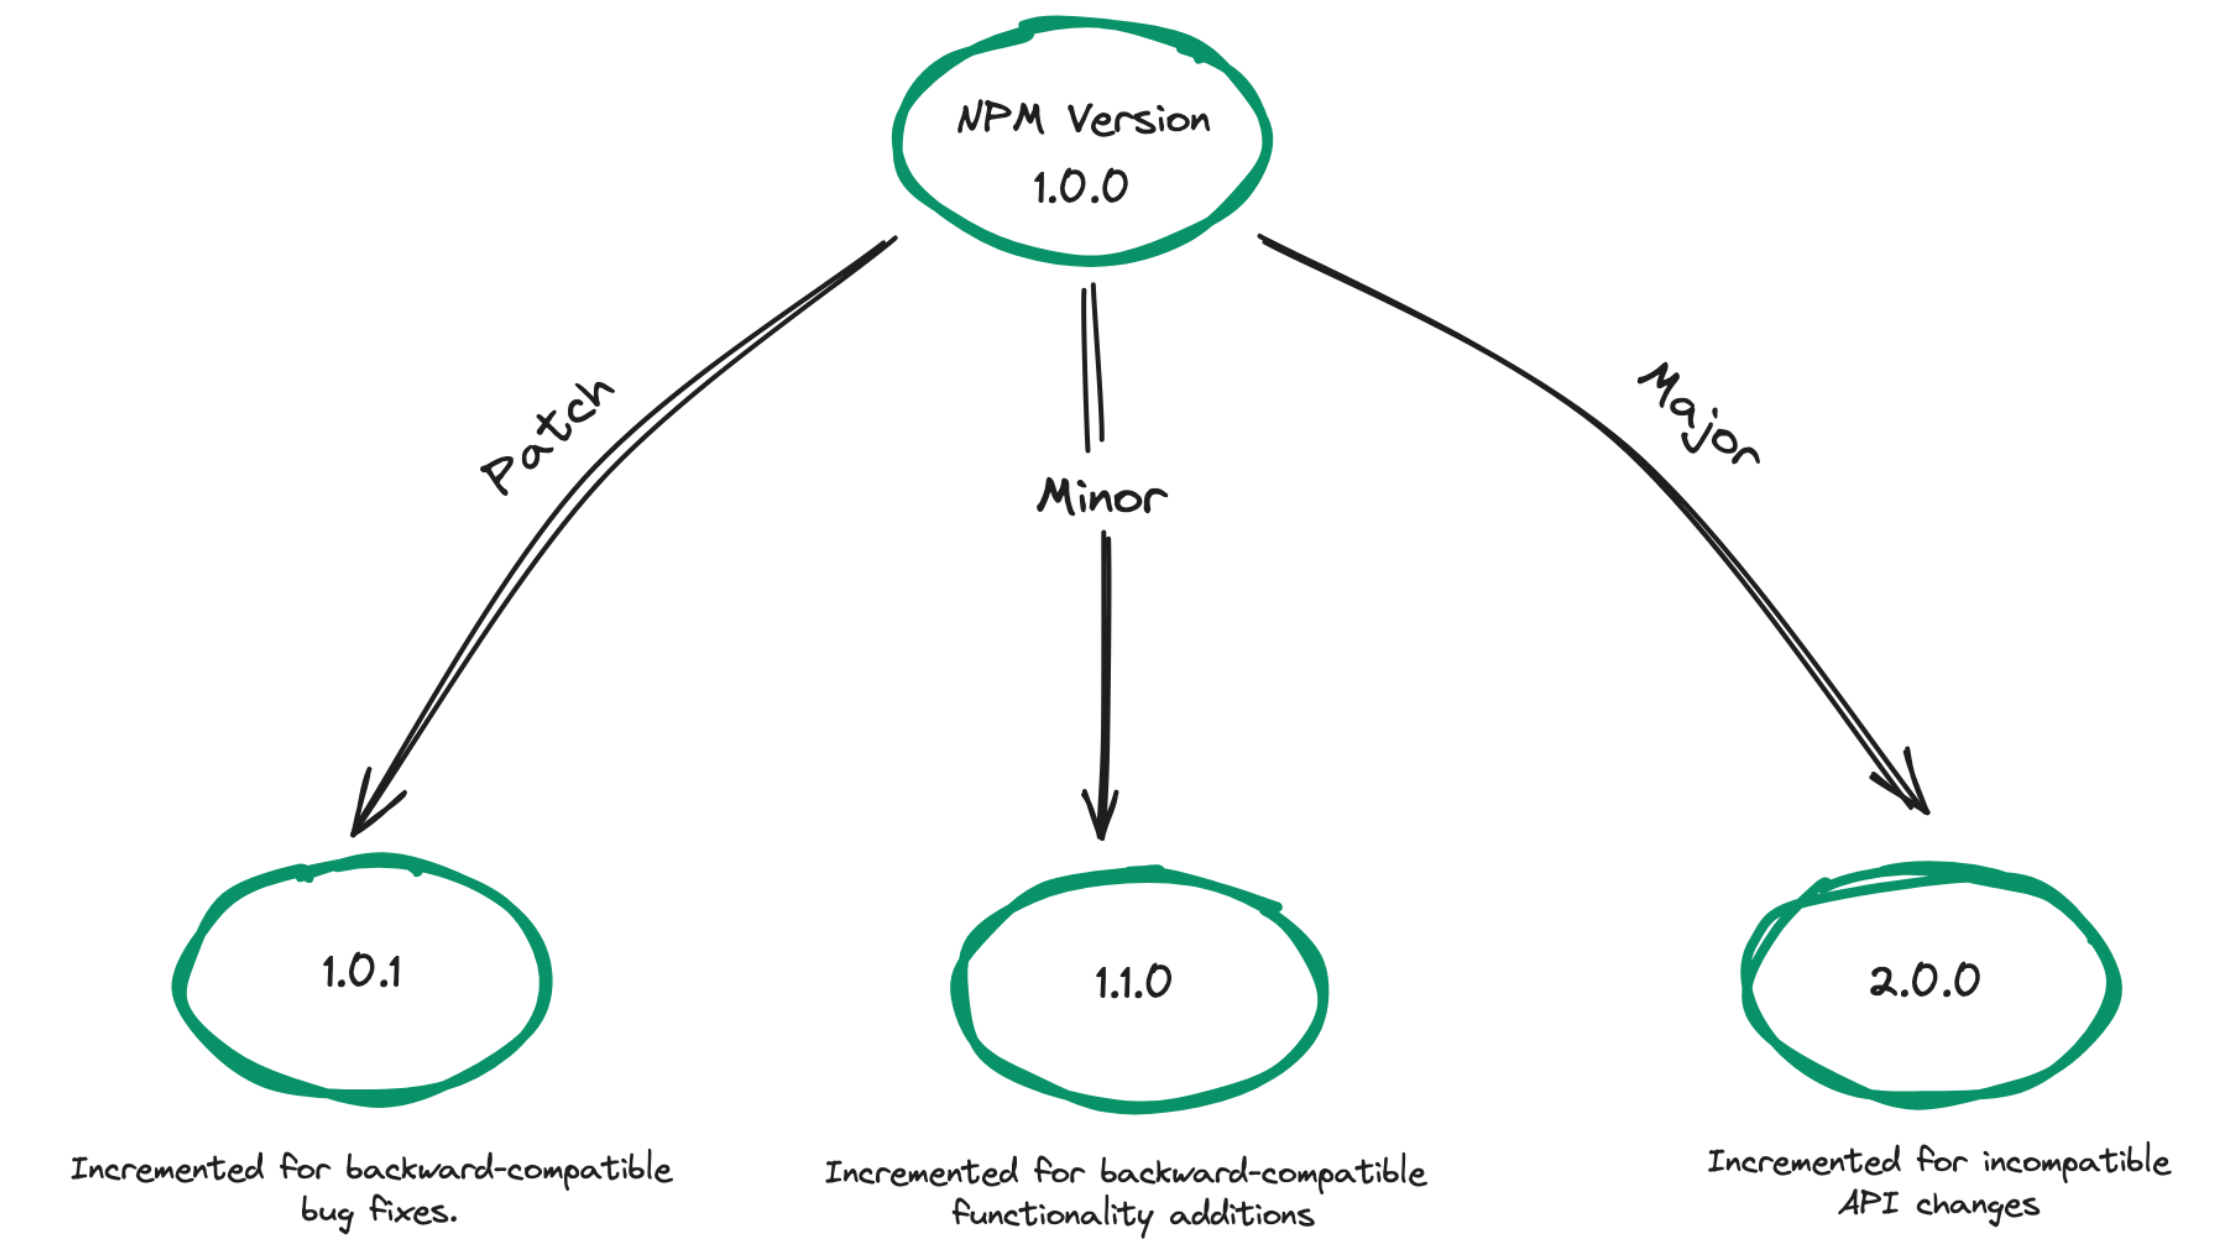
According to SemVer, we are to:
- Increment the
PATCHnumber for backward-compatible bug fixes. - Increment the
MINORnumber for added functionality in a backward-compatible manner. - Increment the
MAJORnumber for significant changes or incompatible API changes.
These versions should be updated appropriately whenever the NPM package is modified or changed, the same package version number cannot be published twice on the NPM registry.
Next, we will update our package.json file with important properties and script commands.
Here’s what our NPM package.json file should look like now:
{
  "name": "validate-npm-pc",
  "version": "1.0.0",
  "description": "A comprehensive library for validating user inputs including emails, mobile numbers, and social media links.",
  "main": "dist/cjs/index.js",
  "module": "dist/esm/index.js",
  "types": "dist/types/index.d.ts",
  "files": [
    "/dist"
  ],
  "scripts": {
    "build": "tsc --project tsconfig.json && tsc --project tsconfig.cjs.json",
    "release": "npm run build && changeset publish",
    "test": "jest"
  },
  "keywords": [
    "validate"
  ],
  "author": "ajibadde",
  "license": "ISC",
  "devDependencies": {
    "@changesets/cli": "^2.27.1",
    "@types/jest": "^29.5.12",
    "jest": "^29.7.0",
    "ts-jest": "^29.1.2",
    "typescript": "^5.4.5"
  }
}
Our package.json now has these additional fields:
main: This specifies the entry point for CommonJS users. When someone usesrequire("validate-npm-pc"),Node.js will look fordist/cjs/index.js.module: This specifies the entry point for ES module users. When someone usesimport from "validate-npm-pc", tools like Webpack or Rollup will look fordist/esm/index.js.types: This specifies the location of the TypeScript declaration file. This helps TypeScript understand the types when our package is used.files: An array specifying which files should be included when our package is published.keywords: An array of keywords to enhance our package’s searchability on the NPM website.scripts: Define commands for building, releasing, and testing the project.build: This script compiles TypeScript files into JavaScript using thetsc. It runs two separate builds using the typescript configuration files we will be creating (tsconfig.jsonandtsconfig.cjs.json).release: This script first runs thebuildscript, and if successful, it then publishes the changes usingchangeset publish.test: This runs our project tests using Jest
Next, update the .gitignore to exclude unnecessary files from being included in our GitHub repository
To do this copy and paste the following into the .gitignore file:
dist
node_modules
Step 2: Initializing Helper Packages
Before proceeding with our package development, we need to initialize the necessary helper dependencies for our NPM package. We’ll be setting up TypeScript, Jest, and Changesets in our project.
Initializing Typescript
We will configure TypeScript to compile our code to output both ES modules (ESM) and CommonJS modules (CJS). To achieve this, we will create two tsconfig.json files: one for ES modules and another for CommonJS modules.
First, initialize TypeScript in the project by running the following command:
npx tsc --init
This command generates our initial tsconfig.json file, which contains TypeScript configuration options. We’ll modify this configuration to enable publishing our package using ES modules.
Replace the content of the tsconfig.json file with the following:
{
  "compilerOptions": {
    "target": "es2015",
    "module": "ESNext",
    "declaration": true,
    "outDir": "./dist/esm",
    "strict": true,
    "esModuleInterop": true,
    "forceConsistentCasingInFileNames": true,
    "skipLibCheck": true
  },
  "include": ["src/**/*"],
  "exclude": ["node_modules", "**/__tests__/*"]
}
Next, create a tsconfig.cjs.json file, then copy and paste the following:
{
  "extends": "./tsconfig.json",
  "compilerOptions": {
    "module": "CommonJS",
    "outDir": "./dist/cjs"
  }
}
In the tsconfig.cjs.json file we extended the settings from our initial tsconfig.json file, changing only the module system to CommonJS and setting the output directory to ./dist/cjs.
With the above configurations, TypeScript is set up to compile our package. The output will be organized into the ./dist directory, with ESM files located in ./dist/esm and CJS files in ./dist/cjs.
Initializing Jest
To set up unit tests for our package using Jest, we will create and configure a Jest configuration file by running the following command:
touch jest.config.mjs
Then copy and paste the following configuration into the jest.config.mjs file:
const config = {
  moduleFileExtensions: ["ts", "tsx", "js"],
  preset: "ts-jest",
};

export default config;
With the above configuration, Jest is now configured to work with TypeScript files, leveraging the ts-jest preset to compile TypeScript code during testing. Jest will recognize files with the specified extensions and execute tests accordingly.
Initializing Changeset
To simplify our NPM versioning process, we will leverage the changeset CLI dependency.
changeset monitors and automates version increments, ensuring precise updates following each change. It maintains a comprehensive record of changes made to our package, facilitating transparency and accountability in version management.
To initialize the changeset in our application, run:
npx changeset init
This command generates a .changeset folder containing a README.md and a config.json file.
By default, the access setting in the config.json file is set to restricted. To publish our package with public access, update the content of the Changeset config.json file with the following:`
{
  "$schema": "https://unpkg.com/@changesets/config@2.3.1/schema.json",
  "changelog": "@changesets/cli/changelog",
  "commit": false,
  "fixed": [],
  "linked": [],
  "access": "public",
  "baseBranch": "main",
  "updateInternalDependencies": "patch",
  "ignore": []
}
With these settings, our package is configured for public access and ready for versioning and publishing.
Step 3: Writing Our Package Function
Now, let’s proceed to the development of our package code. We’ll organize our package logic and functions as follows: the core validation functionalities will reside within the src/validate.ts file, while src/index.ts will serve as the main entry point, exporting all the functions of our module.
In the src/validate.ts file copy and paste the following:
/**
 * Validates a mobile number, ensuring it starts with a "+" sign
 * and contains only digits, with a maximum length of 15 characters.
 * @param {string} mobileNumber
 * @returns {boolean}
 * @example
 * validateMobileNumber("+23470646932") // Output: true
 */
export const validMobileNo = (mobileNumber: string): boolean => {
  if (mobileNumber.charAt(0) === "+") {
    const numberWithoutPlus = mobileNumber.slice(1);

    if (!isNaN(Number(numberWithoutPlus)))
      return numberWithoutPlus.length <= 15;
  }
  return false;
};

/**
 * Validates an email address using a regular expression.
 * @param {string} email
 * @returns {boolean}
 * @example
 * validateEmail("example@mail.com") // Output: true
 */
export const validEmail = (email: string): boolean => {
  const emailRegex: RegExp = /^[^\s@]+@[^\s@]+\.[^\s@]+$/;
  return emailRegex.test(email);
};

/**
 * Validates a social media URL for Facebook or Twitter.
 * @param {string} url
 * @returns {boolean}
 * @example
 * validateSocialURL("https://www.facebook.com/example") // Output: true
 * validateSocialURL("https://www.twitter.com/example") // Output: true
 */
export const validSocial = (url: string): boolean => {
  const socialRegexMap: Map<string, RegExp> = new Map([
    ["facebook", /^(https?:\/\/)?(www\.)?facebook.com\/[a-zA-Z0-9._-]+\/?$/],
    ["twitter", /^(https?:\/\/)?(www\.)?twitter.com\/[a-zA-Z0-9_]+\/?$/],
    // Add more social platforms' regex patterns here
  ]);
  return Array.from(socialRegexMap.values()).some(regex => regex.test(url));
};
In the above code snippet, we created three methods to validate users' input for emails, mobile numbers, and social media links using regular expressions.
Finally, within the src/index.ts file, let’s import and re-export all our API methods as follows:
import { validEmail, validMobileNo, validSocial } from "./validate";
export { validEmail, validMobileNo, validSocial };
Step 4: Writing Tests
To prevent avoidable bugs and errors, it is important to write tests for our package functions.
To do this we’ll simply copy and paste the following into the __test__/validate.ts file:
import { validMobileNo, validEmail, validSocial } from "../src/index";

describe("validMobileNo", () => {
  test("Valid mobile number with + sign and 15 digits", () => {
    expect(validMobileNo("+234706469321234")).toBe(true);
  });

  test("Invalid mobile number without + sign", () => {
    expect(validMobileNo("234706469321234")).toBe(false);
  });

  test("Invalid mobile number with more than 15 digits", () => {
    expect(validMobileNo("+23470646932123456")).toBe(false);
  });
});

describe("validEmail", () => {
  test("Valid email address", () => {
    expect(validEmail("example@mail.com")).toBe(true);
  });

  test('Invalid email address without "@" symbol', () => {
    expect(validEmail("examplemail.com")).toBe(false);
  });

  test("Invalid email address without domain", () => {
    expect(validEmail("example@mail")).toBe(false);
  });
});

describe("validSocial", () => {
  test("Valid Facebook URL", () => {
    expect(validSocial("https://www.facebook.com/example")).toBe(true);
  });

  test("Valid Twitter URL", () => {
    expect(validSocial("https://www.twitter.com/example")).toBe(true);
  });

  test("Invalid URL", () => {
    expect(validSocial("https://www.invalid.com/example")).toBe(false);
  });
});
This code defines a series of test cases to verify the functionality of our validation functions.
To execute these test cases in the terminal, run:
npm run test
This will search for test files within our project directory and execute the test cases found in them.
Step 5: Publishing the Package to NPM
It is often recommended to compile TypeScript code before sharing it on npm for improved performance and compatibility across multiple JavaScript environments. Because our code is written in TypeScript, we will compile it into JavaScript before publishing.
To do this, we’ll run the build command in our package.json file:
npm run build
This command reads TypeScript files (with a .ts extension) and compiles them into JavaScript files (with a .js extension). It automatically creates a ./dist folder, housing the compiled JavaScript version of our TypeScript code both the EJS and CJS version of our code.
Once the compilation is complete, our package is ready for publishing. We will publish our package manually from the terminal.
Manually publishing our first NPM package allows us to thoroughly understand each step of the process. By doing this, we gain insight into how NPM works, from creating an account to logging in and publishing a package.
To publish an NPM package from the terminal, ensure you have an NPM account.
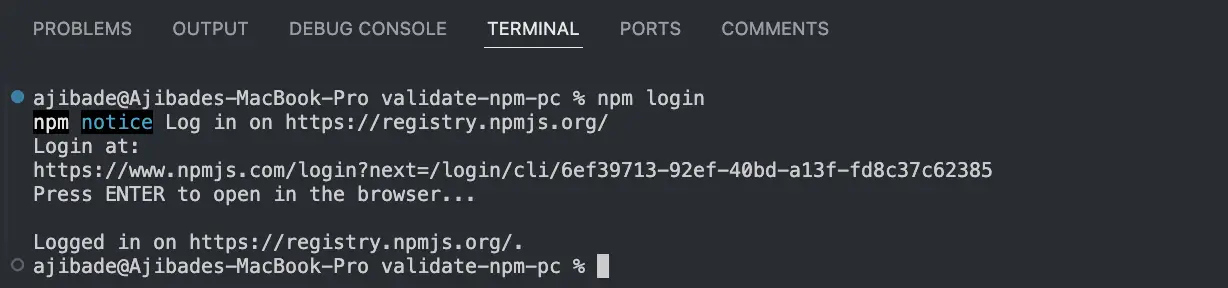
Next, log in to the NPM registry from the terminal by running:
npm login
This will prompt us to enter our credentials, which will log us into our NPM account.
After a successful login, our terminal should indicate that we are logged in on https://registry.npmjs.org/.
We are now ready to publish our package. To publish, run the NPM publish command using a --access=public tag. By default, a published package is set to private this tag will make our package accessible publicly.
To publish our package, run:
npm publish --access=public
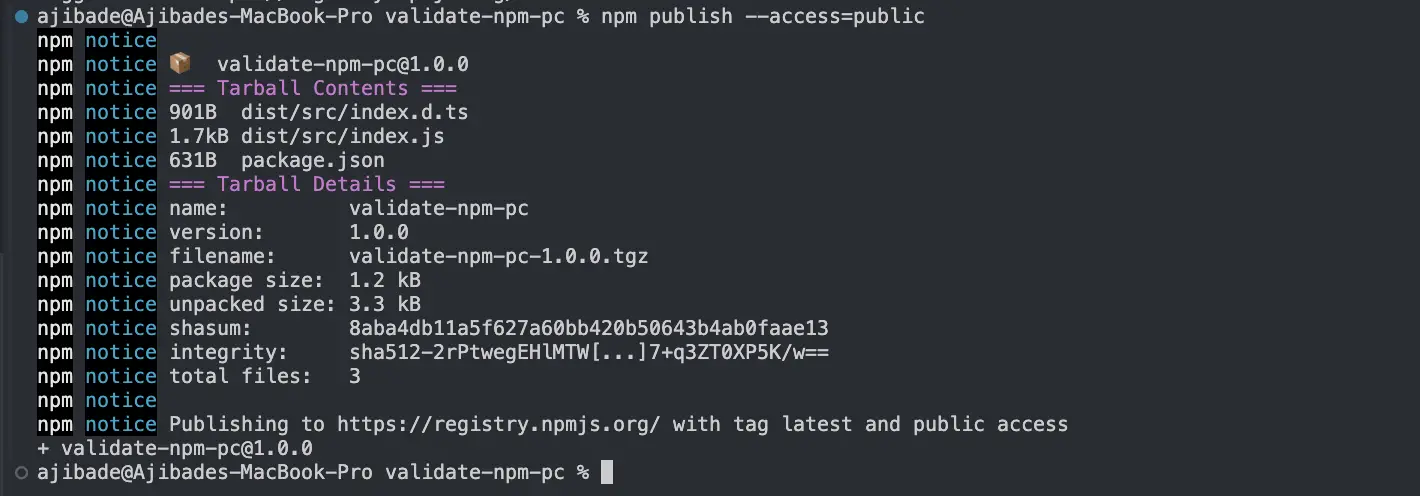
There we go! We successfully created and published an NPM package.
Note: If you receive a 403 Forbidden error on the first publish attempt, it is likely because you haven’t yet verified your email address on npmjs.com or attempting to publish the same version of a package twice
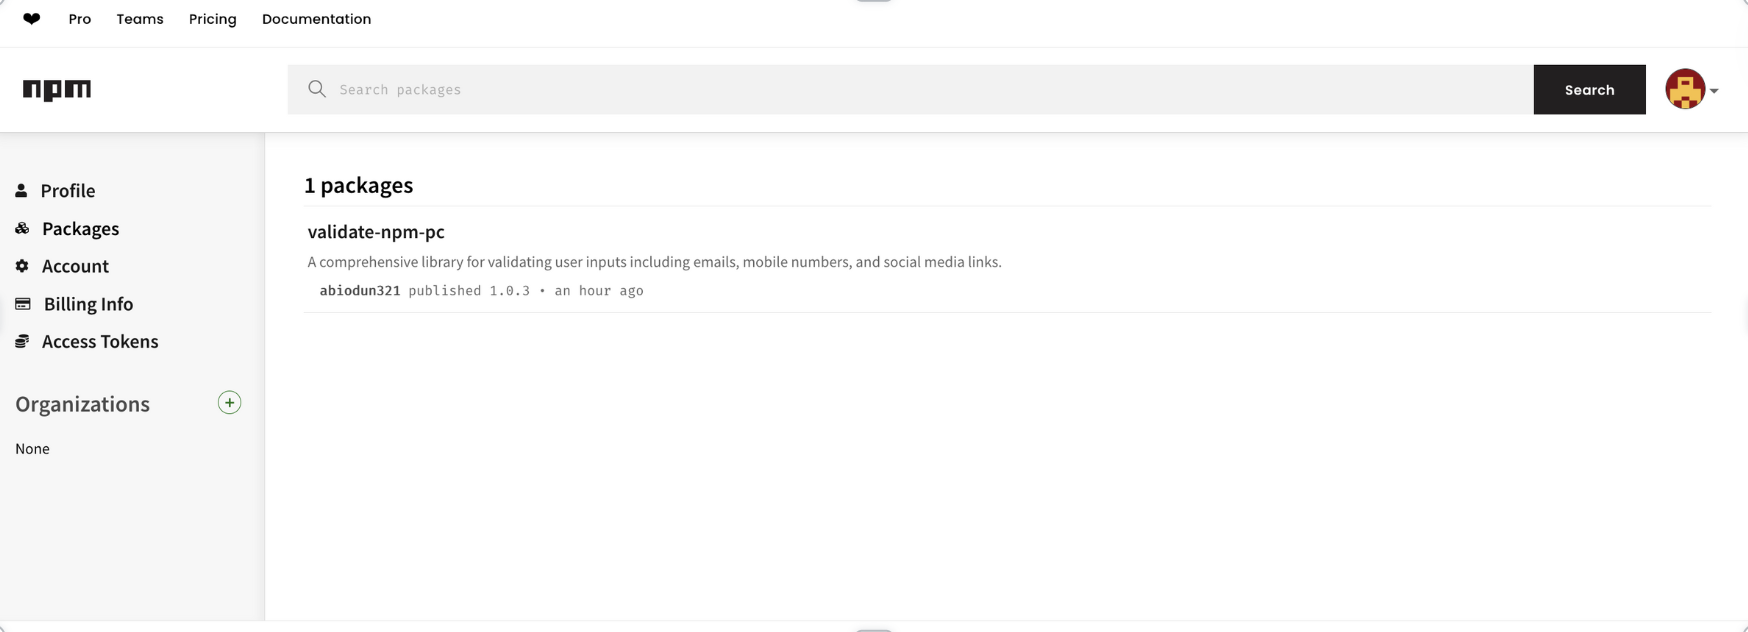
We can now view our published package on the NPM registry.
Updating a Published NPM Package
Next, here are the steps to take to manually update our published NPM package after modifications have been made to the package:
Versioning
After modifying or making changes to the package, head to the package.json file, and update the version number appropriately. We can do this manually or by using NPM’s version command:
npm version patch
This command will automatically increment the patch version number.
Depending on the significance of our changes, we can use npm version [major|minor|patch] to indicate the level of version change needed.
Publishing the Update
Once the changes and the version number update have been made, publish the update to NPM using:
npm publish
This will publish our new changes to the NPM registry. By following these steps, we can ensure that our package updates are properly versioned and made available for installation through the NPM registry.
Step 6: Automating NPM Publishing on GitHub Using Changesets
We’ve built an awesome NPM library and can’t wait to start using it and sharing it with the world. However, manually publishing and updating this library can quickly become a hassle, especially if we’re open to receiving contributions from others. To streamline this, let’s automate our package publishing process using GitHub Actions and the Changesets action.
We’ll start by pushing our package code to a new GitHub repository if it hasn’t been done already. This ensures that our package is ready for integration with changesets and GitHub Actions.
Once a change set is created and merged into the GitHub main branch, our package will undergo automatic publication to npm. This eliminates the need for manual deployment and guarantees that our package remains consistently up to date. Additionally, all records of publishing are kept for reference.
Here are the steps to automate our NPM package publishing process:
Generating and Add NPM Token to GitHub Secrets
The NPM token is necessary for publishing packages to NPM via Github, enabling us to bypass the need to log in to the NPM registry manually.
Here’s how to generate NPM Token, head to npmjs.com. Navigate to your profile and select Access Tokens. Then click Generate new token (Classic Token).
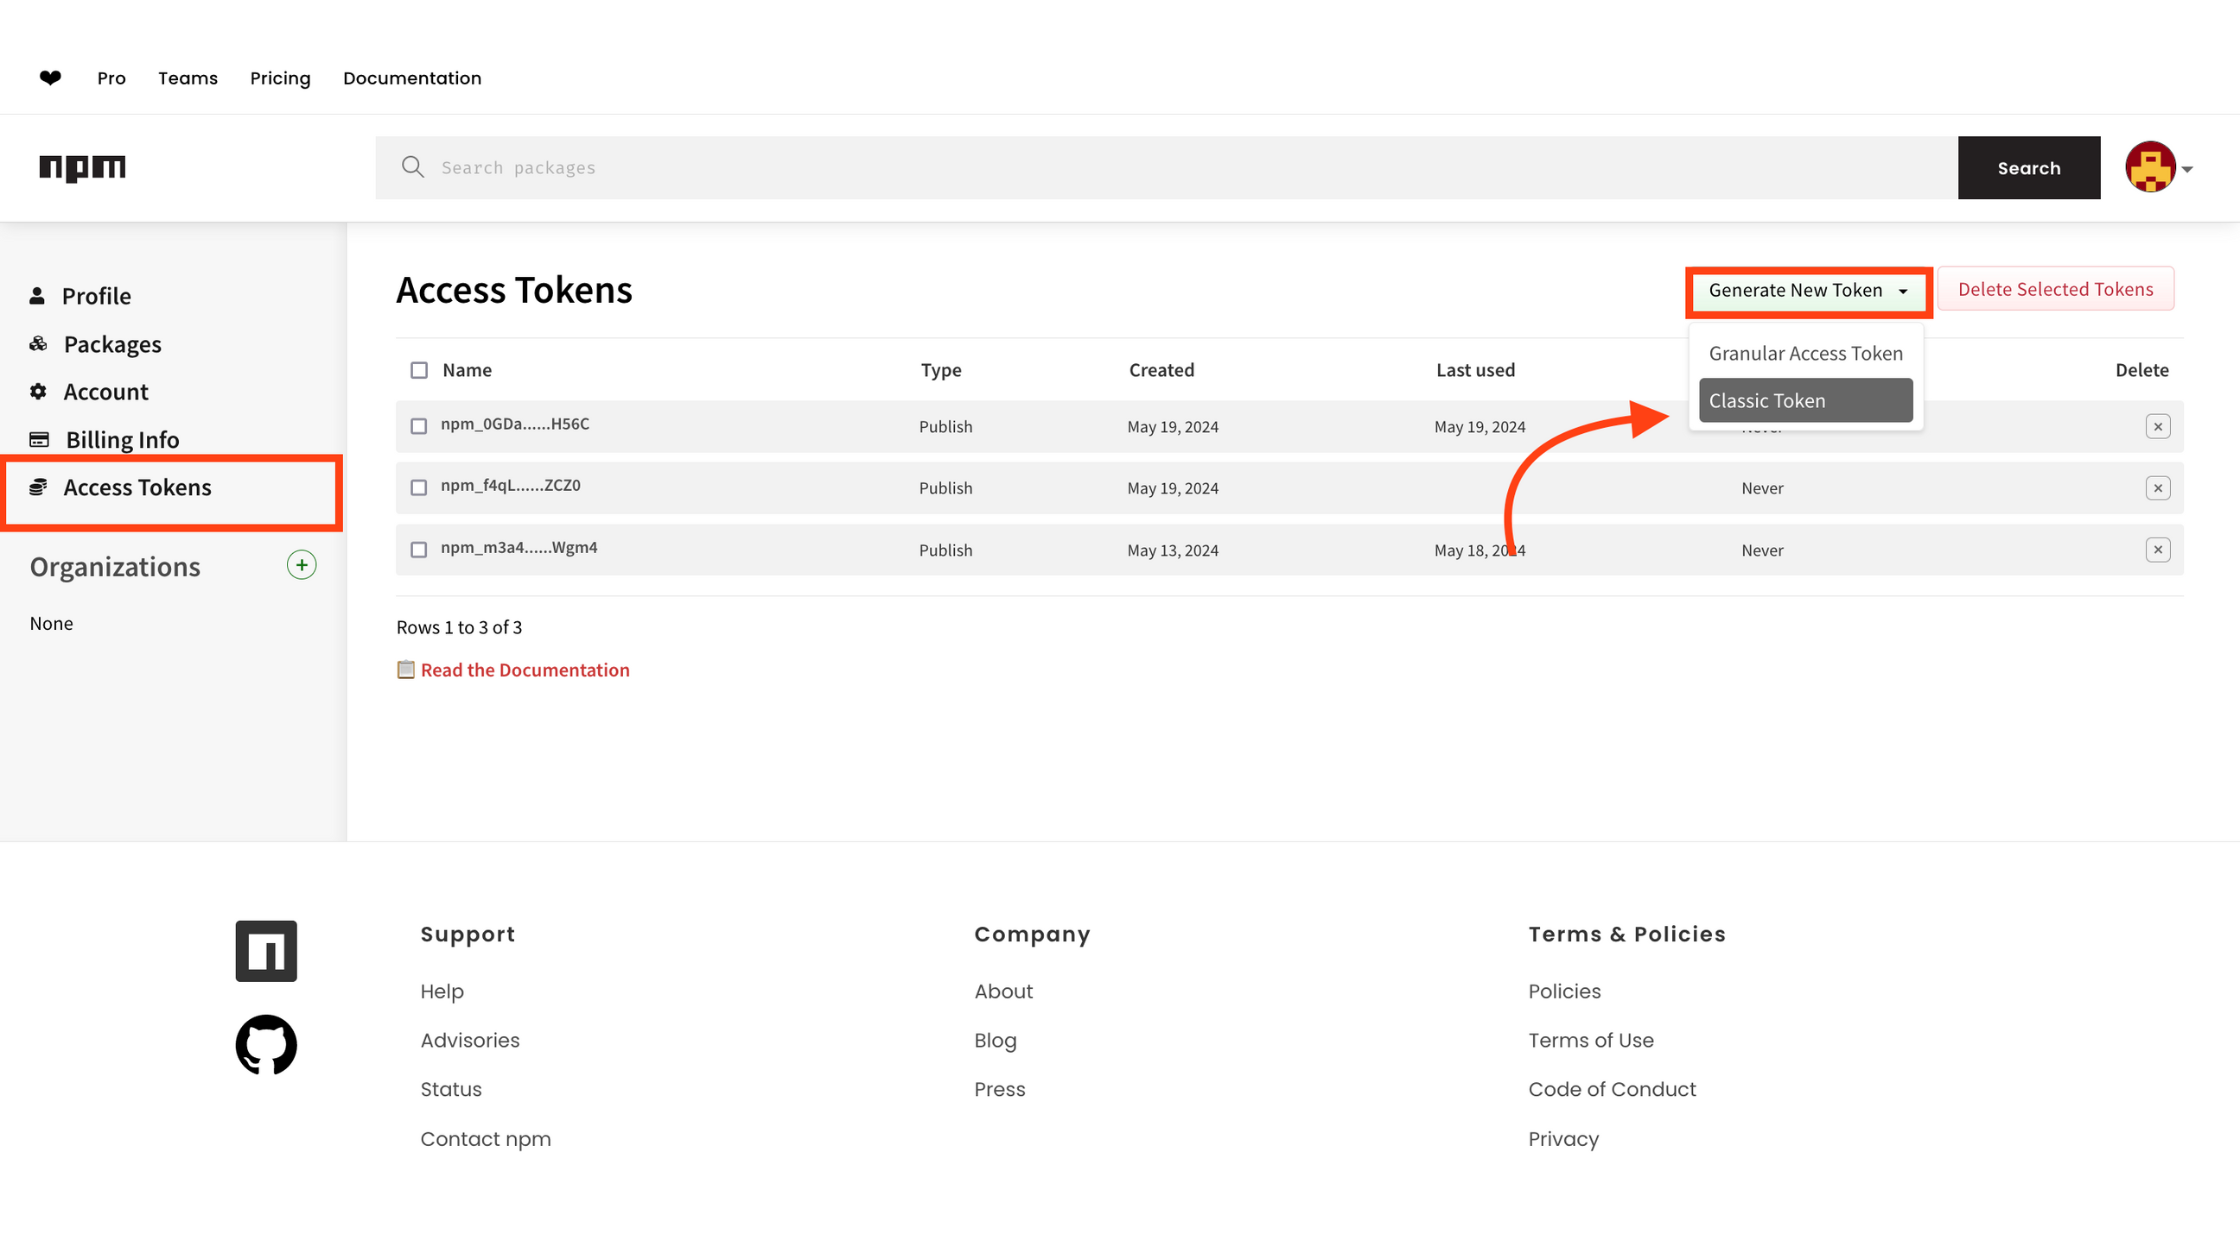
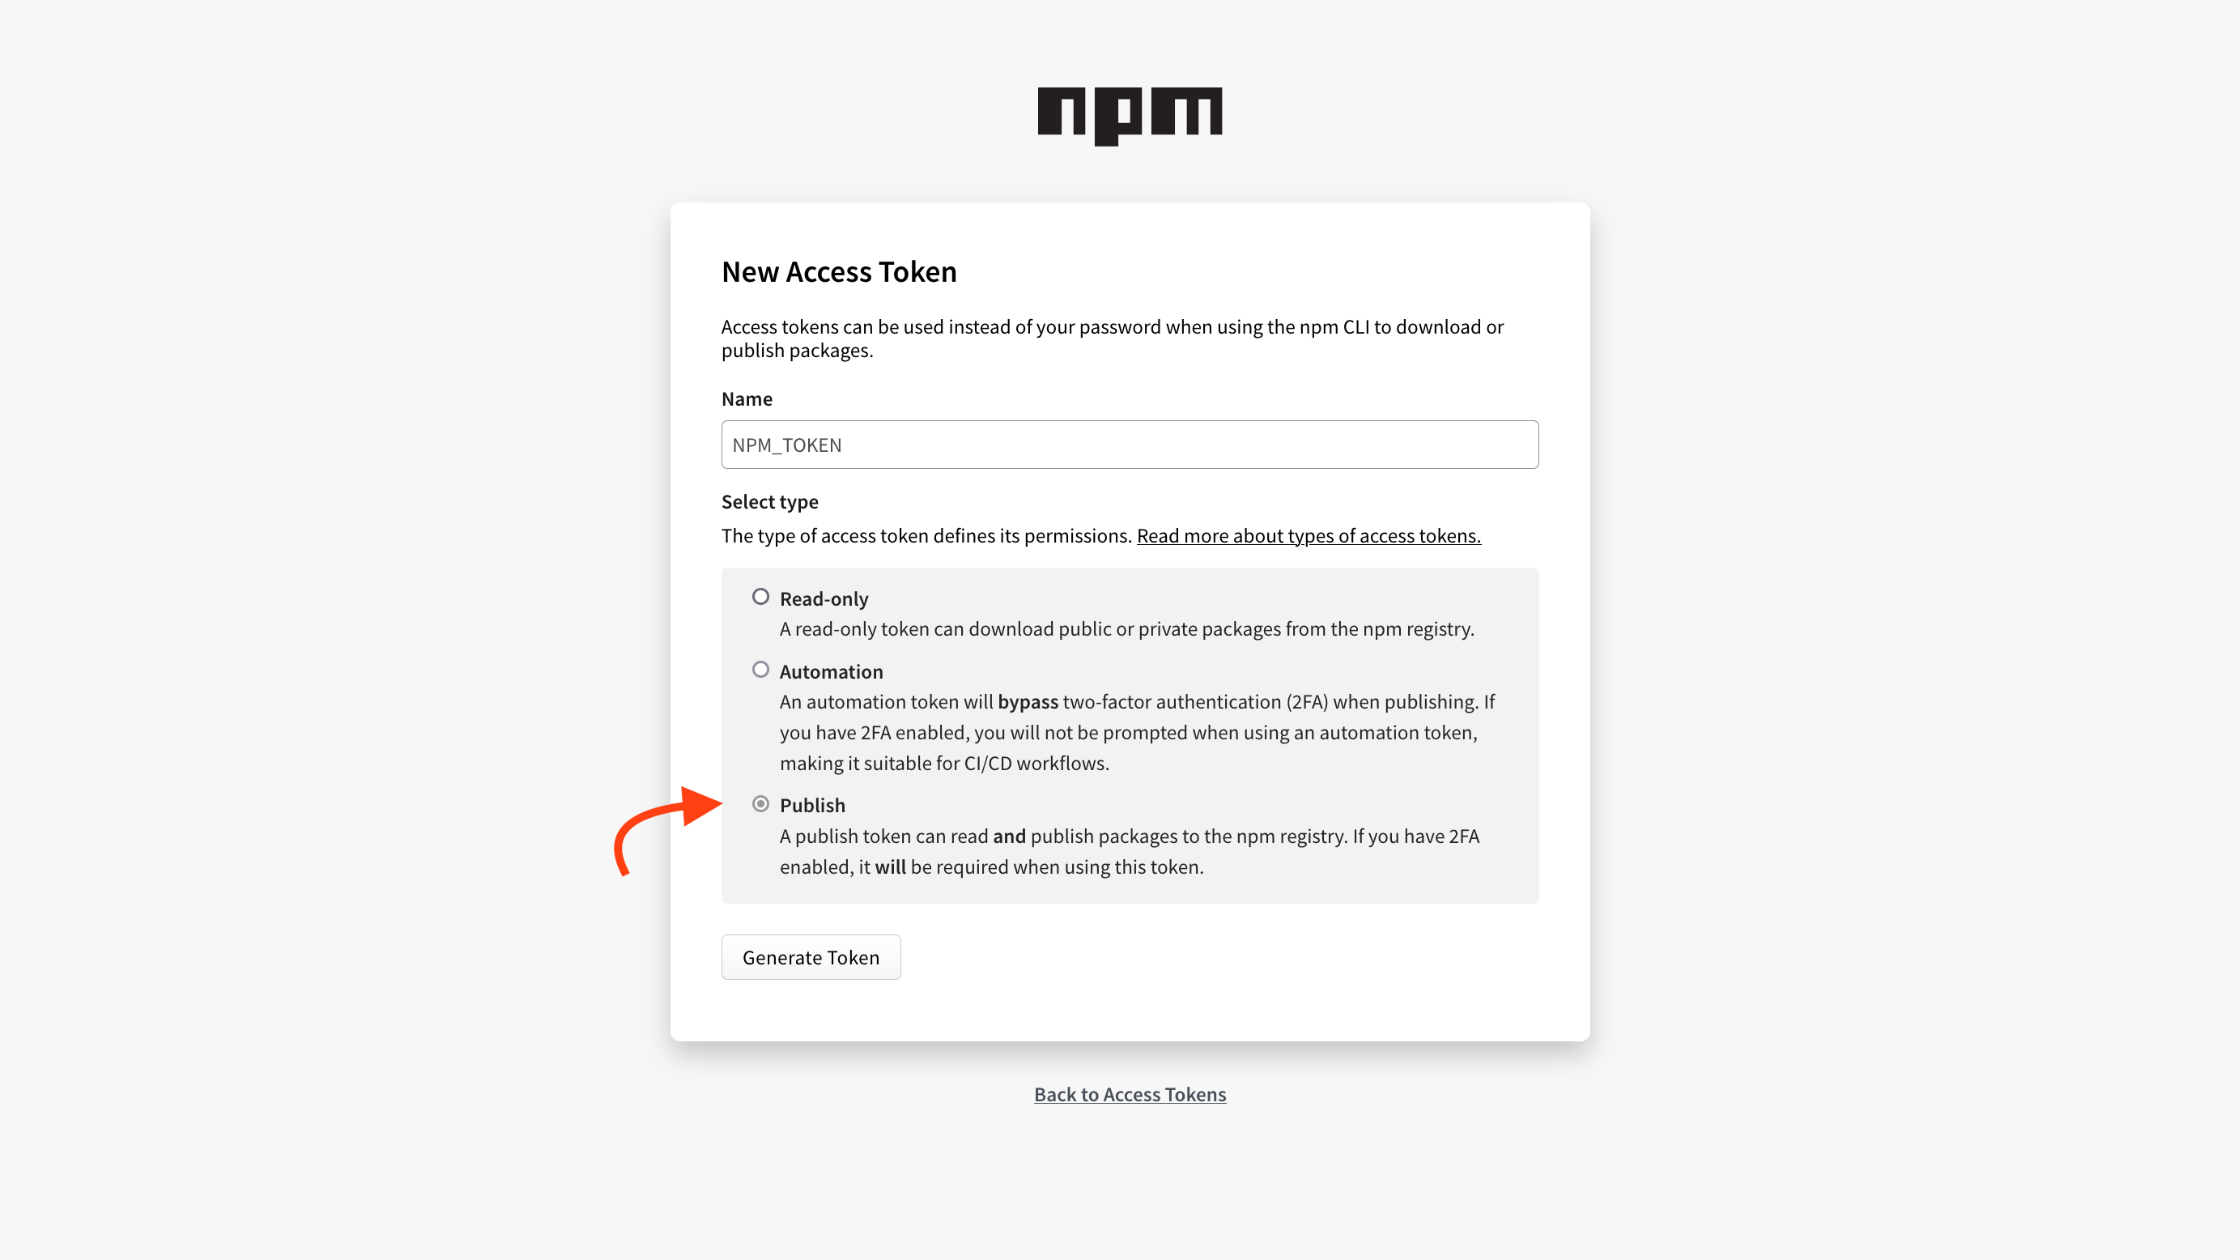
Click the Generate Token button, and copy the generated token.
Next, we will use GitHub secrets to protect this generated token within our project’s repository, as it is sensitive and must be kept secure.
To do this, head to GitHub and go to the project’s repository. Navigate to Settings -> Secrets and variables -> Actions, and select New repository secret to add our generated NPM token as a secret as shown below:
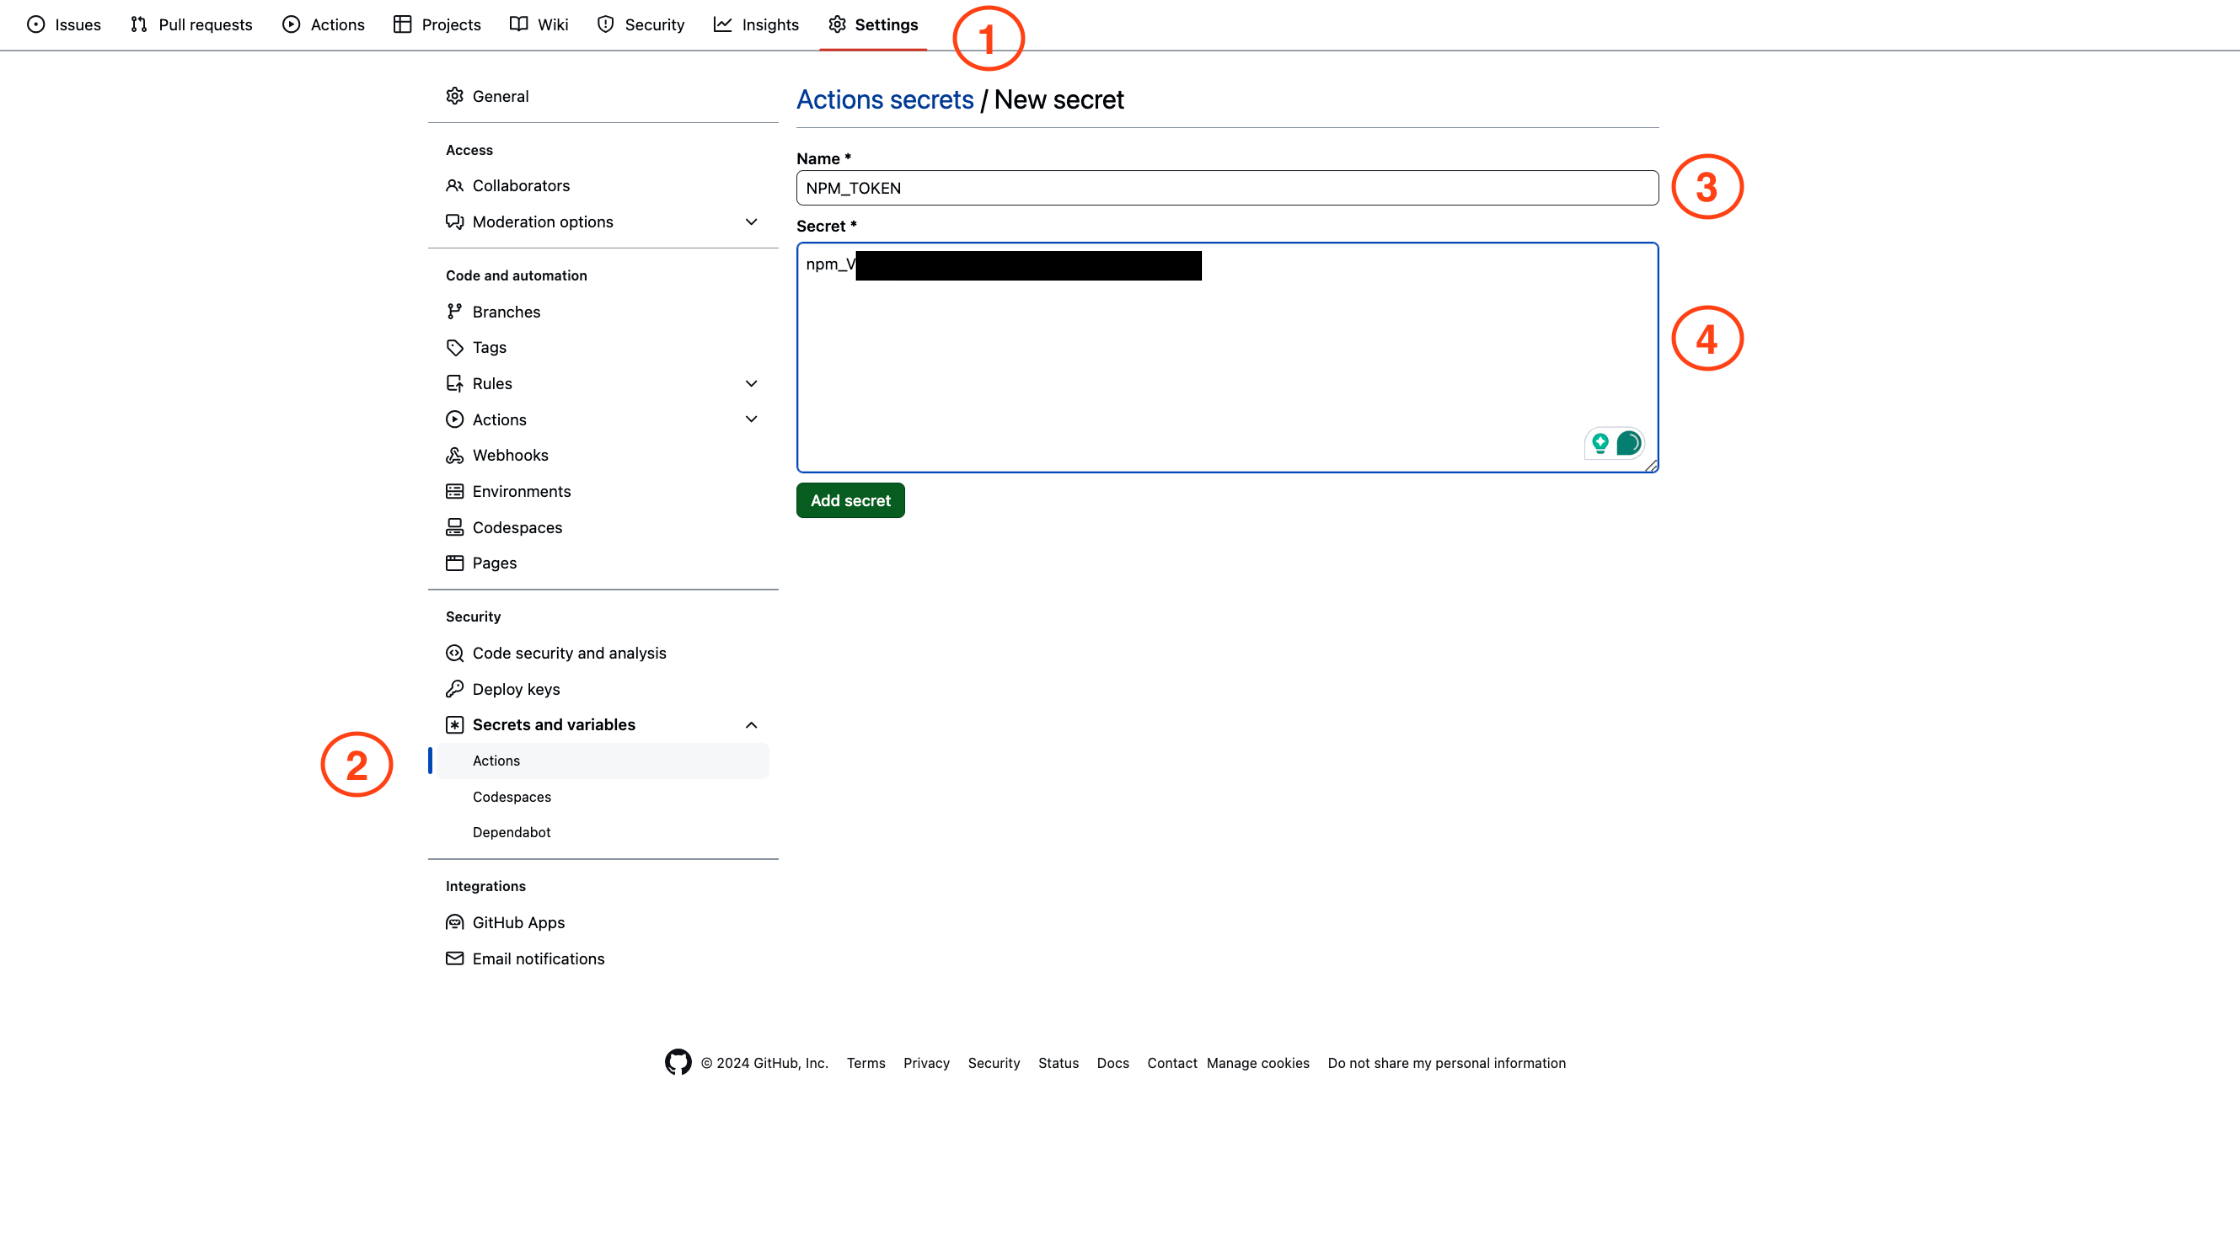
By storing the token as a GitHub secret, we ensure it is securely managed and can be used safely in our workflow.
Updating Repository Action Settings:
Changeset auto-creates a new PR to publish our changes to NPM. However, by default, GitHub Actions cannot create PRs. To enable this functionality, we need to update our GitHub repository’s action settings.
Navigate to repository Settings -> Actions -> General settings.
Then Enable “Read and write permissions” to grant GitHub Actions the necessary access to read from and write to the repository.
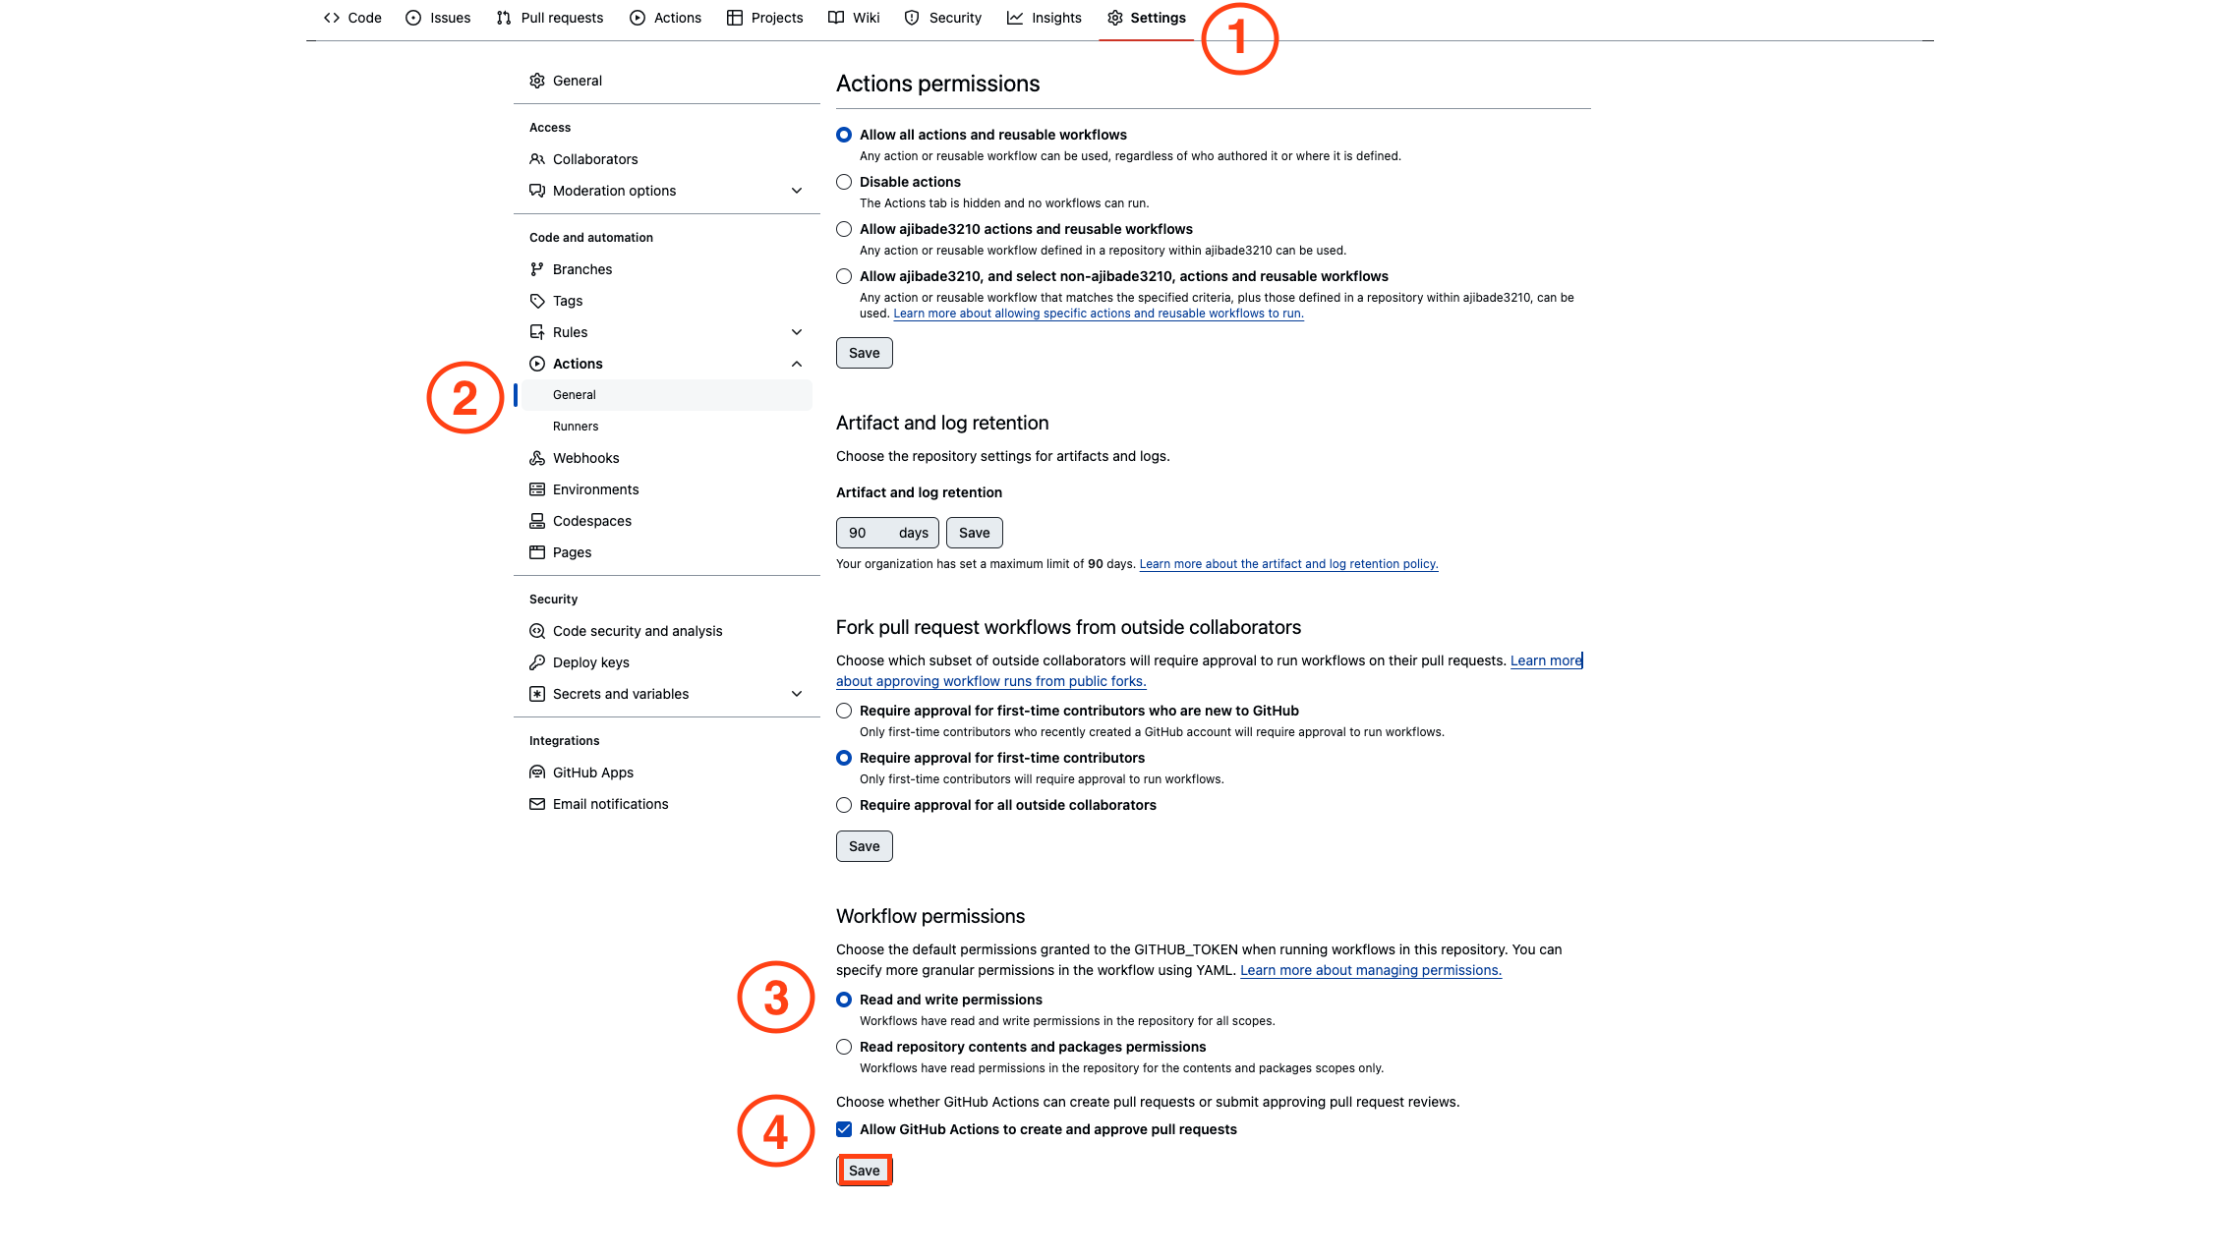
By granting this permission, Changeset will be able to create PRs facilitating the automation of our package publishing process.
Writing Our Git Action Command
Next, let’s write our action workflow.
Copy and Paste the following in the .github/workflows/release.yml file:
name: Release
on:
  push:
    branches:
      - main
jobs:
  release:
    name: Release
    runs-on: ubuntu-latest
    steps:
      - uses: actions/checkout@v3
      - uses: actions/setup-node@v3
        with:
          node-version: 18
      - run: npm install
      - run: npm run test
      - name: Publish to npm
        id: changesets
        uses: changesets/action@v1
        with:
          publish: npm run release
        env:
          GITHUB_TOKEN: ${{ secrets.GITHUB_TOKEN }}
          NPM_TOKEN: ${{ secrets.NPM_TOKEN }}
The above workflow is triggered on any push to the main branch. It uses Changesets to automate the process of versioning and publishing our package to NPM.
In our action environment variable, we are using the saved NPM_TOKEN and a GITHUB_TOKEN, which is provided by GitHub. If you don’t have a GitHub token. You can follow this guide to create one. Don’t forget to give permissions for read-write in GitHub actions.
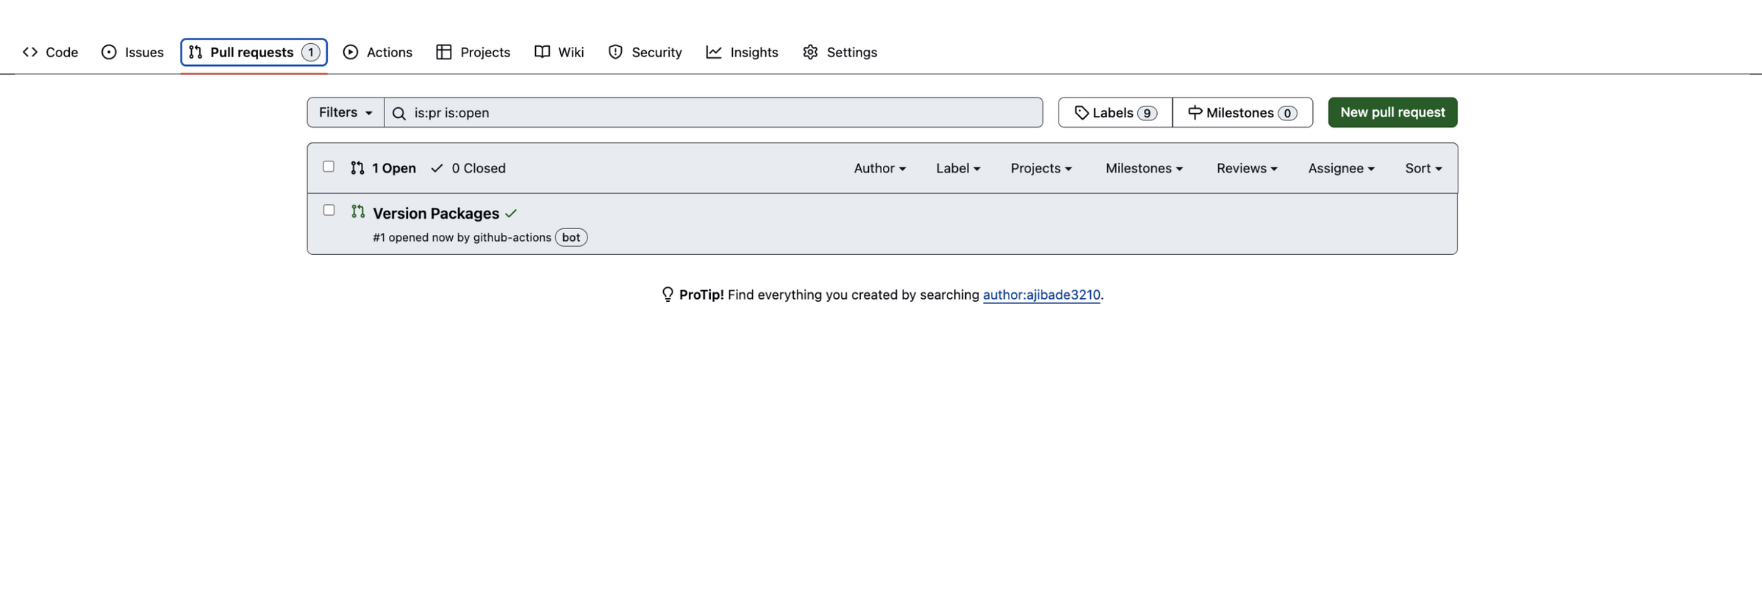
This workflow automates the versioning and publishing process of our package. When a new PR or Push occurs on the main branch, it automatically creates a PR named Version Packages containing the required changes to publish the package
Versioning and Pushing New Updates
We are now ready to push our package to GitHub.
To do this, create a feature branch
git checkout -b feature/test-changeset
Next, we will make our desired changes or updates to the package code.
Whenever we make changes that alter the package’s functionality, we need to create a new changeset before pushing or creating a pull request.
Create a new changeset, by running:
npx changeset
This command will prompt us to choose the type of version change [patch|minor|major] and provide a description of the changes. The description will be included in the changelog upon release. After completing the prompts, a new markdown file will be created in the .changeset folder, documenting the changes made. This file is essential for tracking the changes and versioning.
Note: To remind contributors (and ourselves) to add changeset to PRs, install the Changeset bot from the GitHub Marketplace. This bot will remind all contributors to include a changeset whenever they create a PR.
Next, commit and push the changeset and new updates to the GitHub repository by running the following command:
git add .
git commit -m "feature/test-changeset: testing"
git push -u origin feature/test-changeset
Our changes are on GitHub, now create a new Pull Request (PR)!
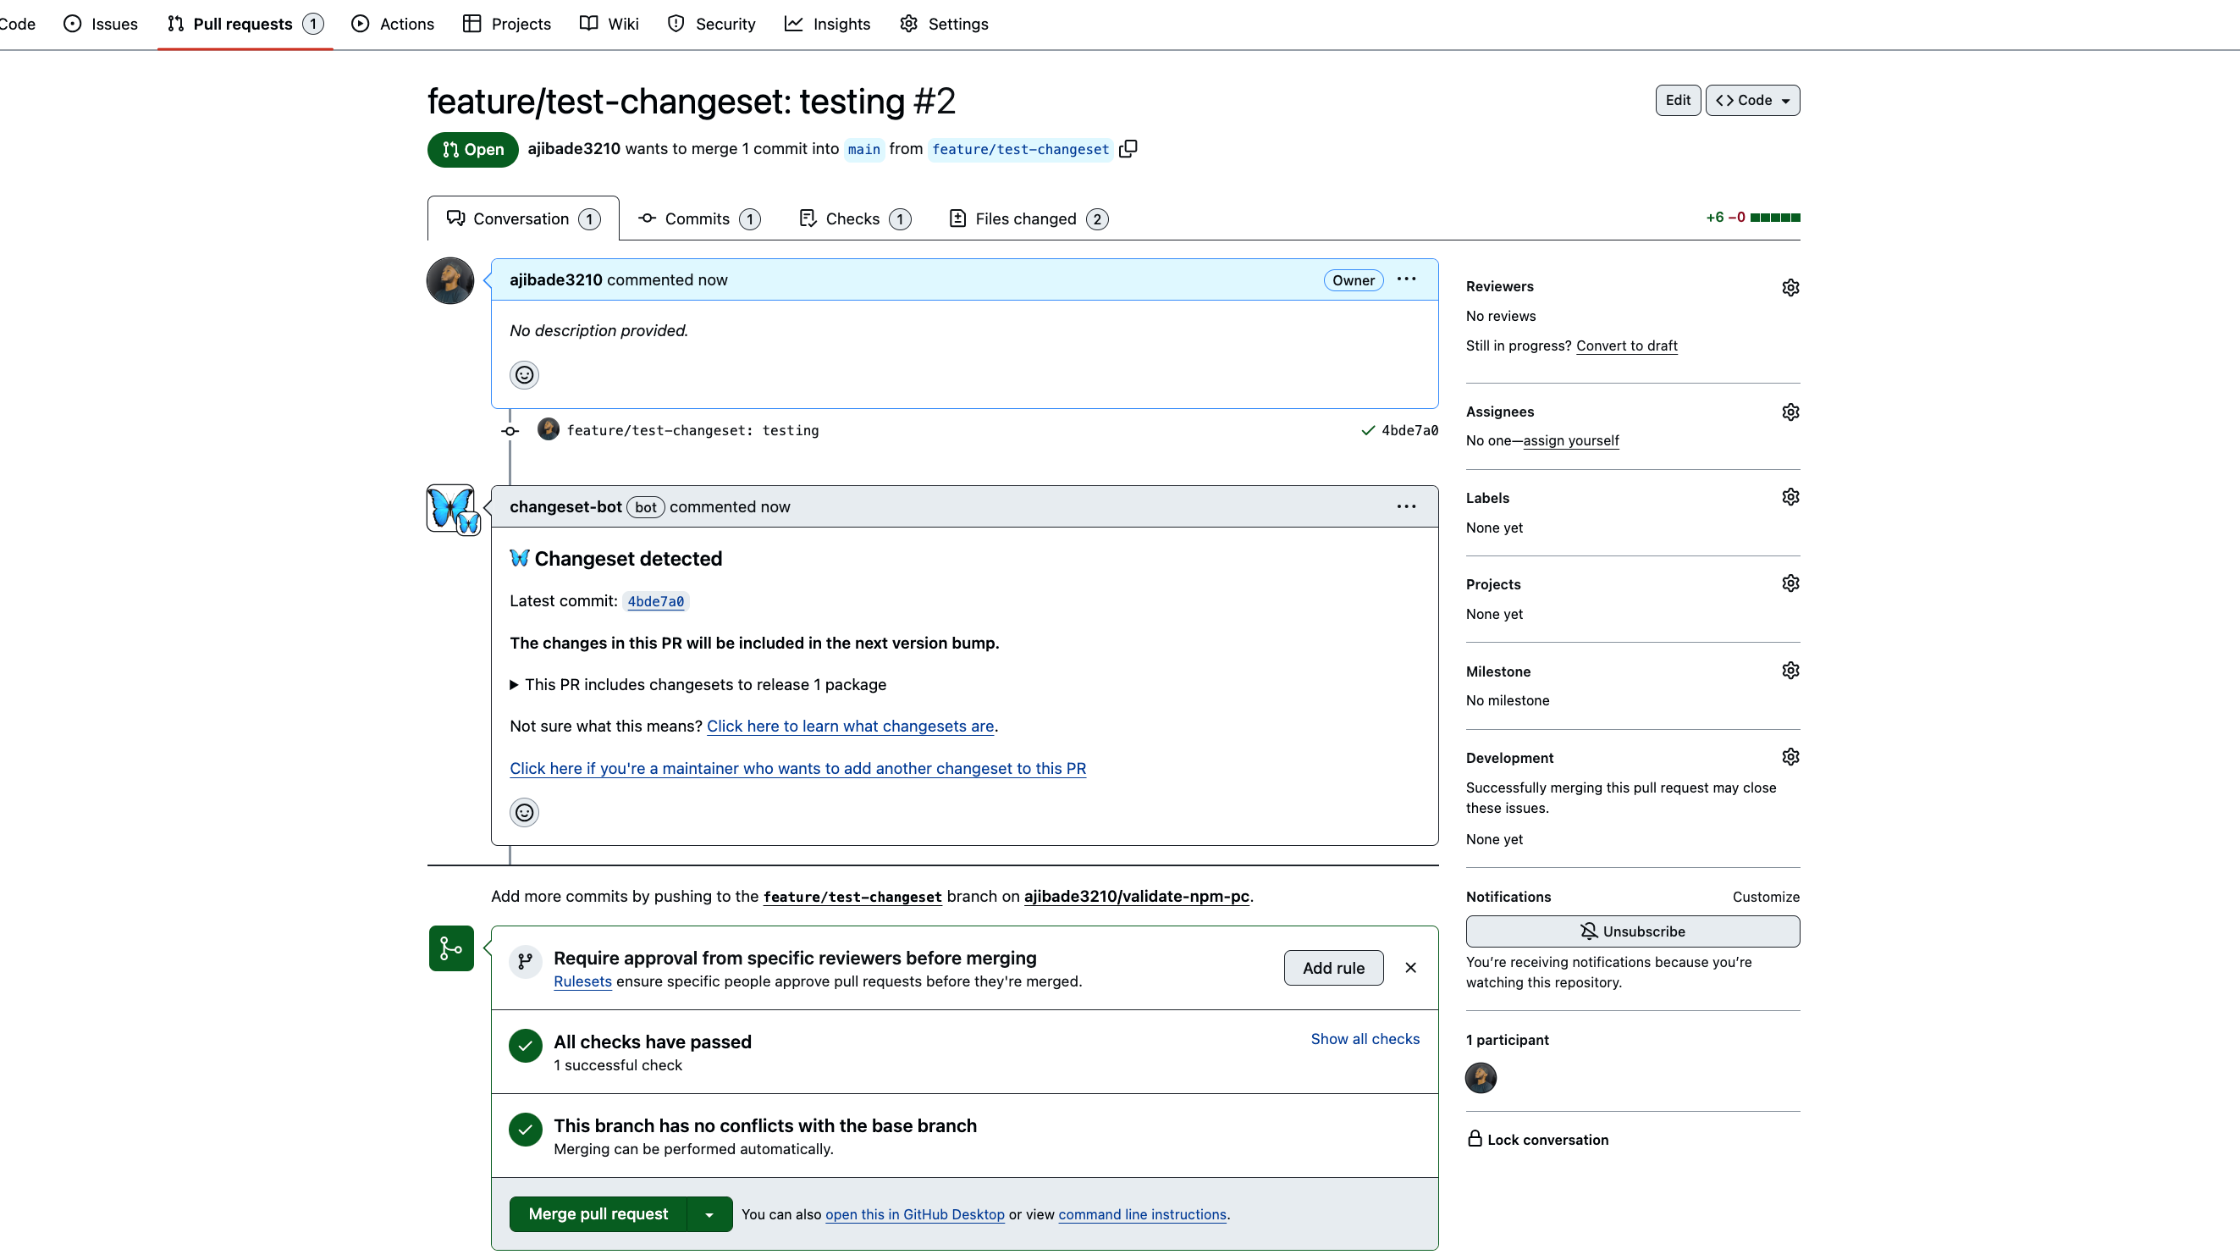
The Changeset bot has already acknowledged that we’ve added our changeset file. If we hadn’t, it would have sent out a notice.
Approve and merge the PR, this will integrate our changes into the main branch and trigger our GitHub Actions workflow.
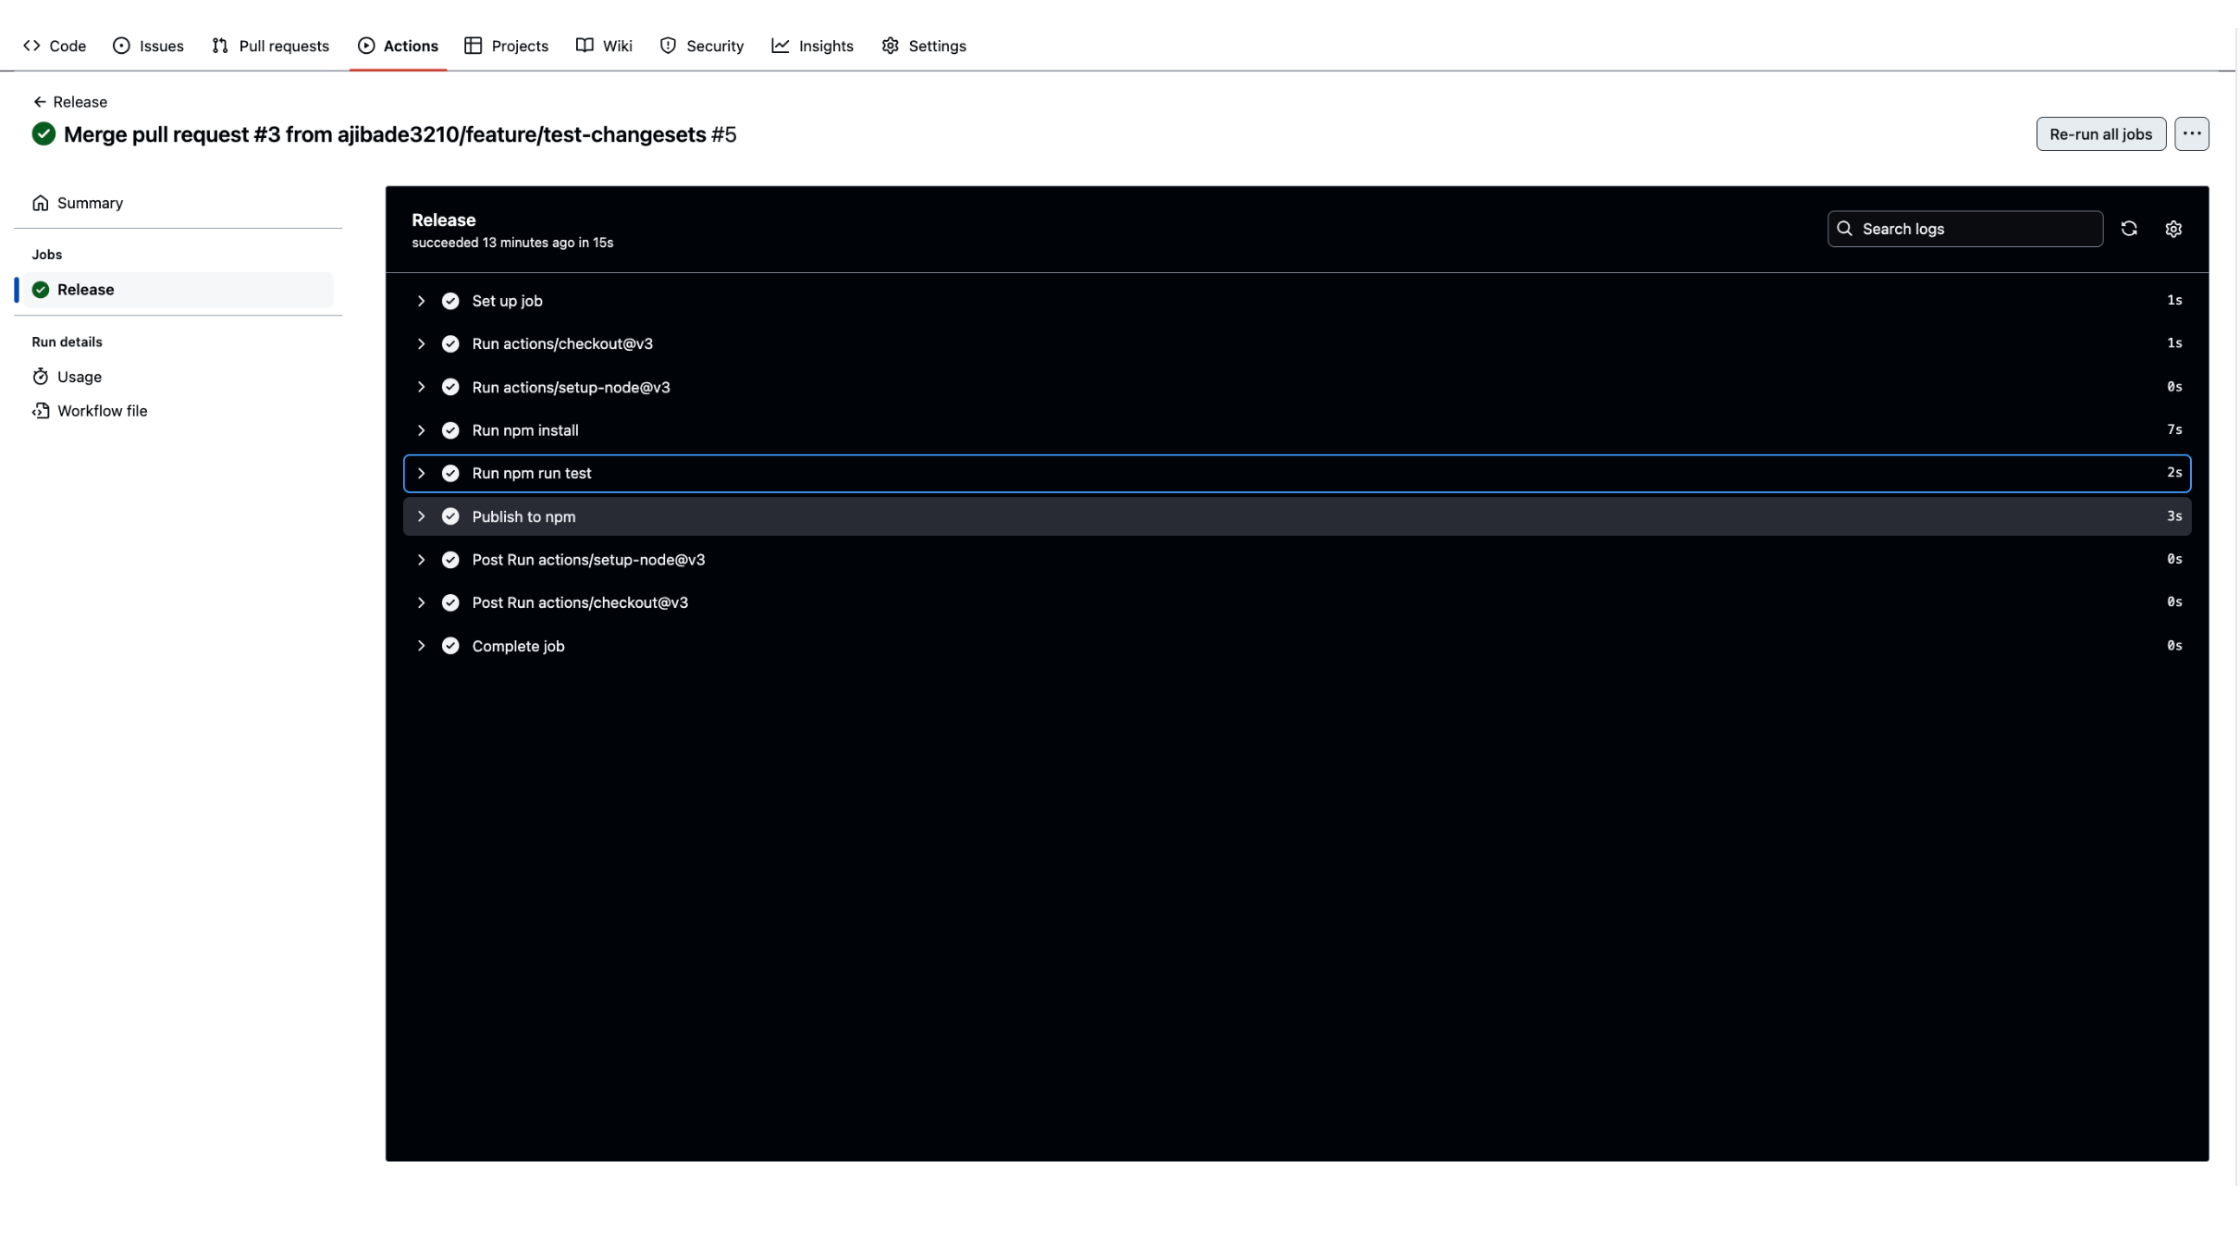
If the action runs successfully, it creates a new PR Version Packages!
Upon merging the Version Packages PR, the published script executes, and our updated package version is published to NPM.
Now we are all set! Our NPM package is up to date, and its update and versioning process is fully automated.
Step 7: Use the Package
We can now install our published package in any project of choice:
npm install validate-npm-pc
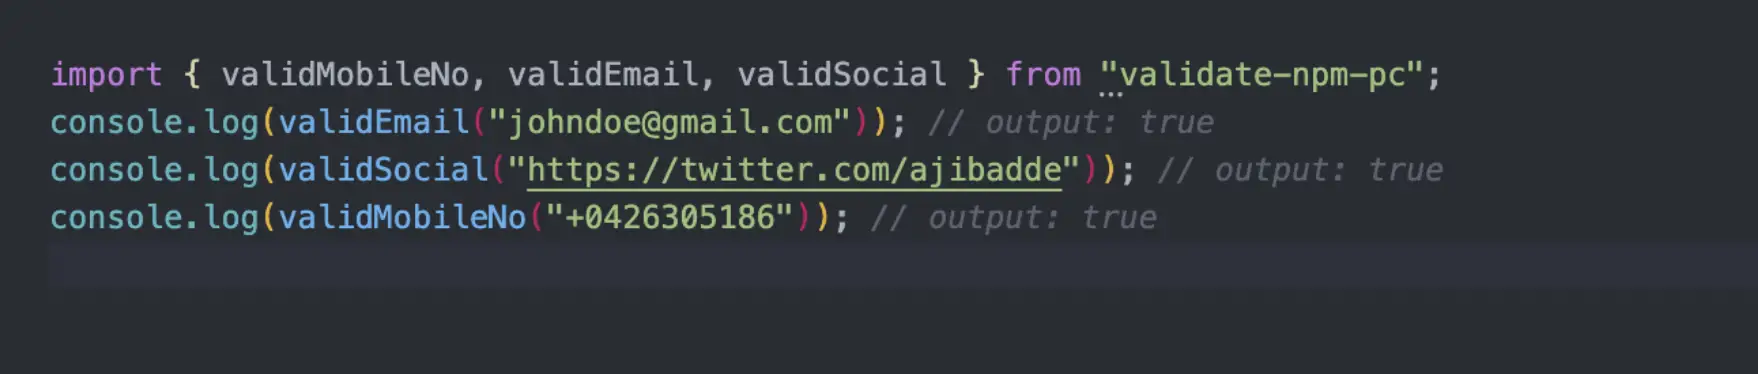
In this snippet, we can see our validate-npm-pc package in action, validating user inputs like a charm.
Conclusion
Creating and publishing an NPM package is a powerful way to contribute to open-source and enhance code reusability. We covered the essentials, from initializing our package to publishing it on NPM, and using changesets for versioning and automated releases. For more details, explore the NPM and changeset documentation. Happy coding!


